
Compliance-as-Code Using OSCAL
Discover how OSCAL simplifies compliance, enhances cybersecurity, and supports organizations in achieving efficient risk management with Iron Fort Compliance.
OSCAL (Open Security Controls Assessment Language) is a standardized framework developed by NIST (National Institute of Standards and Technology) to facilitate security control automation, compliance management, and risk assessment for organizations.
OSCAL is increasingly used by government agencies, cloud service providers (CSPs), and businesses to streamline compliance with security frameworks such as:
NIST 800-53 (Used for FedRAMP and security controls)
ITSG-33 (Canada’s Government of Canada security standard)
ISO 27001 (International cybersecurity framework)
SOC 2 (Service Organization Control for cloud security)
By adopting OSCAL, organizations in Canada can automate security compliance, improve audit efficiency, and enhance risk management for regulated industries.
How is OSCAL Used in Cybersecurity in Canada?
- Automated Compliance Documentation
OSCAL allows organizations to document security controls in machine-readable formats (JSON, XML, YAML), reducing manual work and human errors.
This is particularly useful for cloud security compliance, such as FedRAMP (U.S.) and Protected B (Canada).
- Continuous Security Monitoring
Canadian organizations use OSCAL-based automation to continuously monitor security controls and detect compliance drift.
Helps align with Government of Canada IT Security Guidance (ITSG-33) for risk management.
- Risk Assessment and Reporting
OSCAL simplifies the process of generating security reports for audits, allowing businesses to provide automated evidence of security control effectiveness.
- Third-Party Risk Management
Canadian businesses and government agencies use OSCAL to assess third-party vendors (such as cloud providers) and ensure compliance with national security standards.
- Security Control Inheritance
Cloud service providers (CSPs) can inherit security controls from underlying platforms (such as AWS, Azure, or Google Cloud) using OSCAL models.
This reduces redundant security testing for compliance with Government of Canada Cloud Security Guidelines.
Common Use Cases for OSCAL in Canada
- Government Cloud Security & FedRAMP/ITSG-33 Compliance
Canadian federal agencies use OSCAL to automate security control assessments for cloud environments.
Helps align with Protected A/B/C cloud security requirements under ITSG-33.
- Financial Sector Risk & Compliance
Banks and financial institutions leverage OSCAL to streamline risk management and comply with OSFI (Office of the Superintendent of Financial Institutions) guidelines.
Ensures alignment with ISO 27001, SOC 2, and PCI DSS for financial security.
- Automated Security Auditing for Enterprises
Large organizations use OSCAL to generate compliance documentation automatically, reducing audit times from months to weeks.
Ensures continuous alignment with industry best practices and cybersecurity frameworks.
- Cloud Service Providers (CSPs) & Security Authorization
OSCAL allows CSPs (AWS, Azure, Google Cloud) to automate security documentation, helping them comply with Canadian cloud security regulations faster.
- Critical Infrastructure & Cybersecurity Risk Management
OSCAL is used by critical infrastructure sectors (telecommunications, energy, healthcare) to ensure compliance with Canadian Centre for Cyber Security (CCCS) guidelines.
Conclusion
OSCAL helps organizations automate security documentation, streamline compliance, and improve risk assessments by providing a standardized, machine-readable format for security controls. It is especially useful for government agencies, cloud providers, and enterprises that need to comply with strict security regulations.
-
How To: View OSCAL code for a Control
- Navigate to your organization’s Iron Fort Compliance login page
- Log in to Your Account
- Check your email for the One-Time Password (OTP) sent on your email and enter the OTP to proceed
- Enter the OTP to verify your identity and click “validate.”
- Once logged in, a welcome prompt will appear displaying
- Move your cursor to the left side of the dashboard to display the menu.
- Locate and click the Control tab on the dashboard.
- Under the Controls tab, click the expand icon (<>), located in the top-right corner under the user profile picture.
- The user will be redirected to a new page.
- Select the Pretty-Print checkbox to format and view the OSCAL code in a structured layout.
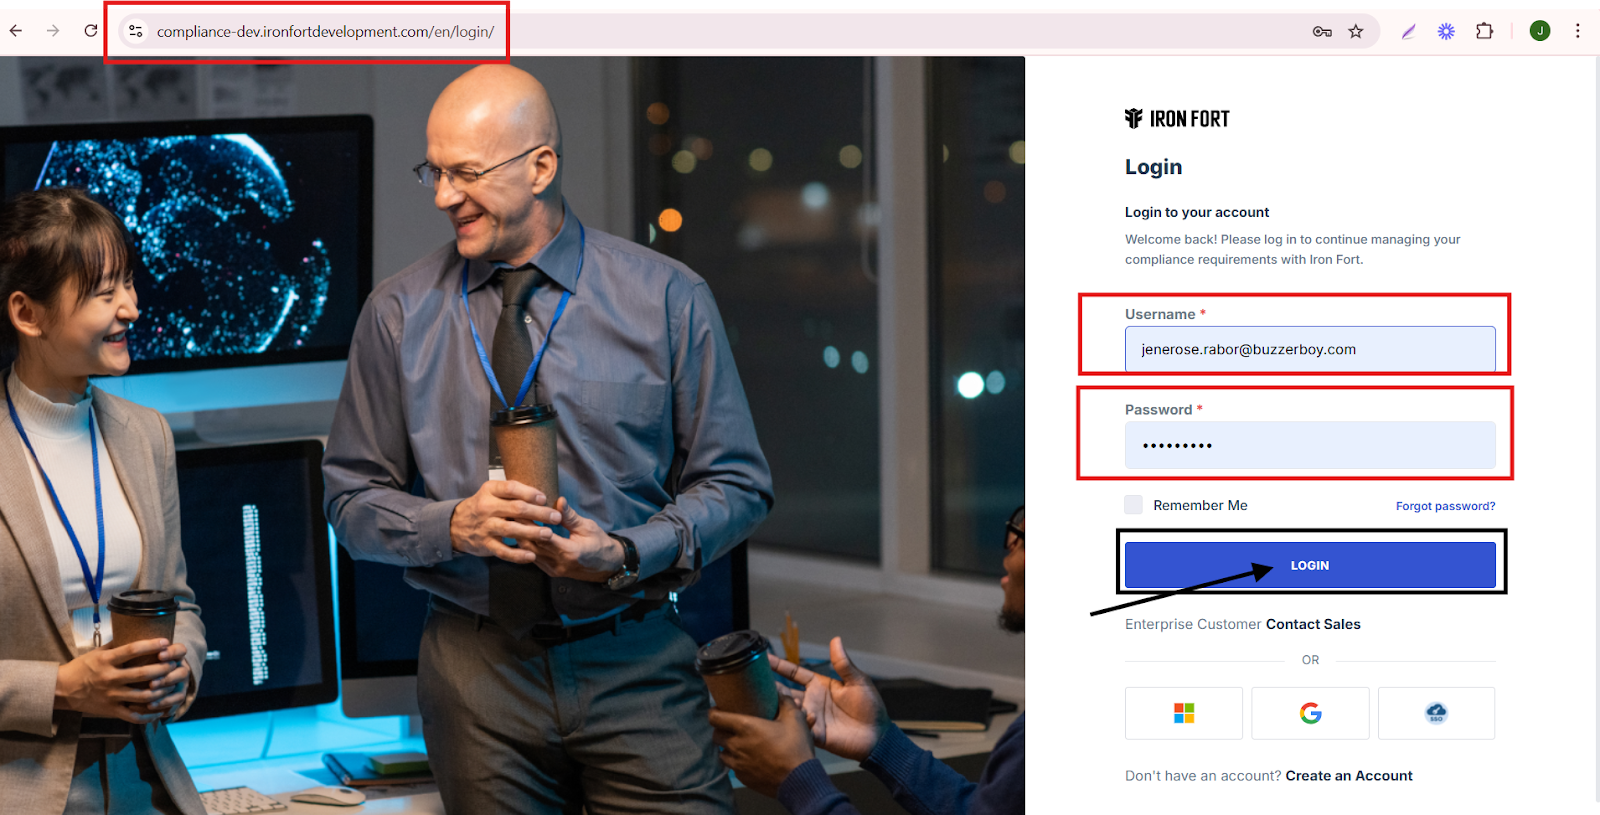
1. Navigate to your organization’s Iron Fort Compliance login page
For example: https://compliance-demo.ironfortdemos.com/en/login/?next=/en
2. Log in to Your Account
Enter your email and password to log in.
3. Check your email for the One-Time Password (OTP) sent on your email and enter the OTP to proceed.
4. Enter the OTP to verify your identity and click “validate.”

5. Once logged in, a welcome prompt will appear displaying
-
Tenant Key Information: Verifying your system access
-
User Email: Your registered email for auditing purposes
-
Last Login Details: To track your previous access
-
Iron Fort Support Email: For any login issues or concerns
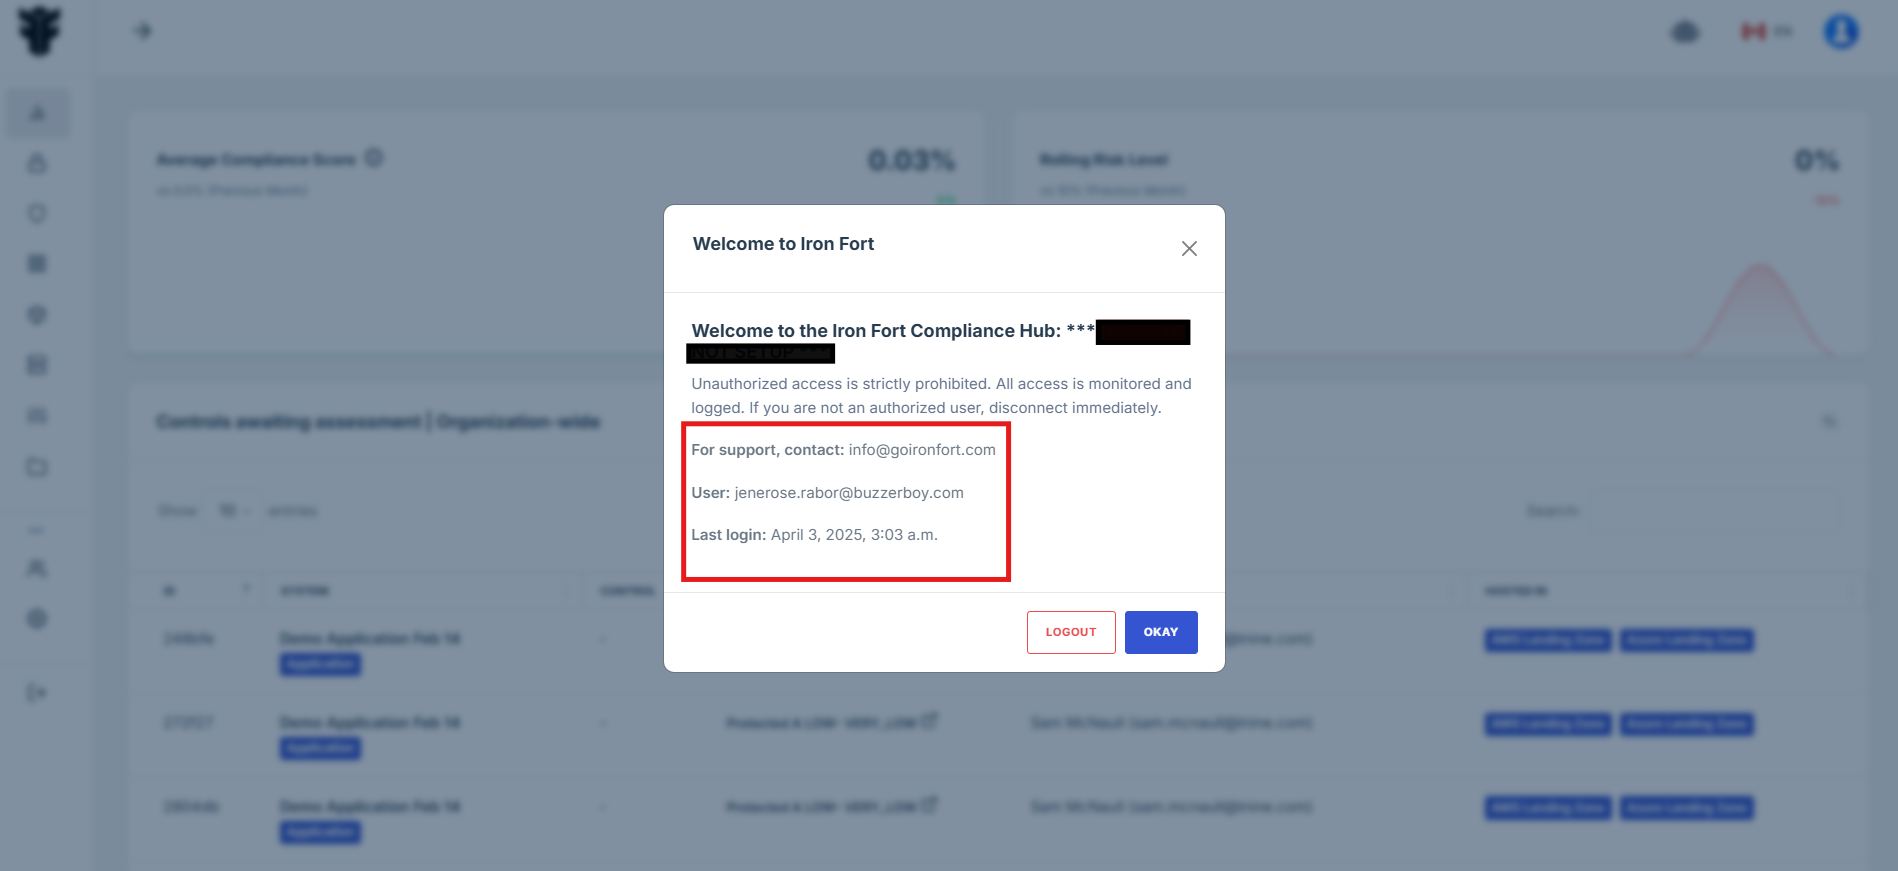
NOTE: If you recognize the details and are authorized, click "OK" to continue. However, if you are not an authorized user, click "Logout" immediately to exit.
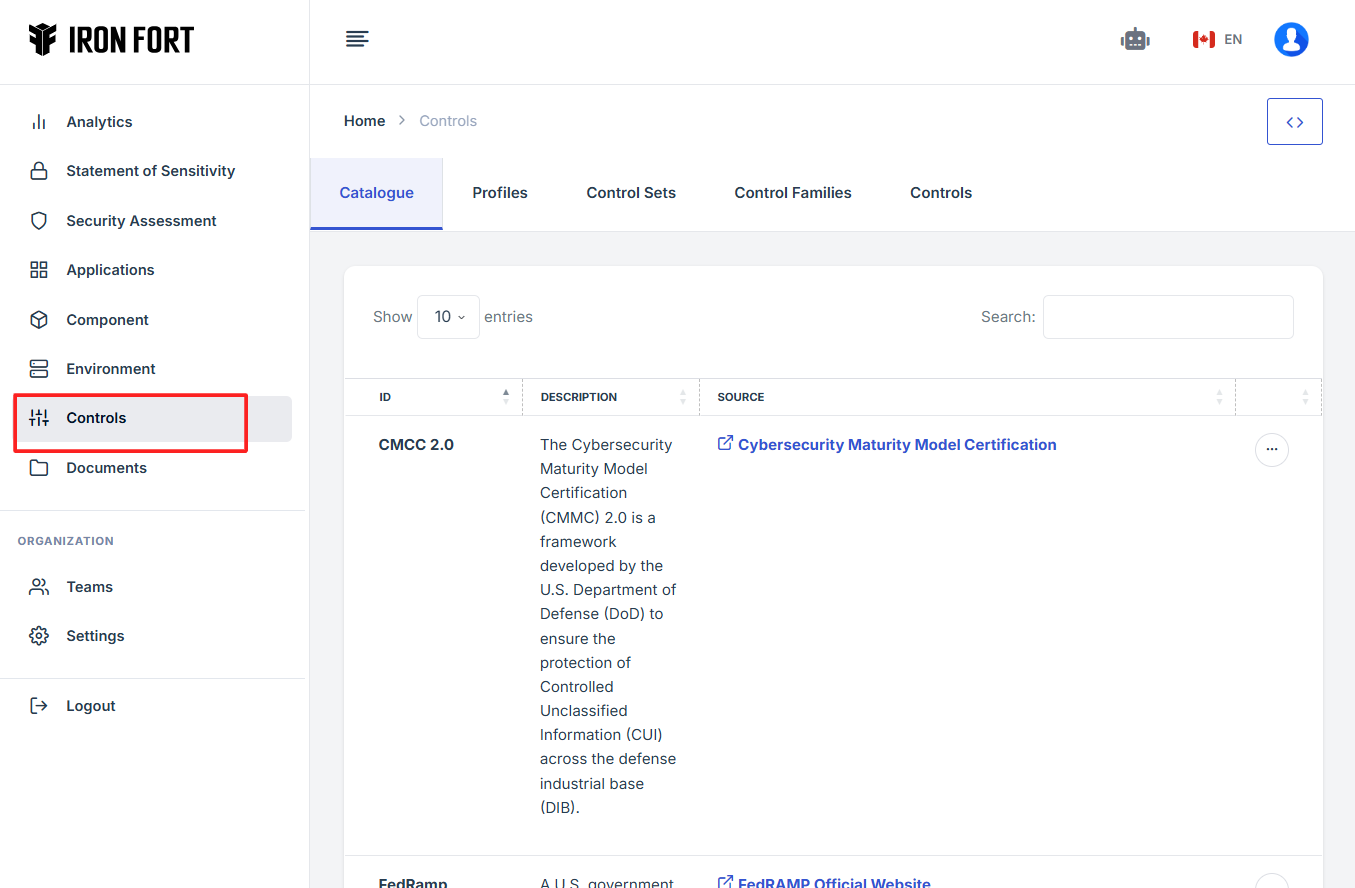
6. Move your cursor to the left side of the dashboard to display the menu.
7. Locate and click the Control tab on the dashboard.

8. Under the Controls tab, click the expand icon (<>), located in the top-right corner under the user profile picture.
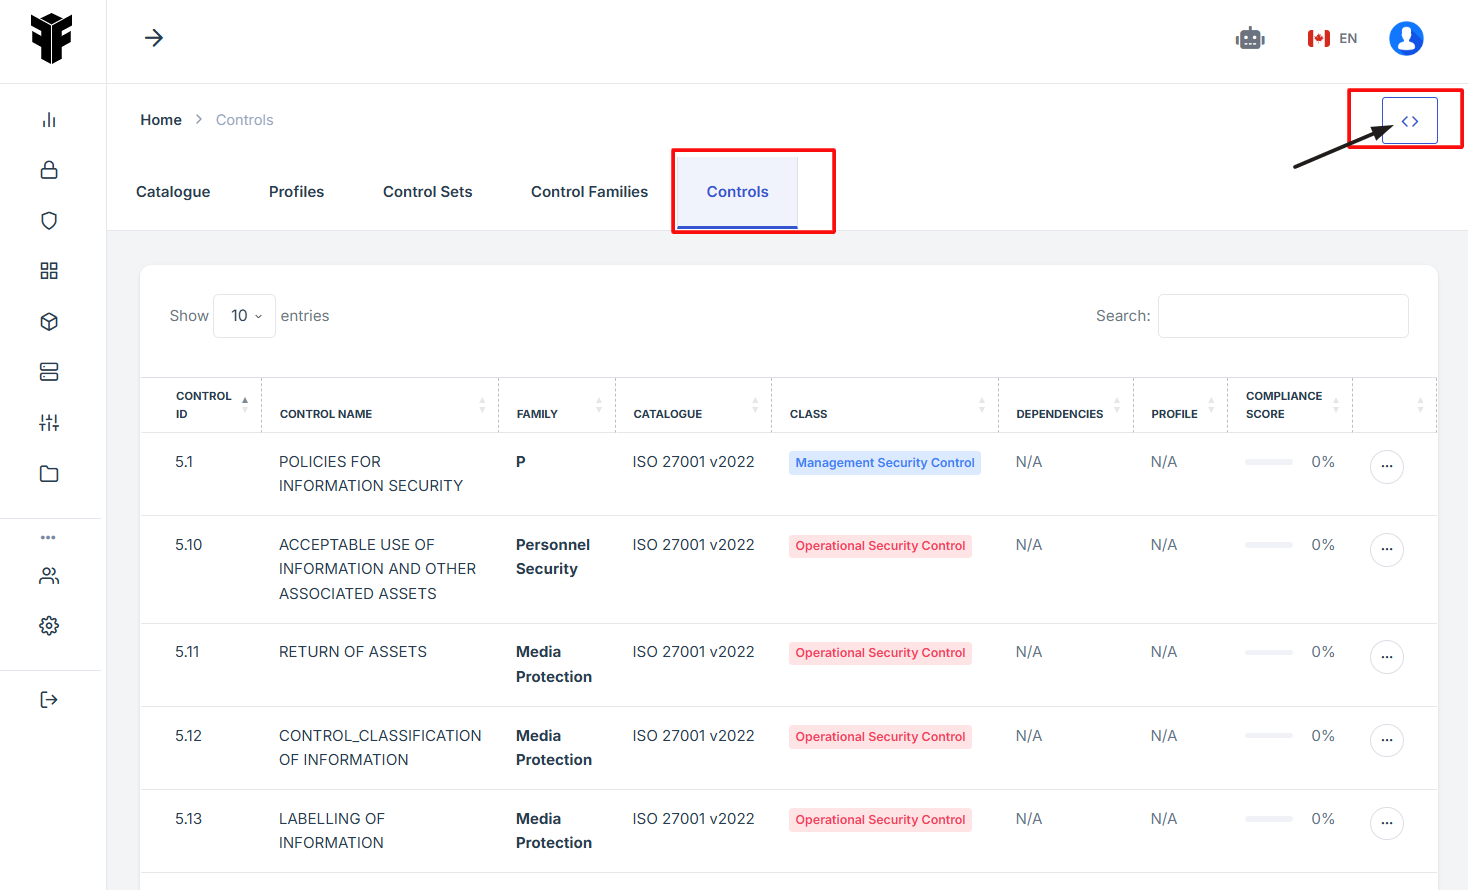
9. The user will be redirected to a new page.
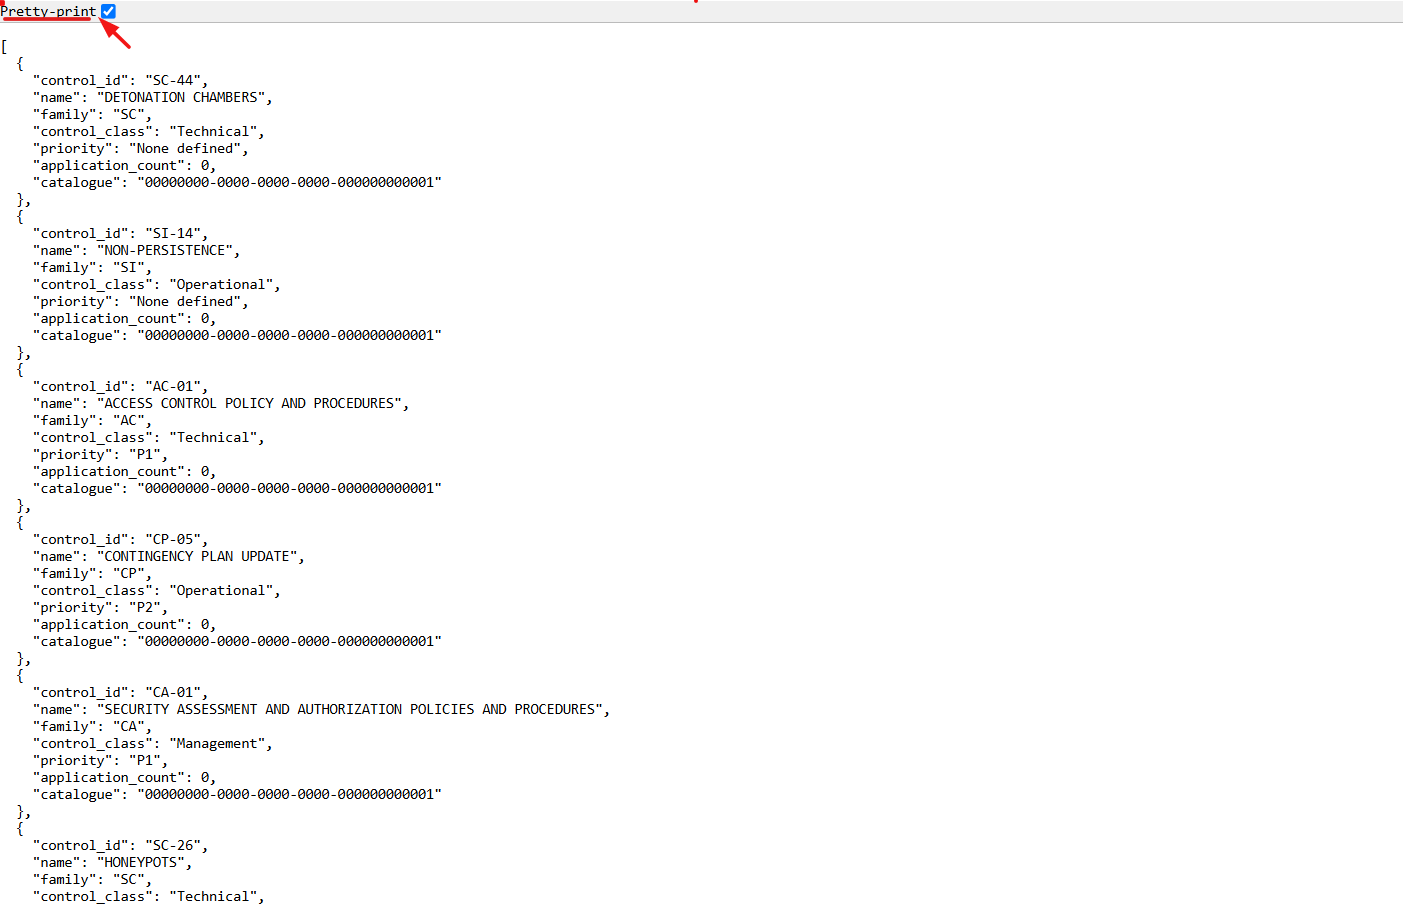
10. Select the Pretty-Print checkbox to format and view the OSCAL code in a structured layout.
-
How To: View OSCAL code for a Control Family
- Navigate to your organization’s Iron Fort Compliance login page
- Log in to Your Account
- Check your email for the One-Time Password (OTP) sent on your email and enter the OTP to proceed
- Enter the OTP to verify your identity and click “validate.”
- Once logged in, a welcome prompt will appear displaying
- Move your cursor to the left side of the dashboard to display the menu.
- Locate and click the Control tab on the dashboard.
- Under the Controls Families tab, click the expand icon (<>), located in the top-right corner under the user profile picture.
- The user will be redirected to a new page.
- Select the Pretty-Print checkbox to format and view the OSCAL code in a structured layout.
1. Navigate to your organization’s Iron Fort Compliance login page
For example: https://compliance-demo.ironfortdemos.com/en/login/?next=/en
2. Log in to Your Account
Enter your email and password to log in.
3. Check your email for the One-Time Password (OTP) sent on your email and enter the OTP to proceed.
4. Enter the OTP to verify your identity and click “validate.”
5. Once logged in, a welcome prompt will appear displaying
-
Tenant Key Information: Verifying your system access
-
User Email: Your registered email for auditing purposes
-
Last Login Details: To track your previous access
-
Iron Fort Support Email: For any login issues or concerns
NOTE: If you recognize the details and are authorized, click "OK" to continue. However, if you are not an authorized user, click "Logout" immediately to exit.
6. Move your cursor to the left side of the dashboard to display the menu.
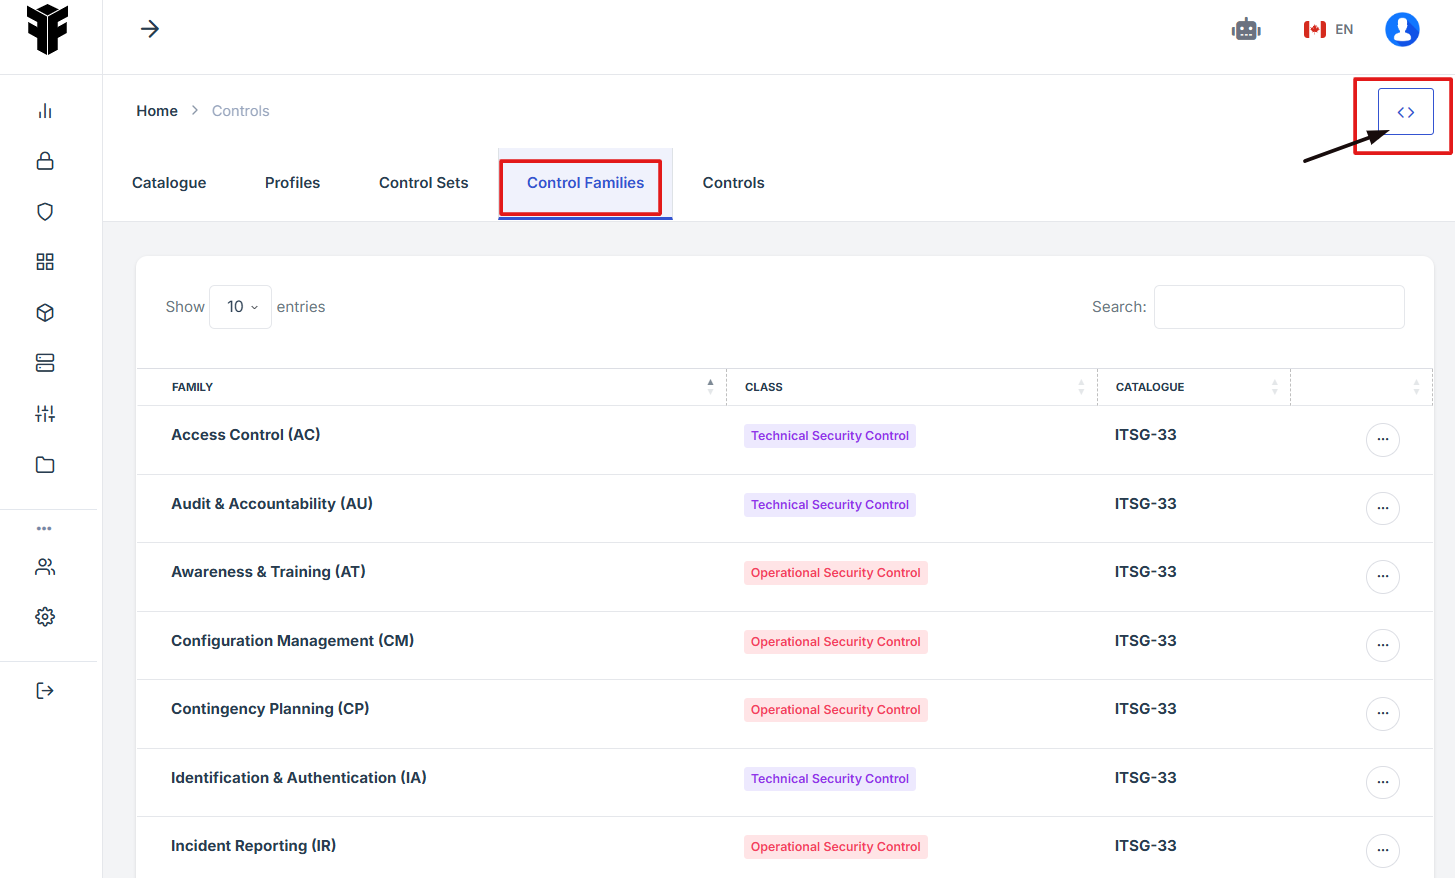
7. Locate and click the Control tab on the dashboard.
8. Navigate to the Control Families section under the Controls tab, then click the 'Expand View' icon (<>), located in the upper-right corner of the screen, just beneath the user profile icon.
9. The user will be redirected to a new page.

10. Select the Pretty-Print checkbox to format and view the OSCAL code in a structured layout.
-
How To: View OSCAL code for a Catalogue
- Navigate to your organization’s Iron Fort Compliance login page
- Log in to Your Account
- Check your email for the One-Time Password (OTP) sent on your email and enter the OTP to proceed
- Enter the OTP to verify your identity and click “validate.”
- Once logged in, a welcome prompt will appear displaying
- Move your cursor to the left side of the dashboard to display the menu.
- Locate and click the Catalogue tab on the dashboard.
- Under the Catalogue tab, click the expand icon (<>), located in the top-right corner under the user profile picture.
- The user will be redirected to a new page.
- Select the Pretty-Print checkbox to format and view the OSCAL code in a structured layout.
1. Navigate to your organization’s Iron Fort Compliance login page
For example: https://compliance-demo.ironfortdemos.com/en/login/?next=/en
2. Log in to Your Account
Enter your email and password to log in.
3. Check your email for the One-Time Password (OTP) sent on your email and enter the OTP to proceed.
4. Enter the OTP to verify your identity and click “validate.”
5. Once logged in, a welcome prompt will appear displaying
-
Tenant Key Information: Verifying your system access
-
User Email: Your registered email for auditing purposes
-
Last Login Details: To track your previous access
-
Iron Fort Support Email: For any login issues or concerns
NOTE: If you recognize the details and are authorized, click "OK" to continue. However, if you are not an authorized user, click "Logout" immediately to exit.
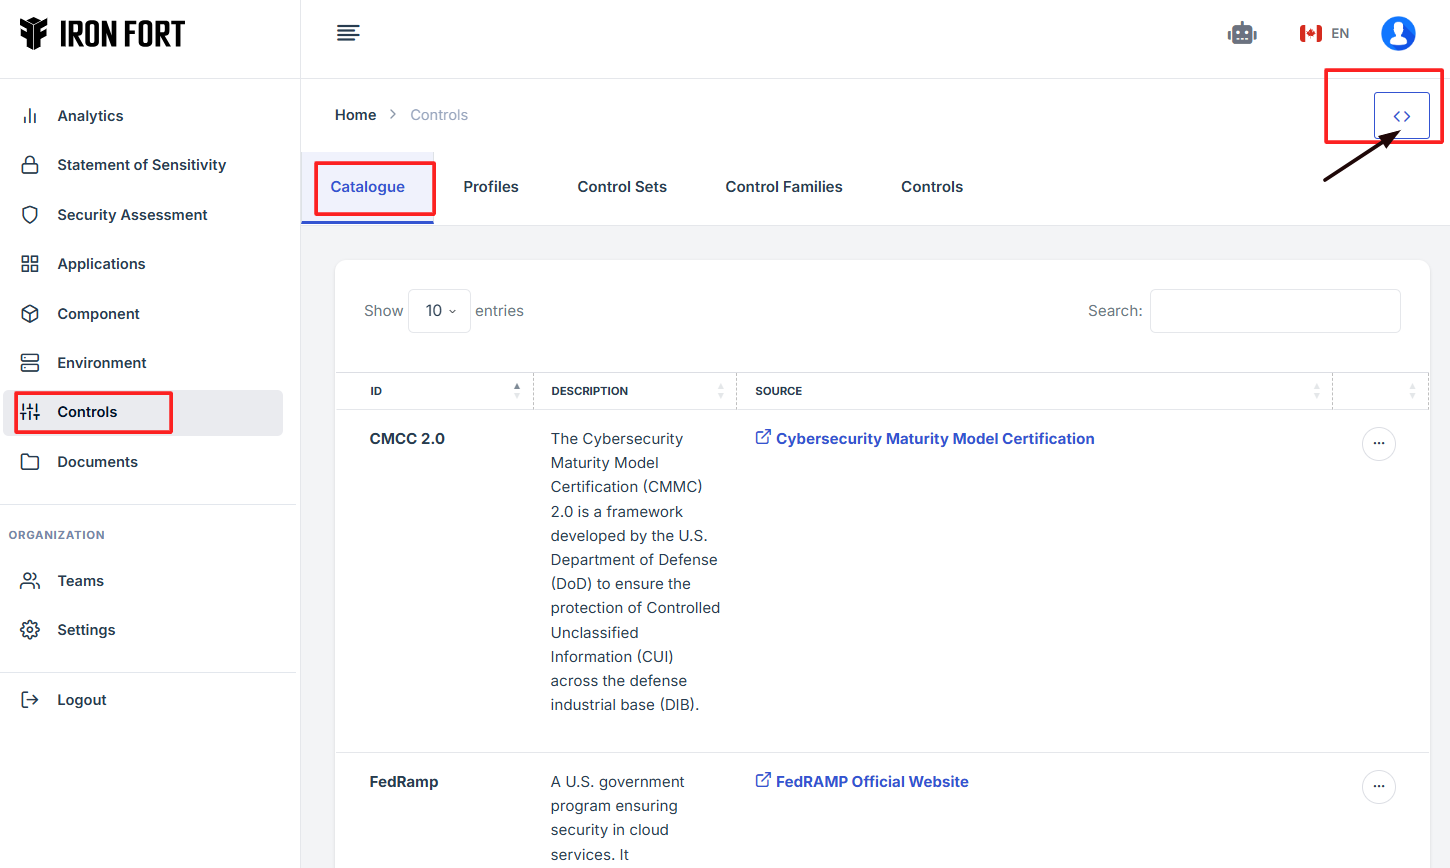
6. Move your cursor to the left side of the dashboard to display the menu.
7. Locate and click the Catalogue tab on the dashboard.

8. Under the Catalogue tab, click the expand icon (<>), located in the top-right corner under the user profile picture.
9. The user will be redirected to a new page.
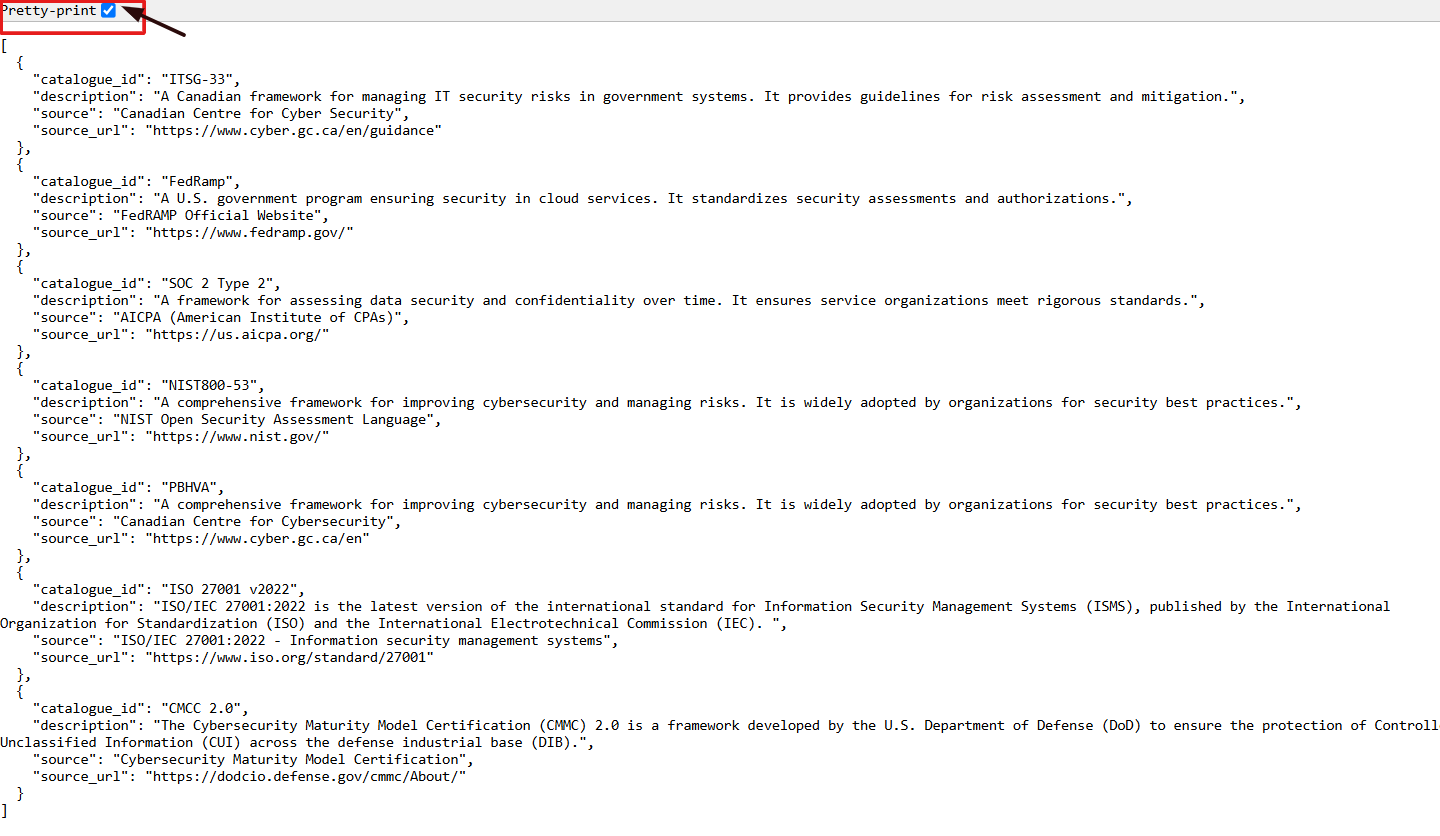
10. Select the Pretty-Print checkbox to format and view the OSCAL code in a structured layout.
-
How To: View OSCAL code for a Application
- Navigate to your organization’s Iron Fort Compliance login page
- Log in to Your Account
- Check your email for the One-Time Password (OTP) sent on your email and enter the OTP to proceed
- Enter the OTP to verify your identity and click “validate.”
- Once logged in, a welcome prompt will appear displaying
- Move your cursor to the left side of the dashboard to display the menu.
- Locate and click the Application tab on the dashboard.
- Click the Application name and the user will be re-directed to a detailed view page of the application.
- Click the expand icon (<>), located beside the pencil icon.
- The user will be redirected to a new page.
- Select the Pretty-Print checkbox to format and view the OSCAL code in a structured layout.
1. Navigate to your organization’s Iron Fort Compliance login page
For example: https://compliance-demo.ironfortdemos.com/en/login/?next=/en
2. Log in to Your Account
Enter your email and password to log in.
3. Check your email for the One-Time Password (OTP) sent on your email and enter the OTP to proceed.
4. Enter the OTP to verify your identity and click “validate.”
5. Once logged in, a welcome prompt will appear displaying
-
Tenant Key Information: Verifying your system access
-
User Email: Your registered email for auditing purposes
-
Last Login Details: To track your previous access
-
Iron Fort Support Email: For any login issues or concerns
NOTE: If you recognize the details and are authorized, click "OK" to continue. However, if you are not an authorized user, click "Logout" immediately to exit.
6. Move your cursor to the left side of the dashboard to display the menu.
7. Locate and click the Application tab on the dashboard.

8. Click the Application name and the user will be re-directed to a detailed view page of the application.
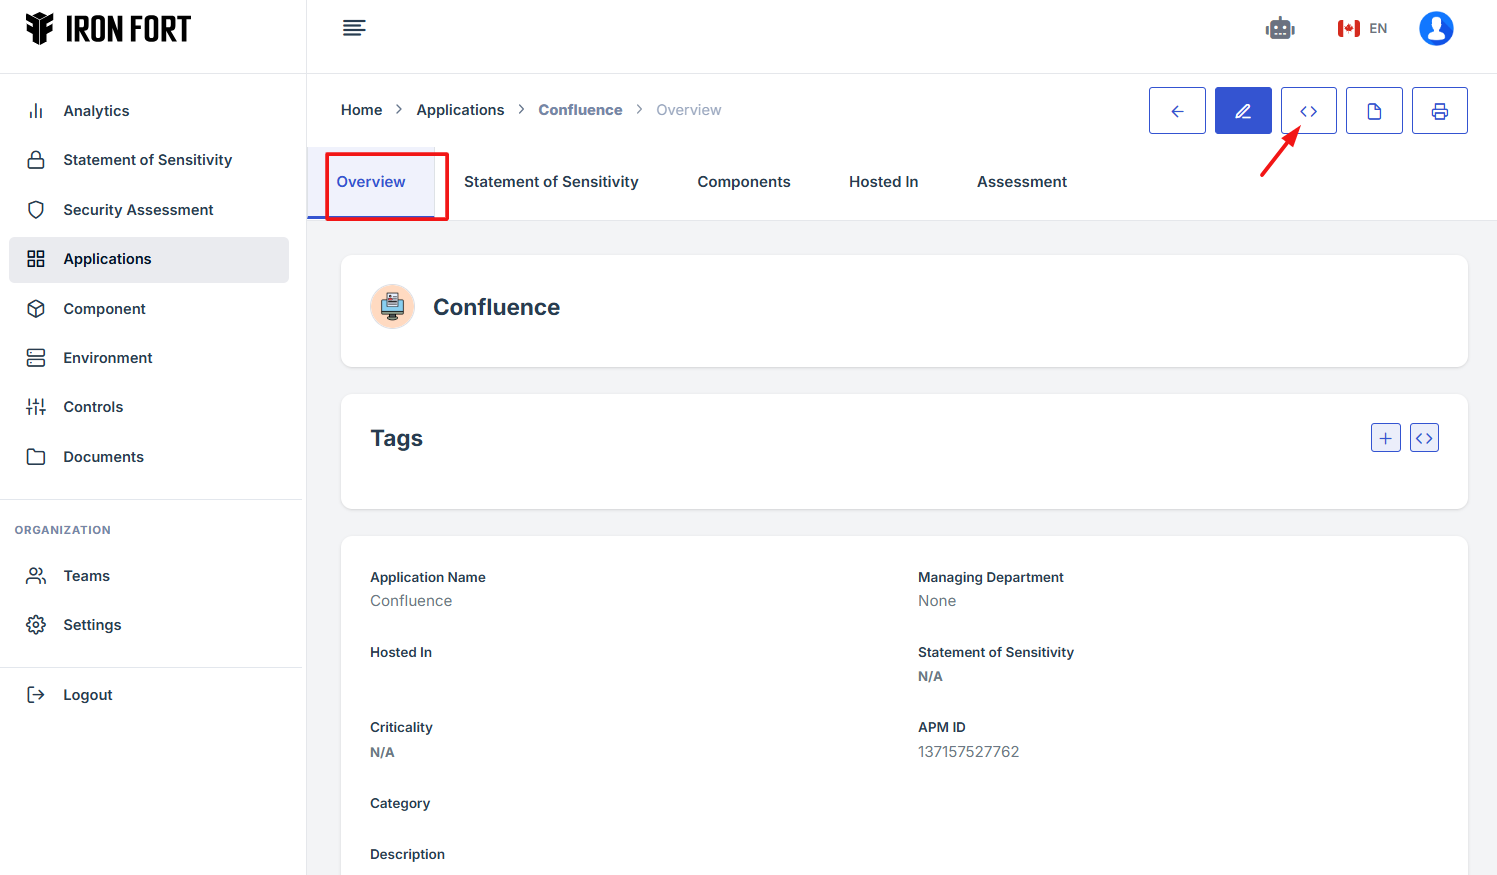
9. Click the expand icon (<>), located beside the pencil icon.
10. The user will be redirected to a new page.
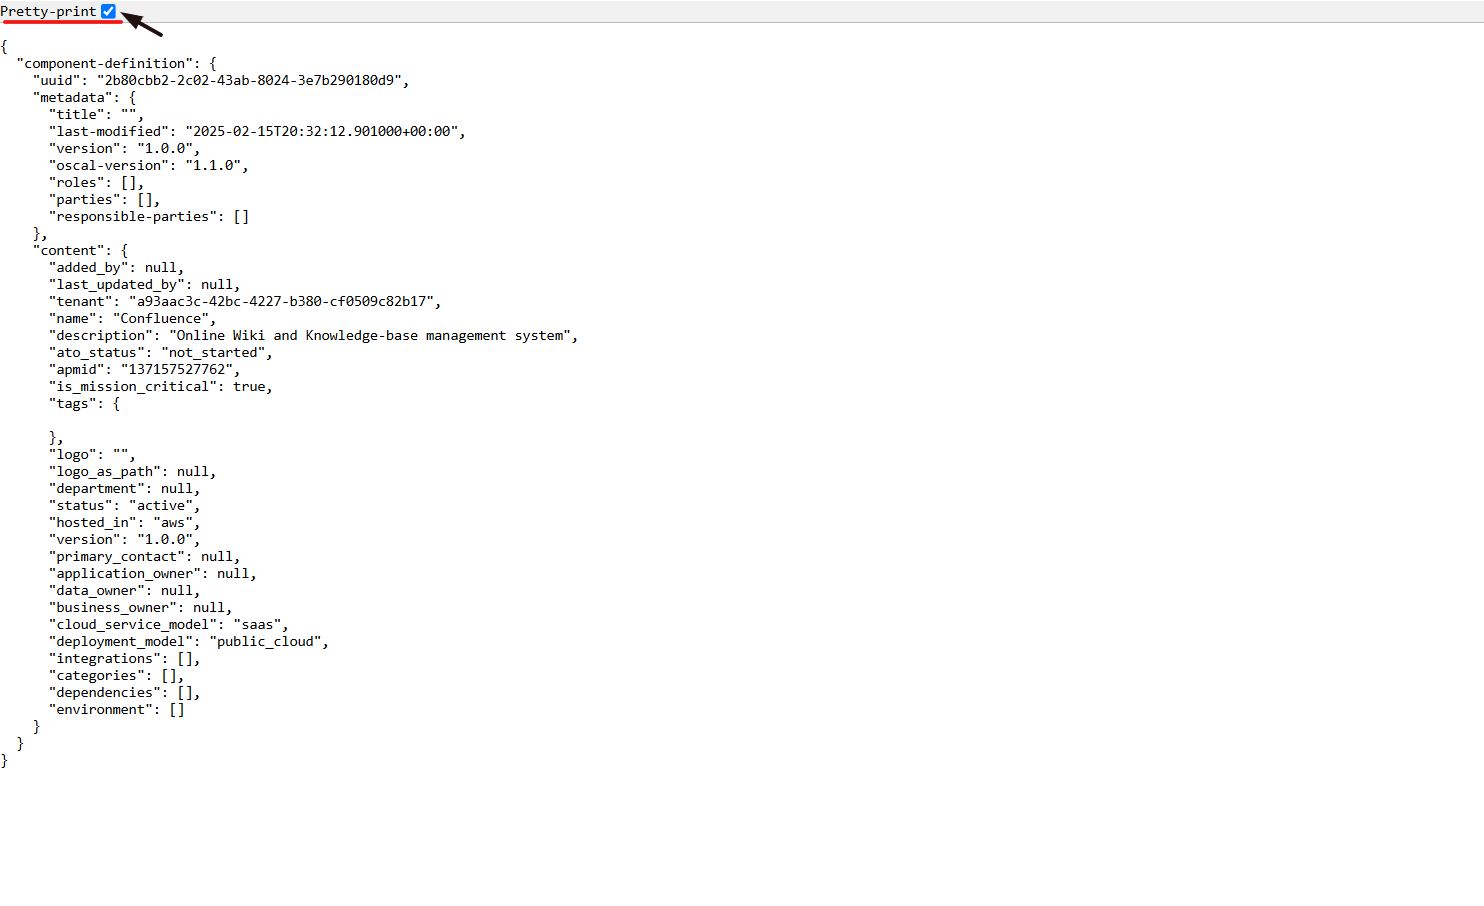
11. Select the Pretty-Print checkbox to format and view the OSCAL code in a structured layout.
-
How To: View OSCAL code for Statement of Sensitivty
- Navigate to your organization’s Iron Fort Compliance login page
- Log in to Your Account
- Check your email for the One-Time Password (OTP) sent on your email and enter the OTP to proceed
- Enter the OTP to verify your identity and click “validate.”
- Once logged in, a welcome prompt will appear displaying
- Move your cursor to the left side of the dashboard to display the menu.
- Locate and click the Statement of Sensitivity tab on the dashboard.
- Click the APM ID and the user will be re-directed to a detailed view page of the application/environment.
- Click the expand icon (<>), located beside the pencil icon.
- The user will be redirected to a new page.
- Select the Pretty-Print checkbox to format and view the OSCAL code in a structured layout.
1. Navigate to your organization’s Iron Fort Compliance login page
For example: https://compliance-demo.ironfortdemos.com/en/login/?next=/en
2. Log in to Your Account
Enter your email and password to log in.
3. Check your email for the One-Time Password (OTP) sent on your email and enter the OTP to proceed.
4. Enter the OTP to verify your identity and click “validate.”
5. Once logged in, a welcome prompt will appear displaying
-
Tenant Key Information: Verifying your system access
-
User Email: Your registered email for auditing purposes
-
Last Login Details: To track your previous access
-
Iron Fort Support Email: For any login issues or concerns
NOTE: If you recognize the details and are authorized, click "OK" to continue. However, if you are not an authorized user, click "Logout" immediately to exit.
6. Move your cursor to the left side of the dashboard to display the menu.
7. Locate and click the Statement of Sensitivity tab on the dashboard.
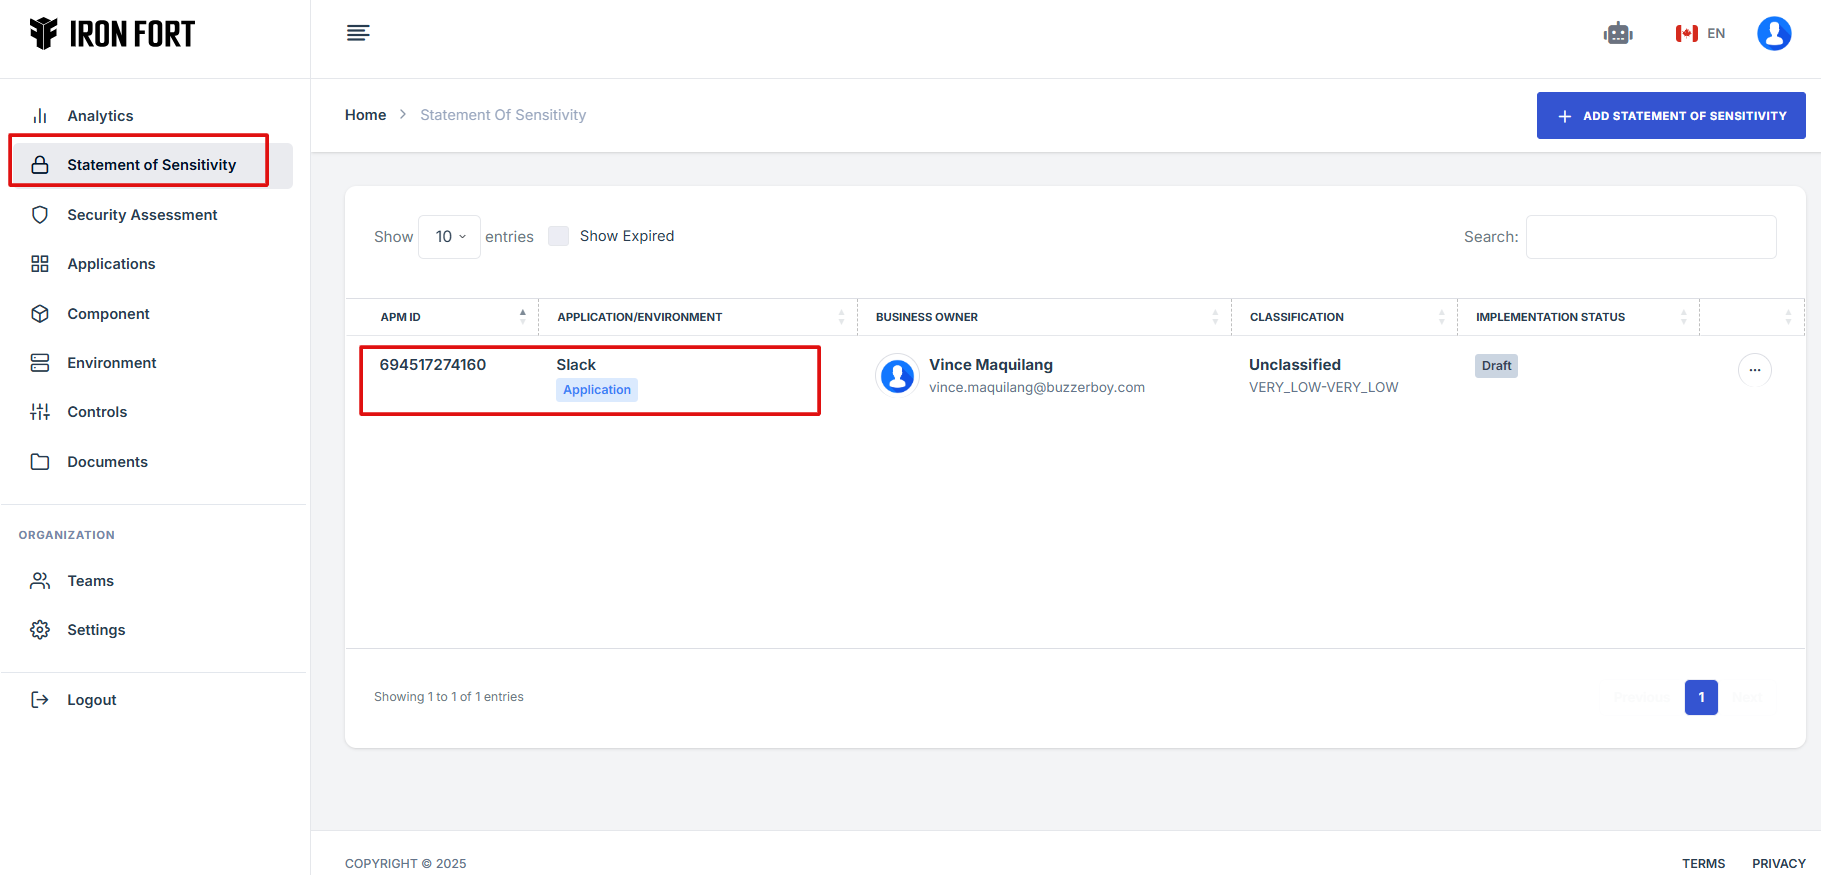
8. Click the APM ID and the user will be re-directed to a detailed view page of the application/environment.
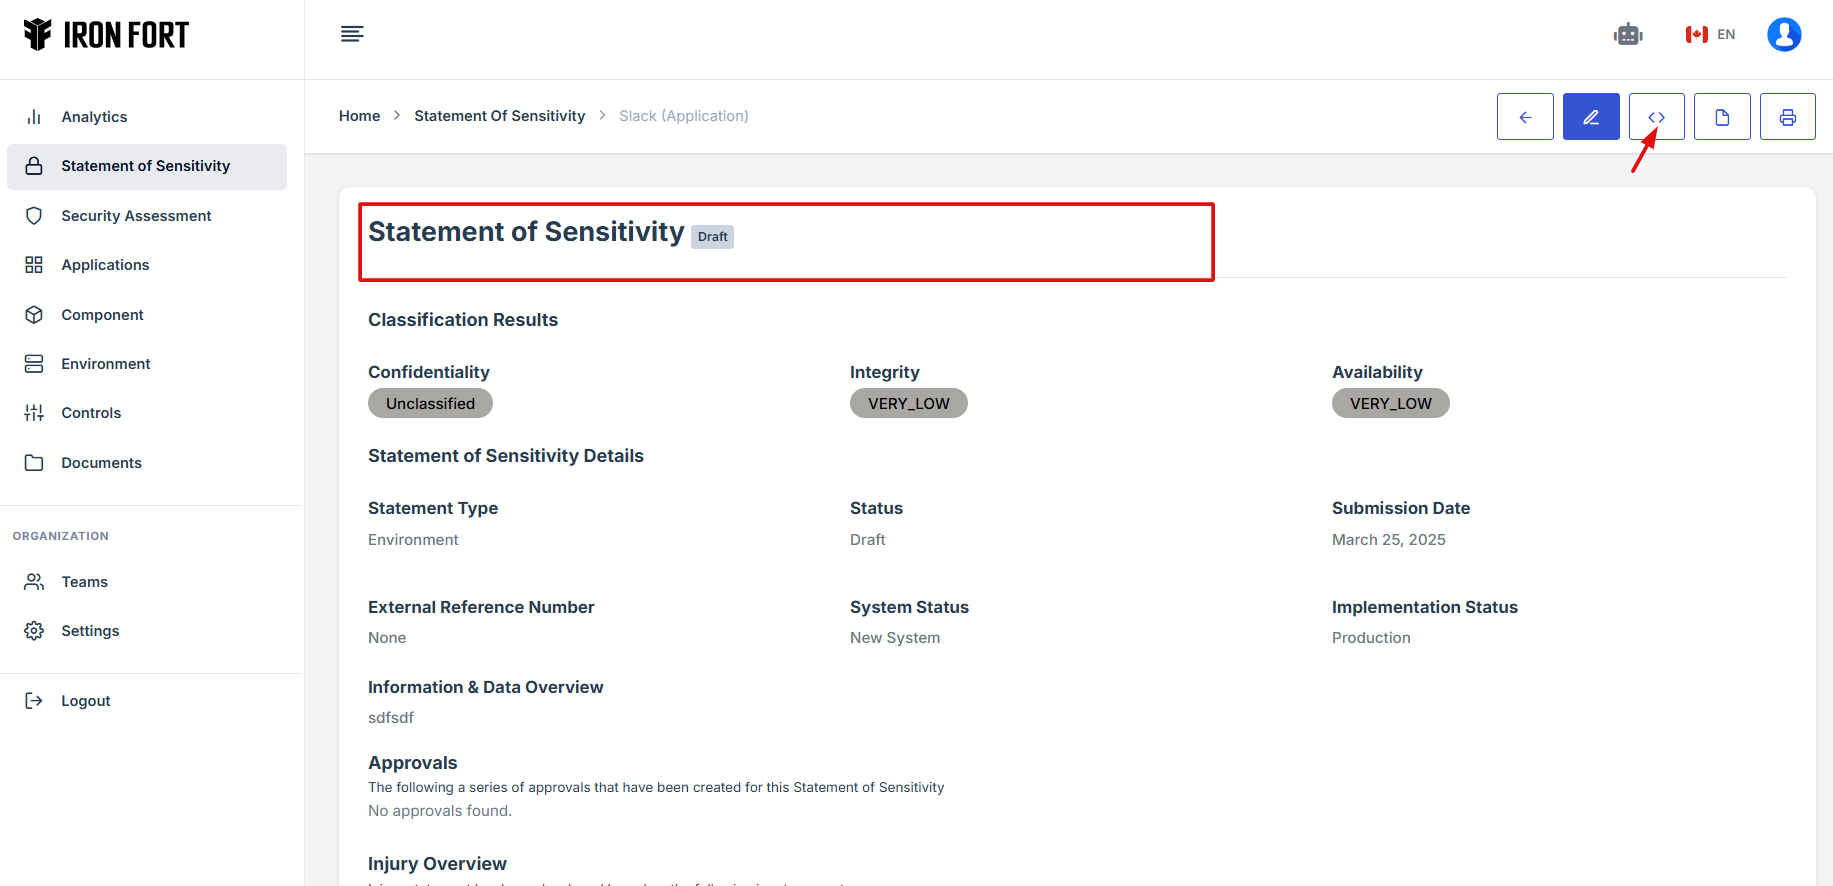
9. Click the expand icon (<>), located beside the pencil icon.
10. The user will be redirected to a new page.
11. Select the Pretty-Print checkbox to format and view the OSCAL code in a structured layout.
-
How To: View OSCAL code for PoAM
- Navigate to your organization’s Iron Fort Compliance login page
- Log in to Your Account
- Check your email for the One-Time Password (OTP) sent on your email and enter the OTP to proceed
- Enter the OTP to verify your identity and click “validate.”
- Once logged in, a welcome prompt will appear displaying
- Move your cursor to the left side of the dashboard to display the menu.
- Locate and click the Security Assessment tab on the dashboard.
- When the user click the APM ID the user will be re-directed to a detailed view page of the application/environment.
- Scroll down locate and click Plan Action and Milestone (POAM)
- Click the expand icon (<>), located beside the pencil icon.
- The user will be redirected to a new page.
- Select the Pretty-Print checkbox to format and view the OSCAL code in a structured layout.
1. Navigate to your organization’s Iron Fort Compliance login page
For example: https://compliance-demo.ironfortdemos.com/en/login/?next=/en
2. Log in to Your Account
Enter your email and password to log in.
3. Check your email for the One-Time Password (OTP) sent on your email and enter the OTP to proceed.
4. Enter the OTP to verify your identity and click “validate.”
5. Once logged in, a welcome prompt will appear displaying
-
Tenant Key Information: Verifying your system access
-
User Email: Your registered email for auditing purposes
-
Last Login Details: To track your previous access
-
Iron Fort Support Email: For any login issues or concerns
NOTE: If you recognize the details and are authorized, click "OK" to continue. However, if you are not an authorized user, click "Logout" immediately to exit.
6. Move your cursor to the left side of the dashboard to display the menu.
7. Locate and click the Security Assessment tab on the dashboard.

8. When the user click the APM ID the user will be re-directed to a detailed view page of the application/environment.
9. Scroll down locate and click Plan Action and Milestone (POAM)
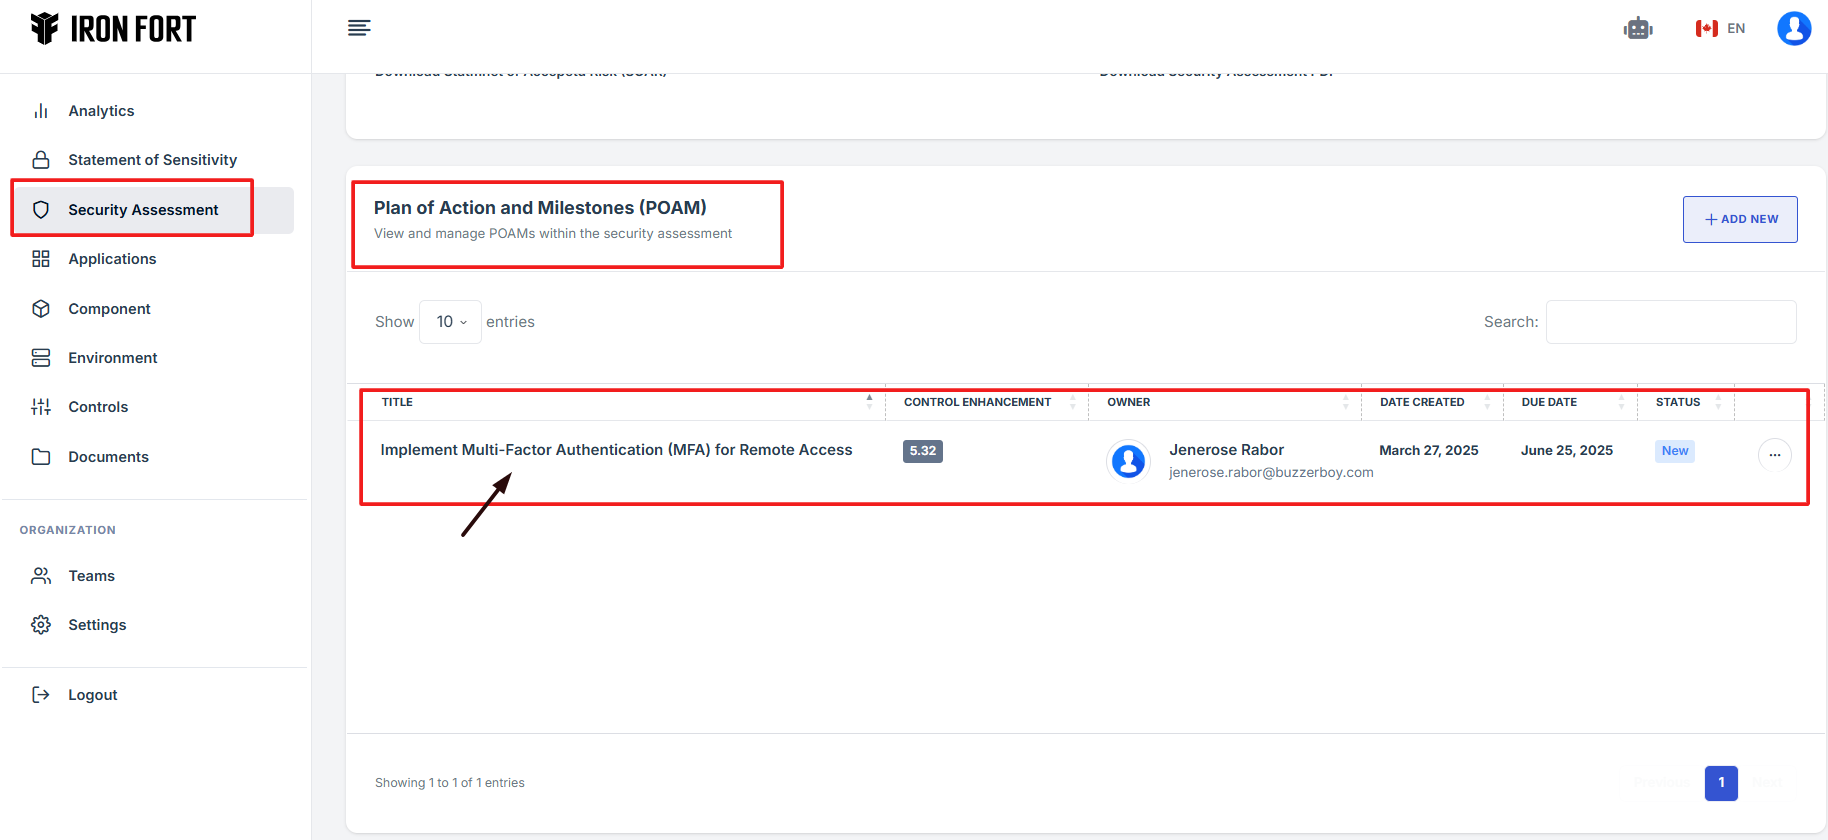
10. Click the expand icon (<>), located beside the pencil icon.

11. The user will be redirected to a new page.

12. Select the Pretty-Print checkbox to format and view the OSCAL code in a structured layout.
-
How To: View OSCAL code for Environment
- Navigate to your organization’s Iron Fort Compliance login page
- Log in to Your Account
- Check your email for the One-Time Password (OTP) sent on your email and enter the OTP to proceed
- Enter the OTP to verify your identity and click “validate.”
- Once logged in, a welcome prompt will appear displaying
- Move your cursor to the left side of the dashboard to display the menu.
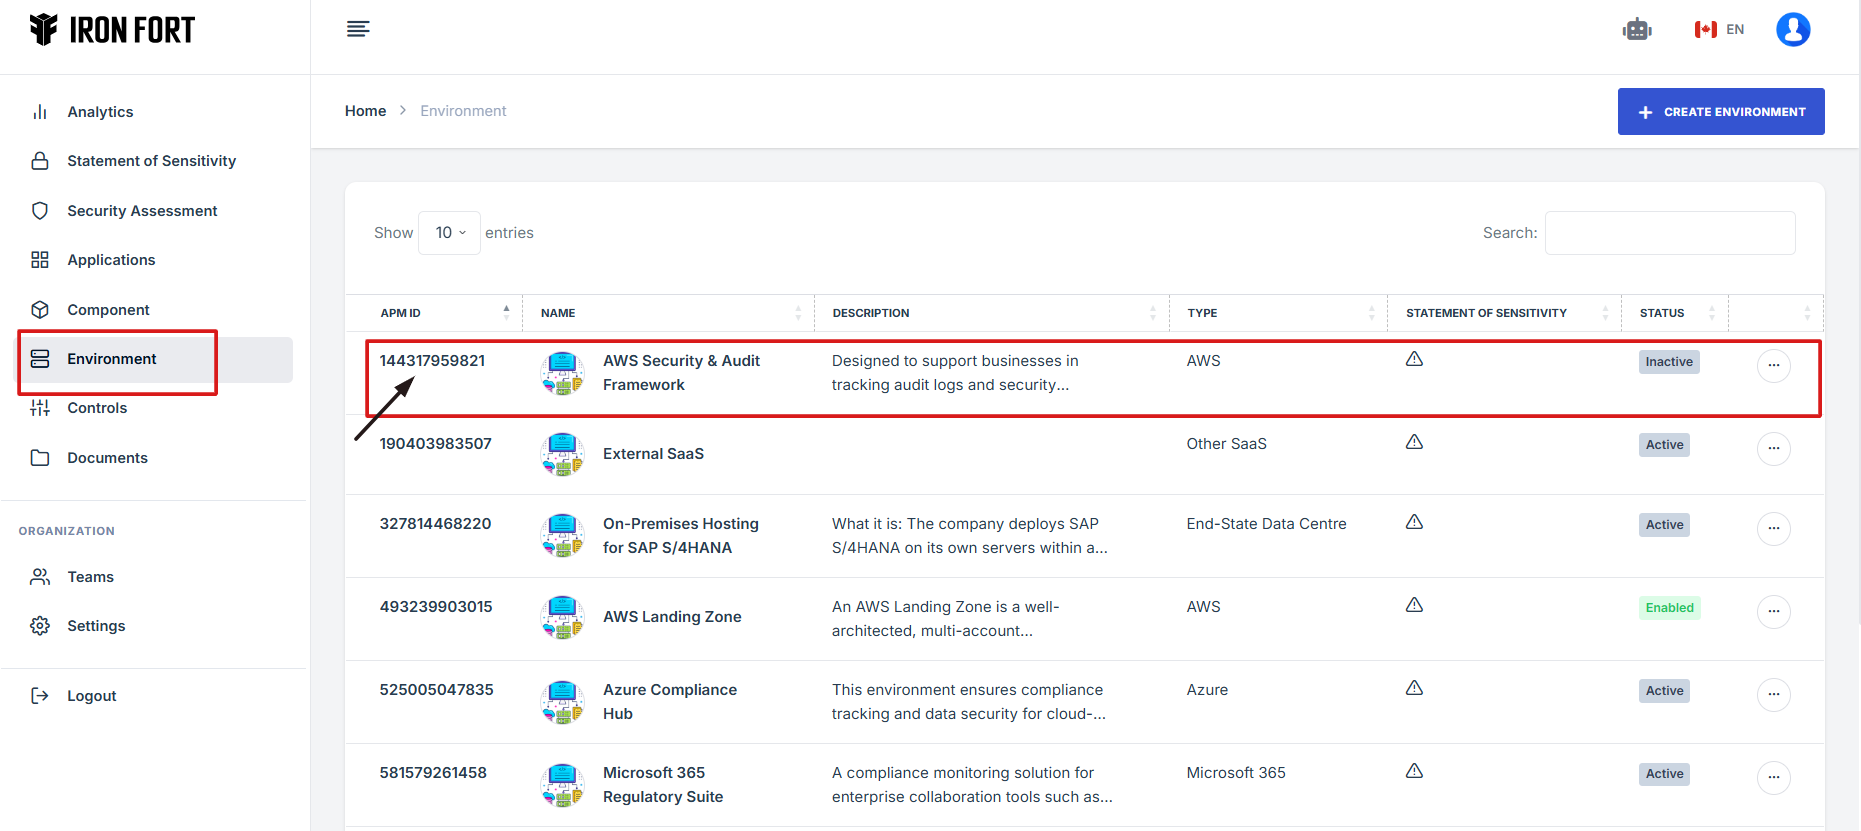
- Locate and click the Environment tab on the dashboard.
- When the user click the APM ID the user will be re-directed to a detailed view page of the application/environment.
- Click the expand icon (<>), located beside the pencil icon.
- The user will be redirected to a new page.
- Select the Pretty-Print checkbox to format and view the OSCAL code in a structured layout.
1. Navigate to your organization’s Iron Fort Compliance login page
For example: https://compliance-demo.ironfortdemos.com/en/login/?next=/en
2. Log in to Your Account
Enter your email and password to log in.
3. Check your email for the One-Time Password (OTP) sent on your email and enter the OTP to proceed.
4. Enter the OTP to verify your identity and click “validate.”
5. Once logged in, a welcome prompt will appear displaying
-
Tenant Key Information: Verifying your system access
-
User Email: Your registered email for auditing purposes
-
Last Login Details: To track your previous access
-
Iron Fort Support Email: For any login issues or concerns
NOTE: If you recognize the details and are authorized, click "OK" to continue. However, if you are not an authorized user, click "Logout" immediately to exit.
6. Move your cursor to the left side of the dashboard to display the menu.
7. Locate and click the Environment tab on the dashboard.
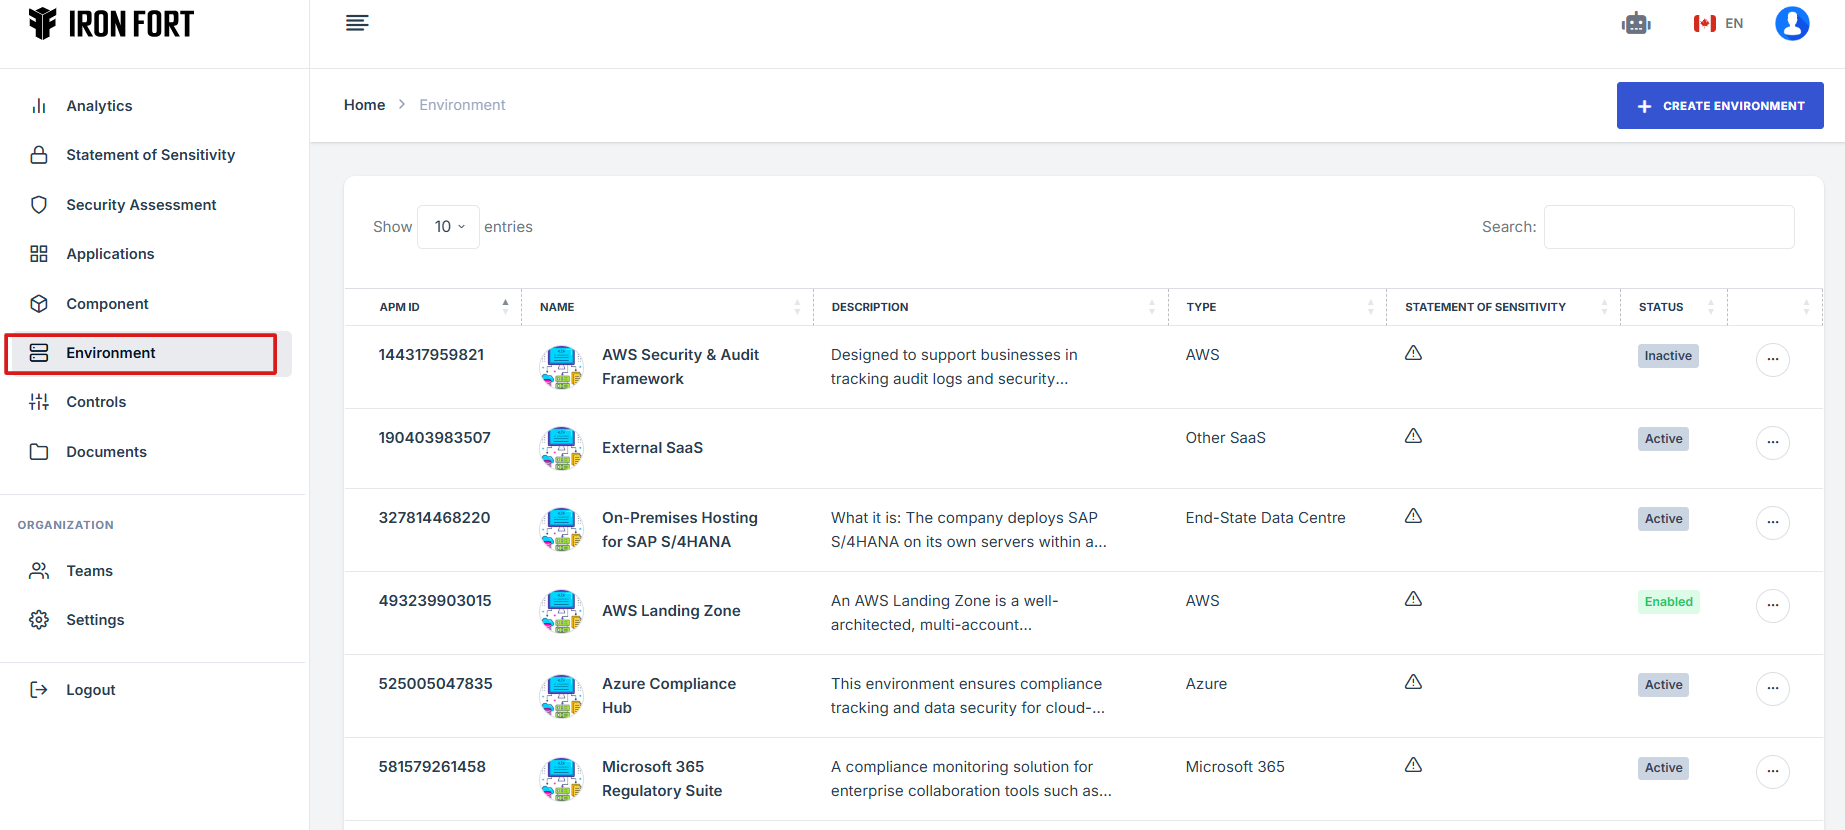
8. When the user click the APM ID the user will be re-directed to a detailed view page of the application/environment.
9. Click the expand icon (<>), located beside the pencil icon.
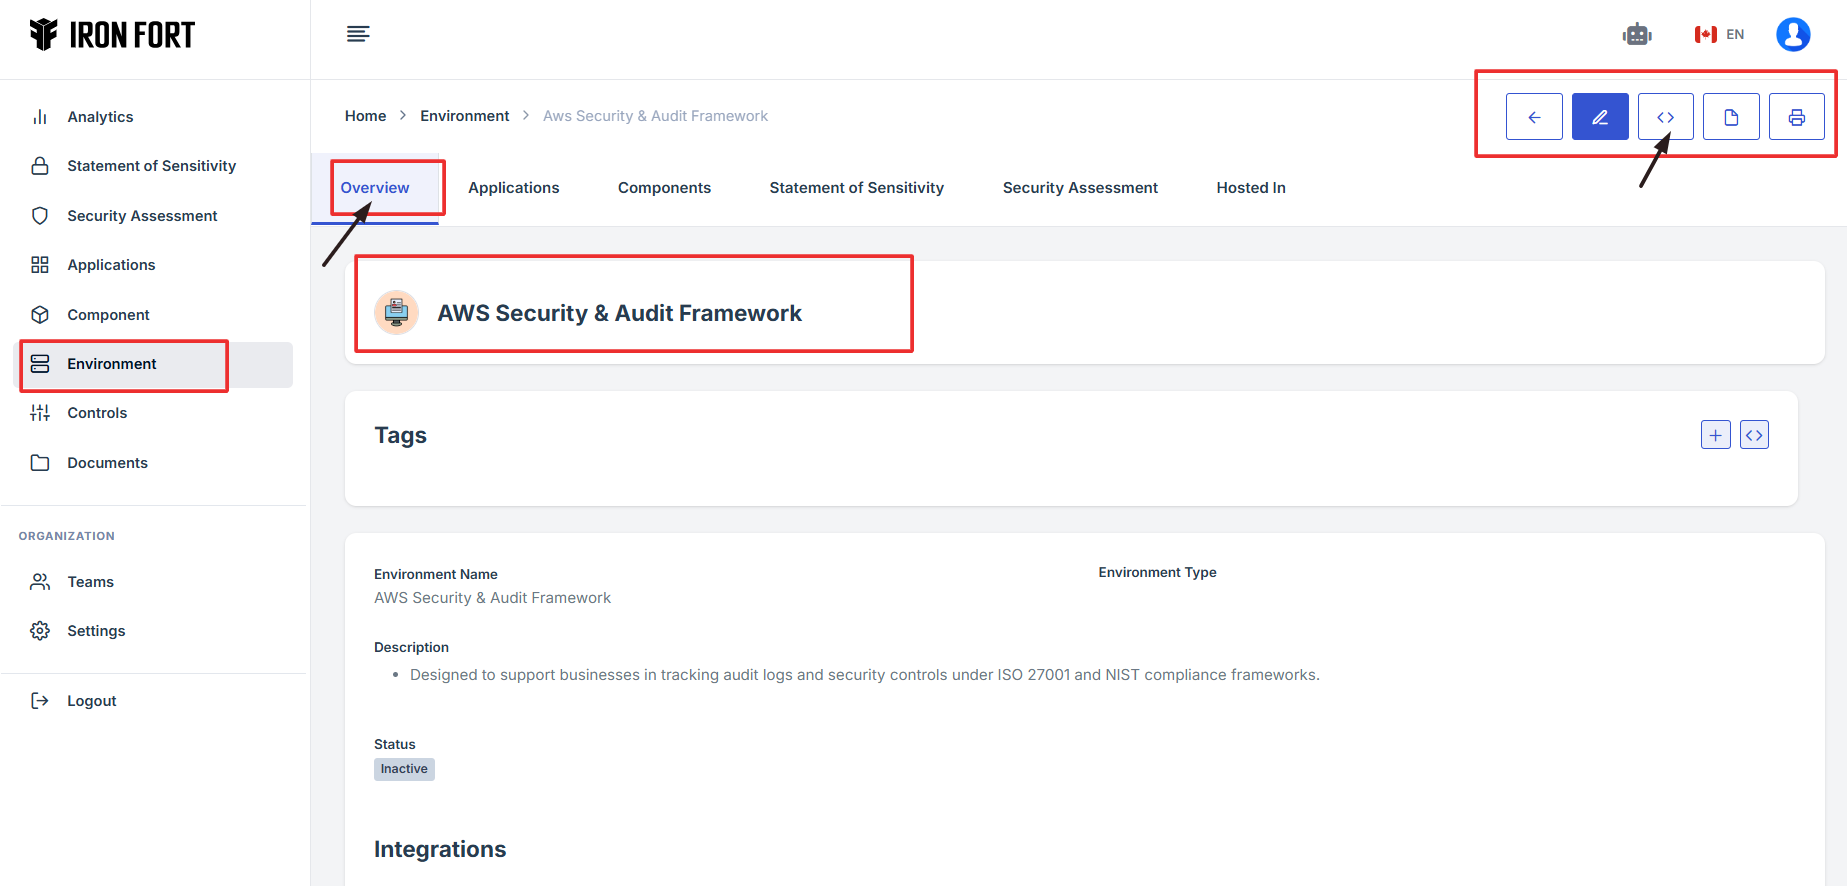
10. The user will be redirected to a new page.
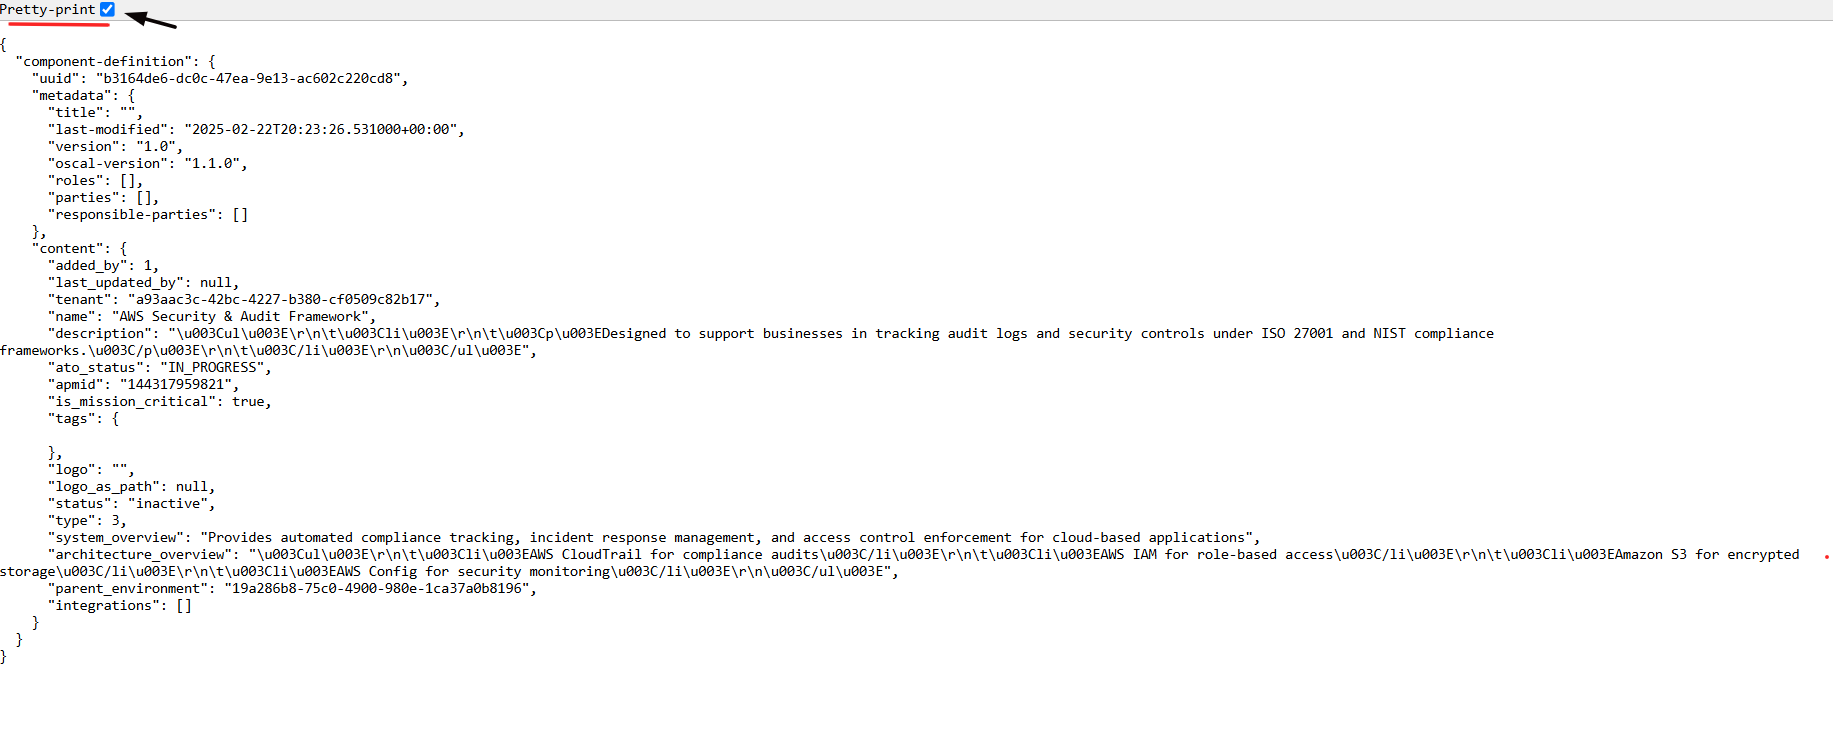
11. Select the Pretty-Print checkbox to format and view the OSCAL code in a structured layout.
-
How To: View OSCAL code for Control Set
- Navigate to your organization’s Iron Fort Compliance login page
- Log in to Your Account
- Check your email for the One-Time Password (OTP) sent on your email and enter the OTP to proceed
- Enter the OTP to verify your identity and click “validate.”
- Once logged in, a welcome prompt will appear displaying
- Move your cursor to the left side of the dashboard to display the menu.
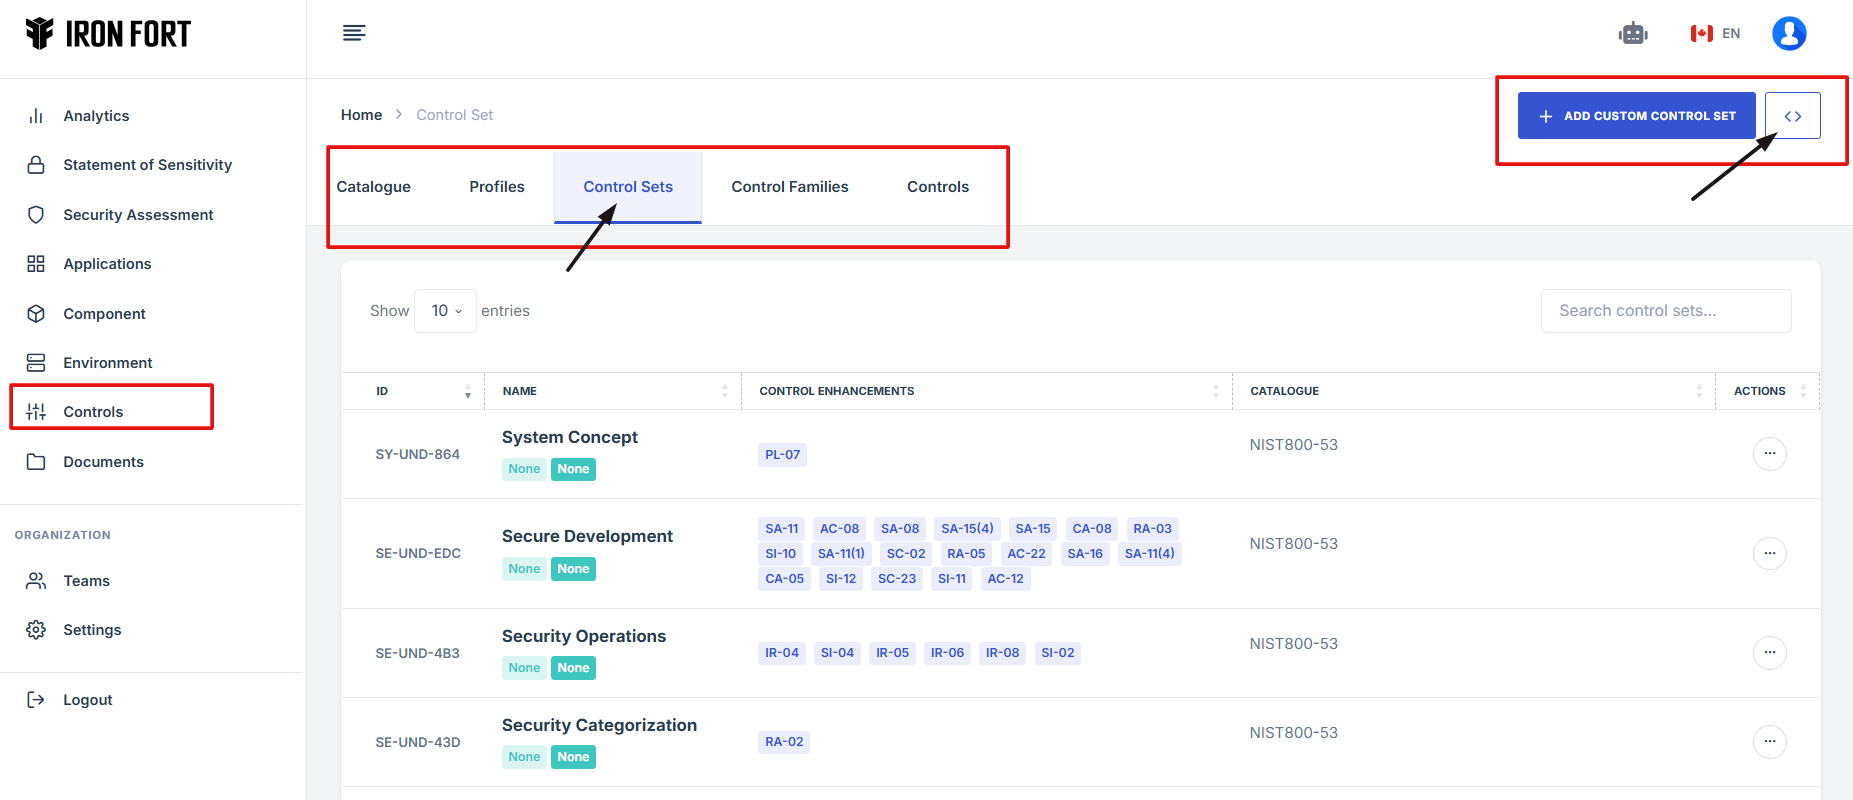
- Locate and click the Controls tab on the dashboard.
- Under the Control sets tab, click the expand icon (<>), located beside the add custom control set.
- The user will be redirected to a new page.
- Select the Pretty-Print checkbox to format and view the OSCAL code in a structured layout.
1. Navigate to your organization’s Iron Fort Compliance login page
For example: https://compliance-demo.ironfortdemos.com/en/login/?next=/en
2. Log in to Your Account
Enter your email and password to log in.
3. Check your email for the One-Time Password (OTP) sent on your email and enter the OTP to proceed.
4. Enter the OTP to verify your identity and click “validate.”
5. Once logged in, a welcome prompt will appear displaying
-
Tenant Key Information: Verifying your system access
-
User Email: Your registered email for auditing purposes
-
Last Login Details: To track your previous access
-
Iron Fort Support Email: For any login issues or concerns
NOTE: If you recognize the details and are authorized, click "OK" to continue. However, if you are not an authorized user, click "Logout" immediately to exit.
6. Move your cursor to the left side of the dashboard to display the menu.
7. Locate and click the Controls tab on the dashboard.
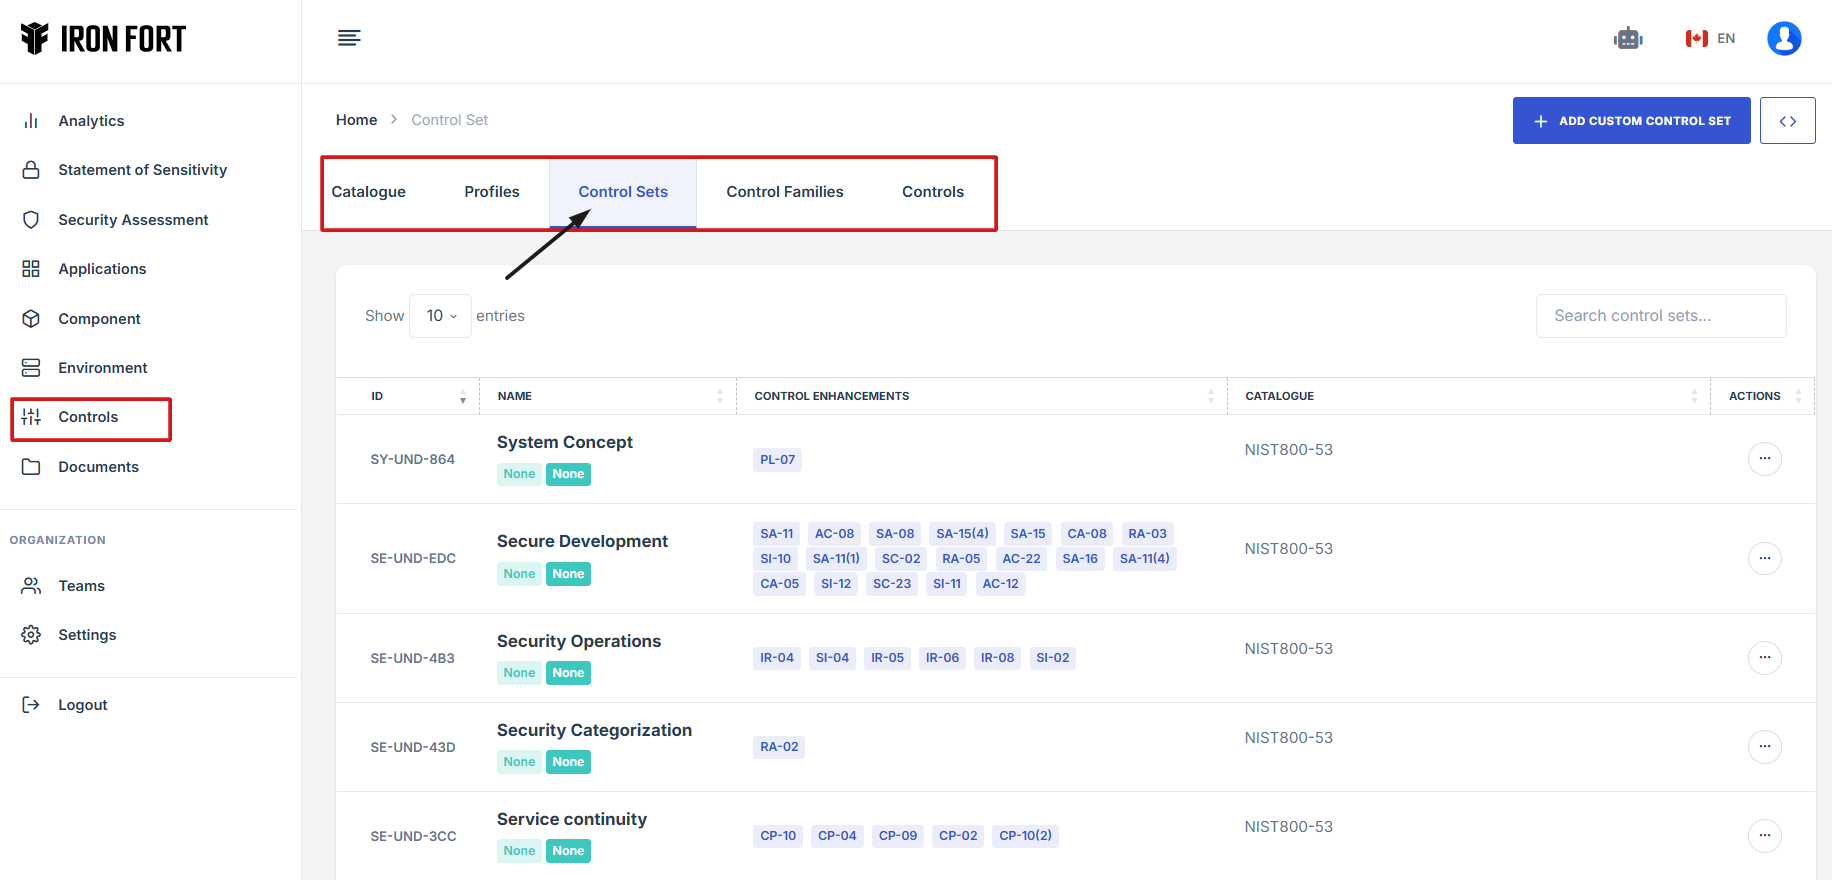
8. Under the Control sets tab, click the expand icon (<>), located beside the add custom control set.
9. The user will be redirected to a new page.
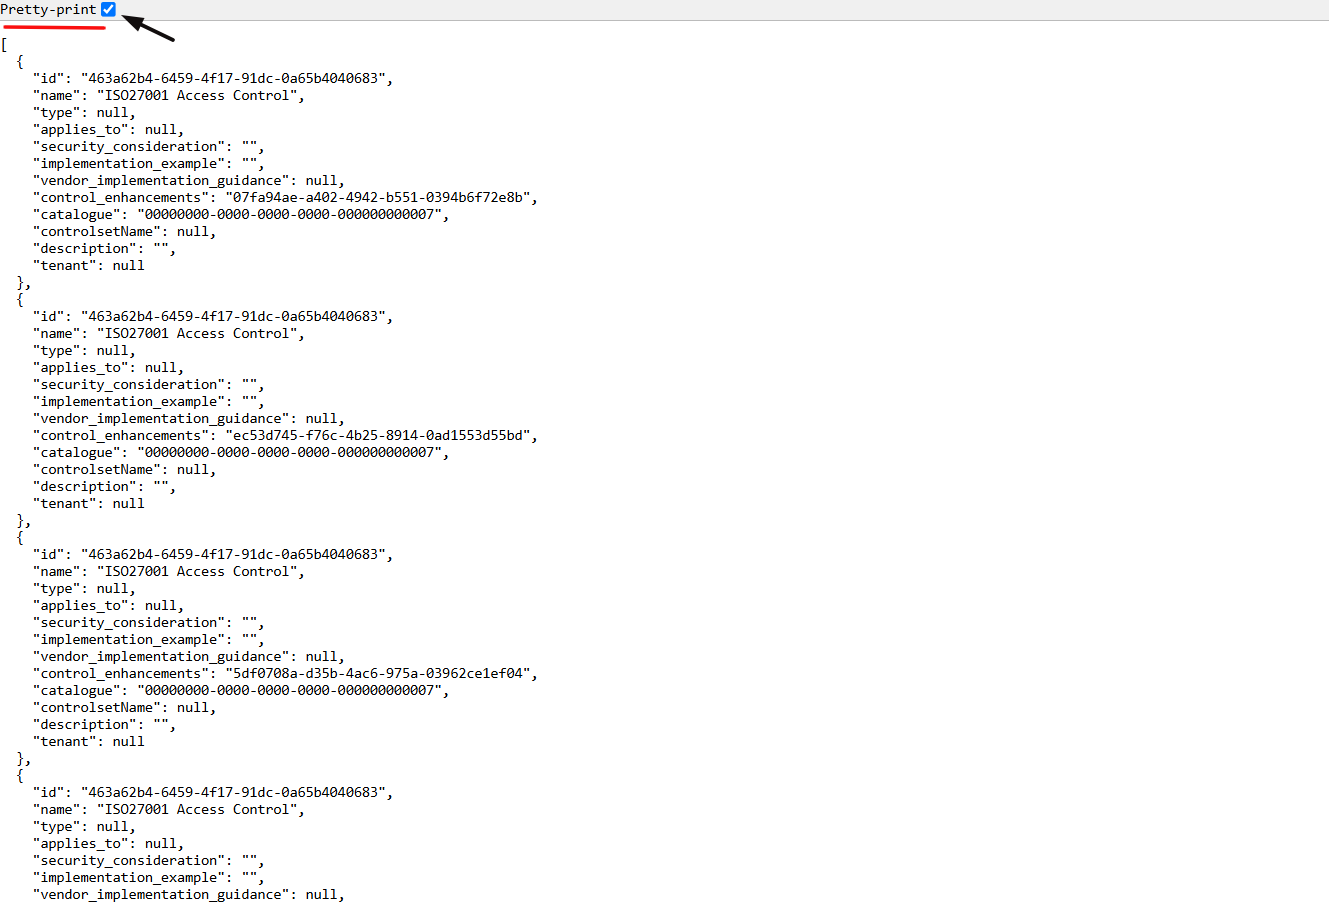
10. Select the Pretty-Print checkbox to format and view the OSCAL code in a structured layout.
-
How To: View OSCAL code for Security Assessment
- Navigate to your organization’s Iron Fort Compliance login page
- Log in to Your Account
- Check your email for the One-Time Password (OTP) sent on your email and enter the OTP to proceed
- Enter the OTP to verify your identity and click “validate.”
- Once logged in, a welcome prompt will appear displaying
- Move your cursor to the left side of the dashboard to display the menu
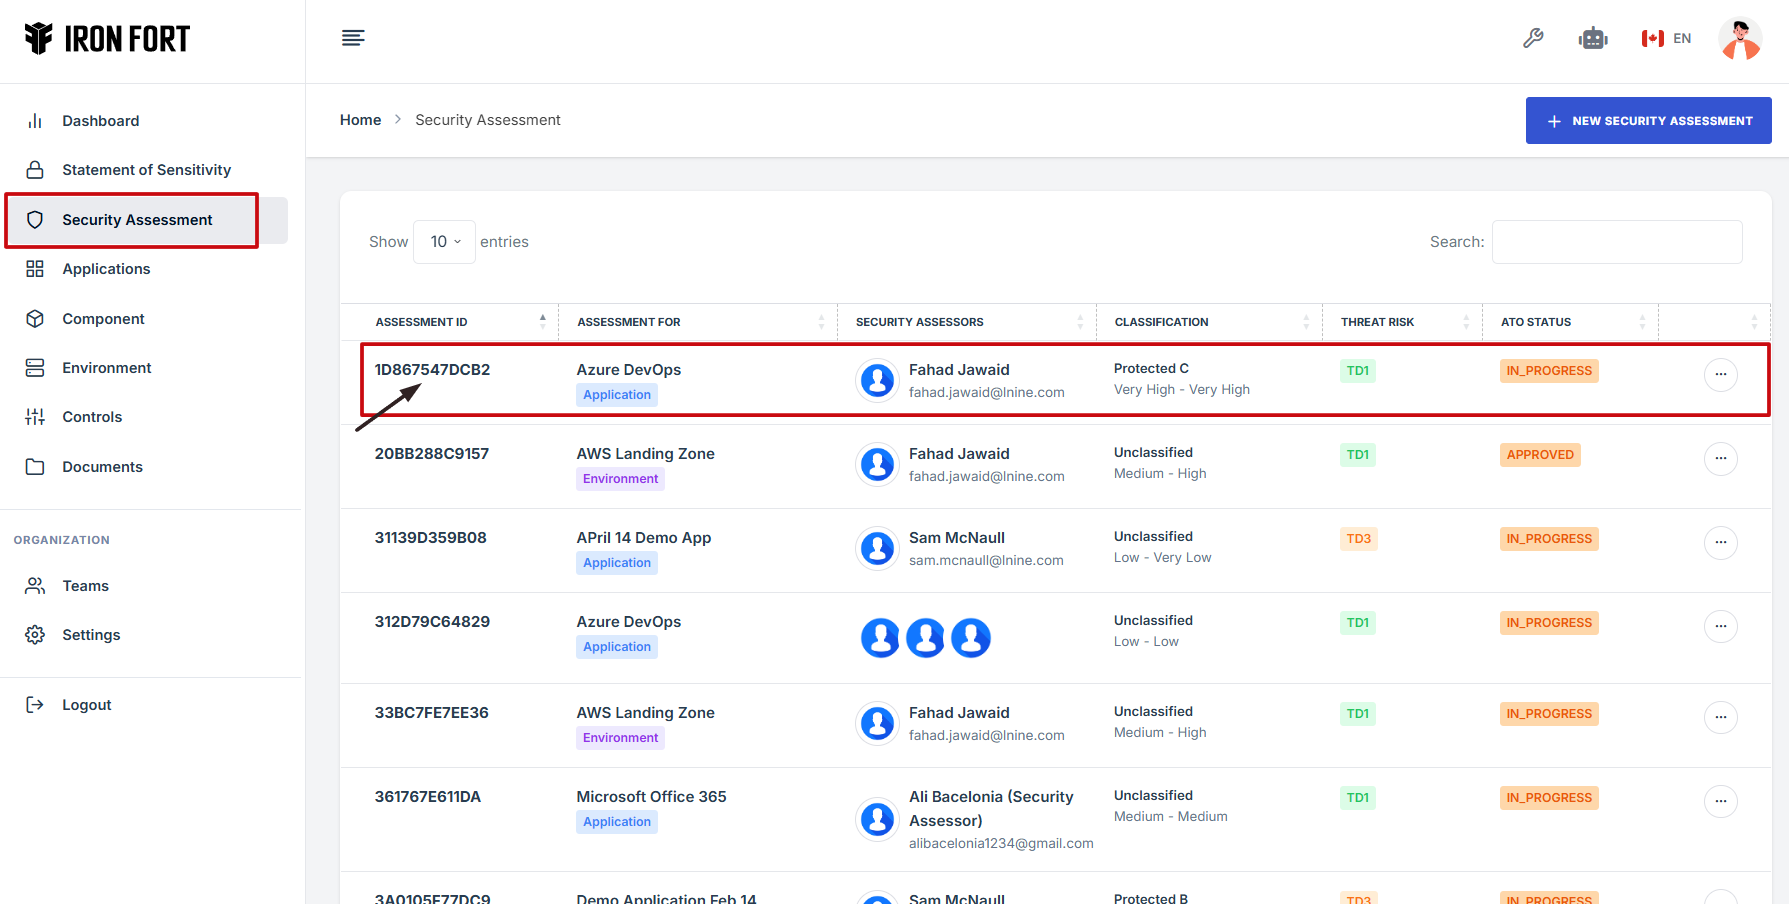
- Locate and click the Security Assessment tab on the dashboard
- Click the Assessment ID on the specific Security Assessment that you want to review
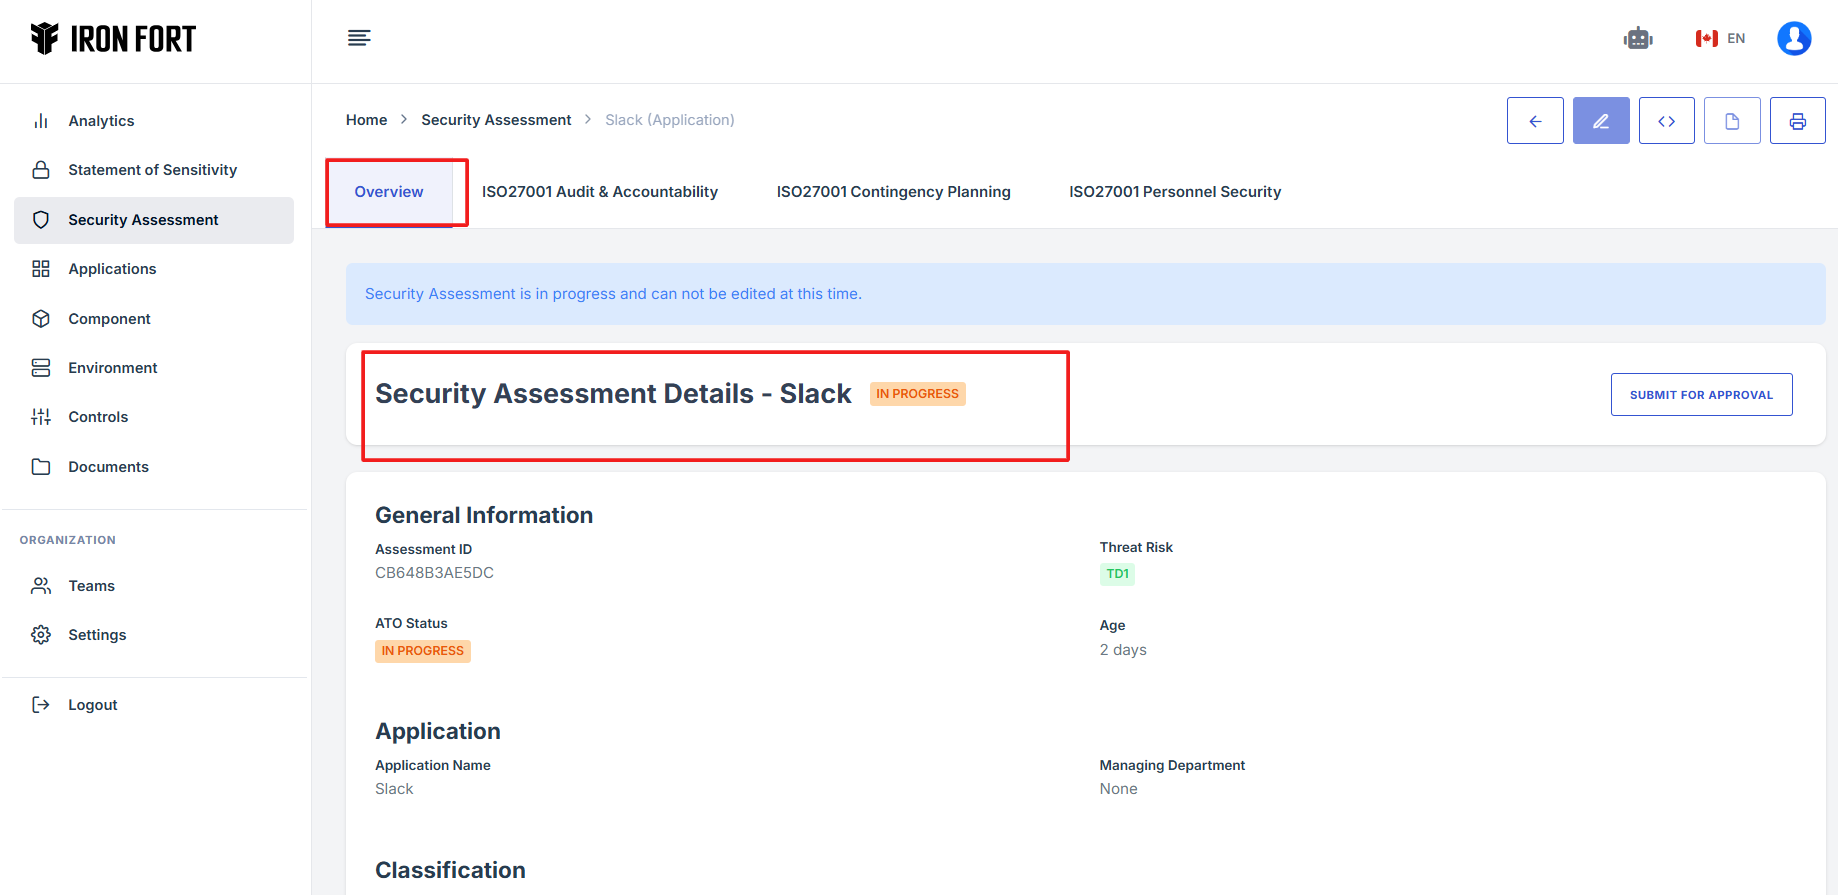
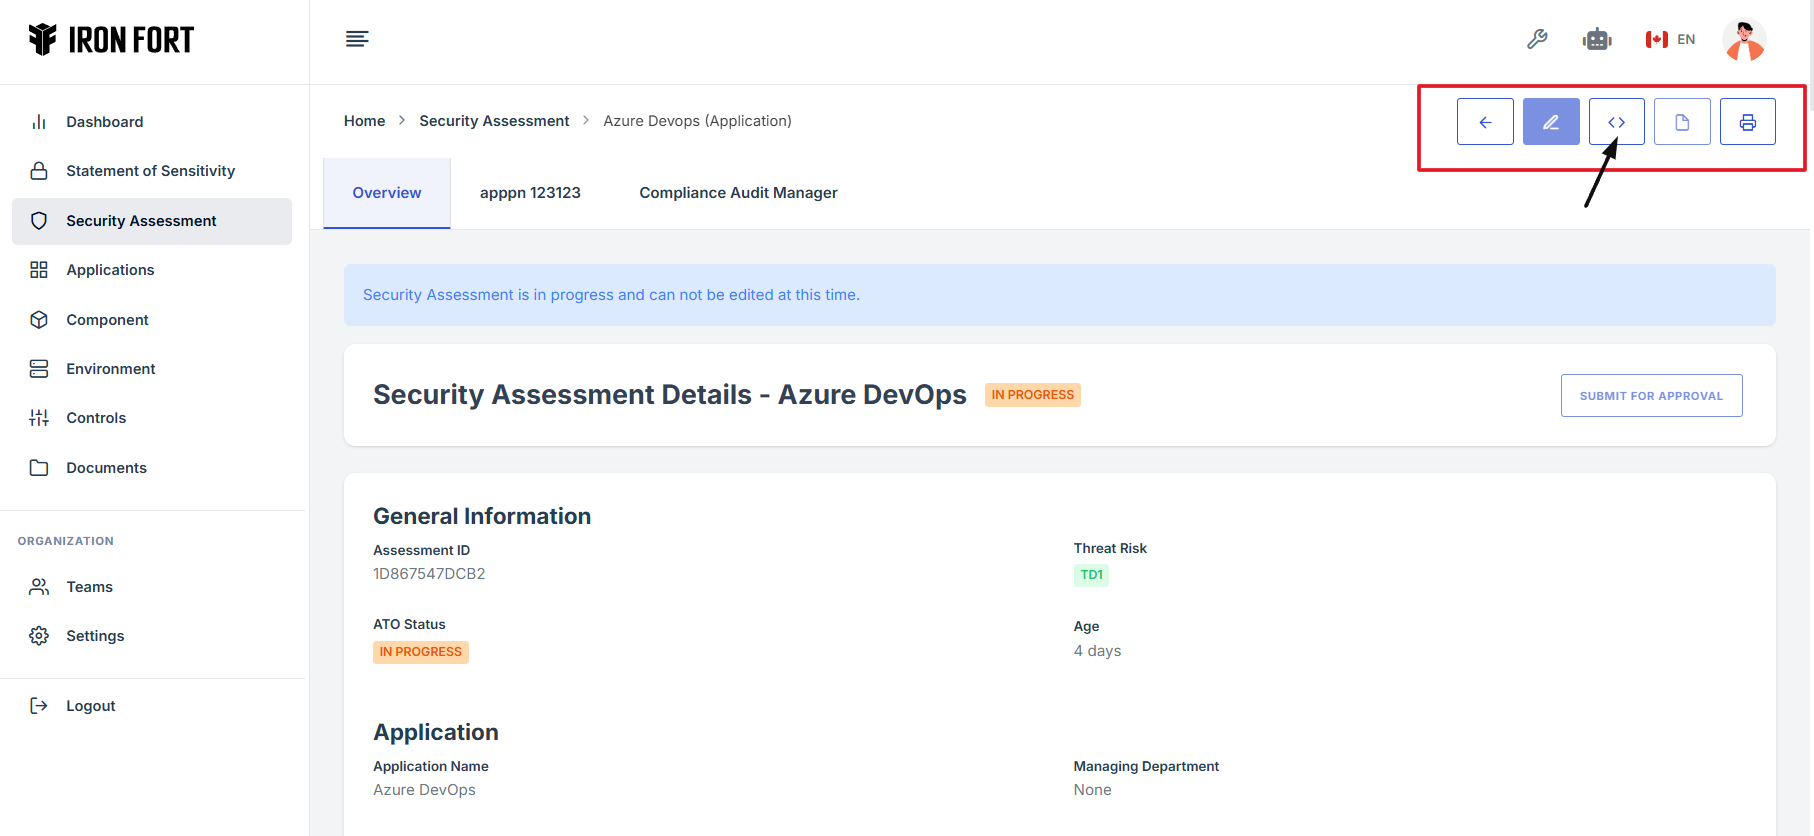
- After clicking the Assessment ID, you will be directed to the overview page
- Navigate on the toolbar on the upper right section
- Under the Overview tab, click the expand icon (<>)
- The user will be redirected to a new page.
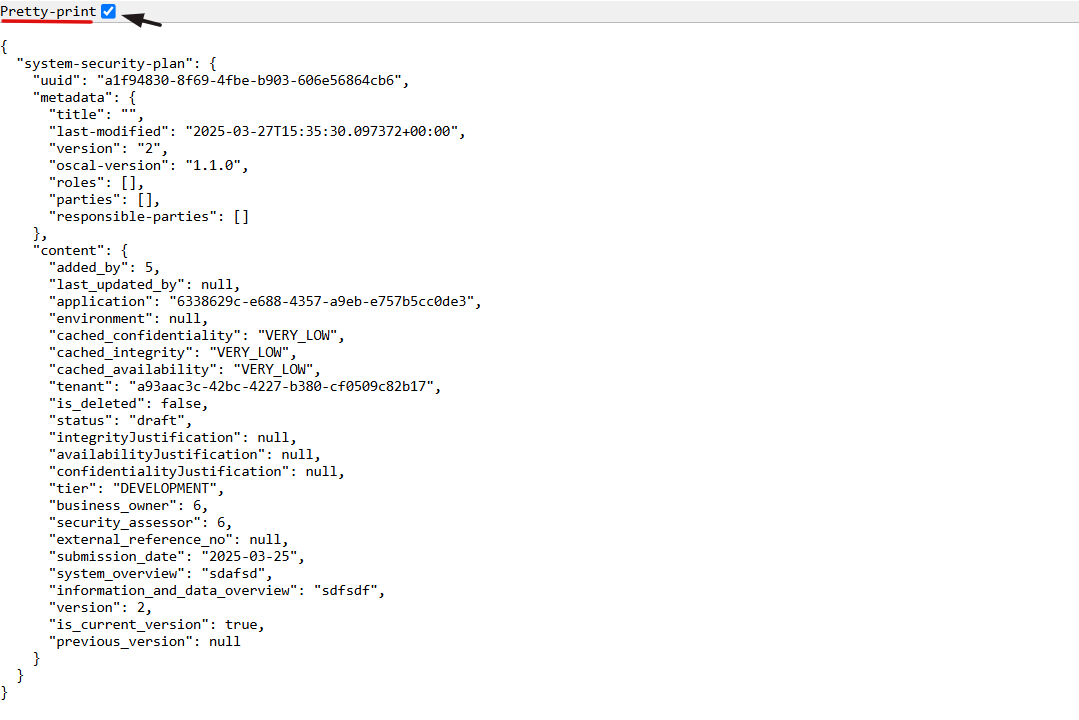
- Select the Pretty-Print checkbox to format and view the OSCAL code in a structured layout
1. Navigate to your organization’s Iron Fort Compliance login page
For example: https://compliance-demo.ironfortdemos.com/en/login/?next=/en
2. Log in to Your Account
Enter your email and password to log in.
3. Check your email for the One-Time Password (OTP) sent on your email and enter the OTP to proceed.
4. Enter the OTP to verify your identity and click “validate.”
5. Once logged in, a welcome prompt will appear displaying
-
Tenant Key Information: Verifying your system access
-
User Email: Your registered email for auditing purposes
-
Last Login Details: To track your previous access
-
Iron Fort Support Email: For any login issues or concerns
NOTE: If you recognize the details and are authorized, click "OK" to continue. However, if you are not an authorized user, click "Logout" immediately to exit.
6. Move your cursor to the left side of the dashboard to display the menu.
7. Locate and click the Security Assessment tab on the dashboard.
8. Click the Assessment ID on the specific Security Assessment that you want to review.
9. After clicking the Assessment ID, you will be directed to the overview page.
10. Navigate on the toolbar on the upper right section.
11. Under the Overview tab, click the expand icon (<>)
Located in the top-right corner under the user profile picture.
12. The user will be redirected to a new page.

13. Select the Pretty-Print checkbox to format and view the OSCAL code in a structured layout.
-
How To: View OSCAL code for Profile in Controls
- Navigate to your organization’s Iron Fort Compliance login page
- Log in to Your Account
- Check your email for the One-Time Password (OTP) sent on your email and enter the OTP to proceed
- Enter the OTP to verify your identity and click “validate.”
- Once logged in, a welcome prompt will appear displaying
- Move your cursor to the left side of the dashboard to display the menu
- Locate and click the Controls tab on the dashboard
- Under the Controls tab, go to the Profile section
- Locate the toolbar in the upper-right corner of the screen
- Click the Expand icon (<>) to view the extended or detailed interface options
- The user will be redirected to a new page
- Select the Pretty-Print checkbox to format and view the OSCAL code in a structured layout
1. Navigate to your organization’s Iron Fort Compliance login page
For example: https://compliance-demo.ironfortdemos.com/en/login/?next=/en
2. Log in to Your Account
Enter your email and password to log in.
3. Check your email for the One-Time Password (OTP) sent on your email and enter the OTP to proceed.
4. Enter the OTP to verify your identity and click “validate.”
5. Once logged in, a welcome prompt will appear displaying
-
Tenant Key Information: Verifying your system access
-
User Email: Your registered email for auditing purposes
-
Last Login Details: To track your previous access
-
Iron Fort Support Email: For any login issues or concerns
NOTE: If you recognize the details and are authorized, click "OK" to continue. However, if you are not an authorized user, click "Logout" immediately to exit.
6. Move your cursor to the left side of the dashboard to display the menu.
7. Locate and click the Controls tab on the dashboard.
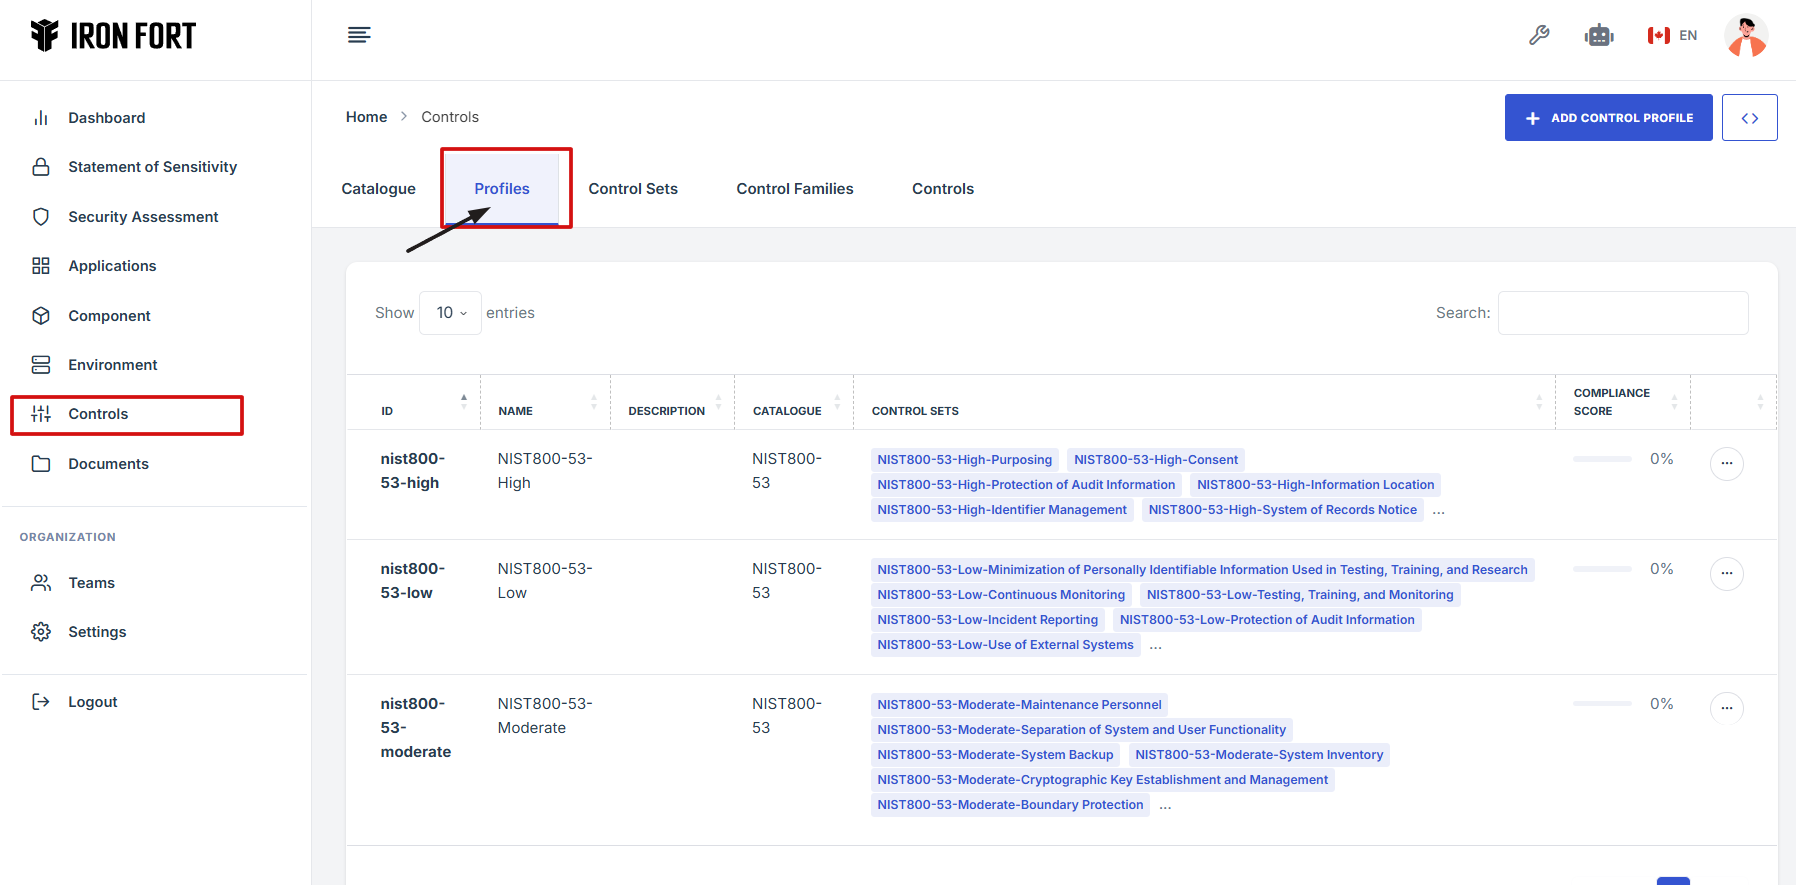
8. Under the Controls tab, go to the Profile section.
9. Locate the toolbar in the upper-right corner of the screen.
10. Click the Expand icon (<>) to view the extended or detailed interface options.
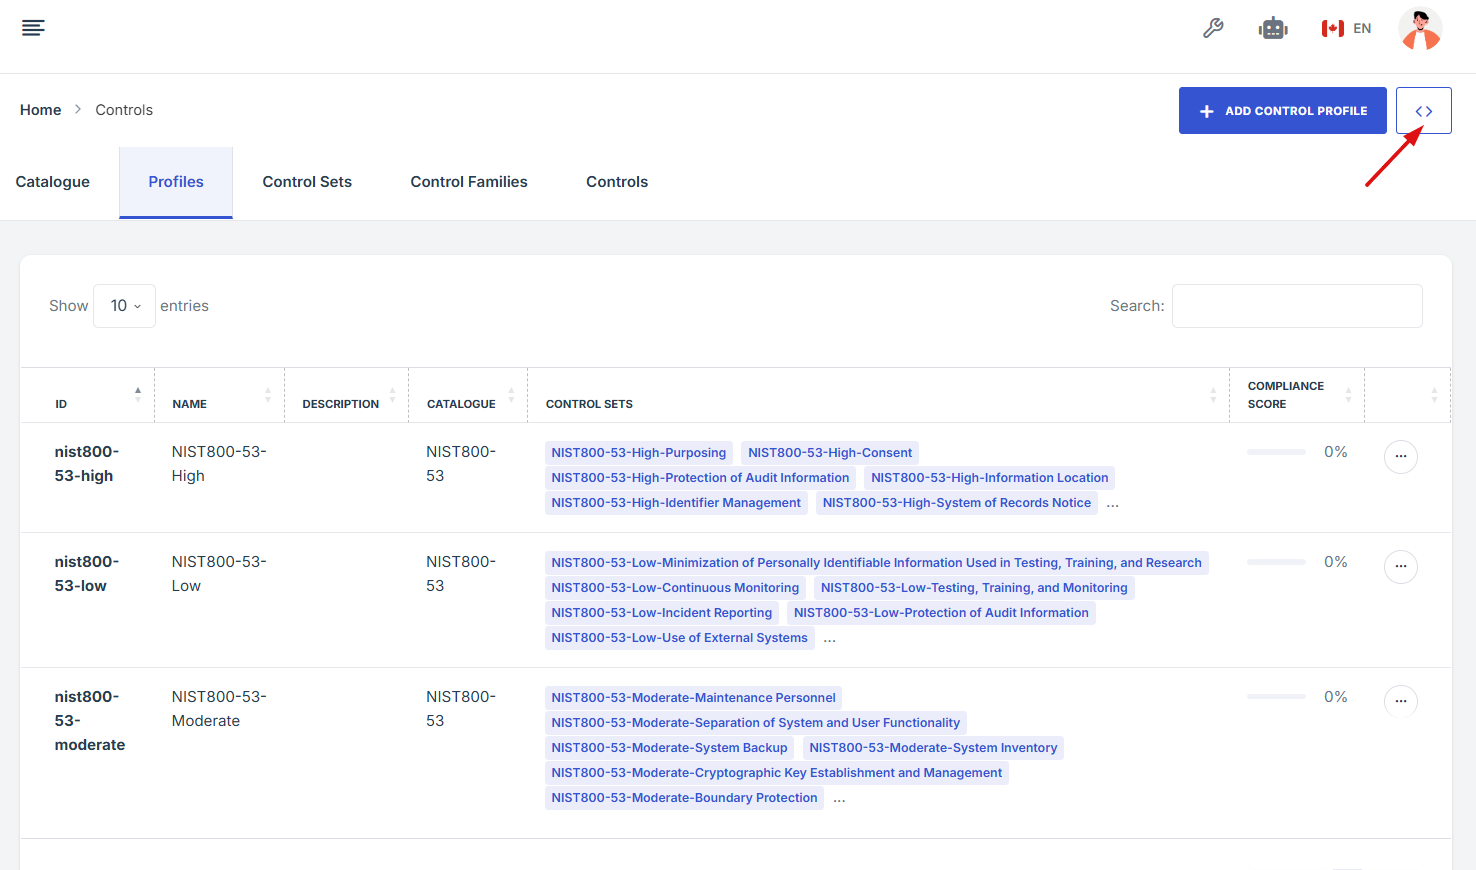
11. The user will be redirected to a new page.
