
How To Guidelines in Control Set
This page explains what a control set is within the Iron Fort Compliance system, detailing its purpose, components, and how it helps in maintaining compliance with industry standards.
Control sets help organizations manage and maintain compliance with industry standards such as ISO, PCI-DSS, and other regulatory frameworks. They consist of predefined security, privacy, and operational controls that ensure a company meets its compliance obligations. These controls are used to document policies, track implementation, and demonstrate adherence to regulatory requirements during audits.
Management and leadership rely on control sets to organize and maintain the necessary documentation required for compliance. Each control is mapped to a specific requirement, allowing teams to systematically track their progress and address any gaps. During an audit, control sets provide a structured way to present evidence, making it easier for auditors to verify compliance.
Common use cases include tracking policies and procedures related to data security, managing employee access controls, ensuring proper encryption standards, and documenting risk assessments. By structuring these controls within a centralized system, organizations can efficiently maintain compliance, reduce audit preparation time, and quickly respond to regulatory changes.
-
How To: Create a new Control Set
- Navigate to your organization’s Iron Fort Compliance login page
- Log in to Your Account
- Check your email for the One-Time Password (OTP) sent on your email and enter the OTP to proceed
- Once logged in, a welcome prompt will appear displaying
- Move your cursor to the left side of the dashboard to reveal the menu
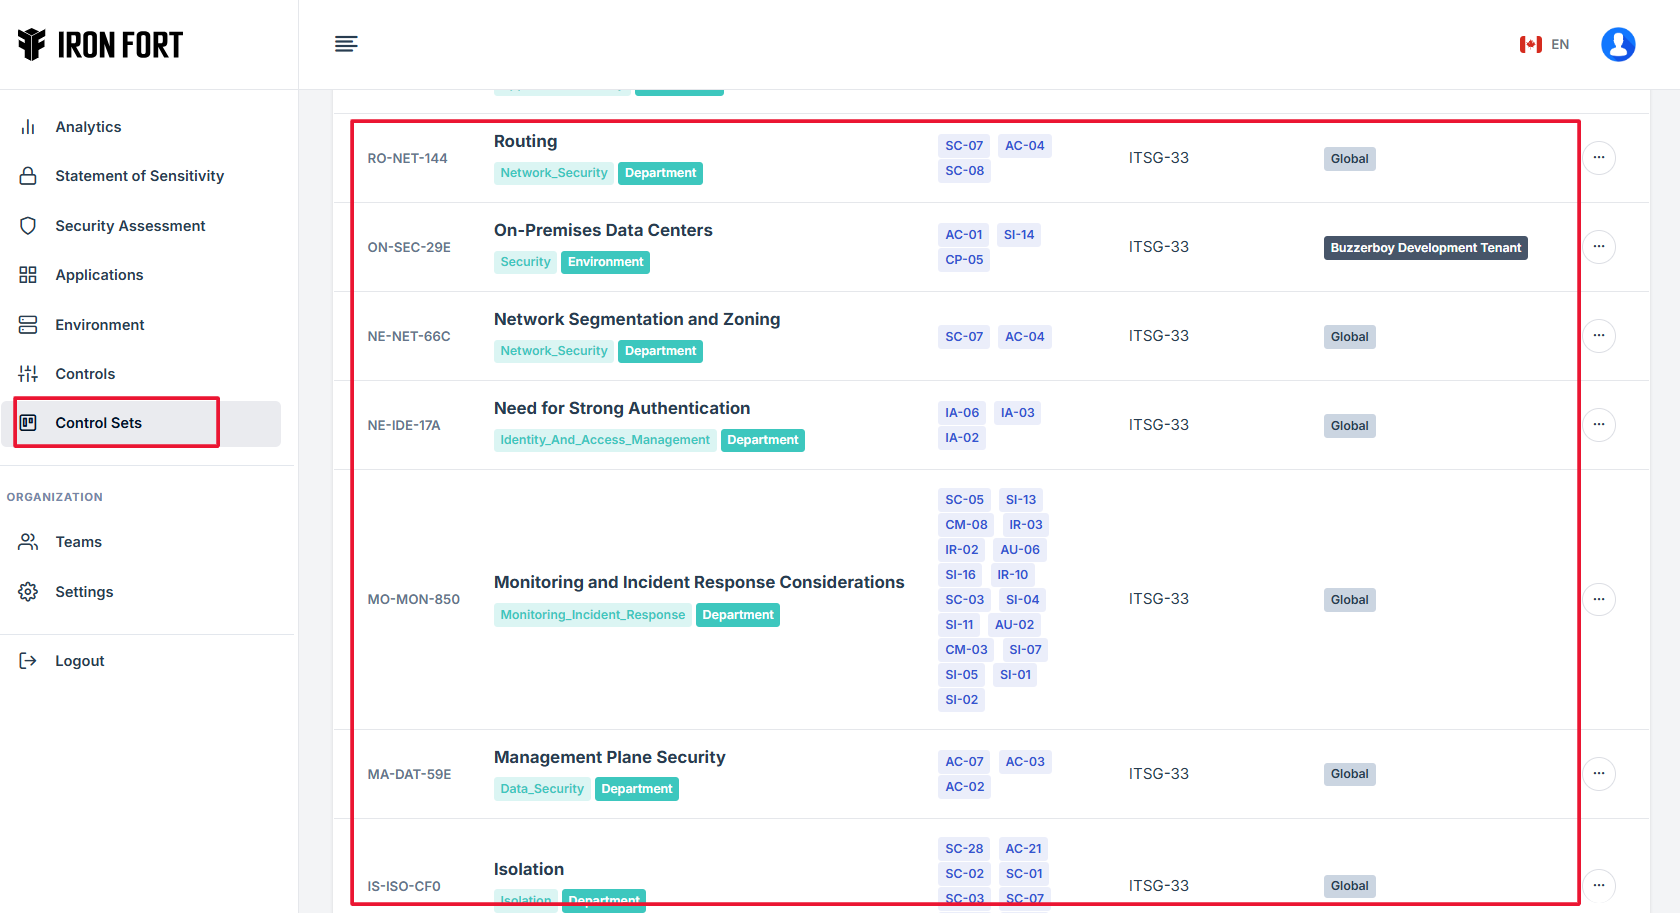
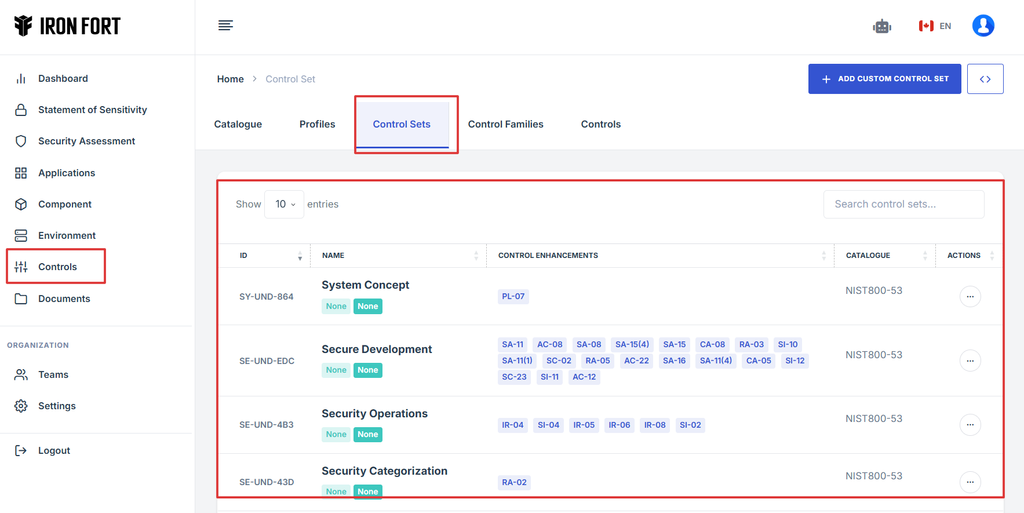
- Click the Control tab on the dashboard.
- This will open the Controls management panel and navigate to Control Sets tab.
- Click Add Custom Control Set to begin setting up a new control set
- This will open a form where you can input the necessary details for the new control set
- To configure the control set properly, complete the following fields
- Assign a Control enhancement to enhance the effectiveness and coverage of standard controls to meet higher compliance or security levels.
- Click Save to finalize the control set setup
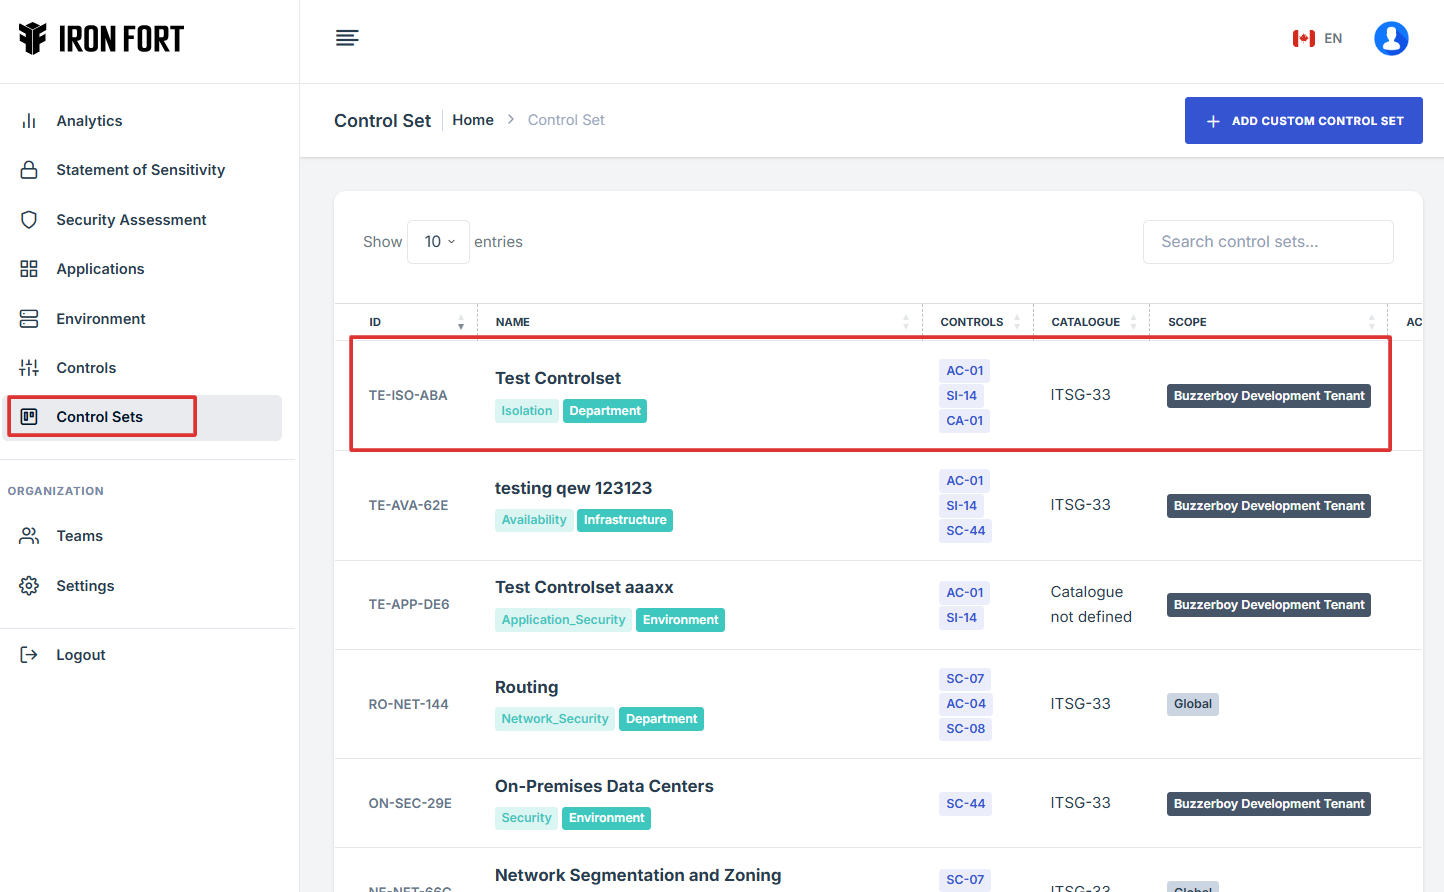
- Navigate back to the Control Sets section and search for the name of the newly created control set to ensure it appears in the list.
- Verify that the Control Set Name, Type, and Applies To fields are correctly displayed
- If necessary, edit the control set to make any adjustments
- NOTE
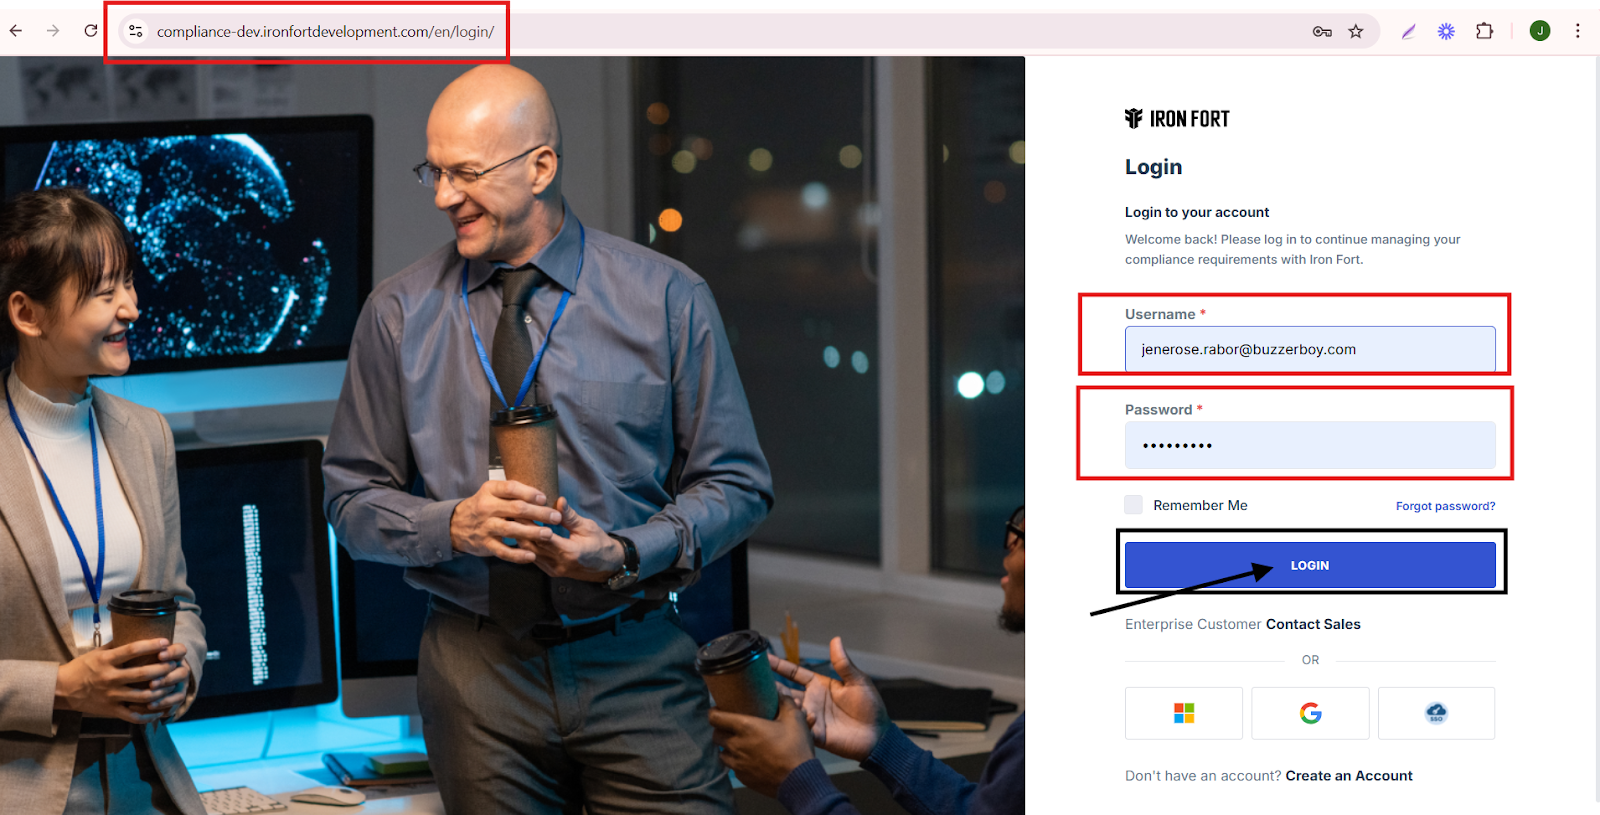
1. Navigate to your organization’s Iron Fort Compliance login page
For example: https://compliance-demo.ironfortdemos.com/en/login/?next=/en
2. Log in to Your Account
Enter your email and password to log in.
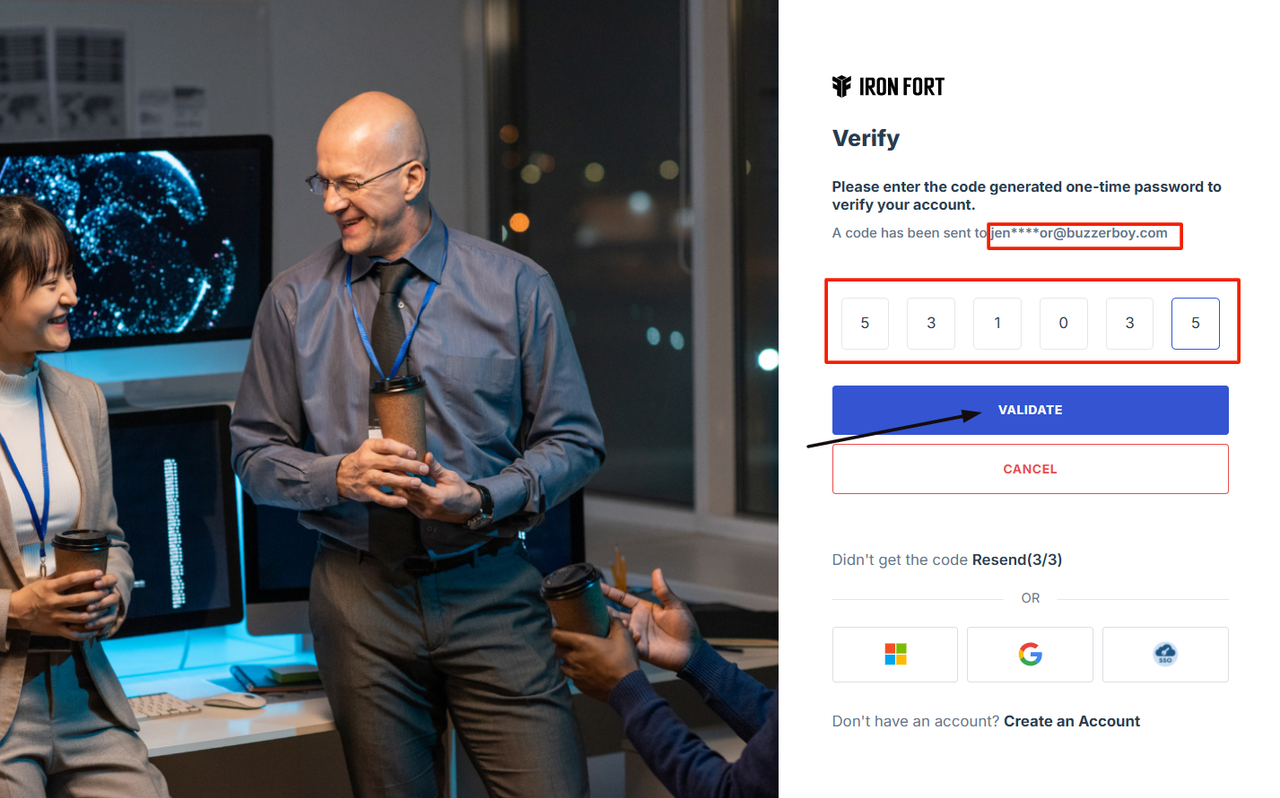
3. Check your email for the One-Time Password (OTP) sent on your email and enter the OTP to proceed.
4. Once logged in, a welcome prompt will appear displaying
-
Tenant Key Information: Verifying your system access
-
User Email: Your registered email for auditing purposes
-
Last Login Details: To track your previous access
-
Iron Fort Support Email: For any login issues or concerns
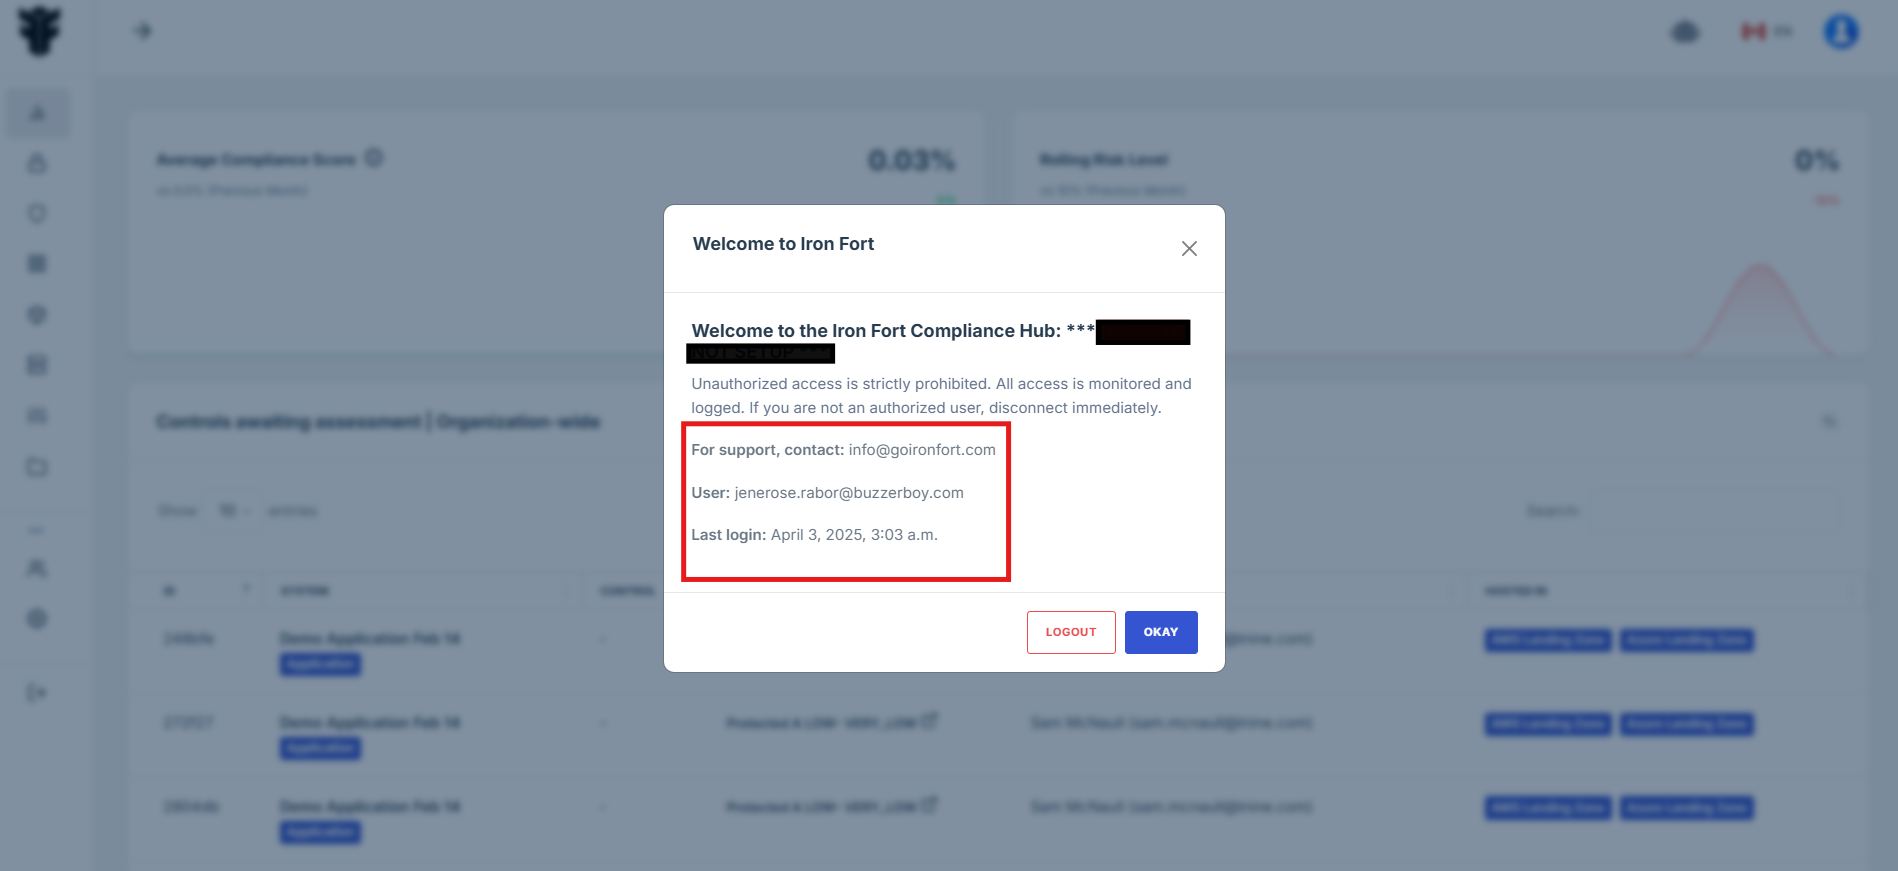
NOTE: If you recognize the details and are authorized, click "OK" to continue. However, if you are not an authorized user, click "Logout" immediately to exit.
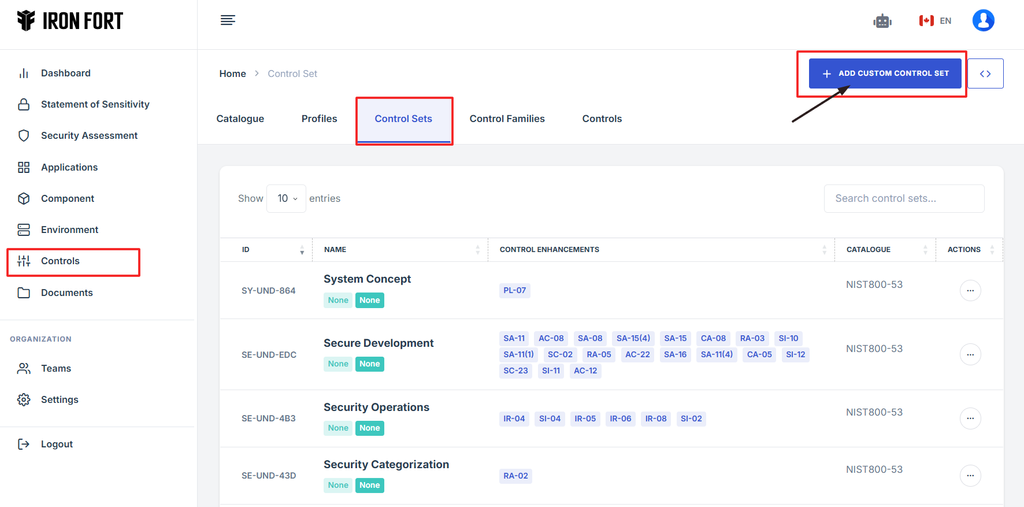
5. Move your cursor to the left side of the dashboard to reveal the menu.
6. Click the Control tab on the dashboard.
7. This will open the Controls management panel and navigate to Control Sets tab.
8. Click Add Custom Control Set to begin setting up a new control set
9. This will open a form where you can input the necessary details for the new control set.
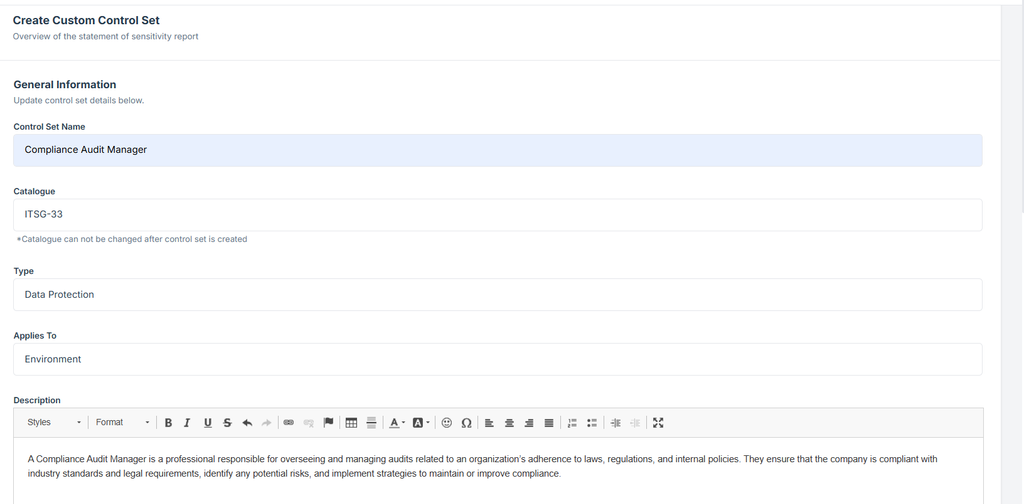
10. To configure the control set properly, complete the following fields
- Control Set Name: Enter a name related to the environment you created.
- Catalogue: Select the applicable security or compliance framework.
- Type: Select the control set type based on its function.
- Applies To: Define where this control set will be applied.
- Description: Provide a summary of the control set's role and responsibilities.
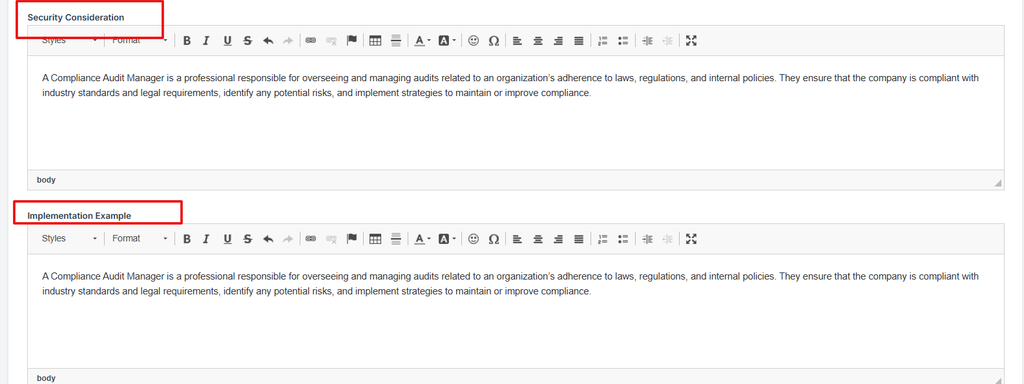
- Security Consideration: Provide a brief description of the security measures implemented.
- Implementation Example: Give an example of how this control set is used in practice.
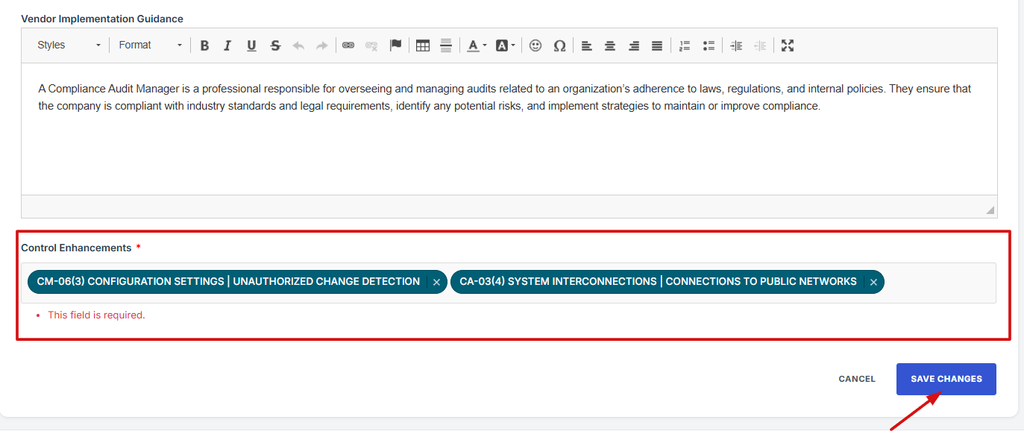
- Vendor Implementation Guidance: Offer clear steps or recommendations for vendors to support this control set.
11. Assign a Control enhancement to enhance the effectiveness and coverage of standard controls to meet higher compliance or security levels.
12. Click Save to finalize the control set setup.
13. Navigate back to the Control Sets section and search for the name of the newly created control set to ensure it appears in the list.
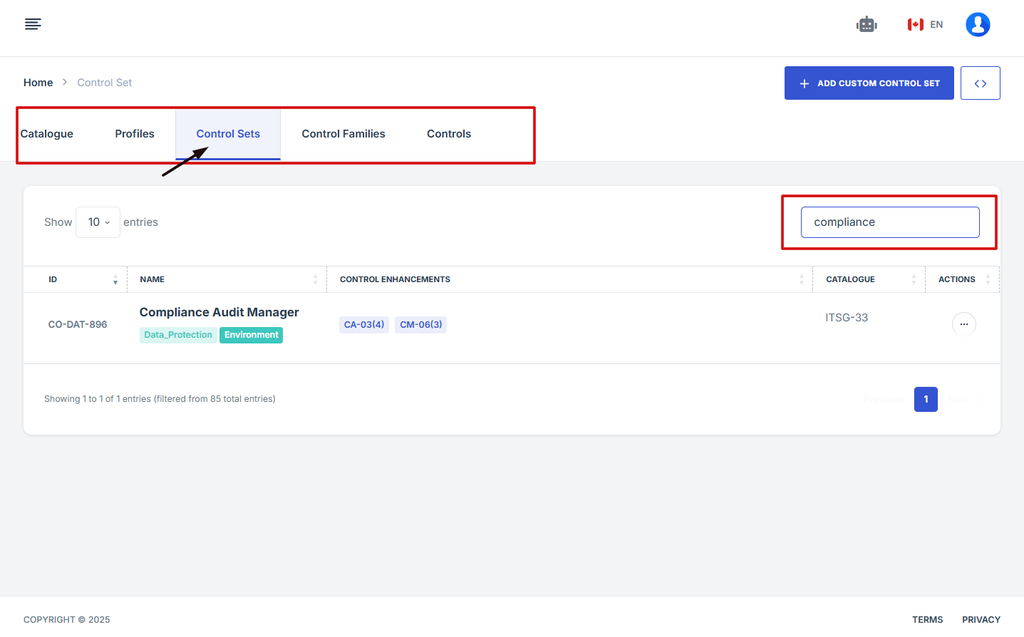
14. Verify that the Control Set Name, Type, and Applies To fields are correctly displayed.
15. If necessary, edit the control set to make any adjustments.
16. Note
Control Set is a standard control set that follows predefined frameworks, industry standards, or compliance requirements. It typically includes a structured list of security and compliance controls that organizations must adhere to.
-
What control sets are available by default?
- Navigate to your organization’s Iron Fort Compliance login page
- Log in to Your Account
- Check your email for the One-Time Password (OTP) sent on your email and enter the OTP to proceed
- Move your cursor to the left side of the dashboard to reveal the menu
- Click the Control sets tab on the dashboard.
- After, you will be redirected to a list of available default control sets.
1. Navigate to your organization’s Iron Fort Compliance login page
For example: https://compliance-demo.ironfortdemos.com/en/login/?next=/en
2. Log in to Your Account
Enter your email and password to log in.
3. Check your email for the One-Time Password (OTP) sent on your email and enter the OTP to proceed.
4. Move your cursor to the left side of the dashboard to reveal the menu.
5. Click the Control sets tab on the dashboard.
6. After, you will be redirected to a list of available default control sets.
-
How To: List existing control sets
- Navigate to your organization’s Iron Fort Compliance login page
- Log in to Your Account
- Check your email for the One-Time Password (OTP) sent on your email and enter the OTP to proceed
- Once logged in, a welcome prompt will appear displaying
- Move your cursor to the left side of the dashboard to reveal the menu
- Click the Control sets tab on the dashboard.
- To list existing control sets simply click on the control set item on the left side.
1. Navigate to your organization’s Iron Fort Compliance login page
For example: https://compliance-demo.ironfortdemos.com/en/login/?next=/en
2. Log in to Your Account
Enter your email and password to log in.
3. Check your email for the One-Time Password (OTP) sent on your email and enter the OTP to proceed.
4. Once logged in, a welcome prompt will appear displaying
- Tenant Key Information: Verifying your system access
- User Email: Your registered email for auditing purposes
- Last Login Details: To track your previous access
- Iron Fort Support Email: For any login issues or concerns
NOTE: If you recognize the details and are authorized, click "OK" to continue. However, if you are not an authorized user, click "Logout" immediately to exit.
5. Move your cursor to the left side of the dashboard to reveal the menu.
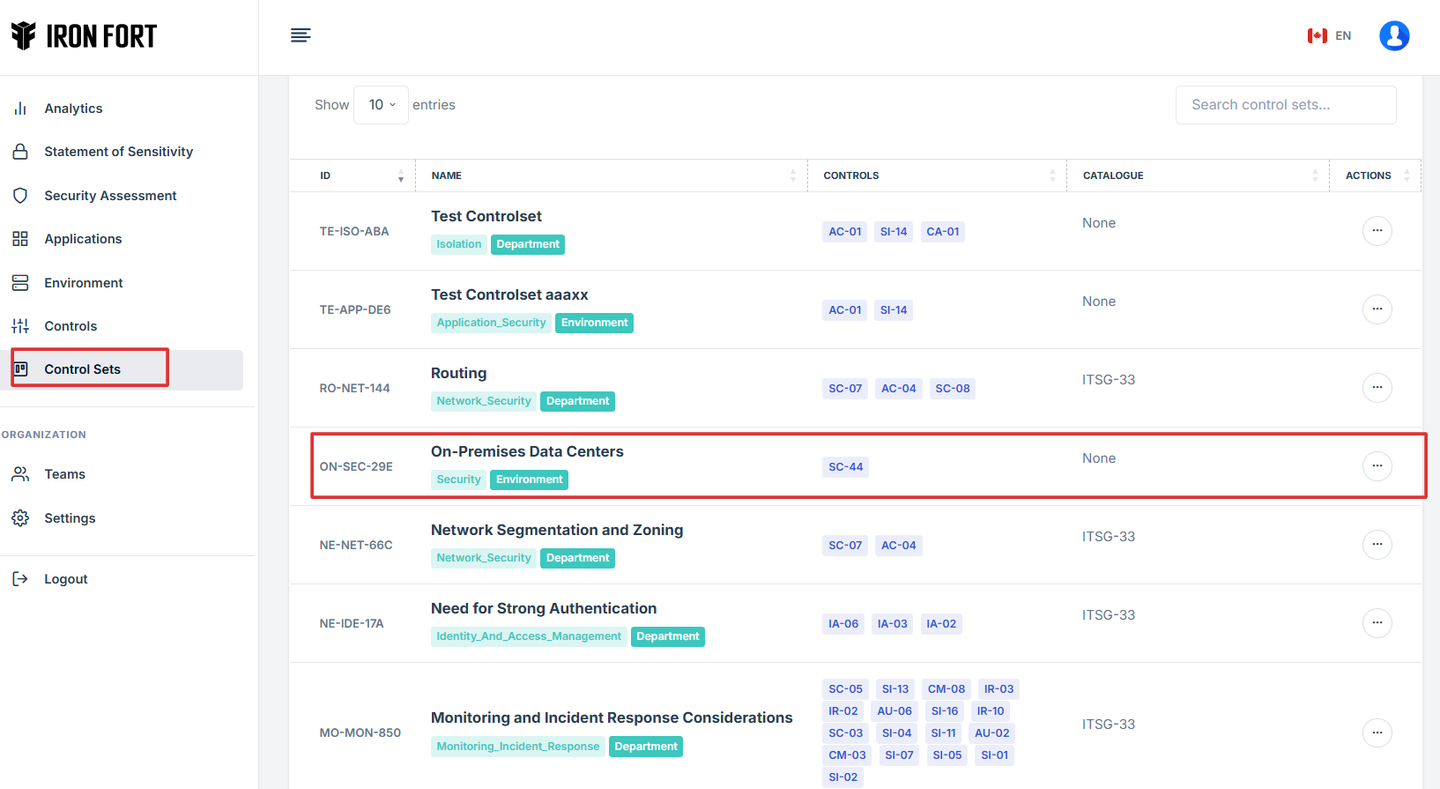
6. Click the Control sets tab on the dashboard.
This will open the Control Sets management panel
7. To list existing control sets simply click on the control set item on the left side.

-
How To: Edit a control set?
- Navigate to your organization’s Iron Fort Compliance login page
- Log in to Your Account
- Check your email for the One-Time Password (OTP) sent on your email and enter the OTP to proceed
- Once logged in, a welcome prompt will appear displaying
- Move your cursor to the left side of the dashboard to reveal the menu
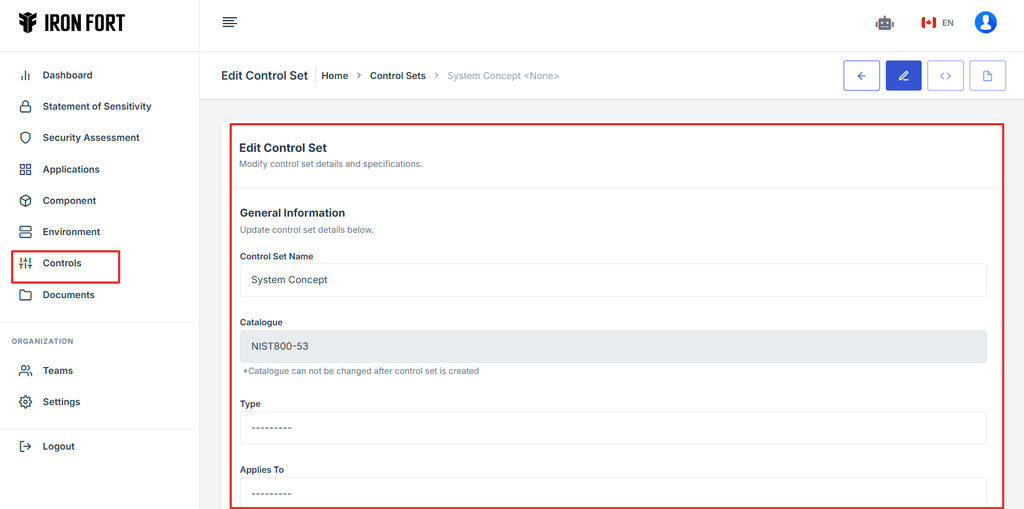
- Click the Control tab on the dashboard and navigate to Control Sets tab.
- In the Control Sets section, browse the list of available control sets.
- Click on the control set you want to edit.
- Once inside the selected control set, you will see its detailed information.
- Locate the pen (edit) icon at the top right corner of the page.
- Click the pen icon to enter edit mode, allowing you to modify the control set’s details.
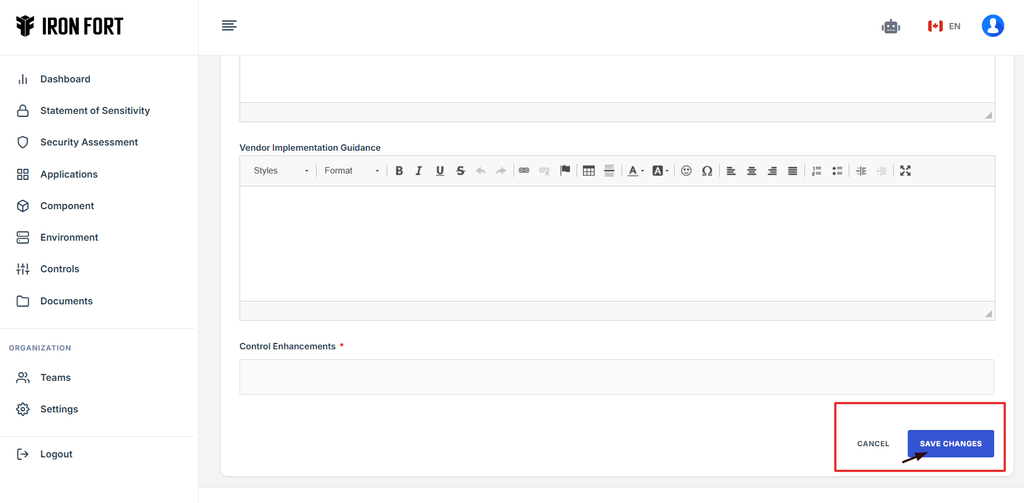
- Review the existing control set information and make the necessary changes.
- After making the required updates, review your changes for accuracy.
- Click the Save Changes button at the bottom of the page to apply the modifications.
- Your control set is now updated with the revised details.
1. Navigate to your organization’s Iron Fort Compliance login page
For example: https://compliance-demo.ironfortdemos.com/en/login/?next=/en
2. Log in to Your Account
Enter your email and password to log in.
3. Check your email for the One-Time Password (OTP) sent on your email and enter the OTP to proceed.
4. Once logged in, a welcome prompt will appear displaying
- Tenant Key Information: Verifying your system access
- User Email: Your registered email for auditing purposes
- Last Login Details: To track your previous access
- Iron Fort Support Email: For any login issues or concerns
NOTE: If you recognize the details and are authorized, click "OK" to continue. However, if you are not an authorized user, click "Logout" immediately to exit.
5. Move your cursor to the left side of the dashboard to reveal the menu.
6. Click the Control tab on the dashboard and navigate to Control Sets tab.
7. In the Control Sets section, browse the list of available control sets.
8. Click on the control set you want to edit.
9. Once inside the selected control set, you will see its detailed information.
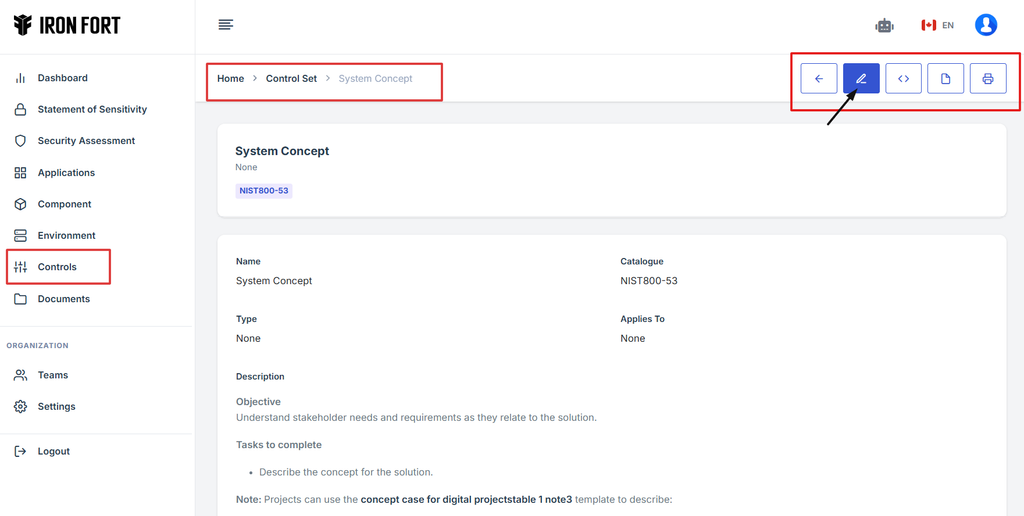
10. Locate the pen (edit) icon at the top right corner of the page.
11. Click the pen icon to enter edit mode, allowing you to modify the control set’s details.
12. Review the existing control set information and make the necessary changes.
13. After making the required updates, review your changes for accuracy.
14. Click the Save Changes button at the bottom of the page to apply the modifications.
15. Your control set is now updated with the revised details.
-
How To: Create a new custom Control Set
- Navigate to your organization’s Iron Fort Compliance login page
- Log in to Your Account
- Check your email for the One-Time Password (OTP) sent on your email and enter the OTP to proceed
- Once logged in, a welcome prompt will appear displaying
- Move your cursor to the left side of the dashboard to reveal the menu
- Click the Control tab on the dashboard.
- This will open the Controls management panel and navigate to Control Sets tab.
- Click Add Custom Control Set to begin setting up a new control set
- This will open a form where you can input the necessary details for the new control set
- To configure the control set properly, complete the following fields
- Assign a Control enhancement to enhance the effectiveness and coverage of standard controls to meet higher compliance or security levels.
- Click Save to finalize the control set setup
- Navigate back to the Control Sets section and search for the name of the newly created control set to ensure it appears in the list.
- Verify that the Control Set Name, Type, and Applies To fields are correctly displayed
- If necessary, edit the control set to make any adjustments
- NOTE
1. Navigate to your organization’s Iron Fort Compliance login page
For example: https://compliance-demo.ironfortdemos.com/en/login/?next=/en
2. Log in to Your Account
Enter your email and password to log in.
3. Check your email for the One-Time Password (OTP) sent on your email and enter the OTP to proceed.
4. Once logged in, a welcome prompt will appear displaying
-
Tenant Key Information: Verifying your system access
-
User Email: Your registered email for auditing purposes
-
Last Login Details: To track your previous access
-
Iron Fort Support Email: For any login issues or concerns
NOTE: If you recognize the details and are authorized, click "OK" to continue. However, if you are not an authorized user, click "Logout" immediately to exit.
5. Move your cursor to the left side of the dashboard to reveal the menu.
6. Click the Control tab on the dashboard.
7. This will open the Controls management panel and navigate to Control Sets tab.
8. Click Add Custom Control Set to begin setting up a new control set
9. This will open a form where you can input the necessary details for the new control set.
10. To configure the control set properly, complete the following fields
- Control Set Name: Enter a name related to the environment you created.
- Catalogue: Select the applicable security or compliance framework.
- Type: Select the control set type based on its function.
- Applies To: Define where this control set will be applied.
- Description: Provide a summary of the control set's role and responsibilities.
- Security Consideration: Provide a brief description of the security measures implemented.
- Implementation Example: Give an example of how this control set is used in practice.
- Vendor Implementation Guidance: Offer clear steps or recommendations for vendors to support this control set.
11. Assign a Control enhancement to enhance the effectiveness and coverage of standard controls to meet higher compliance or security levels.
12. Click Save to finalize the control set setup.
13. Navigate back to the Control Sets section and search for the name of the newly created control set to ensure it appears in the list.
14. Verify that the Control Set Name, Type, and Applies To fields are correctly displayed.
15. If necessary, edit the control set to make any adjustments.
16. Note
A custom Control Set is tailored control set designed specifically for an organization’s unique security, compliance, or operational needs. This also allows users to define their own set of controls instead of relying on predefined frameworks.