How To Guidelines in Controls
Discover comprehensive instructions for managing and implementing security controls in Iron Fort Compliance to strengthen organizational security, streamline compliance processes, and mitigate risks effectively.
Security Control refers to a defined policy, rule, or mechanism designed to protect data, applications, and systems from unauthorized access, misuse, or security threats. It serves as a safeguard to ensure that security best practices are enforced and compliance requirements are met.
Security Controls in Iron Fort help organizations manage risk, enforce access control, and maintain regulatory compliance by setting structured security policies within the CRM environment.
How is a Security Control Used in Iron Fort?
Security Controls in Iron Fort are used to:
Restrict Access – Define who can view, edit, or manage specific data and applications.
Monitor Security Compliance – Ensure that users and applications adhere to security standards.
Automate Security Policies – Apply predefined security measures to protect sensitive information.
Audit User Activity – Track changes, access, and actions taken by users for security transparency.
Manage Permissions – Assign roles and permissions based on user responsibilities.
Security Controls can be applied at different levels, including
User Level: Restricting or granting access to specific functionalities based on roles.
Application Level: Defining security policies for individual applications within Iron Fort.
Data Level: Protecting sensitive information by setting data access restrictions.
Common Use Cases for Security Controls in Iron Fort
-
Role-Based Access Control (RBAC)
A government agency using Iron Fort can define roles like Administrator, Security Assessor, and Business Owner to ensure that only authorized personnel can approve security assessments.
-
Data Sensitivity Management
Organizations handling sensitive customer data can implement security controls that restrict access based on user roles. For example, only data owners can edit or delete customer records.
-
Audit and Compliance Enforcement
Financial institutions using Iron Fort for CRM can track who accessed or modified critical records, ensuring compliance with regulatory standards like GDPR, HIPAA, or SOC 2.
-
Multi-Factor Authentication (MFA) Enforcement
Security Controls can be used to enforce MFA policies, requiring users to verify their identity before accessing high-risk applications.
-
Application Security Management
An enterprise deploying applications within Iron Fort can set security policies that prevent unauthorized API access, ensuring that external integrations follow strict security guidelines.
Conclusion
Security Controls in Iron Fort help businesses and government organizations enforce security policies, manage access, and maintain compliance with industry regulations. By defining and applying Security Controls effectively, users can safeguard data and applications while ensuring that only authorized individuals can perform critical operations.
A Control Catalogue is a structured collection of predefined security controls, policies, and compliance frameworks used to manage and enforce security requirements across applications and systems. It serves as a centralized library where organizations can select, customize, and apply security controls to ensure compliance with industry standards and regulations.
Control Catalogues in Iron Fort are designed to help businesses and government agencies maintain consistency, automation, and standardization in their security and compliance processes.
How is a Control Catalogue Used in Iron Fort?
- Centralized Security Control Management
Organizations can store and manage approved security controls in one place.
Helps standardize security policies across different applications and environments.
- Compliance Mapping and Enforcement
Controls are mapped to compliance frameworks like NIST 800-53, ISO 27001, FedRAMP, SOC 2, etc.
Ensures that security controls align with industry and regulatory requirements.
- Risk Assessment and Audit Preparation
Security teams can quickly identify gaps in security controls.
Control Catalogues simplify the process of preparing for security audits and assessments.
- Automated Security Control Implementation
Iron Fort allows for automated enforcement of security controls from the catalogue, reducing manual configuration efforts.
Helps in maintaining consistency across different projects and environments.
- Role-Based Access Control (RBAC) for Controls
Ensures that only authorized users can apply, modify, or review security controls.
Maintains audit logs of changes for security monitoring.
Common Use Cases for a Control Catalogue
- Government Security Compliance
A federal agency can use the Control Catalogue to apply security controls from NIST 800-53 and ensure compliance with FedRAMP standards for cloud security.
- Enterprise-Wide Security Standardization
A large corporation with multiple departments can use a single Control Catalogue to enforce company-wide security policies across different business units.
- Cloud Security and Risk Management
Cloud service providers (CSPs) can use Control Catalogues to implement SOC 2 and ISO 27001 controls for cloud-based applications.
- Third-Party Vendor Security Validation
Organizations using third-party software or integrations can ensure that vendors comply with security controls from the Control Catalogue before approval.
- Automated Compliance Auditing and Reporting
Security teams can generate automated reports showing which controls are in place and where compliance gaps exist.
Conclusion
A Control Catalogue in Iron Fort is a powerful tool for managing, enforcing, and standardizing security controls across applications and environments. It helps organizations automate compliance, streamline audits, and maintain a strong security posture while ensuring alignment with industry regulations.
A Control Family is a grouping of related security controls that address specific aspects of cybersecurity, risk management, and compliance. Each Control Family consists of multiple security controls that work together to achieve a common security objective.
Control Families are based on industry-recognized compliance frameworks, such as:
NIST 800-53 (National Institute of Standards and Technology)
ISO 27001 (International Security Standard)
FedRAMP (Federal Risk and Authorization Management Program)
SOC 2 (Service Organization Control)
By organizing security controls into families, Iron Fort helps organizations structure and implement security best practices more efficiently.
How is a Control Family Used in Iron Fort?
-
Security Policy Structuring
Control Families help categorize security policies based on their function (e.g., Access Control, Incident Response, Risk Management).
-
Compliance Framework Alignment
Organizations can map security controls to specific compliance frameworks (e.g., NIST, ISO, FedRAMP) to ensure adherence to regulatory standards.
-
Risk Management and Security Audits
Security teams can assess compliance by reviewing Control Families to identify gaps or weaknesses in security posture.
-
Automated Security Control Implementation
Control Families allow for bulk application of related security measures, making it easier to enforce consistent policies across an organization.
-
Continuous Monitoring & Reporting
Control Families facilitate ongoing security monitoring, ensuring that security controls remain up to date and effective.
Common Control Families
-
Access Control (AC)
Focuses on managing user access to systems, applications, and data.
Example: Role-Based Access Control (RBAC), Multi-Factor Authentication (MFA), Least Privilege Principle.
-
Audit and Accountability (AU)
Ensures that security events are recorded and tracked for compliance.
Example: Logging, Monitoring, Security Incident Auditing.
-
Risk Assessment (RA)
Helps organizations identify and mitigate risks.
Example: Threat Modeling, Vulnerability Assessments, Business Impact Analysis.
-
System and Communications Protection (SC)
Ensures secure communication channels and data protection.
Example: Encryption, Network Segmentation, Secure APIs.
-
Incident Response (IR)
Defines policies for responding to security breaches and cyber threats.
Example: Incident Handling Procedures, Security Incident Reporting, Forensic Analysis.
-
Identification and Authentication (IA)
Focuses on user and device authentication mechanisms.
Example: Username & Password Management, Biometric Authentication, Single Sign-On (SSO).
Common Use Cases for Control Families
-
Government Compliance & FedRAMP Authorization
A federal agency using Iron Fort can apply NIST 800-53 Control Families to meet FedRAMP security requirements for cloud services.
-
Enterprise-Wide Security Policy Implementation
Large organizations can structure company-wide security controls by grouping them into Control Families for easy management.
-
Cloud Security & Zero Trust Implementation
Cloud providers can use System and Communications Protection (SC) and Access Control (AC) families to enforce Zero Trust security models.
-
Financial Institution Risk Management
Banks and financial firms can apply Risk Assessment (RA) and Audit (AU) Control Families to comply with SOX, GDPR, and PCI DSS.
-
Healthcare Data Security & HIPAA Compliance
Hospitals and healthcare providers can use Identification and Authentication (IA) and System Protection (SC) families to secure patient health records (PHI/PII) under HIPAA.
Conclusion
A Control Family in Iron Fort is a structured way to group, apply, and manage security controls for regulatory compliance, risk management, and cybersecurity. By using Control Families, organizations can enforce consistent security policies, automate compliance processes, and strengthen their security posture.
-
How To: Review Security Controls Catalogue
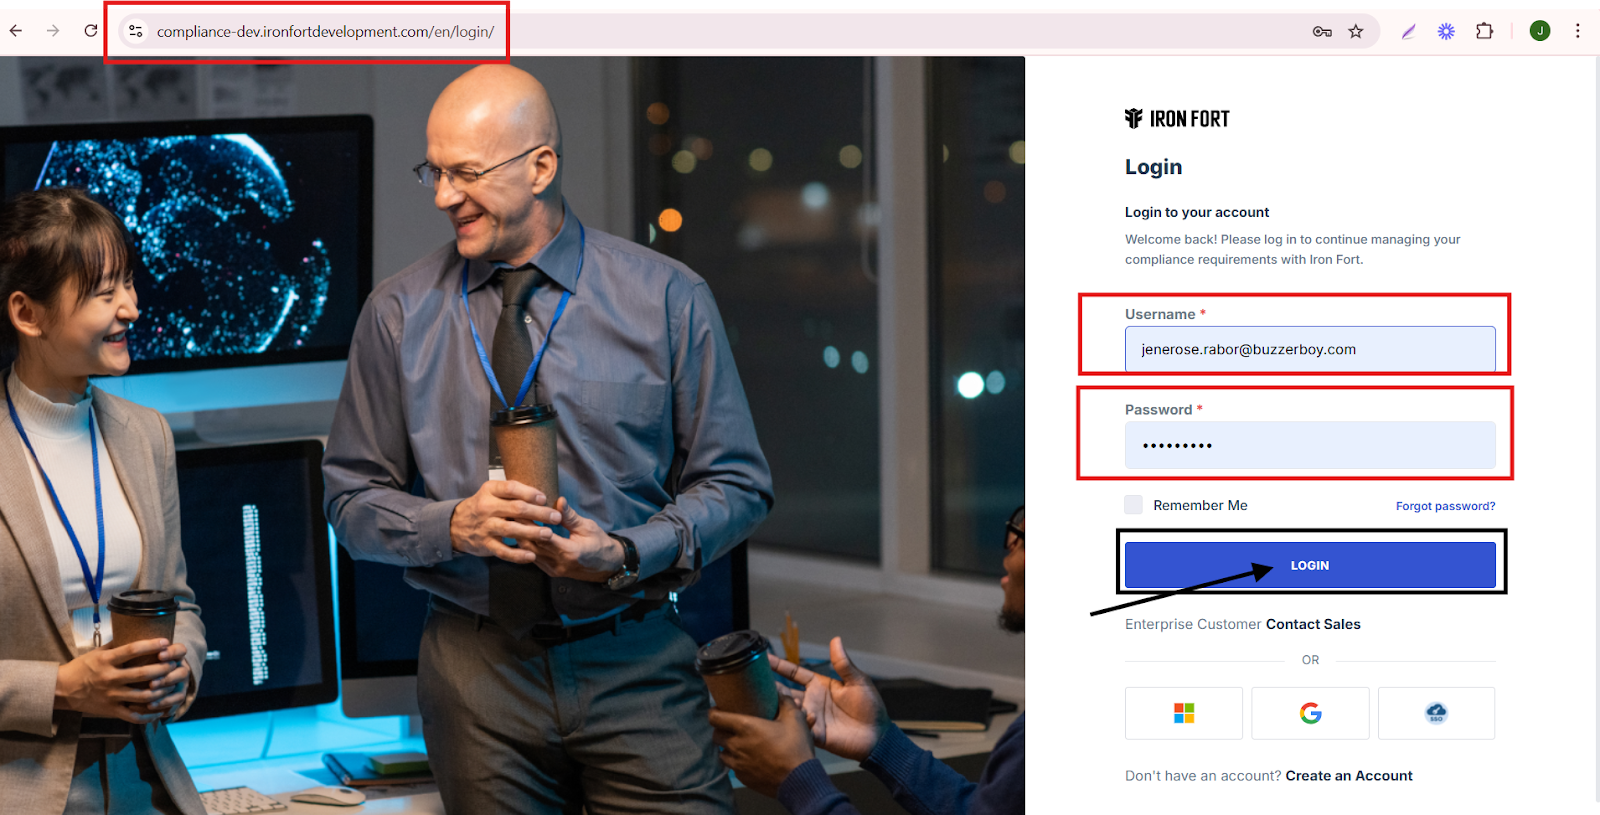
- Navigate to your organization’s Iron Fort Compliance login page
- Log in to Your Account
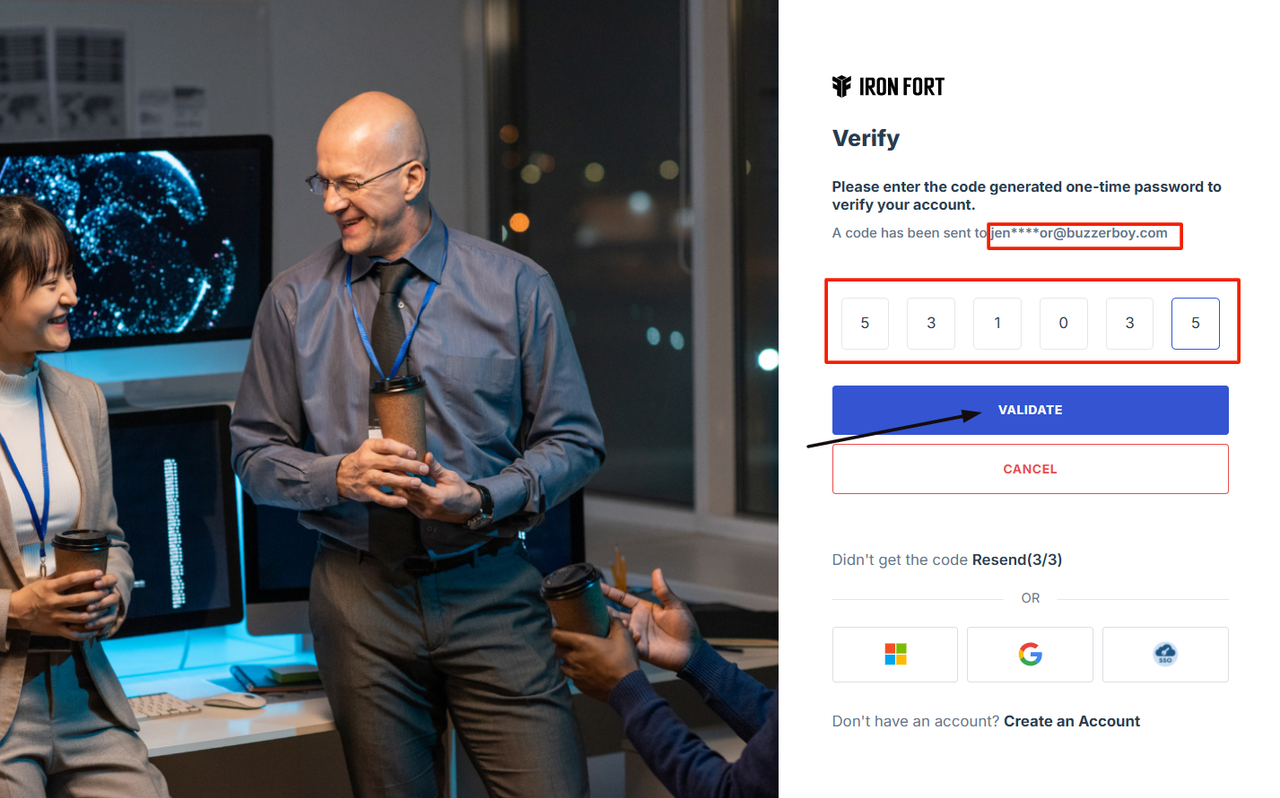
- Check your email for the One-Time Password (OTP) sent on your email and enter the OTP to proceed
- Once logged in, a welcome prompt will appear displaying
- Move your cursor to the left side of the dashboard to reveal the menu
- Click the Control tab on the dashboard.
- You will be redirected to the Controls Overview Page
- The Catalogue section includes various security control frameworks with descriptions and sources.
- Review the Security Controls Catalogue
1. Navigate to your organization’s Iron Fort Compliance login page
For example: https://compliance-demo.ironfortdemos.com/en/login/?next=/en
2. Log in to Your Account
Enter your email and password to log in.
3. Check your email for the One-Time Password (OTP) sent on your email and enter the OTP to proceed.
4. Once logged in, a welcome prompt will appear displaying
Once logged in, a welcome prompt will appear displaying
-
Tenant Key Information: Verifying your system access
-
User Email: Your registered email for auditing purposes
-
Last Login Details: To track your previous access
-
Iron Fort Support Email: For any login issues or concerns
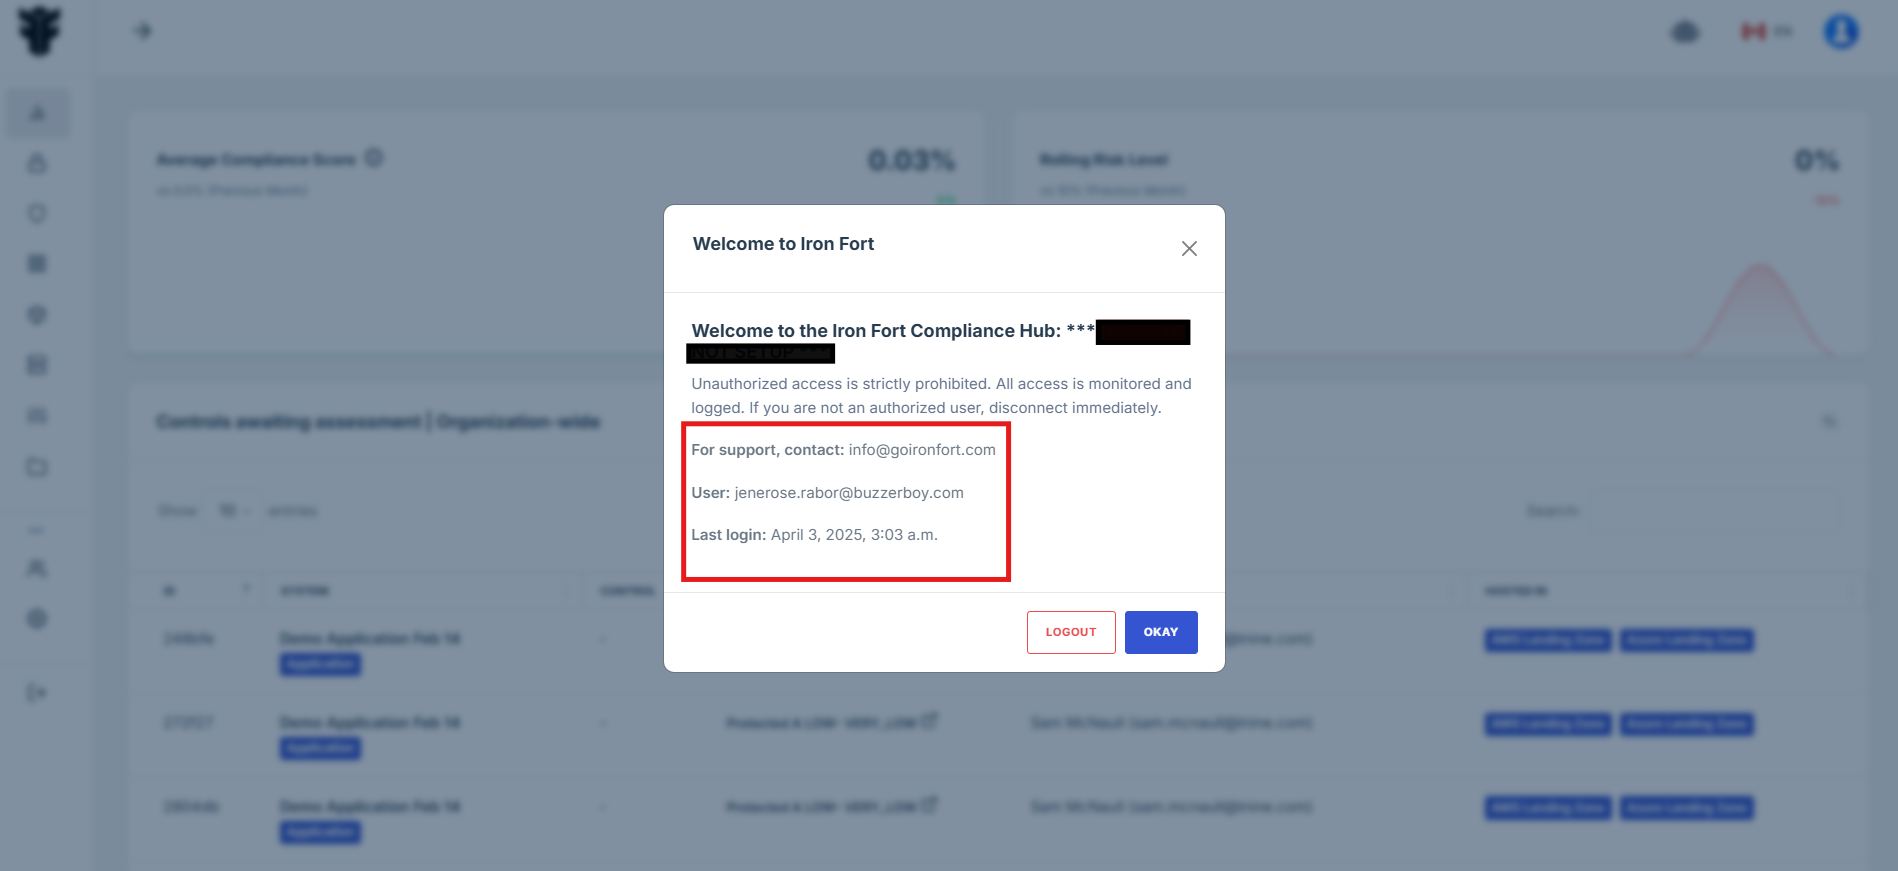
NOTE: If you recognize the details and are authorized, click "OK" to continue. However, if you are not an authorized user, click "Logout" immediately to exit.
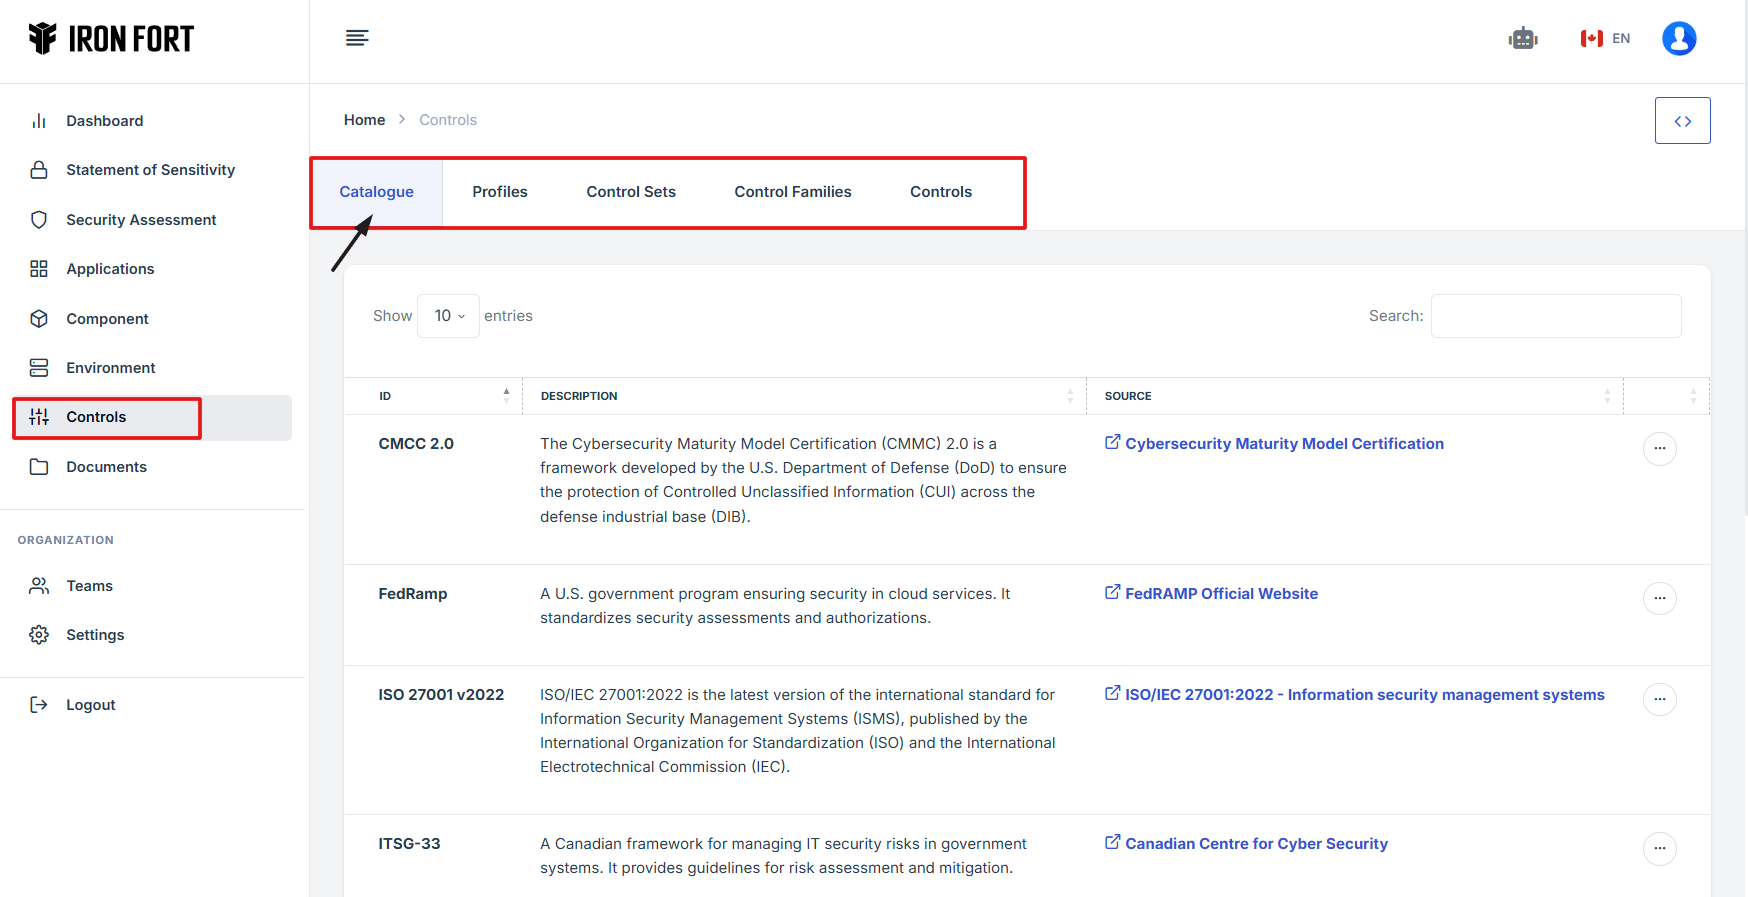
5. Move your cursor to the left side of the dashboard to reveal the menu.
6. Click the Controls tab on the dashboard.
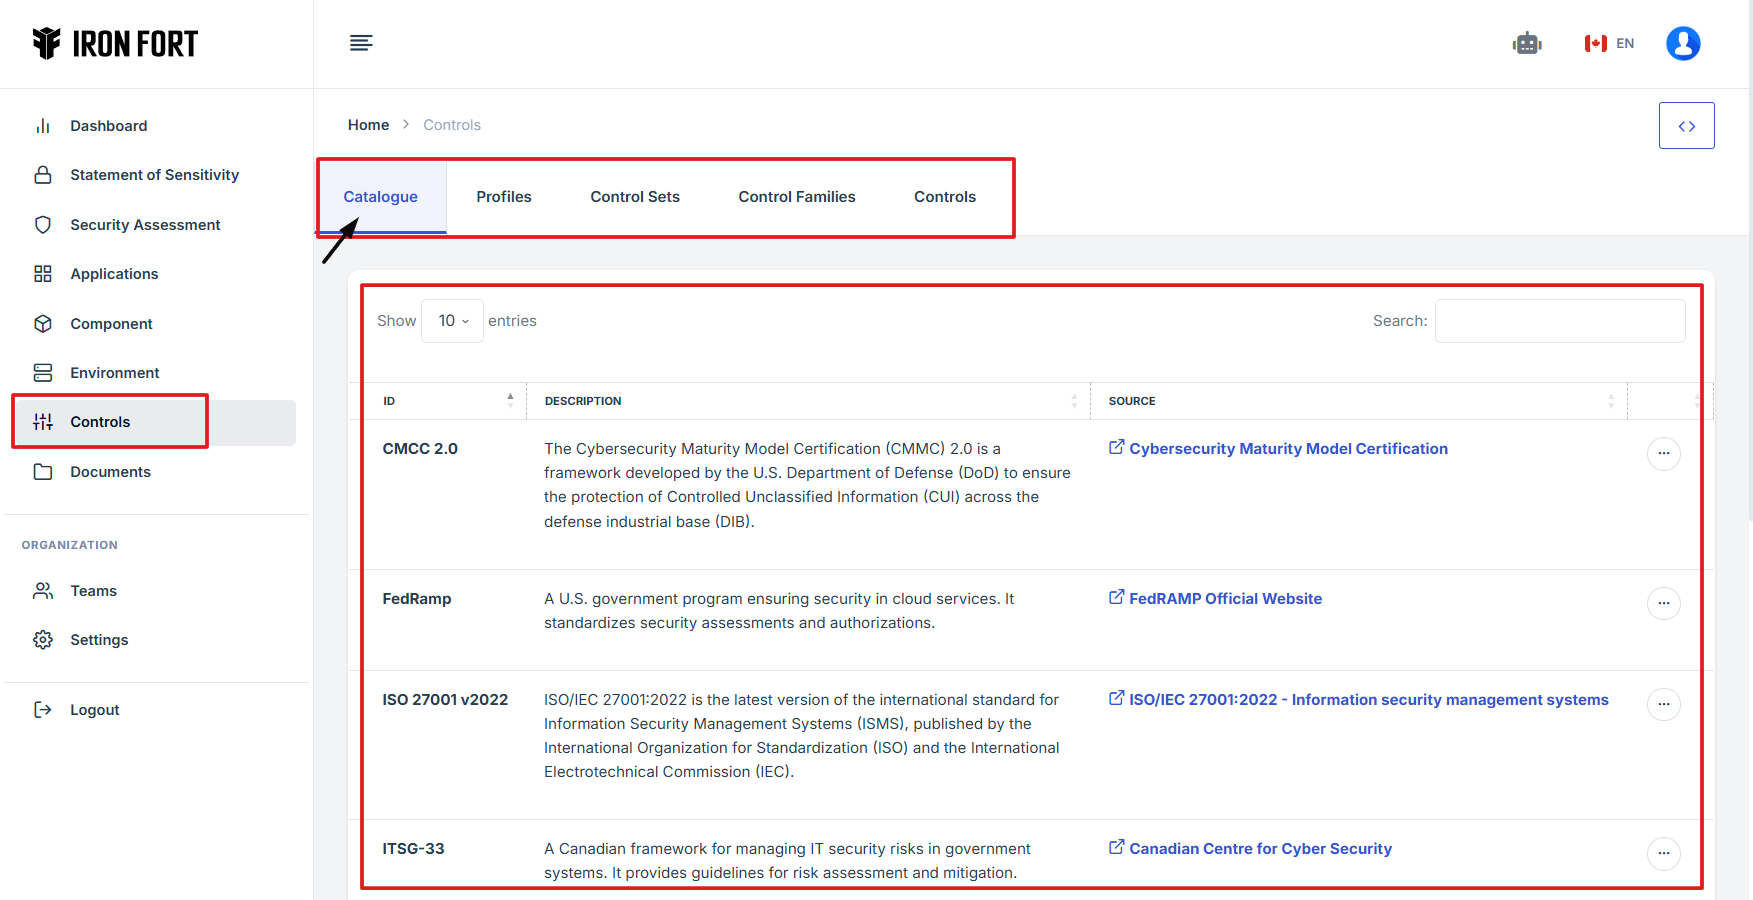
7. You will be redirected to the Controls Overview Page, where different security control frameworks are listed.
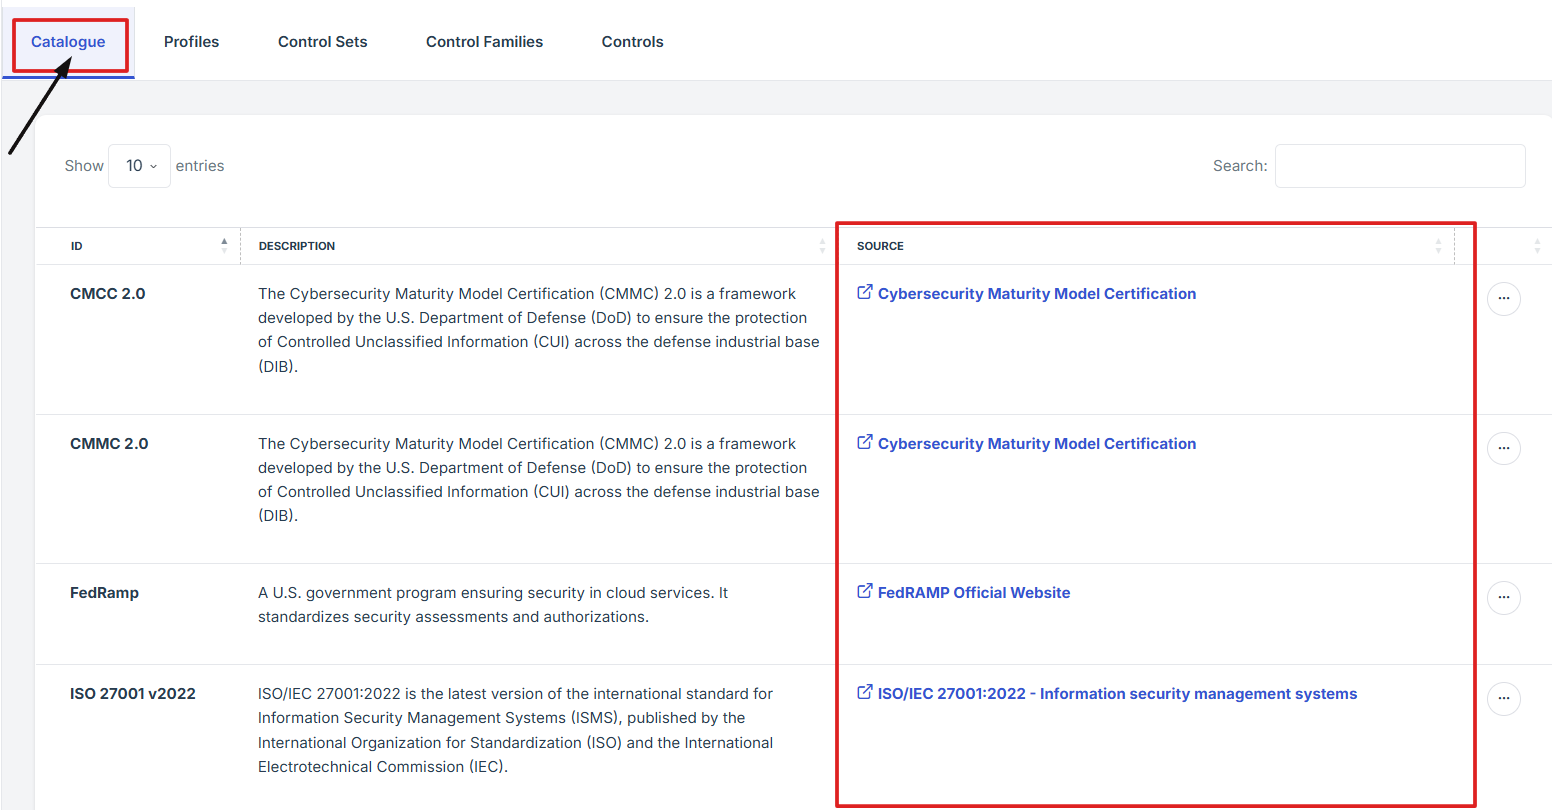
8. The Catalogue section includes various security control frameworks with descriptions and sources.
9. Review the Security Controls Catalogue:
- Identify the Listed Frameworks:
- Each control framework is displayed with its name, description, and source.
- Understand the Purpose of Each Framework:
- Read the descriptions provided to determine the purpose of each security control framework.
- Click on the source link to access additional details and official documentation.
- Sort or Search for Specific Frameworks:
- Use the Search bar to find specific security controls.
- Adjust the entries display settings to view more items per page.
1. Log in to Iron fort: How To: Login
2. Locate and click the Settings on the dashboard.
3. From the settings menu, click “Support case.”
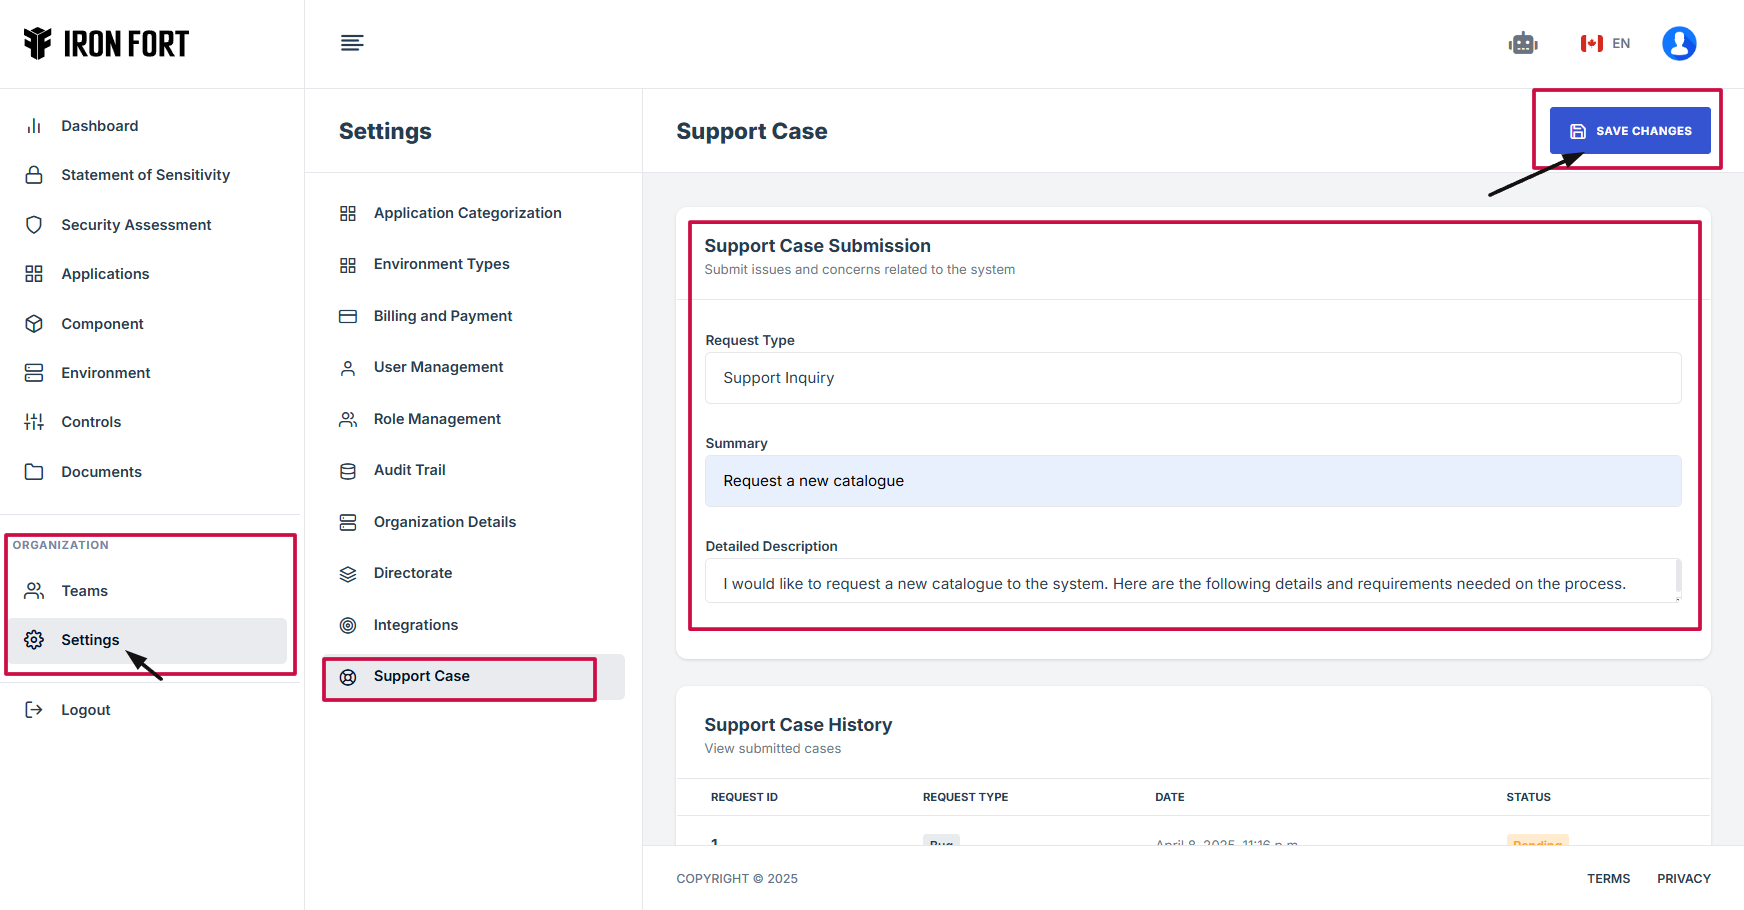
4. Fill out the necessary details:
-
Request Type: This field specifies the category or nature of the request, such as bug report, feature request, or general inquiry.
-
Summary: A brief statement outlining the main purpose of the request, providing a clear and concise topic.
-
Detailed Description: A more in-depth explanation of the request, including relevant details, requirements, and any additional context to help process the request efficiently.
5. Click "Save Changes" to submit your request.
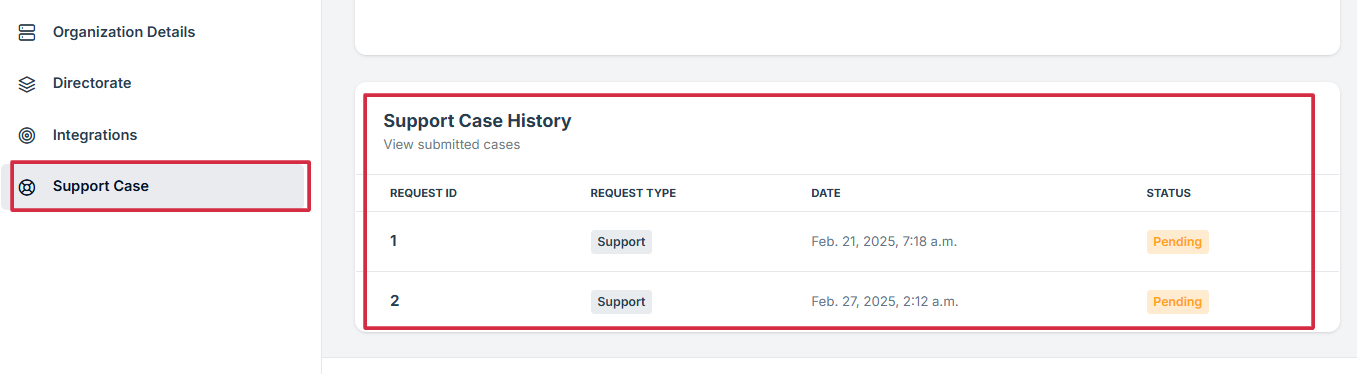
6. Monitor Your Request:
-
Request ID: Unique number for your request
-
Request Type: Type of issue reported
-
Date: Submission time
-
Status: E.g., Pending, Resolved
-
How To: View Profile in Controls
- Navigate to your organization’s Iron Fort Compliance login page
- Log in to Your Account
- Check your email for the One-Time Password (OTP) sent on your email and enter the OTP to proceed
- Enter the OTP to verify your identity and click “validate.”
- Once logged in, a welcome prompt will appear displaying
- Move your cursor to the left side of the dashboard to display the menu
- Locate and click the Controls tab on the dashboard.
- Navigate to the Profile tab
1. Navigate to your organization’s Iron Fort Compliance login page
For example: https://compliance-demo.ironfortdemos.com/en/login/?next=/en
2. Log in to Your Account
Enter your email and password to log in.
3. Check your email for the One-Time Password (OTP) sent on your email and enter the OTP to proceed.
4. Enter the OTP to verify your identity and click “validate.”
5. Once logged in, a welcome prompt will appear displaying
-
Tenant Key Information: Verifying your system access
-
User Email: Your registered email for auditing purposes
-
Last Login Details: To track your previous access
-
Iron Fort Support Email: For any login issues or concerns
NOTE: If you recognize the details and are authorized, click "OK" to continue. However, if you are not an authorized user, click "Logout" immediately to exit.
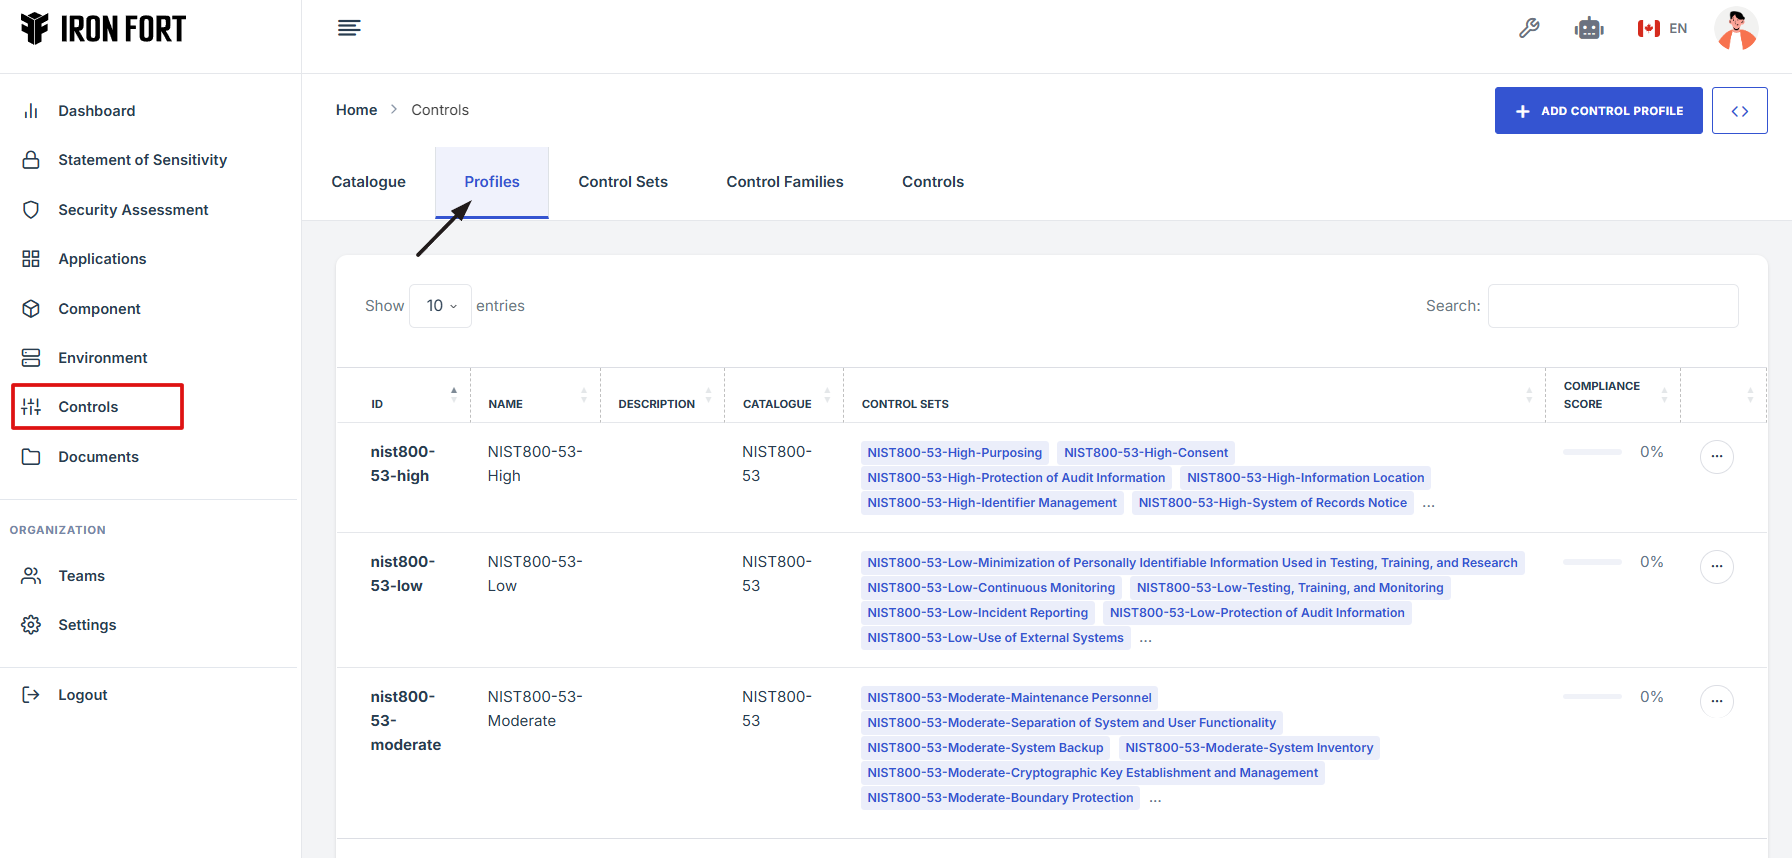
6. Move your cursor to the left side of the dashboard to display the menu.
7. Locate and click the Controls tab on the dashboard.
8. Navigate to the Profile tab.
-
How To: Add Control Profile
- Navigate to your organization’s Iron Fort Compliance login page
- Log in to Your Account
- Check your email for the One-Time Password (OTP) sent on your email and enter the OTP to proceed
- Enter the OTP to verify your identity and click “validate.”
- Once logged in, a welcome prompt will appear displaying
- Move your cursor to the left side of the dashboard to display the menu
- Locate and click the Controls tab on the dashboard.
- Navigate on the Profile tab and click “Add Control Profile” on the upper right corner.
- Fill out the important information
- After filling out all the required information
1. Navigate to your organization’s Iron Fort Compliance login page
For example: https://compliance-demo.ironfortdemos.com/en/login/?next=/en
2. Log in to Your Account
Enter your email and password to log in.
3. Check your email for the One-Time Password (OTP) sent on your email and enter the OTP to proceed.
4. Enter the OTP to verify your identity and click “validate.”
5. Once logged in, a welcome prompt will appear displaying
-
Tenant Key Information: Verifying your system access
-
User Email: Your registered email for auditing purposes
-
Last Login Details: To track your previous access
-
Iron Fort Support Email: For any login issues or concerns
NOTE: If you recognize the details and are authorized, click "OK" to continue. However, if you are not an authorized user, click "Logout" immediately to exit.
6. Move your cursor to the left side of the dashboard to display the menu.
7. Locate and click the Controls tab on the dashboard.
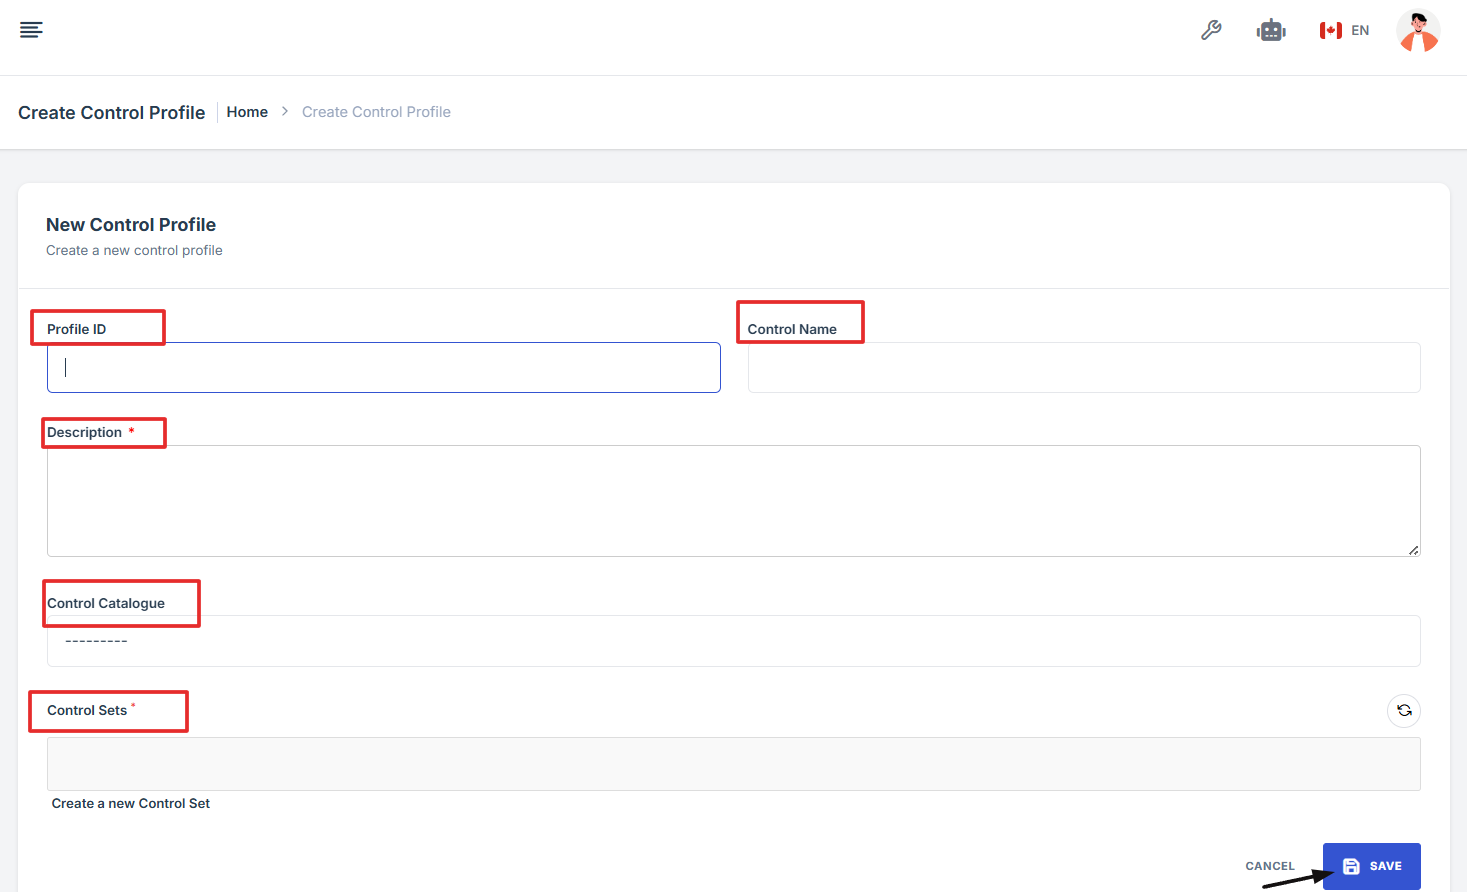
8. Navigate on the Profile tab and click “Add Control Profile” on the upper right corner.
9. Fill out the important information
-
Profile ID: Enter a unique ID for the new control profile.
-
Control Name: Provide a descriptive name for the control profile.
-
Description: Write a brief description explaining the purpose of the control profile.
-
Control Catalogue: Choose the appropriate control catalogue from the dropdown list.
-
Control Sets: Select the required control sets linked to this profile.
10. Navigate to the Profile tab.
Click the Save button to complete the process.
1. Log in to Iron fort: How To: Login
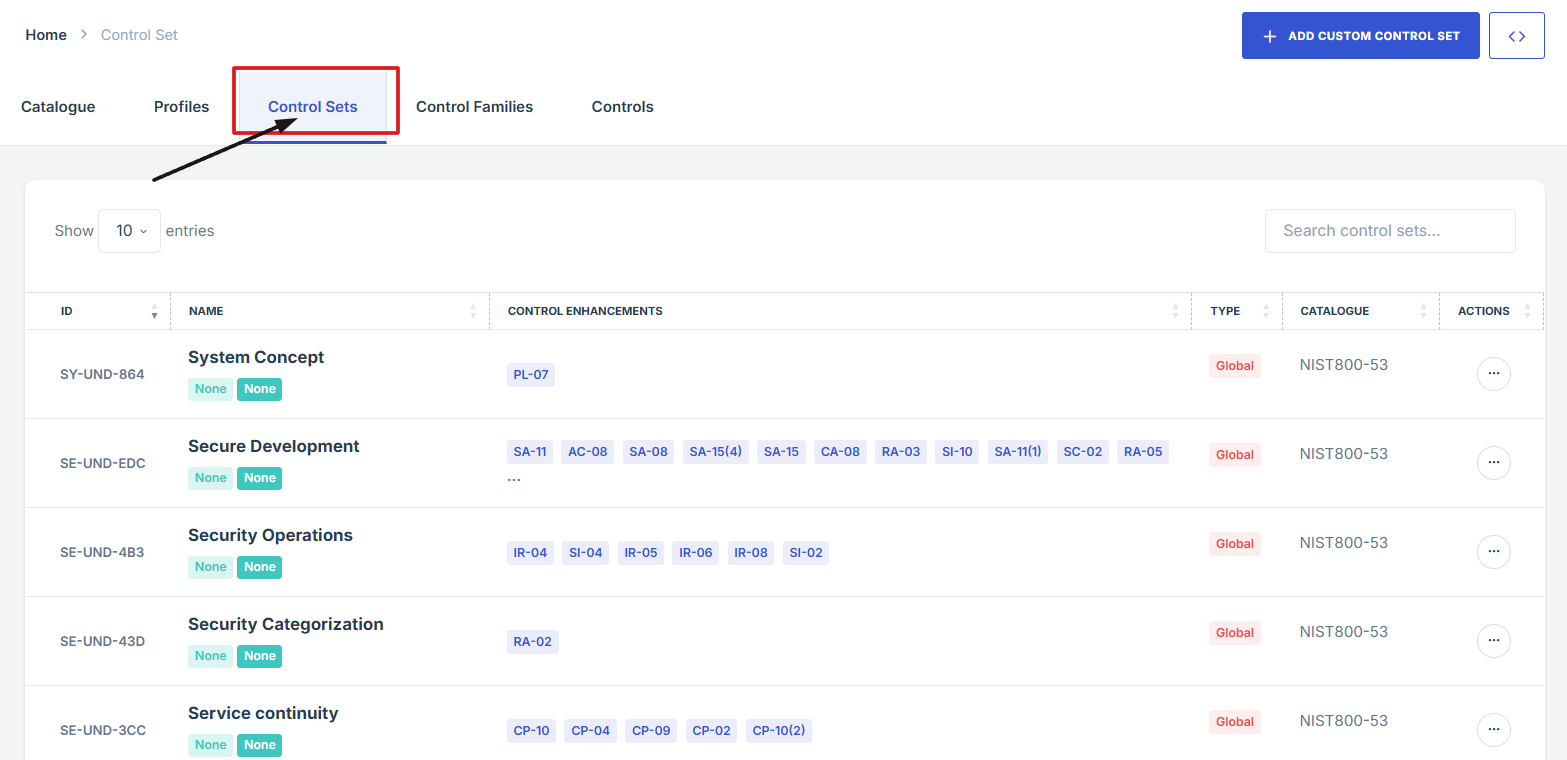
2. Locate and click the Controls tab on the dashboard.
3. Once you're on the Controls page, navigate to the Control Sets section to view or manage grouped control items.

-
How To: Access Source Links from the Controls Catalogue Page
- Log in to Iron fort: How To: Login
- Locate and click the Controls tab on the dashboard.
- Once you're on the Controls page, navigate to the Catalogue section.
- In the Catalogue section, you’ll see a list of frameworks.
- To view the source for a specific framework, look at the Source column on the right and click the blue link.
- This will open the official source for that framework in a new tab.
1. Log in to Iron fort: How To: Login
2. Locate and click the Controls tab on the dashboard.
3. Once you're on the Controls page, navigate to the Catalogue section.
4. In the Catalogue section, you’ll see a list of frameworks.
5. To view the source for a specific framework, look at the Source column on the right and click the blue link.
6. This will open the official source for that framework in a new tab.
-
How To: Navigate Back from the Control Overview Page
- Log in to Iron fort: How To: Login
- Locate and click the Controls tab on the dashboard.
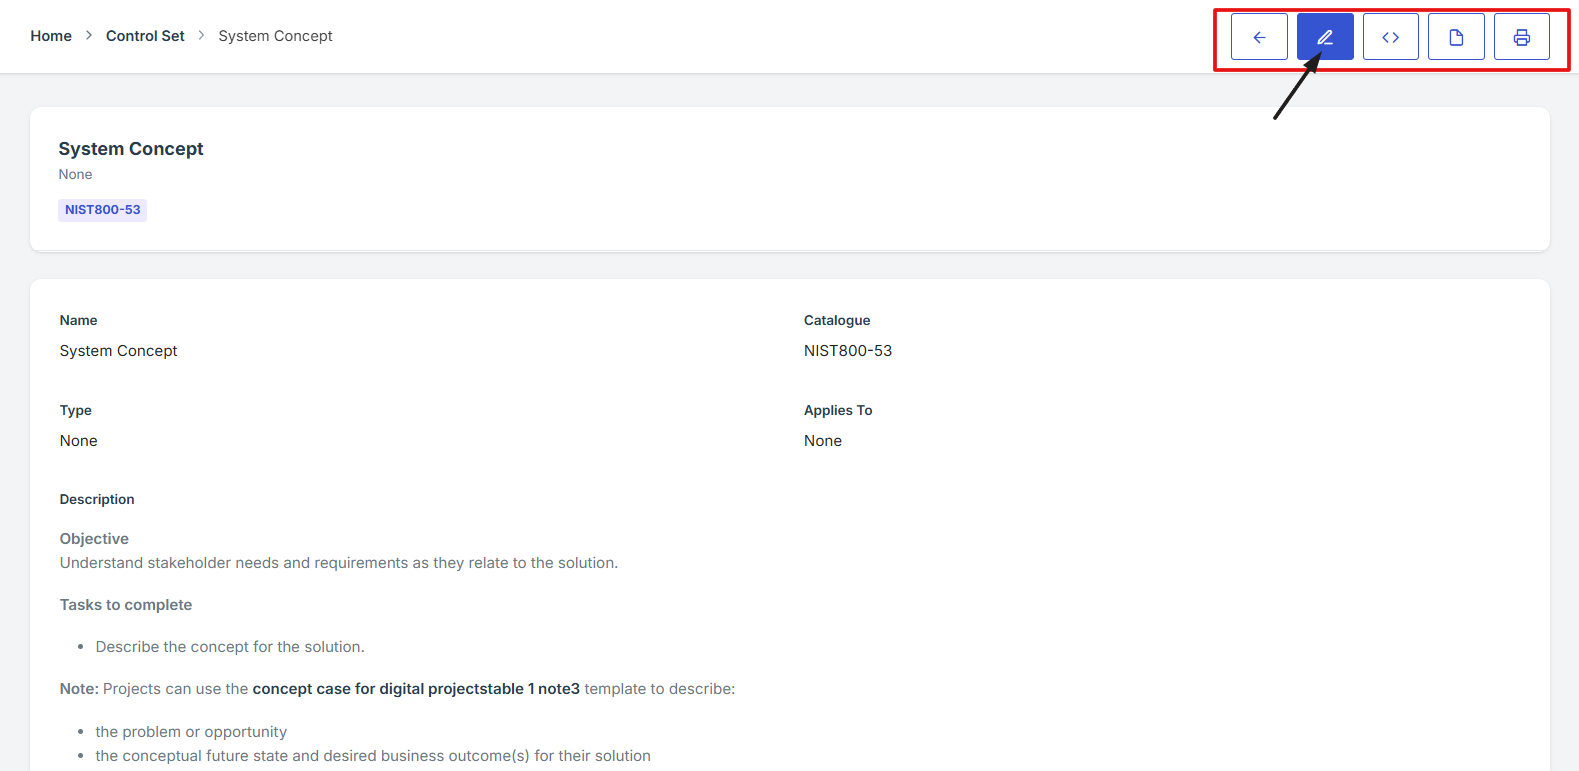
- Once you're on the Controls page, navigate to the Control Sets section to view or manage grouped control items.
- On the Control set overview page, navigate at the top right corner, click the (<-) icon to go back to the Control set list.


-
How To: Add Custom Control sets under Control Tab
- Log in to Iron fort: How To: Login
- Locate and click the Controls tab on the dashboard.
- Once you're on the Controls page, navigate to the Control sets section.
- Once you're in the Control Sets section, click the Add Custom Control List button. This will open a form or setup page.
- Fill in the required details for your new control set
- After entering the details, click Save or Submit to finalize and create your custom control set.
1. Log in to Iron fort: How To: Login
2. Locate and click the Controls tab on the dashboard.
3. Once you're on the Controls page, navigate to the Control sets section.
4. Once you're in the Control Sets section, click the Add Custom Control List button. This will open a form or setup page.
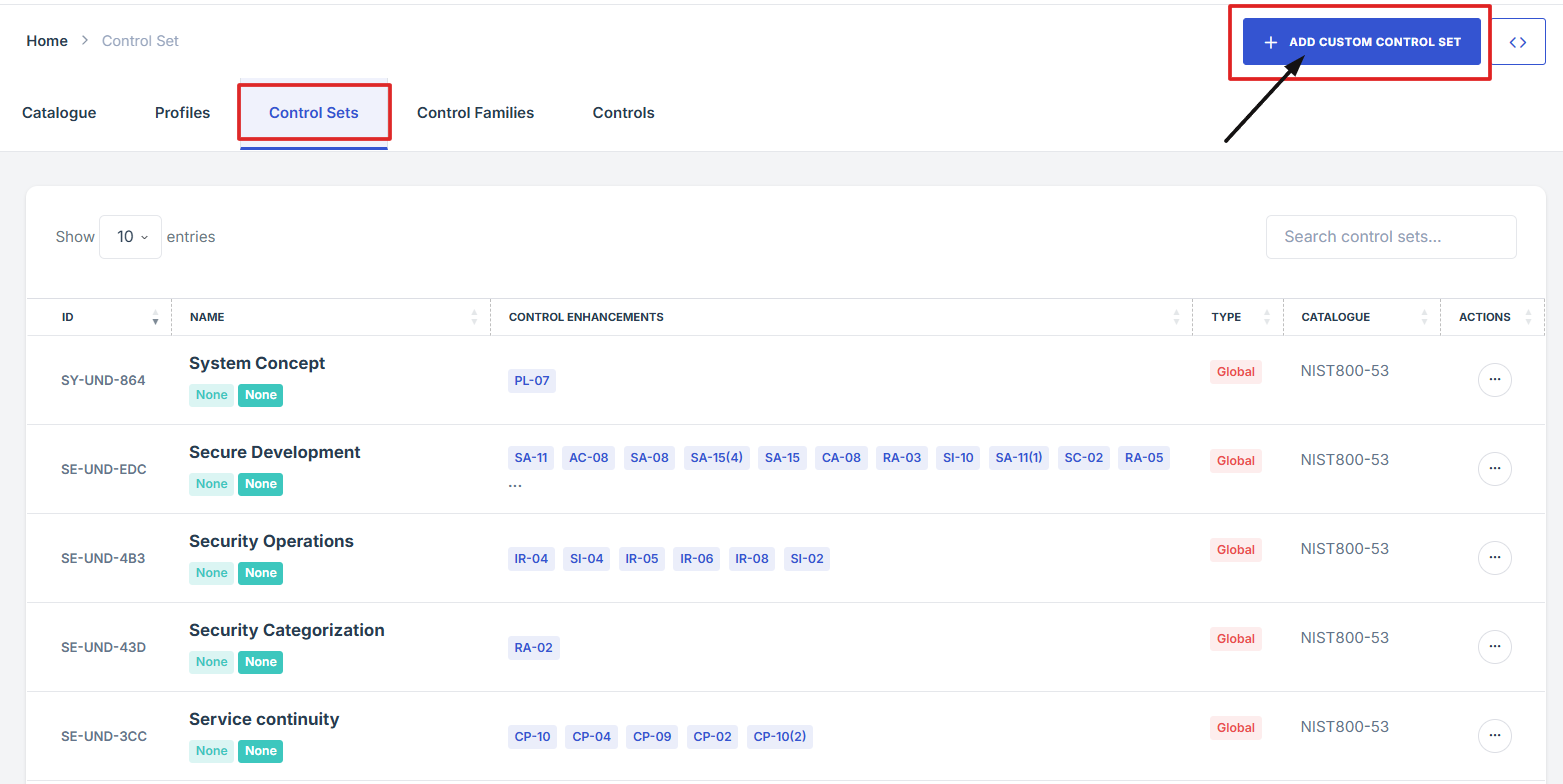
5. Fill in the required details for your new control set:
-
Control Name: The title of the custom control set used to easily identify it.
-
Catalogue: Specifies the source framework or standard (e.g., ISO, NIST) the control set is based on.
-
Type: Indicates the classification of the control set, such as technical, administrative, or physical.
-
Applies To: Defines the system, environment, or data type the control set is relevant for.
-
Description: A brief summary explaining the purpose and scope of the control set.
-
Security Consideration: Highlights any specific security risks or concerns the control set addresses.
-
Implementation Example: Provides a real-world example of how the control can be applied in practice.
-
Vendor Implementation Guidance: Offers specific instructions or tips for vendors on how to meet the control requirements effectively.


6. After entering the details, click Save or Submit to finalize and create your custom control set.


-
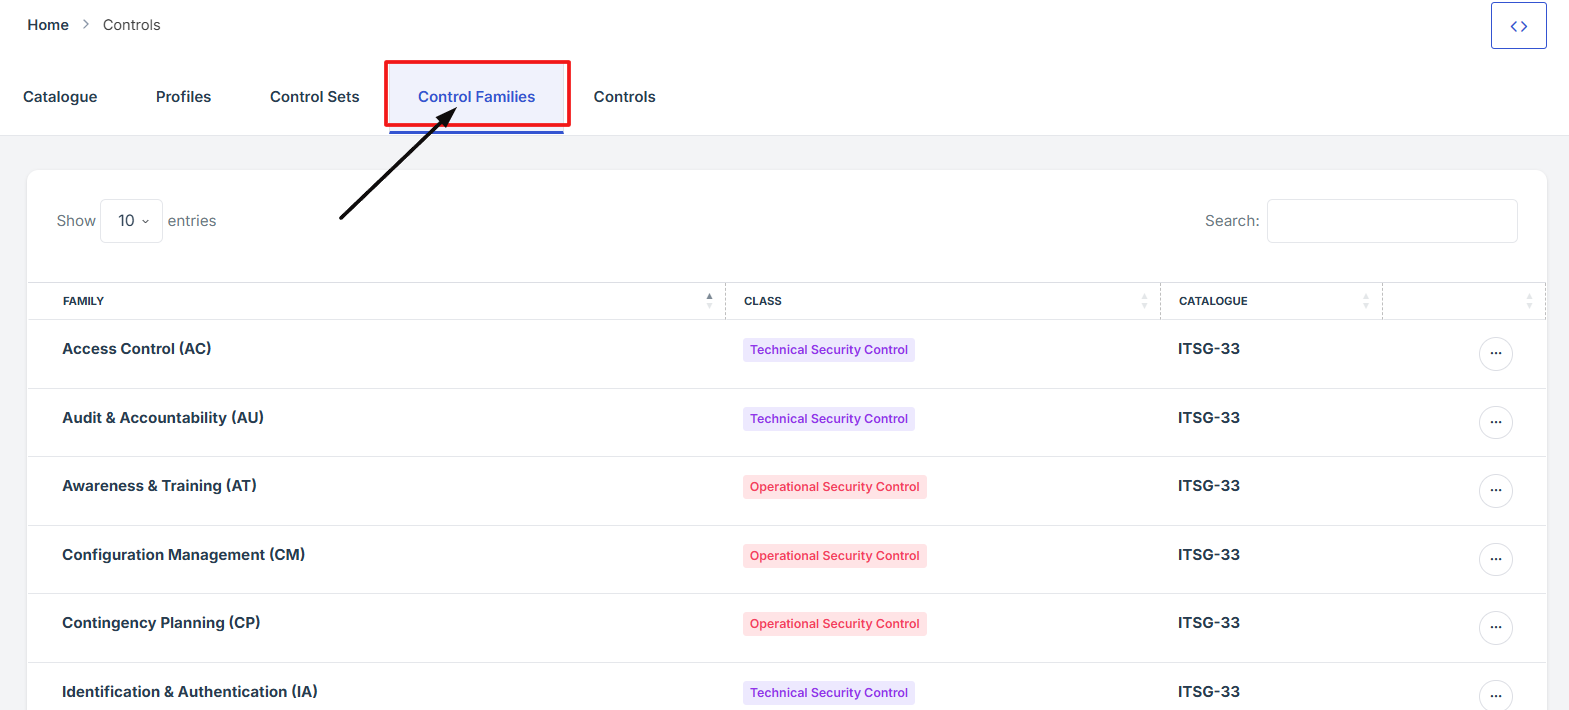
How To: Navigate controls in Family in three-dot-menu tab
- Log in to Iron fort: How To: Login
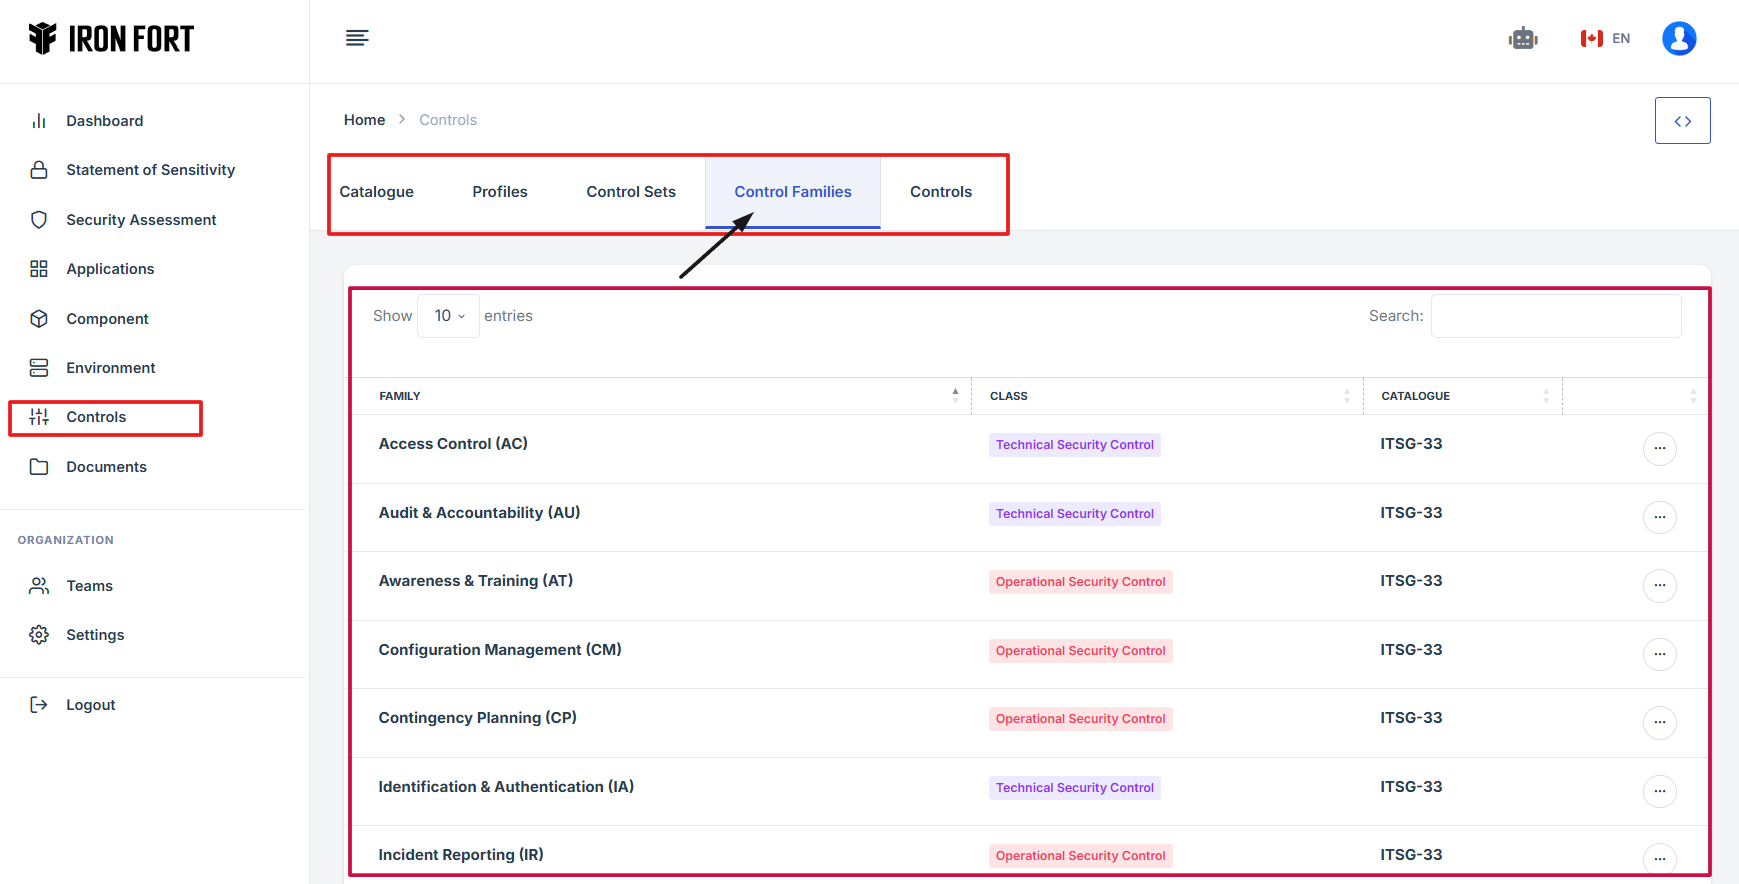
- Locate and click the Controls tab on the dashboard.
- Once you're on the Controls page, navigate to the Control Families section.
- This will take you to the central hub where all control-related sections are managed.
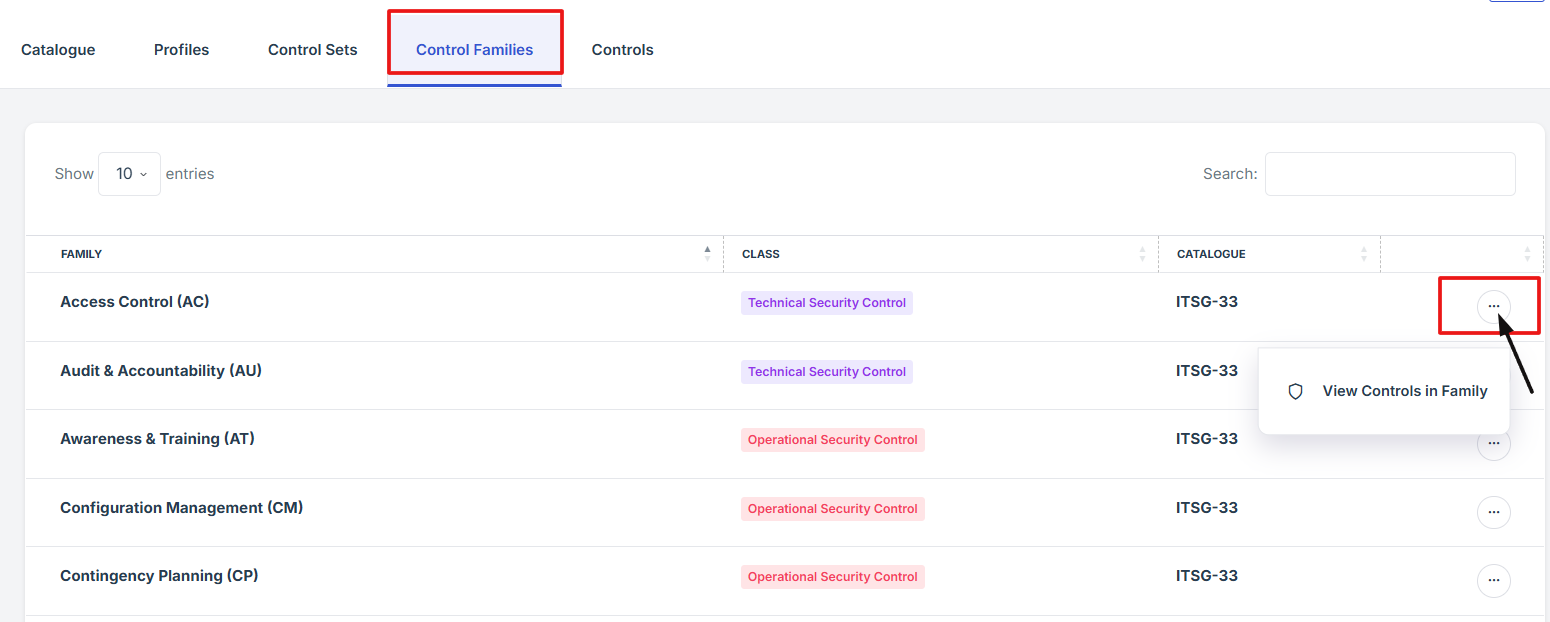
- Find the control family you want to view, then click the three-dot icon (⋮) next to it to open more options.
- From the options, select View to open and explore the control family details.