How To Guidelines for Standard Settings
This tutorial provides comprehensive guidelines for configuring and managing standard settings in the Iron Fort Compliance system. Follow the instructions to optimize your account setup and system usage effectively.
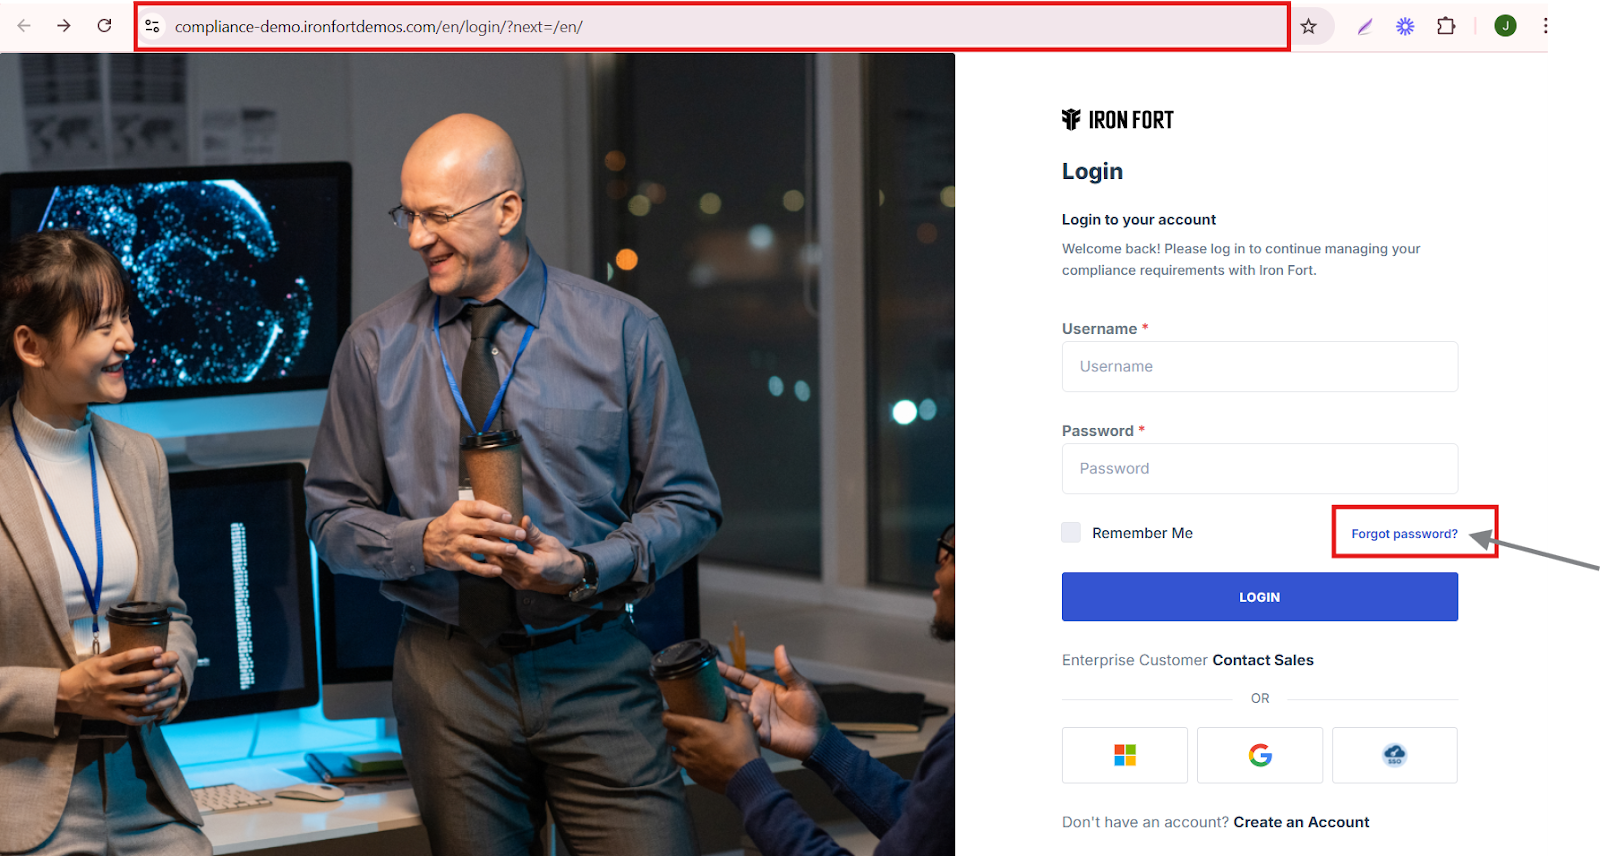
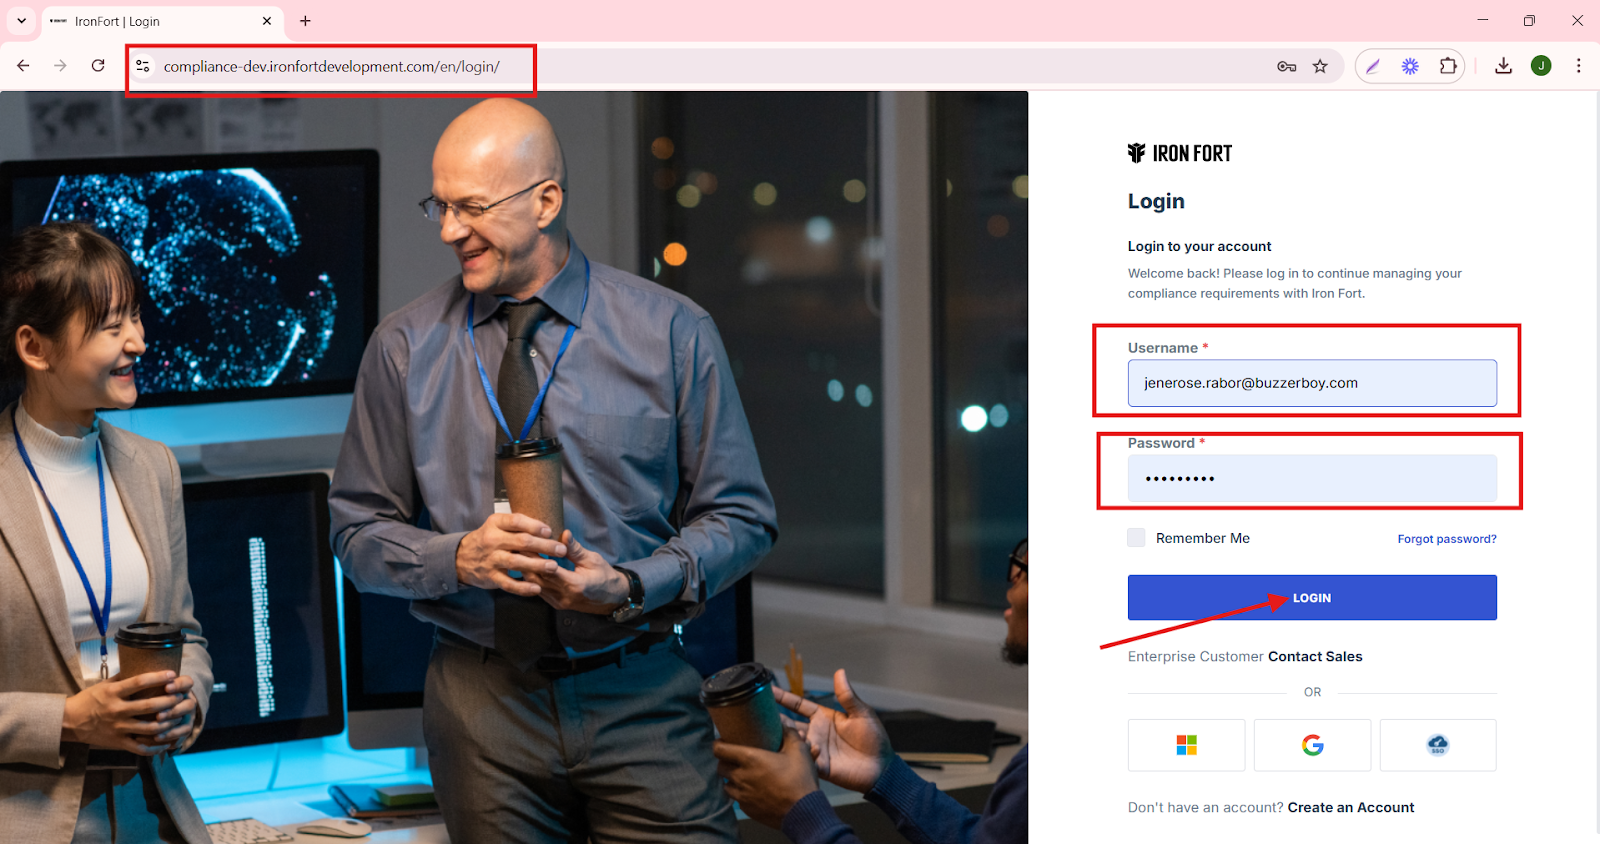
1. Navigate to your organization’s Iron Fort Compliance login page
For example: https://compliance-demo.ironfortdemos.com/en/login/?next=/en
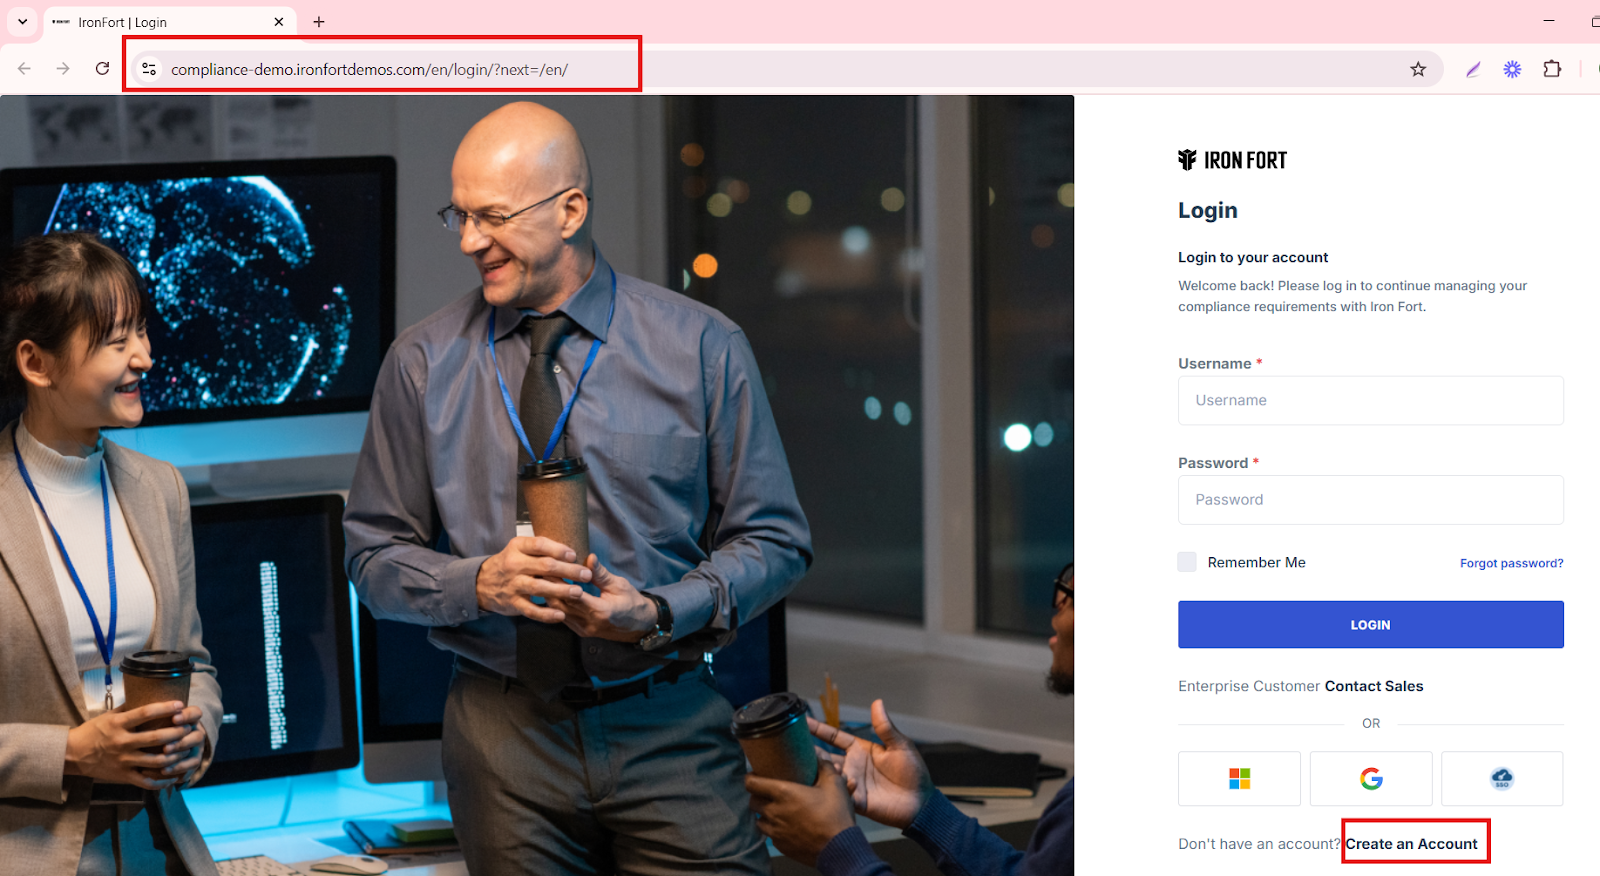
Click on the "Create an Account" to proceed to the registration page.
2. Fill in the required information, such as your first name, last name, email address, and password.
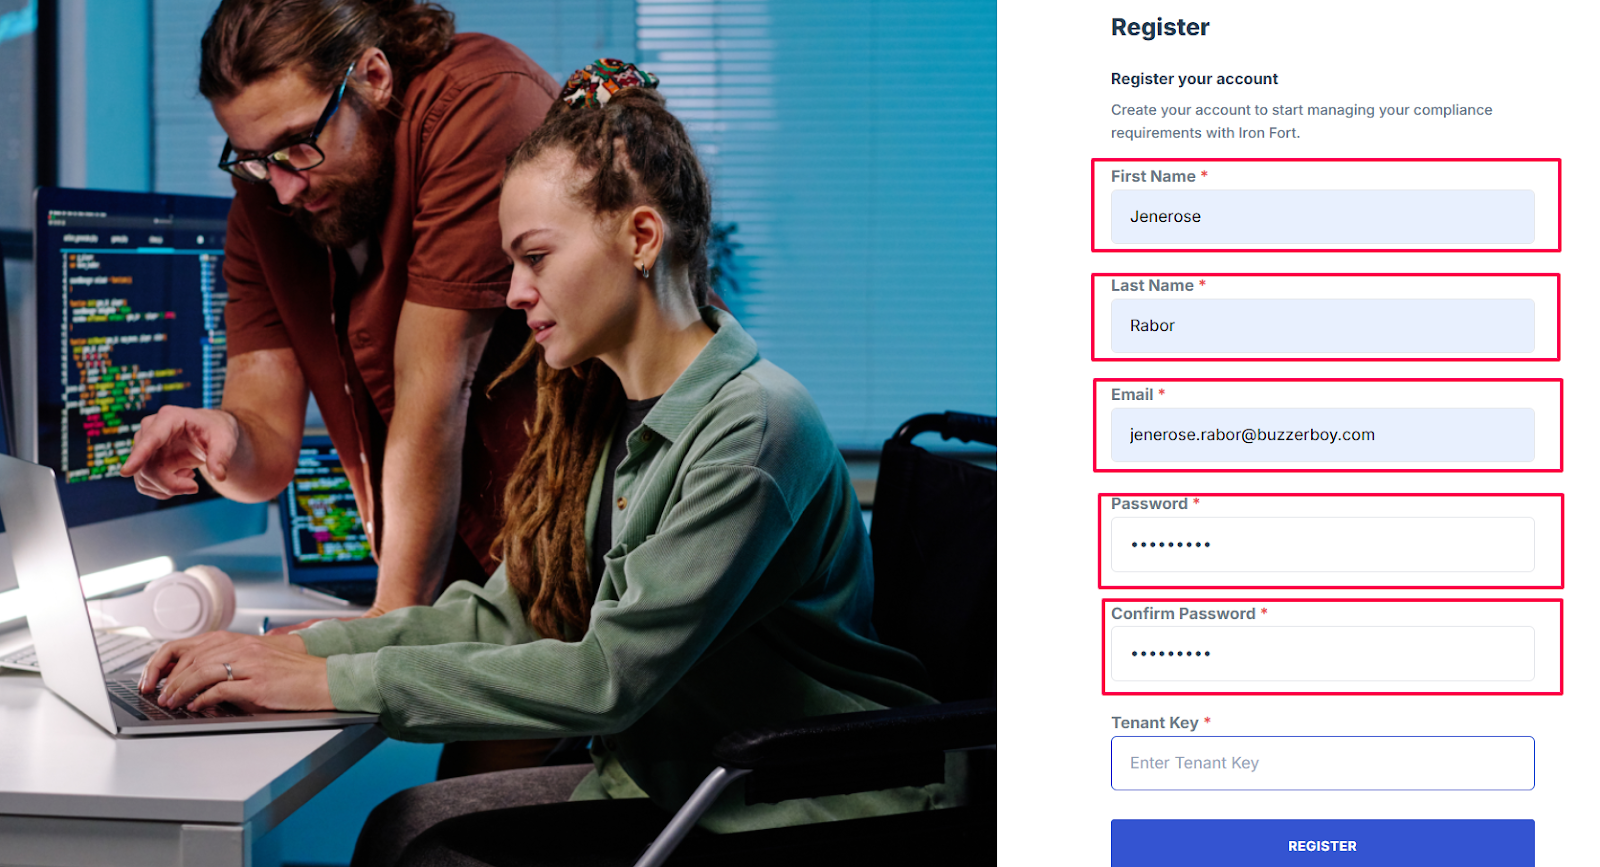
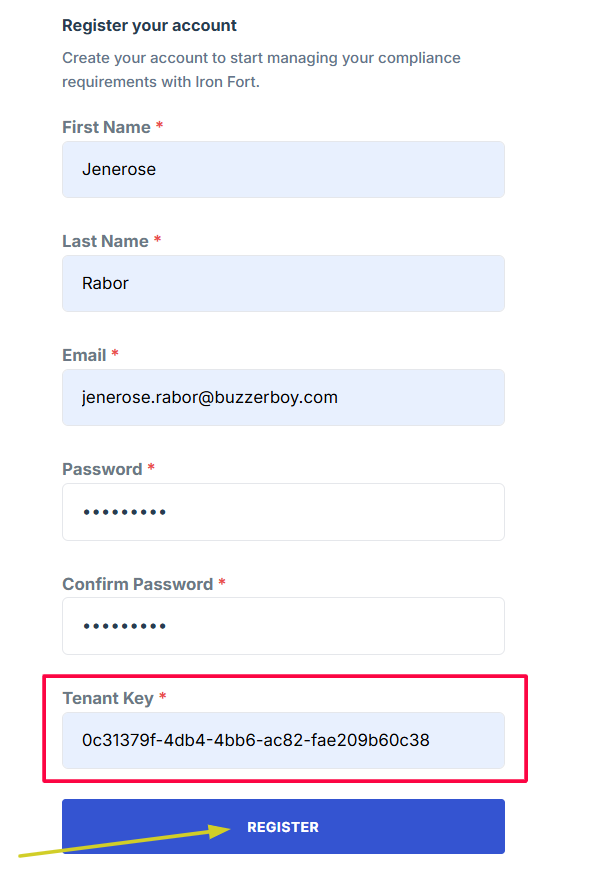
3. You may be prompted to enter a "Tenant Key."
This key is typically provided by your organization's administrator or the Iron Fort support team.
NOTE: If you have not received a Tenant Key, please contact your organization's administrator or reach out to Iron Fort's support for assistance
4. After entering all necessary information, click the register button to submit the form.
5. You should receive a confirmation email to verify your account.
Follow the instructions in the email to complete the verification process.
1. Navigate to your organization’s Iron Fort Compliance login page
For example: https://compliance-demo.ironfortdemos.com/en/login/?next=/en
2. Click the “forgot password” button.
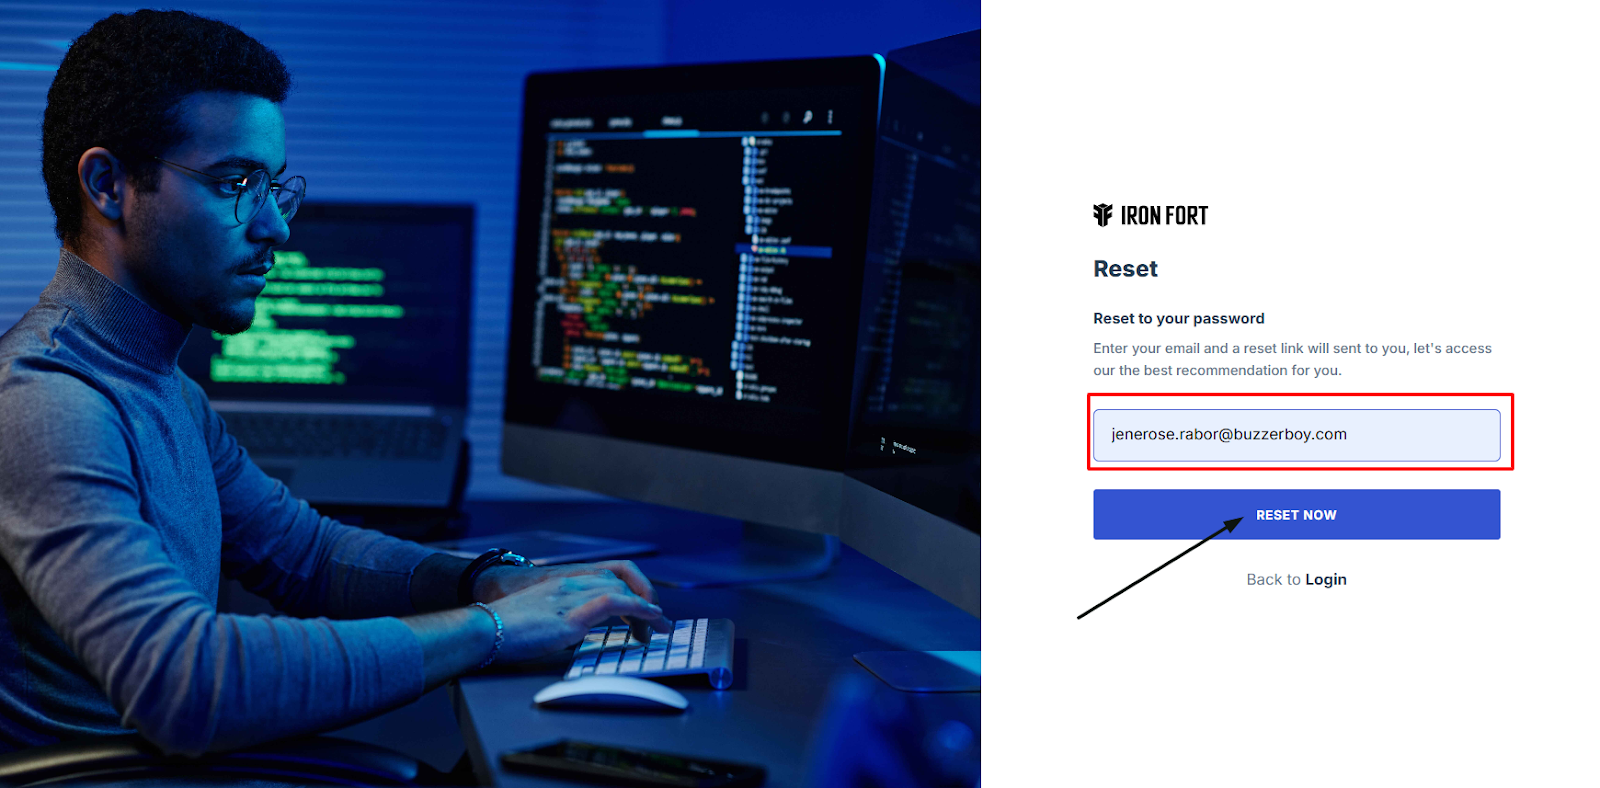
3. On the password reset page, you'll be prompted to enter the email address associated with your account.
4. After entering your email, click the “reset now.”
5. You should receive an email with a link to reset your password. If you don't see it in your inbox, check your spam or junk folder.
6. Click on the link provided in the email and follow the instructions to set a new password for your account.
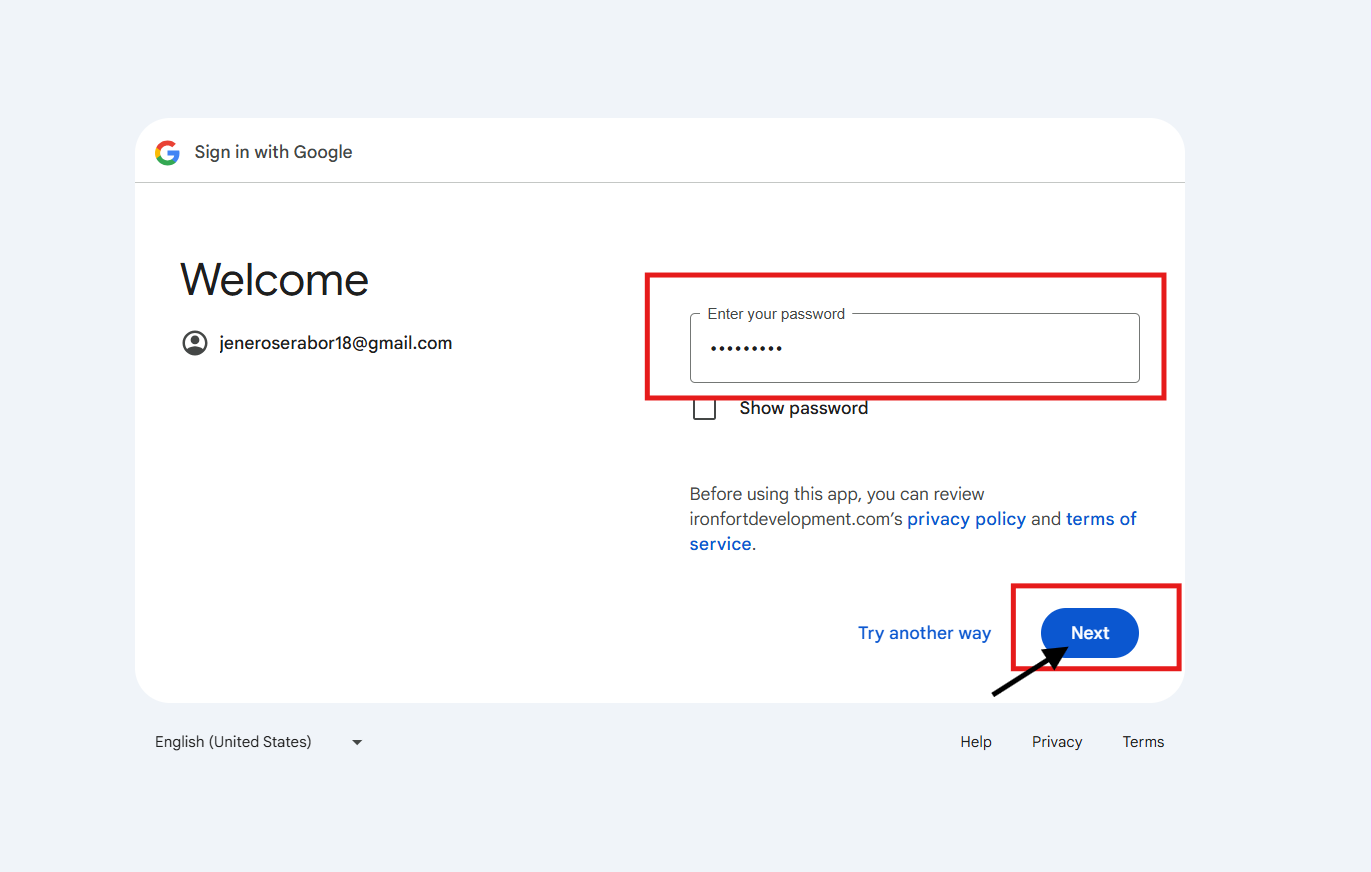
1. Navigate to your organization’s Iron Fort Compliance login page
For example: https://compliance-demo.ironfortdemos.com/en/login/?next=/en
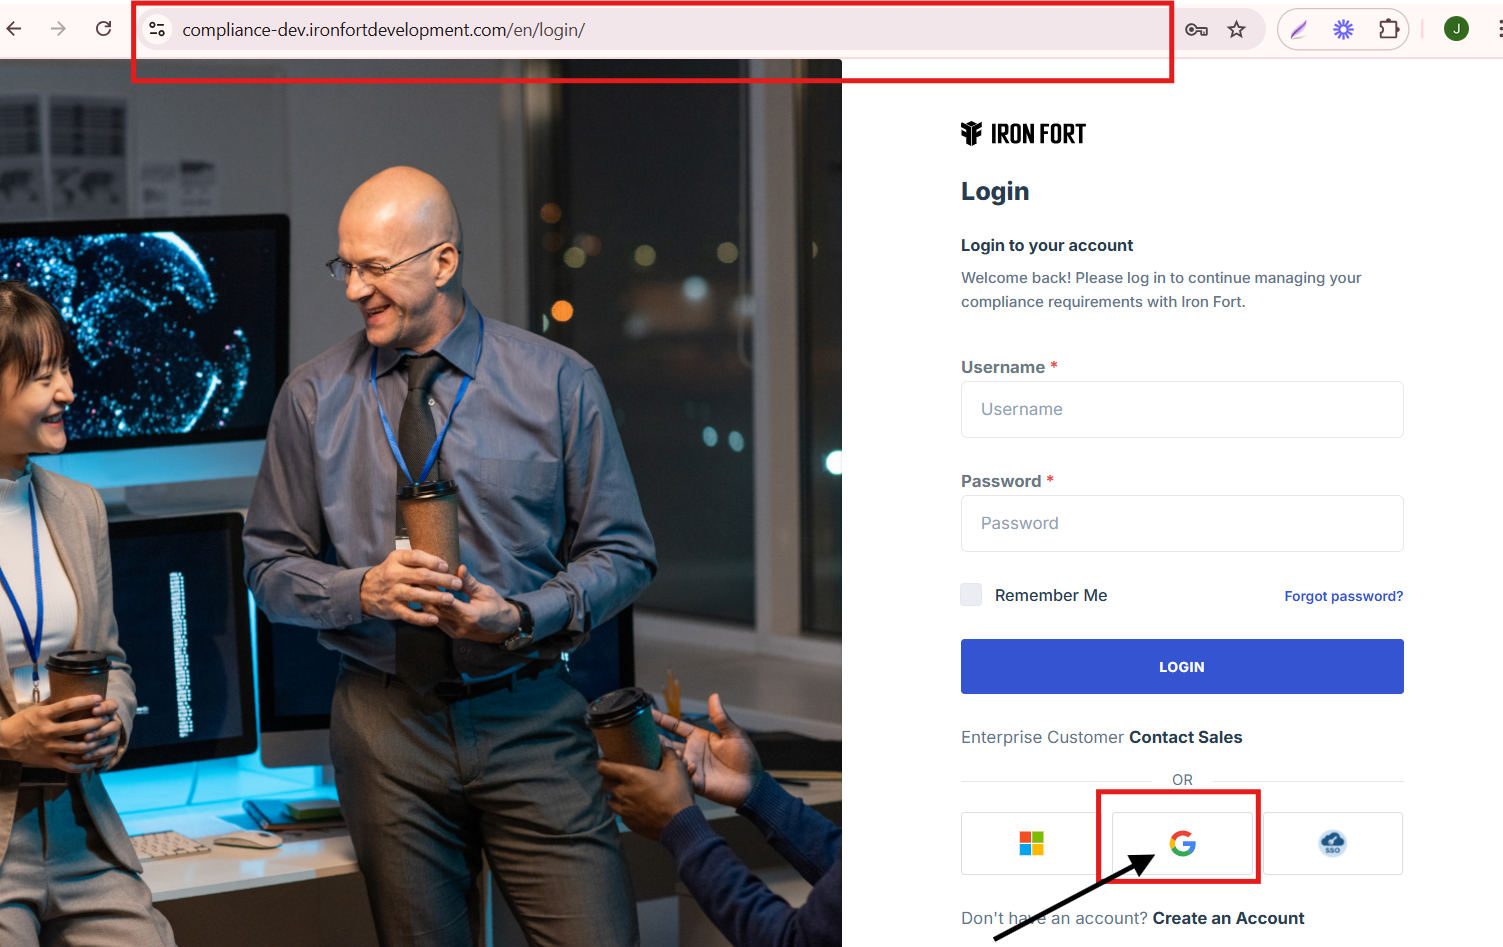
2. Type in your registered Google account and click "Next."
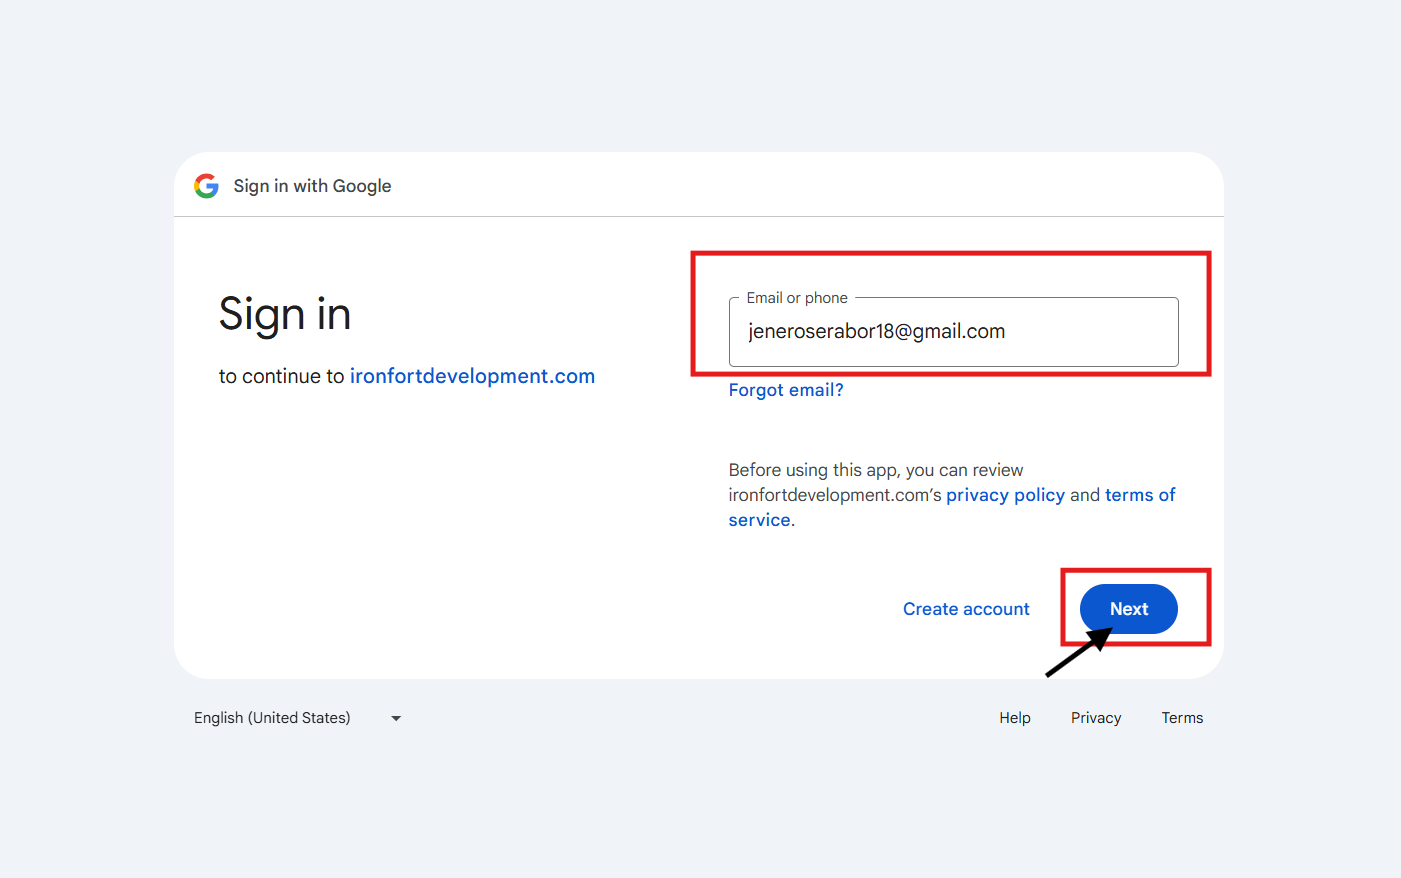
3. Input your password and proceed by clicking "Next."
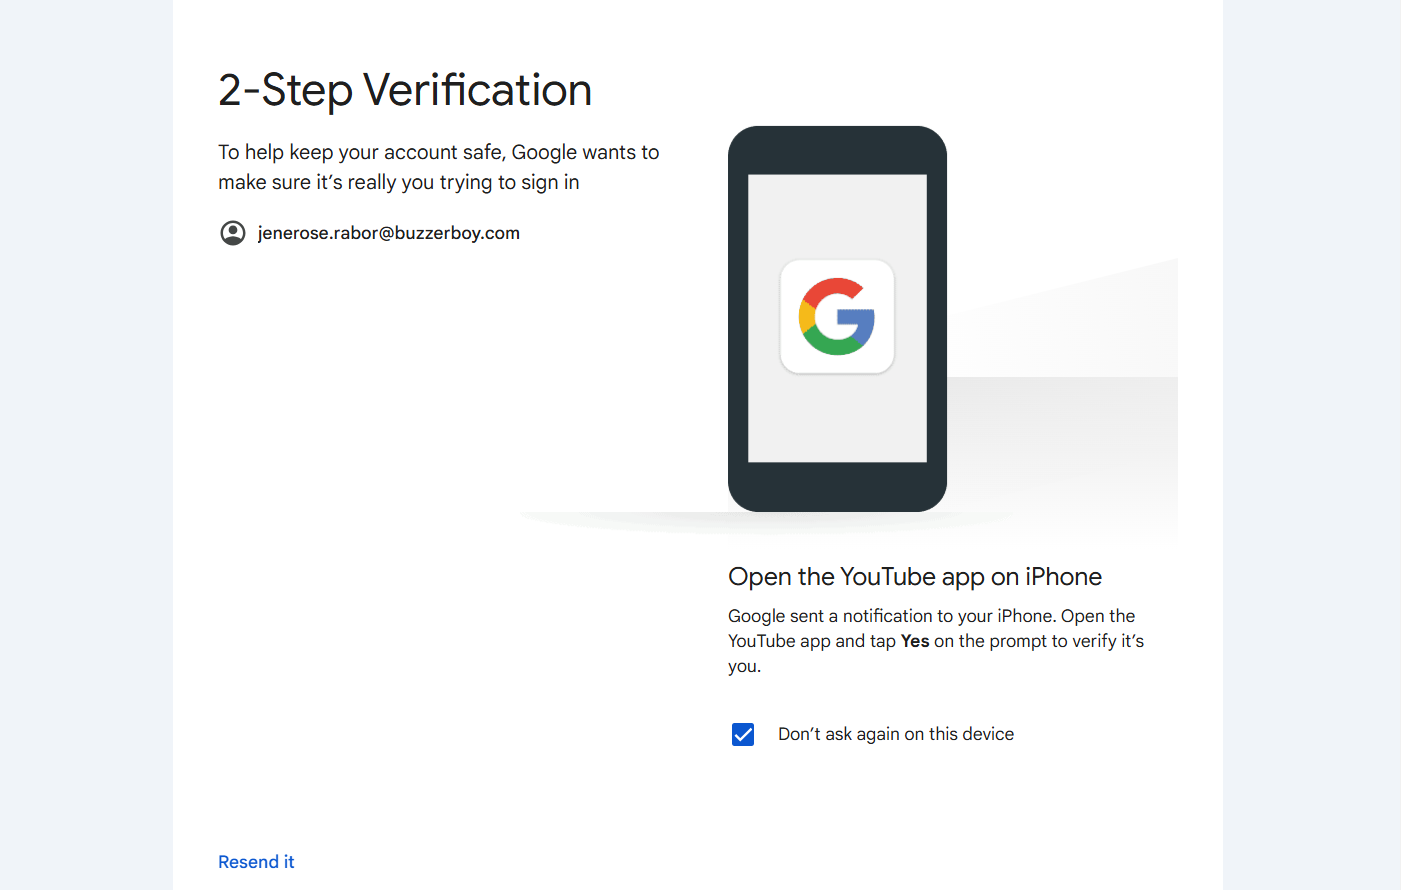
4. Complete the 2-Step Verification and Follow the verification prompt to confirm your identity.
5. Once verified, you should be successfully logged in.
-
Microsoft using Google Account
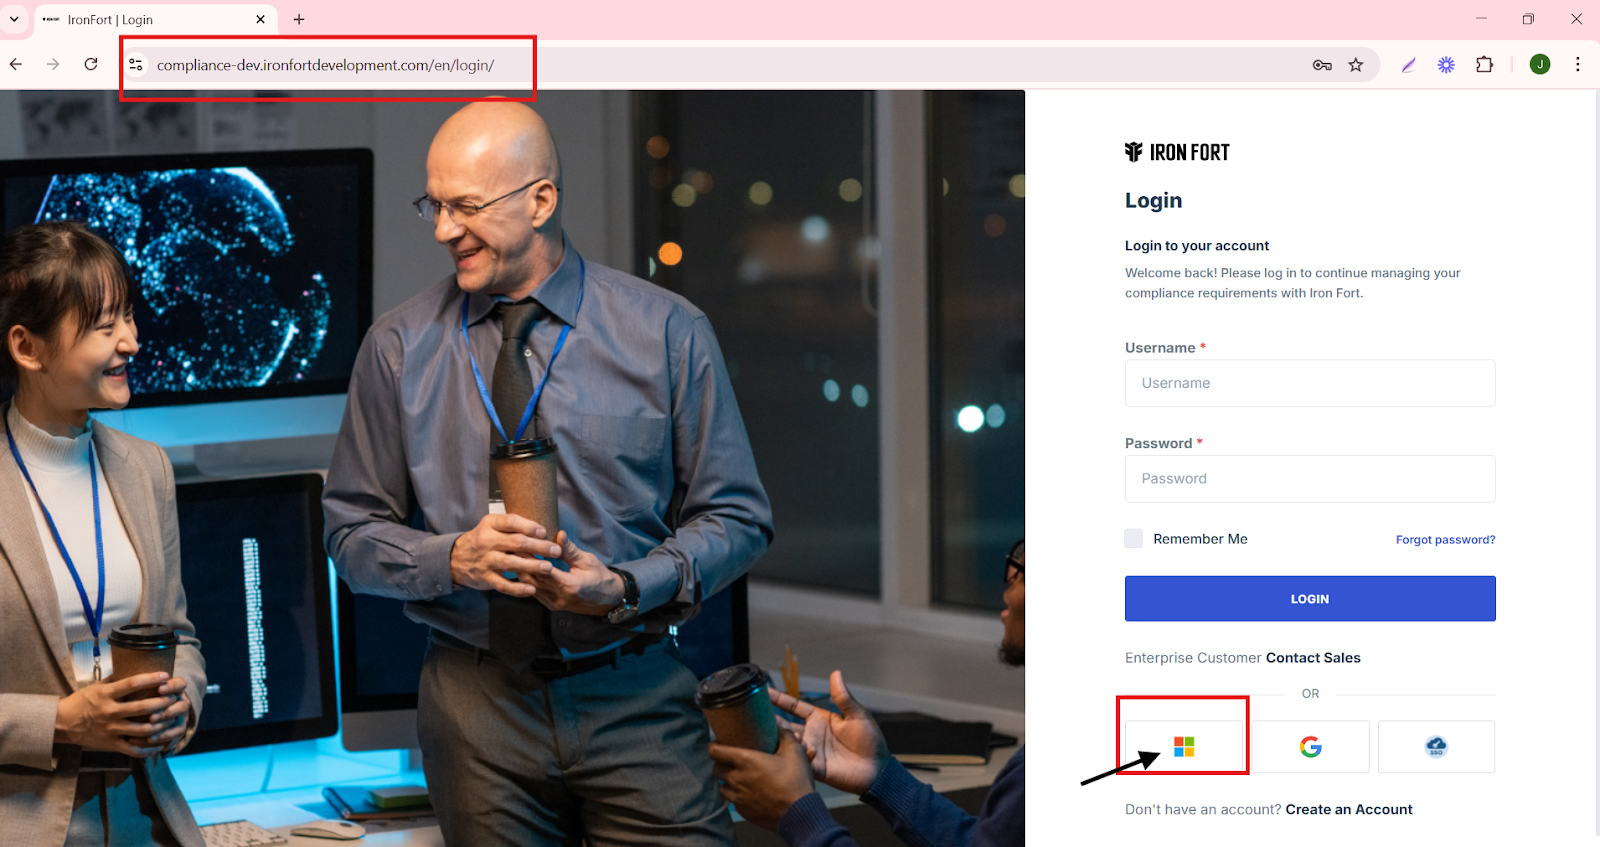
- Navigate to your organization’s Iron Fort Compliance login page
- Click the Microsoft logo to log in.
- You will be redirected to the approval page to request access from the Iron Fort admin.
- The admin will be notified
- Wait for a confirmation email regarding your access request.
- After getting approved, reload your Iron Fort website page and try logging in using Microsoft
1. Navigate to your organization’s Iron Fort Compliance login page
For example: https://compliance-demo.ironfortdemos.com/en/login/?next=/en
2. Click the Microsoft logo to log in.
3. You will be redirected to the approval page to request access from the Iron Fort admin.

NOTE: In some cases, the Entra Directory administrator must approve your request before proceeding.
4. The admin will be notified via email and must review and approve your request before access is granted
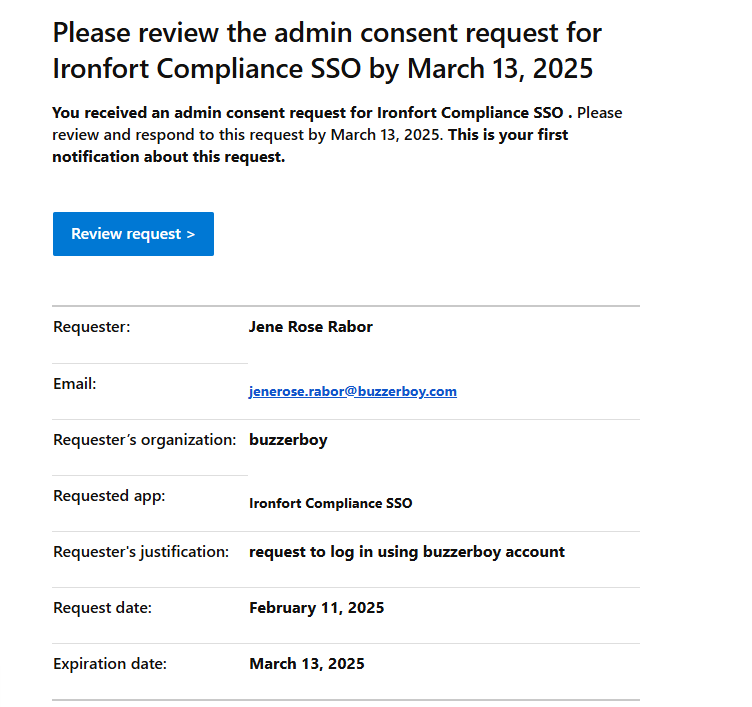
5. Wait for a confirmation email regarding your access request.
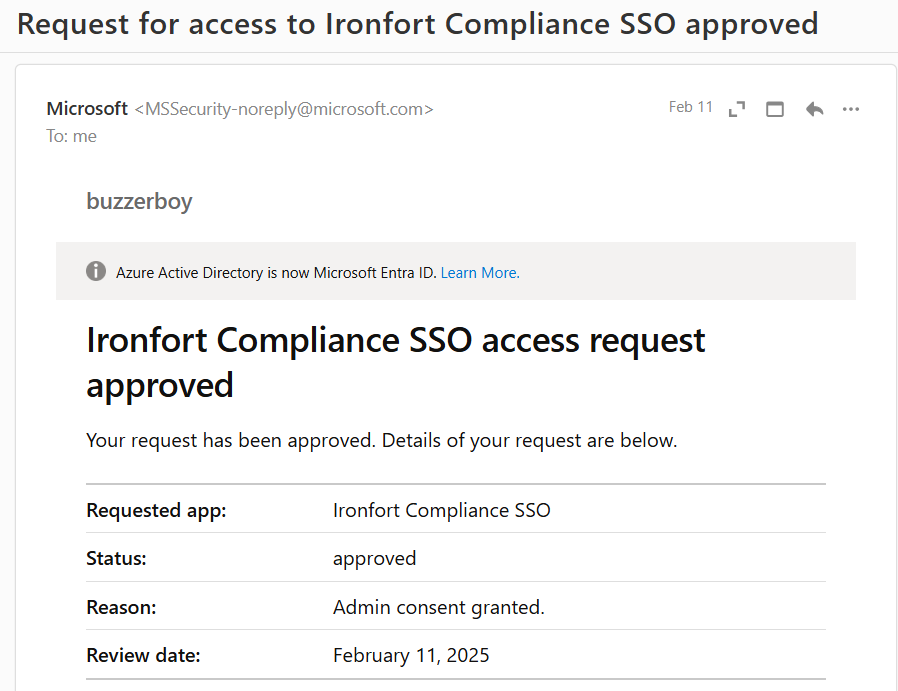
6. After getting approved, reload your Iron Fort website page and try logging in using Microsoft. You should be able to log in immediately.
-
Change your password
- Navigate to your organization’s Iron Fort Compliance login page
- Wait for a One-Time Password (OTP) that will be sent to your registered email.
- Enter the OTP to verify your identity and click “validate.”
- After logging in, you will be redirected to the “Main Dashboard” page.
- Click on your profile icon located in the upper right corner of the screen.
- Select "Change Password" from the dropdown menu.
- Enter the following details
- Click "Save Changes" to update your password.
1. Navigate to your organization’s Iron Fort Compliance login page
For example: https://compliance-demo.ironfortdemos.com/en/login/?next=/en

2. Wait for a One-Time Password (OTP) that will be sent to your registered email.
3. Enter the OTP to verify your identity and click “validate.”

4. After logging in, you will be redirected to the “Main Dashboard” page.
5. Click on your profile icon located in the upper right corner of the screen.
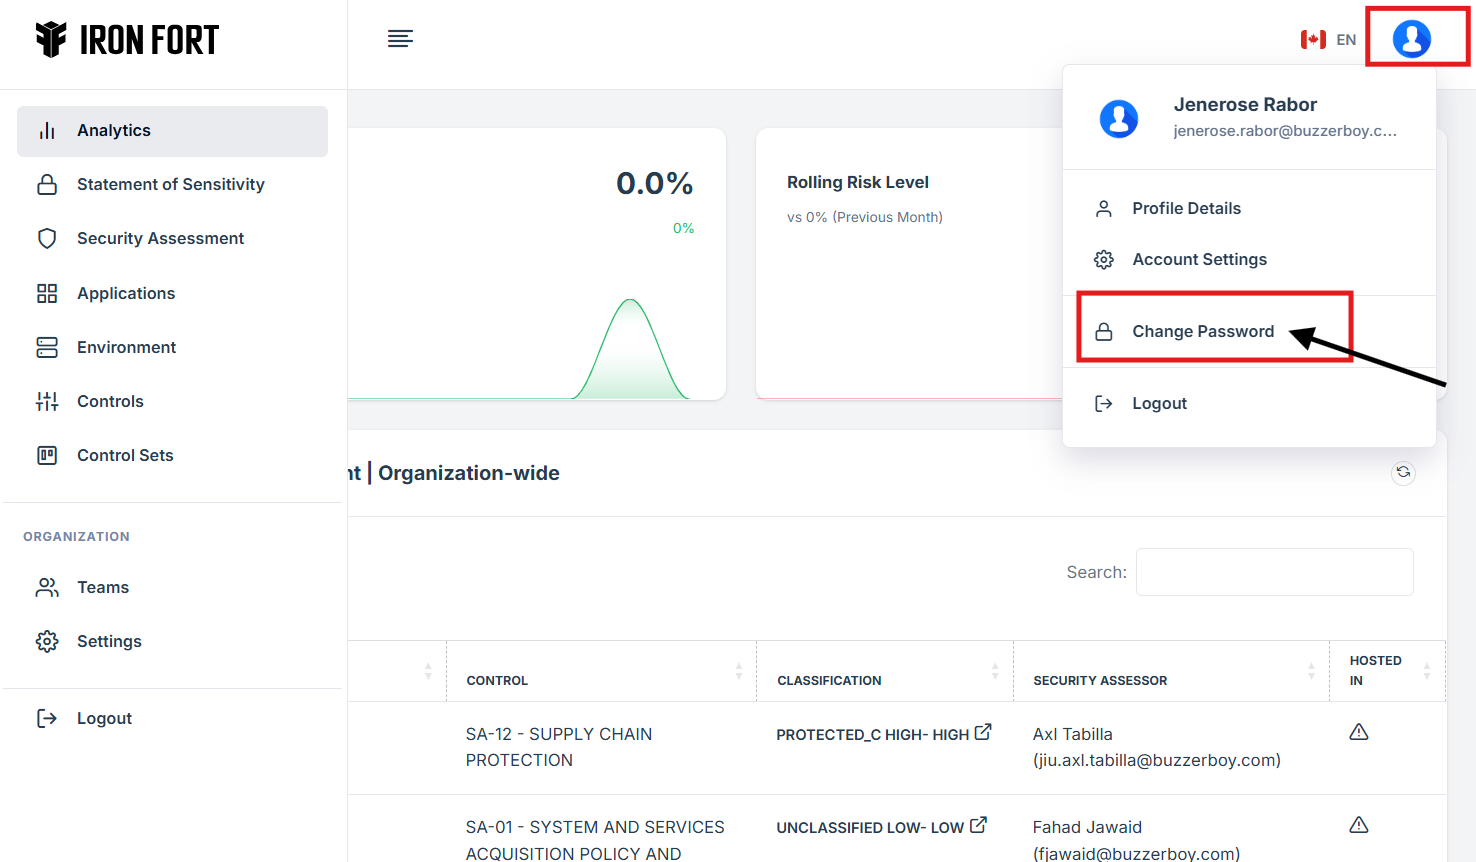
6. Select "Change Password" from the dropdown menu.
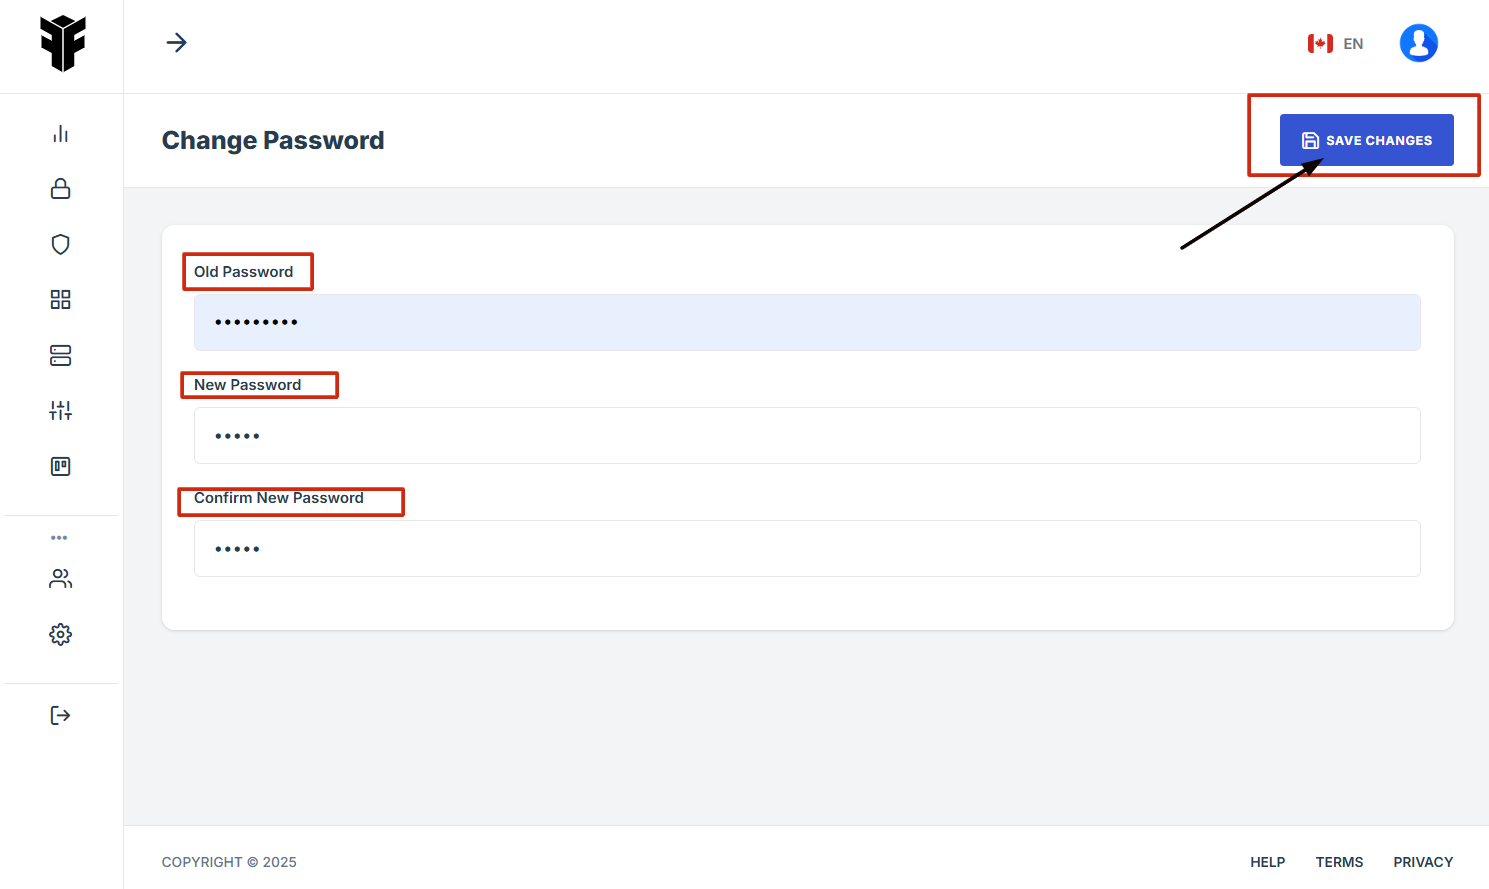
7. Enter the following details
Old Password (Your current password)
New Password (Create a strong new password)
Confirm New Password (Re-enter the new password for confirmation)
8. Click "Save Changes" to update your password.
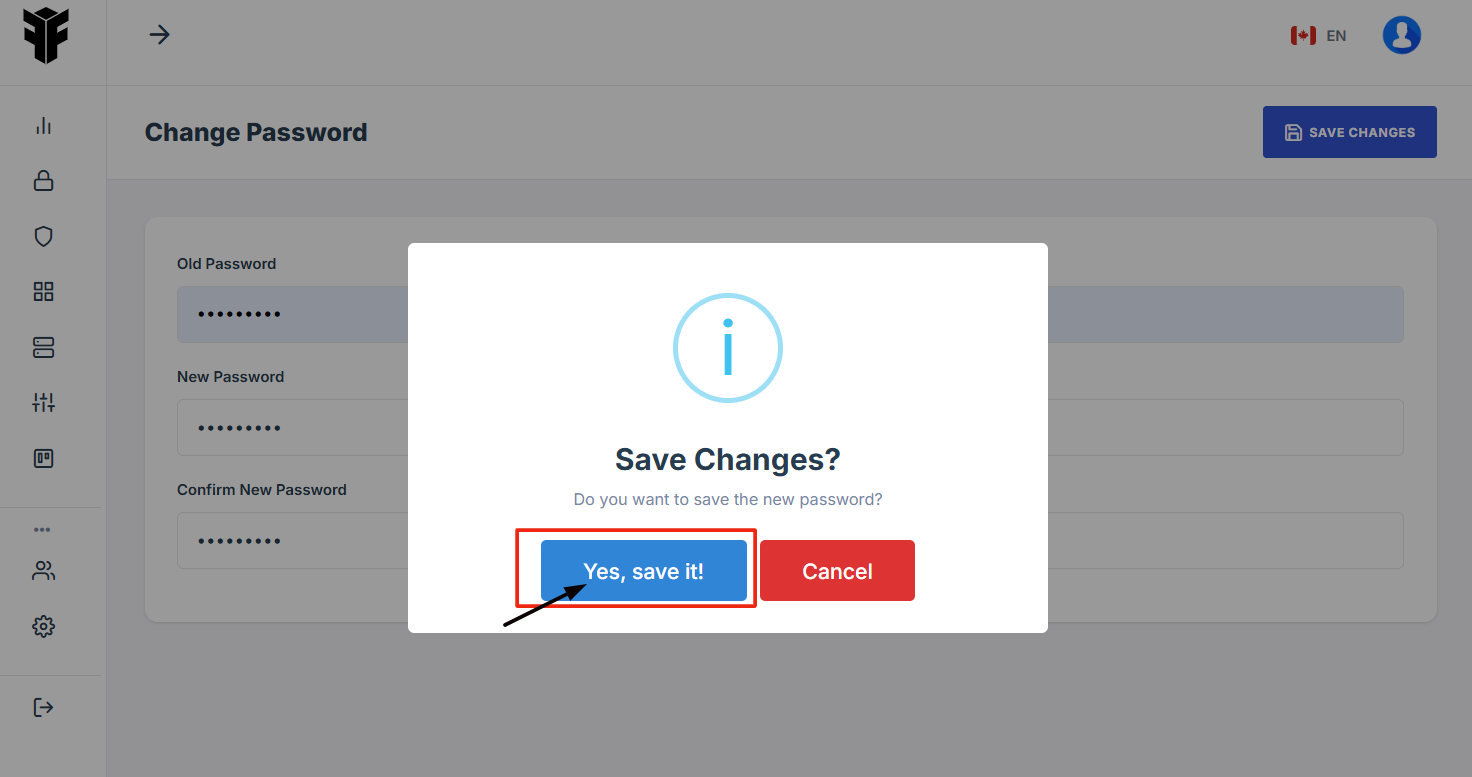
A confirmation message will appear. Click "Save it" to finalize the changes.
-
Check what permissions you have
- Navigate to your organization’s Iron Fort Compliance login page
- Wait for a One-Time Password (OTP) that will be sent to your registered email.
- Enter the OTP to verify your identity and click “validate.”
- After logging in, you will be taken to the Main Dashboard.
- On the top right corner of the screen, click on your profile icon.
- From the dropdown menu, select "Account Settings"
- Inside Account Settings, find and click on the "Permissions" tab.
- Here, you will see a list of permissions assigned to your user account.
- Additional Information
1. Navigate to your organization’s Iron Fort Compliance login page
For example: https://compliance-demo.ironfortdemos.com/en/login/?next=/en
2. Wait for a One-Time Password (OTP) that will be sent to your registered email.
3. Enter the OTP to verify your identity and click “validate.”
4. After logging in, you will be taken to the Main Dashboard.
5. On the top right corner of the screen, click on your profile icon.
6. From the dropdown menu, select "Account Settings"
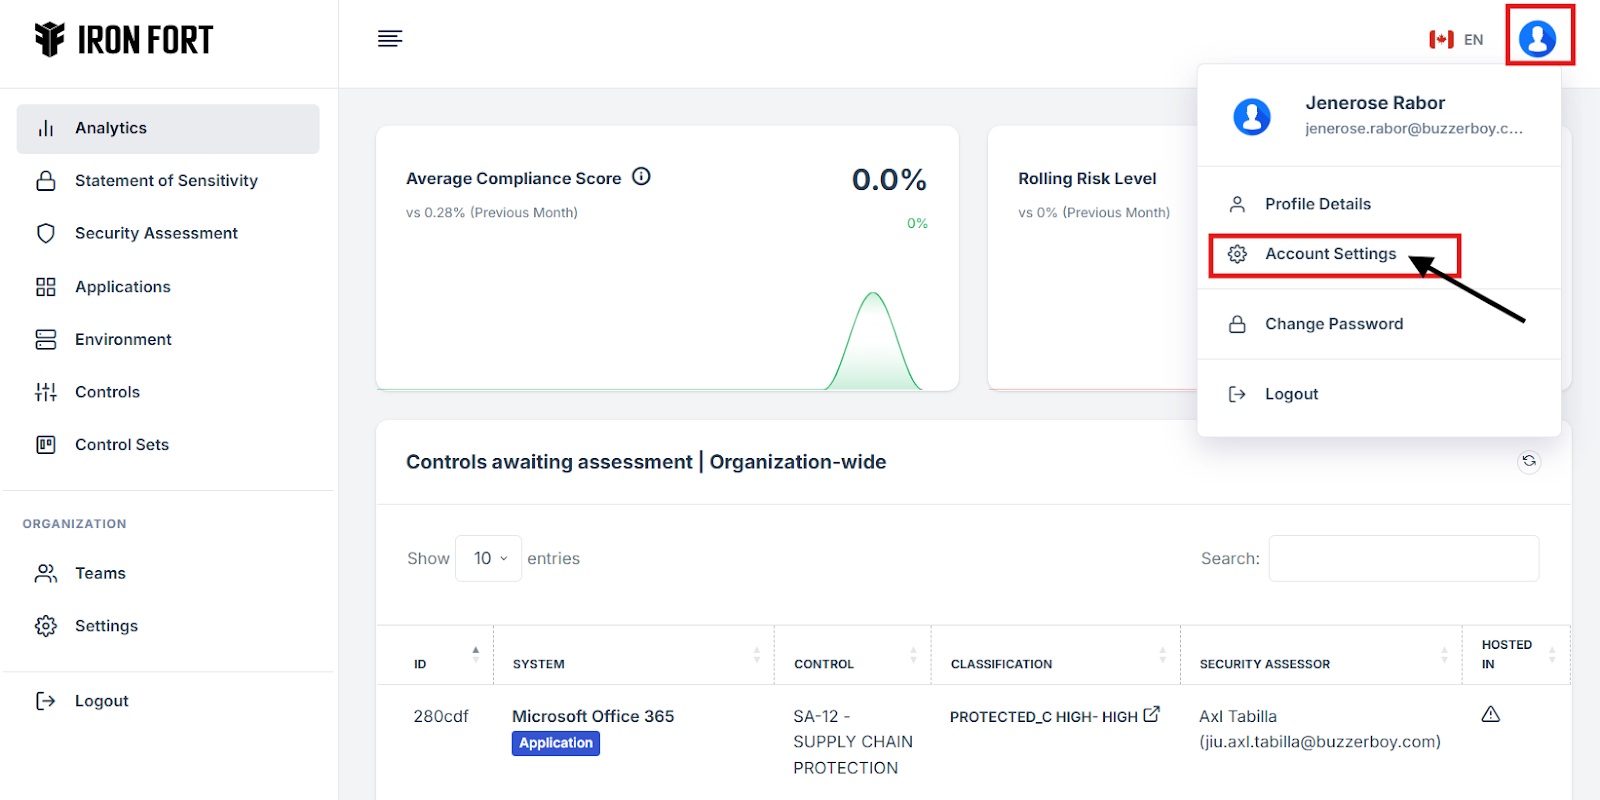
7. Inside Account Settings, find and click on the "Permissions" tab.
8. Here, you will see a list of permissions assigned to your user account.
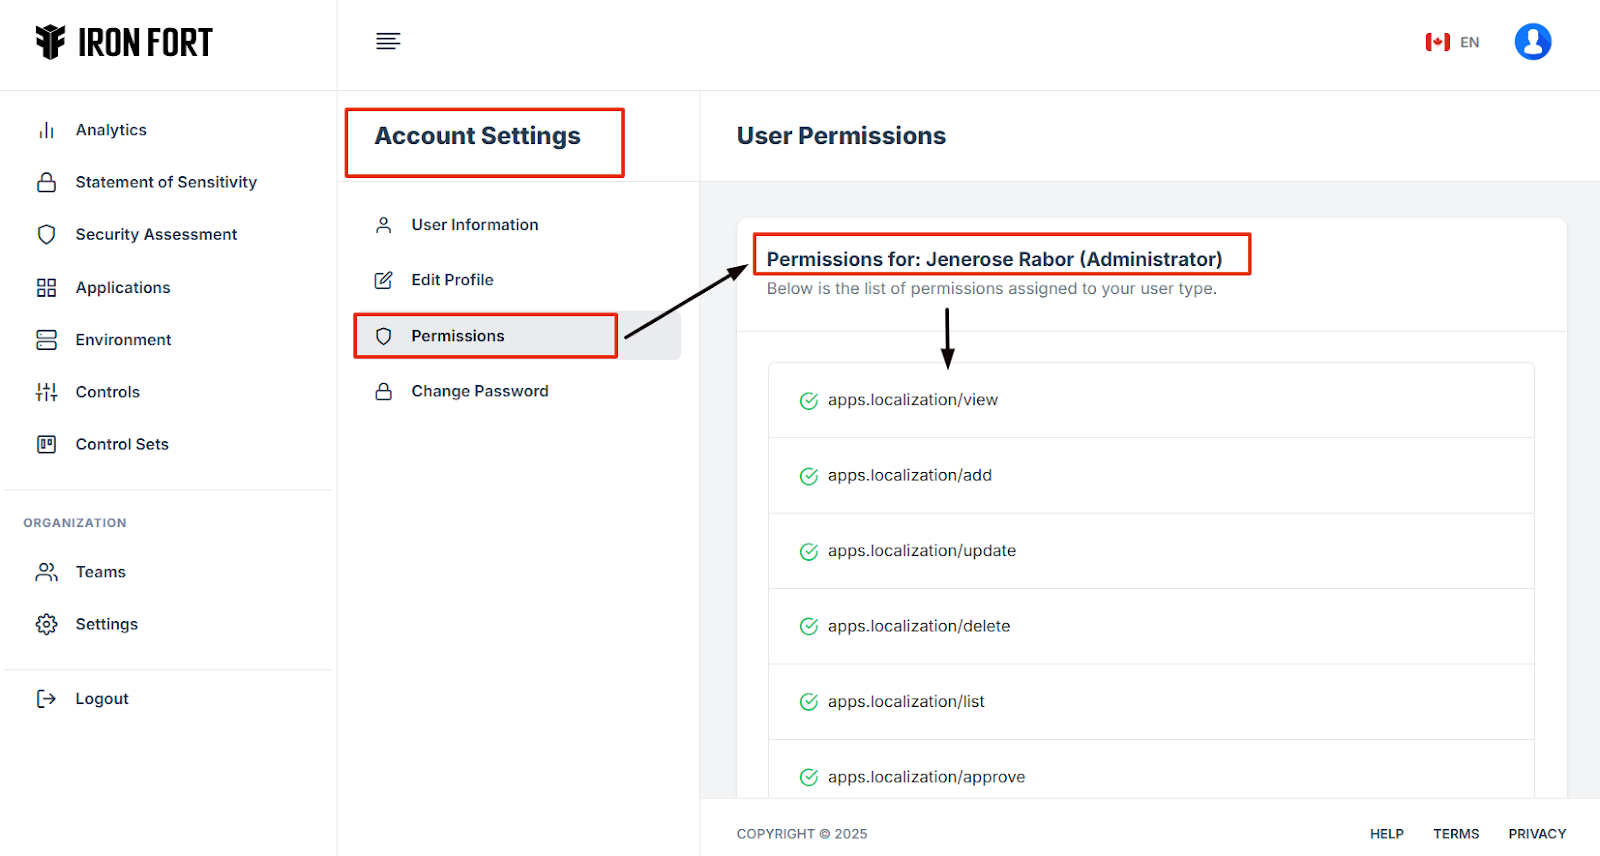
9. Additional Information
Administrator - Full access to all features, including user management.
Security Practitioner - Access to security assessments, reports, and risk analysis.
Viewer - Read-only access to dashboards and reports.
-
Setup your user profile
- Navigate to your organization’s Iron Fort Compliance login page
- Log In to Your Account (Enter your username and password to log in).
- Wait for a One-Time Password (OTP) that will be sent to your registered email.
- Enter the OTP to verify your identity and click “validate.”
- Once logged in, a welcome prompt will appear displaying
- After logging in, you will be redirected to the Edit Profile page.
- Fill Out the Required Fields
- Optionally, add your Company, Website, and LinkedIn Profile.
- Set Communication Preferences
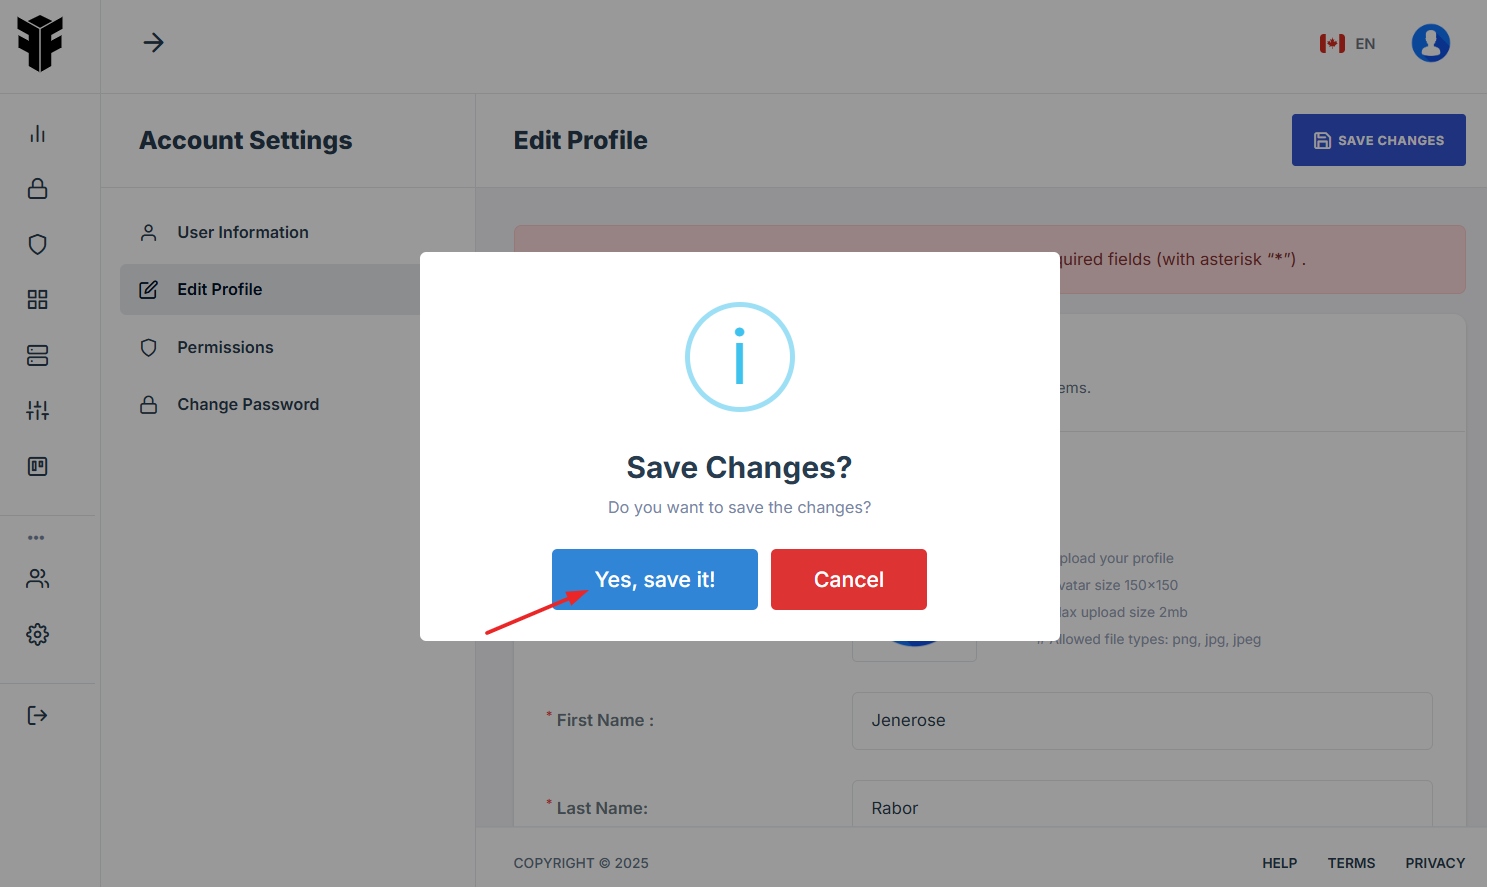
- Click the Save Changes button to finalize your profile setup
- Click “Yes, save it” to save profile set up.
1. Navigate to your organization’s Iron Fort Compliance login page
For example: https://compliance-demo.ironfortdemos.com/en/login/?next=/en
2. Log In to Your Account (Enter your username and password to log in).
3. Wait for a One-Time Password (OTP) that will be sent to your registered email.
4. Enter the OTP to verify your identity and click “validate.”

5. Once logged in, a welcome prompt will appear displaying
-
Tenant Key Information: Verifying your system access
-
User Email: Your registered email for auditing purposes
-
Last Login Details: To track your previous access
-
Iron Fort Support Email: For any login issues or concerns
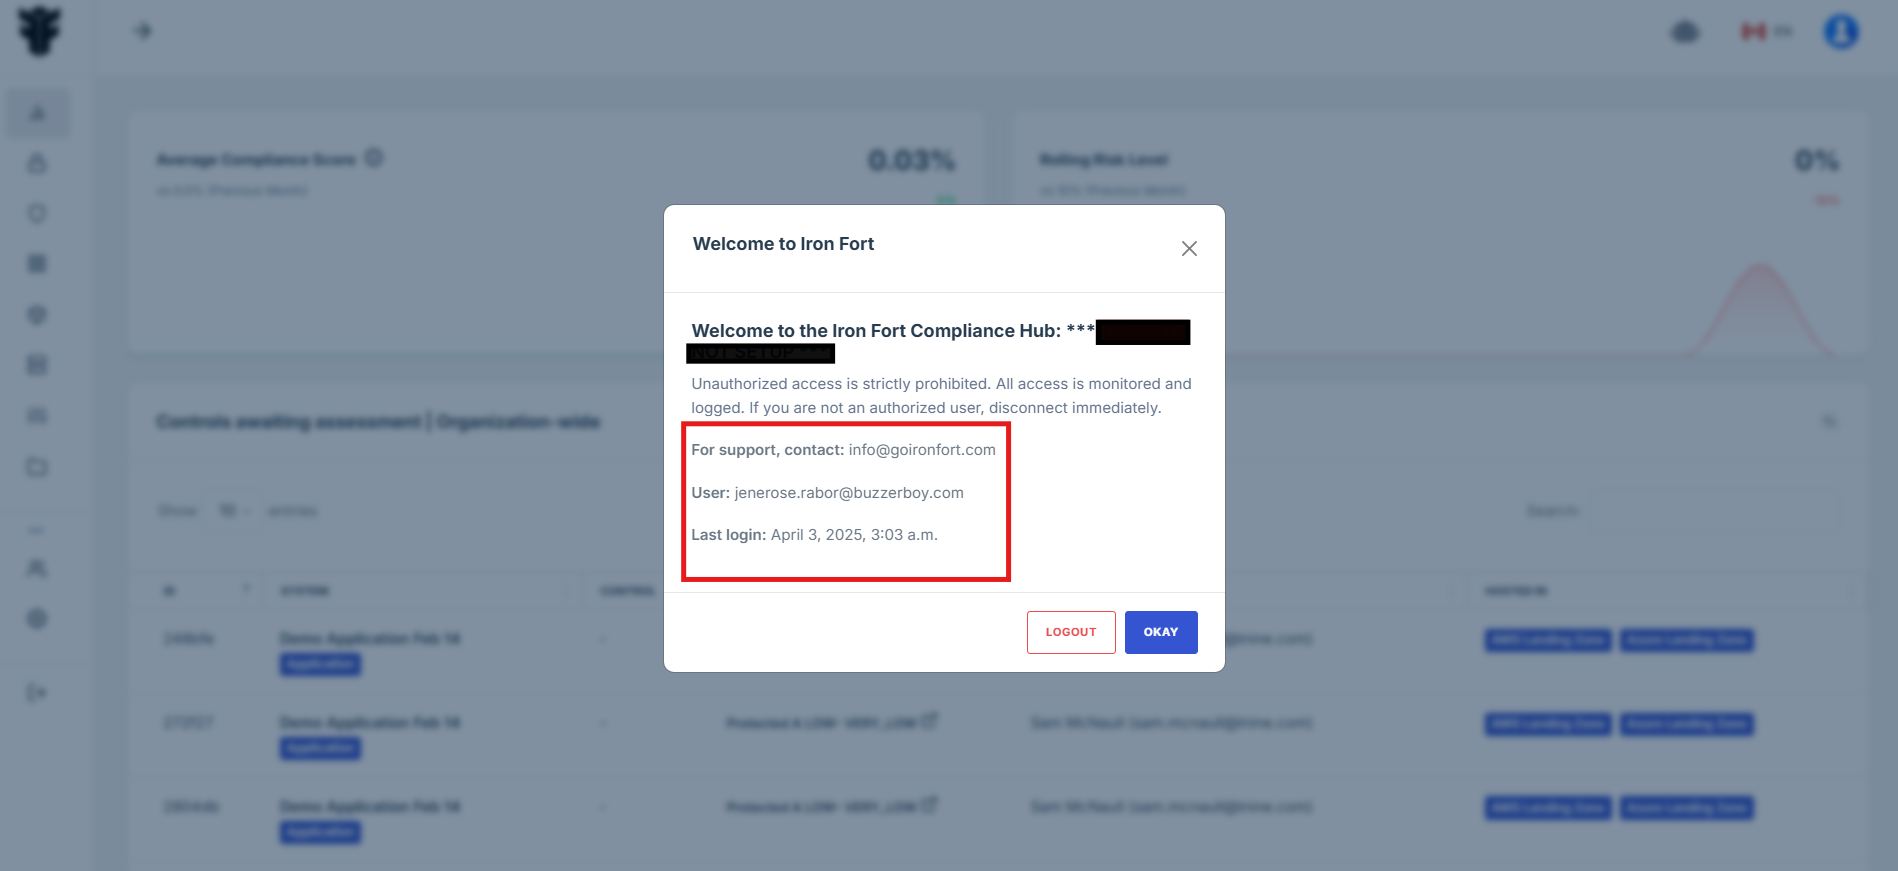
NOTE: If you recognize the details and are authorized, click "OK" to continue. However, if you are not an authorized user, click "Logout" immediately to exit.
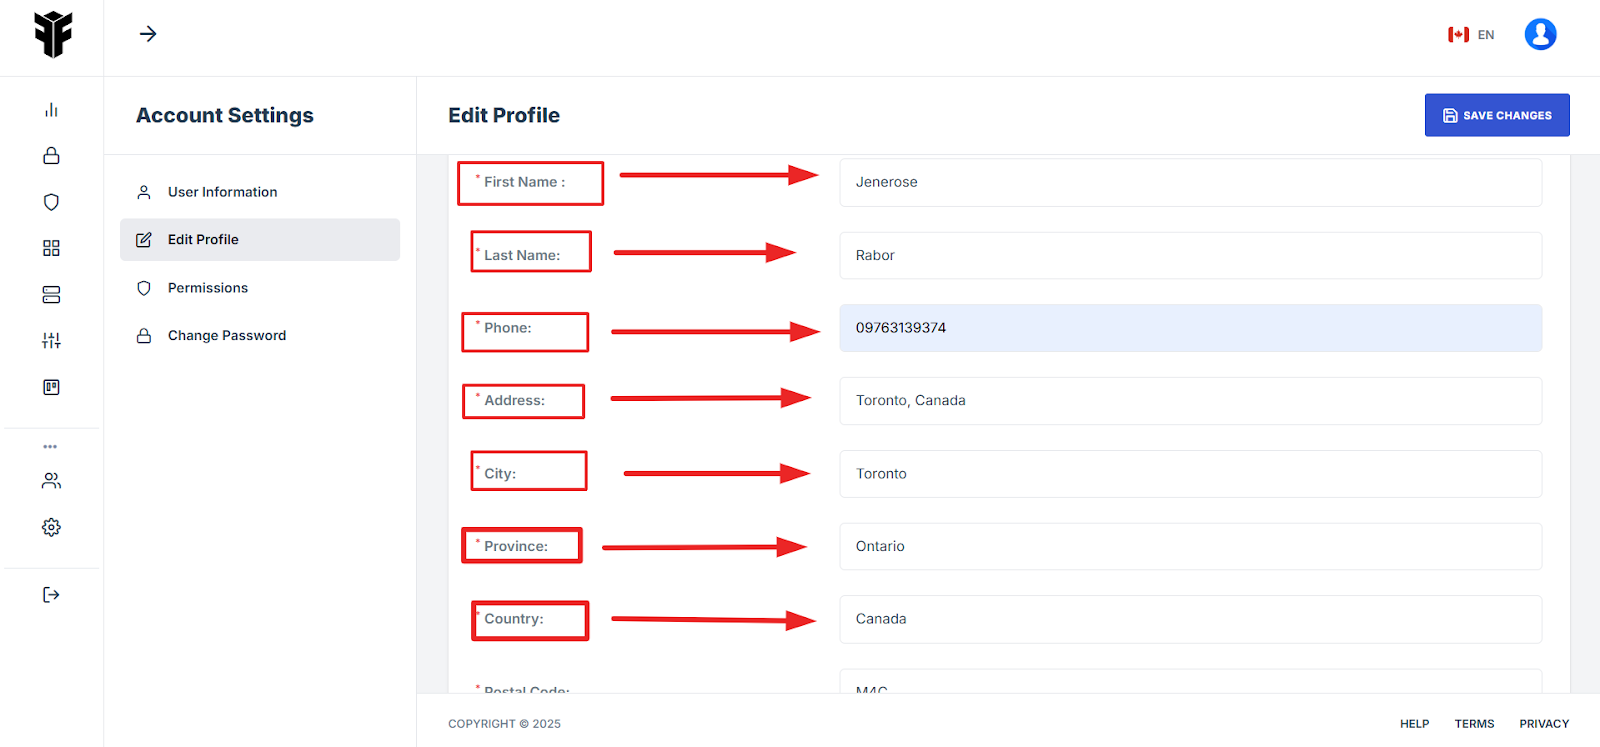
6. After logging in, you will be redirected to the Edit Profile page.
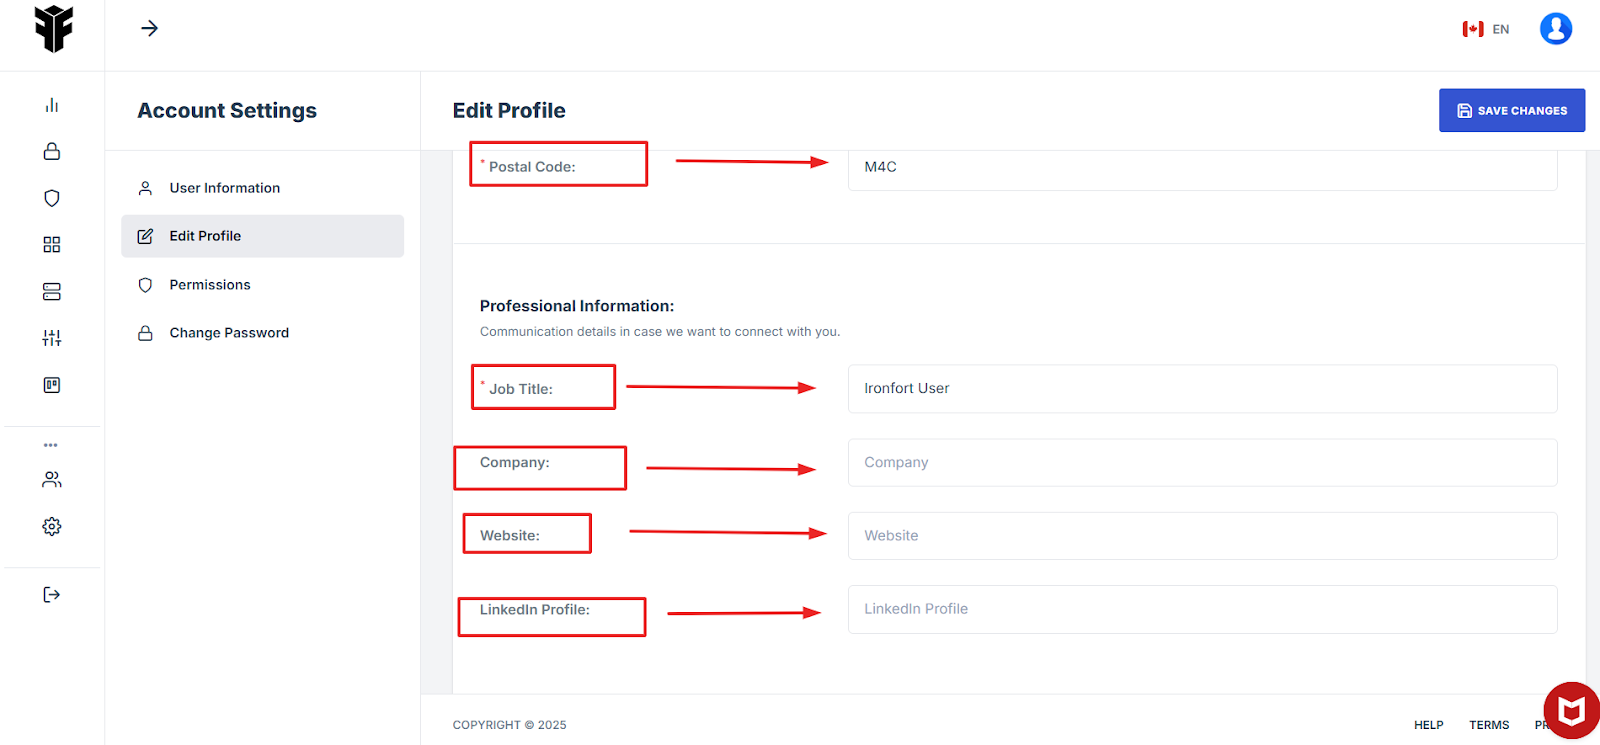
7. Fill Out the Required Fields
Upload a Profile Picture, enter your First Name and Last Name, provide your Postal Code, Input your Job Title (mandatory).

8. Optionally, add your Company, Website, and LinkedIn Profile.
9. Set Communication Preferences
Choose your Language and Timezone and manage Notification Preferences (Email, SMS, Push Notifications)

10. Click the Save Changes button to finalize your profile setup
11. Click “Yes, save it” to save profile set up.
-
Invite a Team Member
- Navigate to your organization’s Iron Fort Compliance login page
- Log In to Your Account (Enter your username and password to log in).
- Once logged in, a welcome prompt will appear displaying
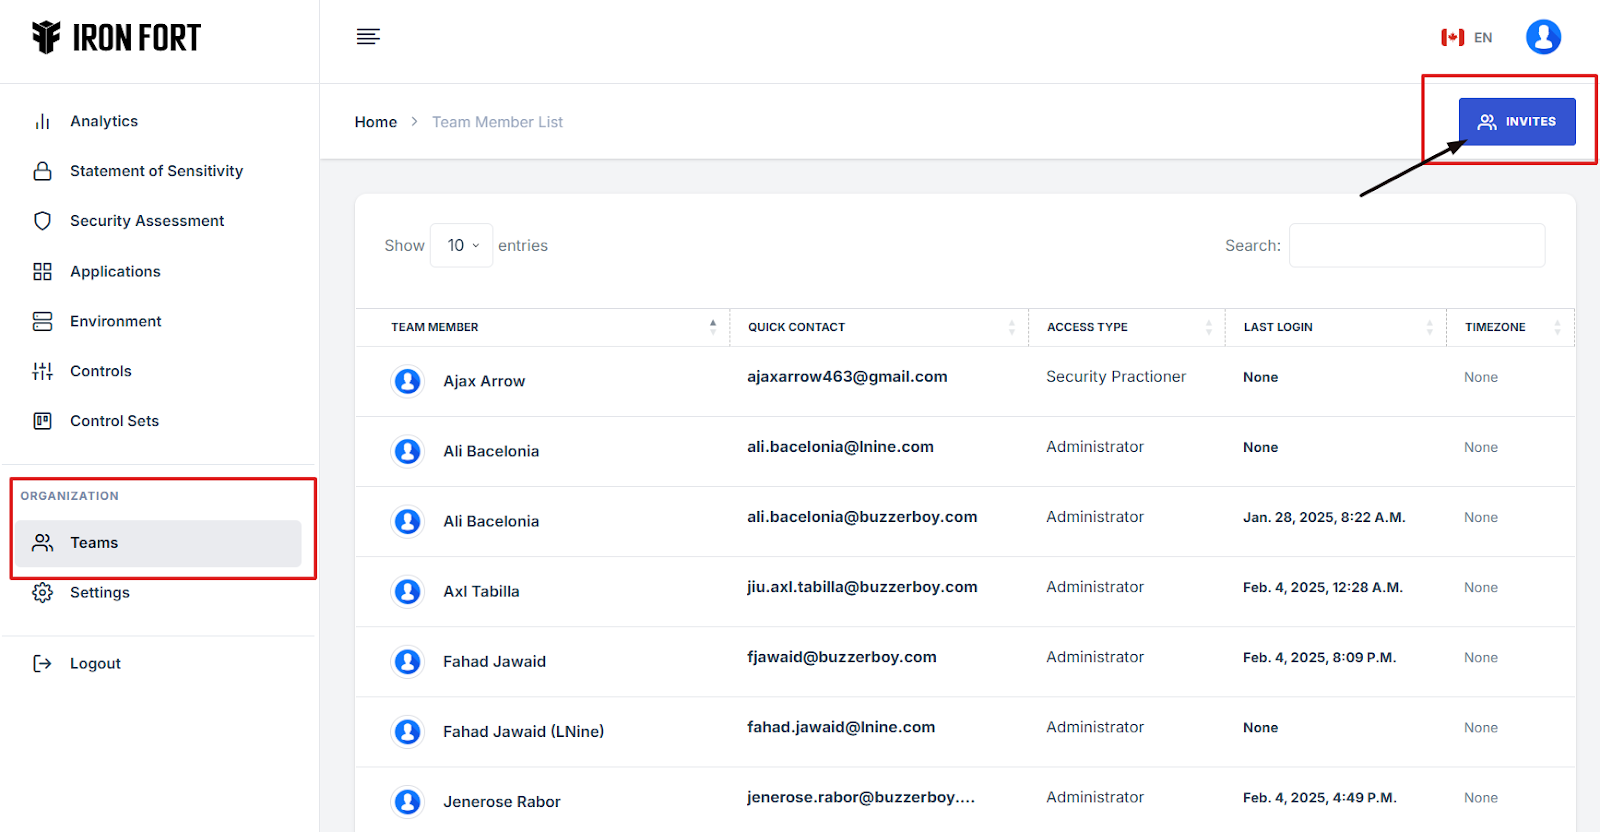
- Locate the “organization” section and look for the “Teams” tab
- Click on this section to manage your team members.
- After clicking the "Teams" tab, you will be directed to this page. Click the “Invite” button in the top right corner.
- Click “invite team member” tab beside the team member button on the top right corner.
- Provide the required information for the new team member
- Ensure that the email address is correct
- After entering the necessary details
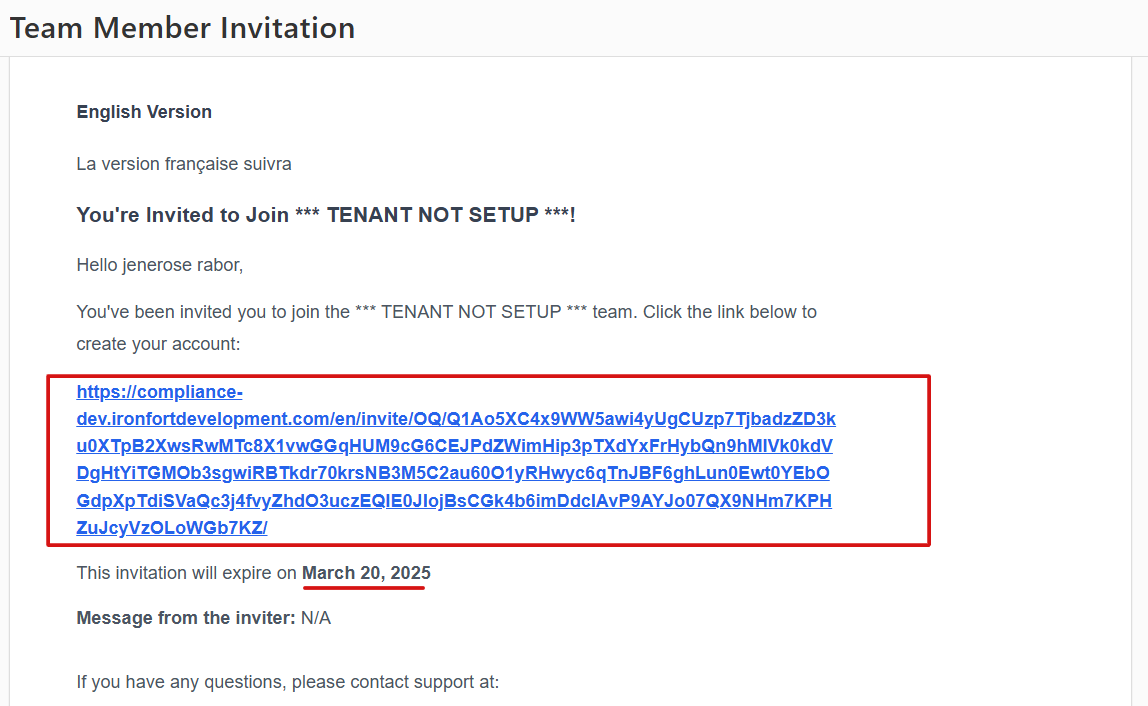
- The invited team member needs to accept the invitation by clicking the link in the email and setting up their account.
- Once the invitation is accepted, the new team member should appear in your team's list within the platform.
1. Navigate to your organization’s Iron Fort Compliance login page
For example: https://compliance-demo.ironfortdemos.com/en/login/?next=/en
2. Log In to Your Account (Enter your username and password to log in).
3. Once logged in, go to the “organization” section and look for the “Teams” tab in the main navigation menu.
-
Tenant Key Information: Verifying your system access
-
User Email: Your registered email for auditing purposes
-
Last Login Details: To track your previous access
-
Iron Fort Support Email: For any login issues or concerns
NOTE: If you recognize the details and are authorized, click "OK" to continue. However, if you are not an authorized user, click "Logout" immediately to exit.
4. Locate the “organization” section and look for the “Teams” tab in the main navigation menu.
5. Click on this section to manage your team members.

6. After clicking the "Teams" tab, you will be directed to this page. Click the “Invite” button in the top right corner.
7. Click “invite team member” tab beside the team member button on the top right corner.
8. Provide the required information for the new team member
(Role, email address, first and last name, notes (optional), and member expiration date)
9. Ensure that the email address is correct, as the invitation will be sent there. Then Click “save changes.”
10. After entering the necessary details
The new team member will receive an email with instructions on how to join the platform.
11. The invited team member needs to accept the invitation by clicking the link in the email and setting up their account.

12. Once the invitation is accepted, the new team member should appear in your team's list within the platform.
-
View Team Members and their Access Type
- Navigate to your organization’s Iron Fort Compliance login page
- Log In to Your Account (Enter your username and password to log in).
- Check your email for the One-Time Password (OTP) sent on your email and enter the OTP to proceed.
- Once logged in, a welcome prompt will appear displaying
- Once on the main dashboard, move your mouse cursor to the vertical menu on the left side of the screen.
- On the organization tab locate and click the "Teams" button.
- A list of team members will appear, displaying their names and contact details.
- You can find the access type of each team member in the "Access Type" column.
1. Navigate to your organization’s Iron Fort Compliance login page
For example: https://compliance-demo.ironfortdemos.com/en/login/?next=/en
2. Log In to Your Account (Enter your username and password to log in).
3. Check your email for the One-Time Password (OTP) sent on your email and enter the OTP to proceed.

4. Once logged in, a welcome prompt will appear displaying
-
Tenant Key Information: Verifying your system access
-
User Email: Your registered email for auditing purposes
-
Last Login Details: To track your previous access
-
Iron Fort Support Email: For any login issues or concerns
NOTE: If you recognize the details and are authorized, click "OK" to continue. However, if you are not an authorized user, click "Logout" immediately to exit.
5. Once on the main dashboard, move your mouse cursor to the vertical menu on the left side of the screen.
6. On the organization tab locate and click the "Teams" button.
7. A list of team members will appear, displaying their names and contact details.
8. You can find the access type of each team member in the "Access Type" column.
-
Switch languages to English or French
- Navigate to your organization’s Iron Fort Compliance login page
- Log In to Your Account (Enter your username and password to log in).
- Wait for a One-Time Password (OTP) that will be sent to your registered email.
- Enter the OTP to verify your identity and click “validate.”
- Once logged in, a welcome prompt will appear displaying
- After logging in, you will be redirected to the “Main Dashboard” page.
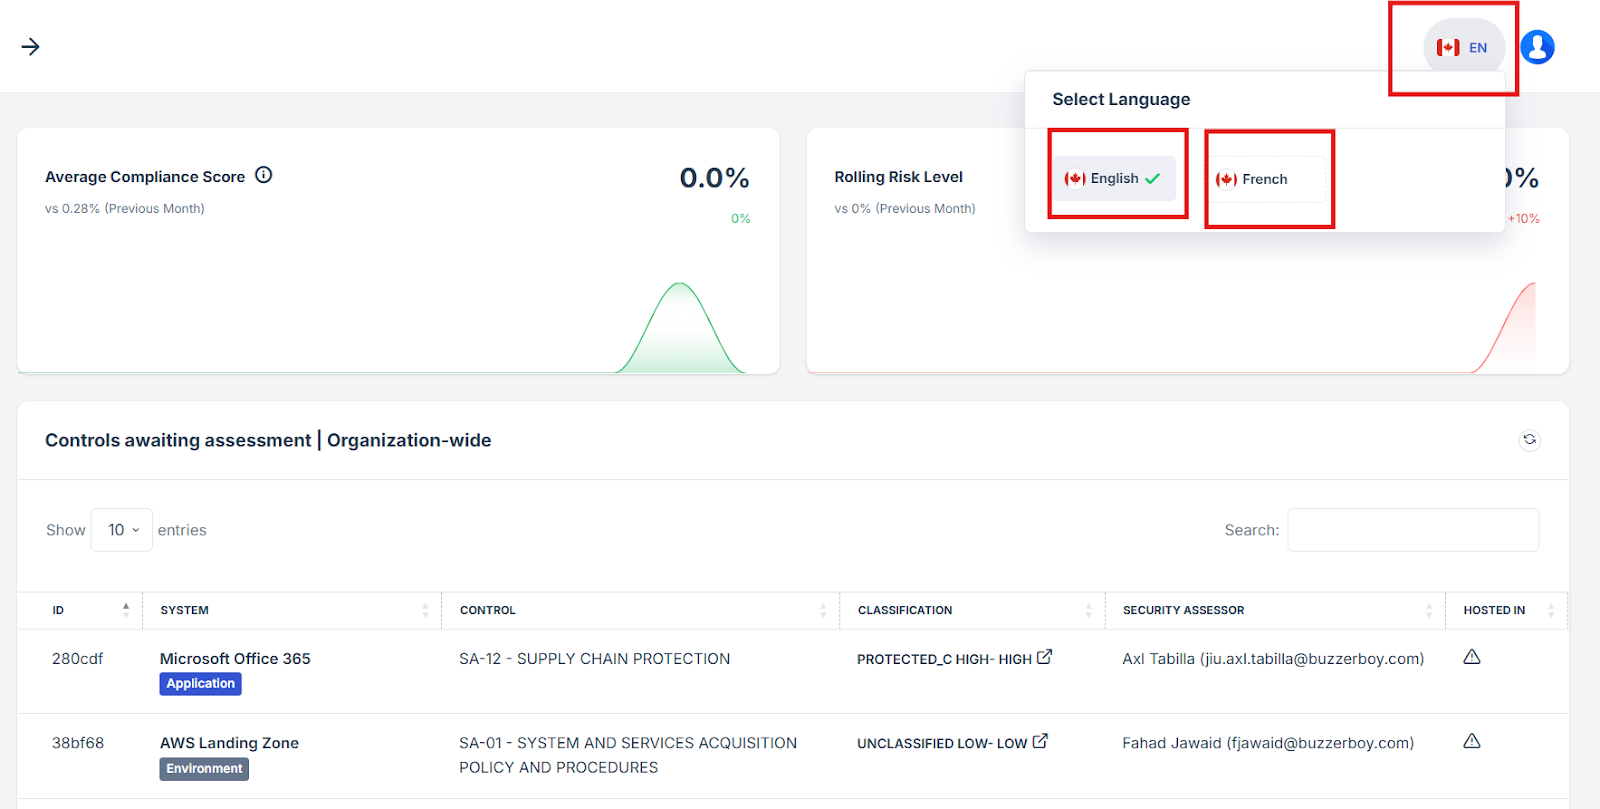
- Locate the flag icon next to your profile picture.
- Click the flag icon and select your preferred language from the dropdown menu.
1. Navigate to your organization’s Iron Fort Compliance login page
For example: https://compliance-demo.ironfortdemos.com/en/login/?next=/en
2. Log In to Your Account (Enter your username and password to log in).
3. Wait for a One-Time Password (OTP) that will be sent to your registered email.
4. Enter the OTP to verify your identity and click “validate.”

5. Once logged in, a welcome prompt will appear displaying
-
Tenant Key Information: Verifying your system access
-
User Email: Your registered email for auditing purposes
-
Last Login Details: To track your previous access
-
Iron Fort Support Email: For any login issues or concerns
NOTE: If you recognize the details and are authorized, click "OK" to continue. However, if you are not an authorized user, click "Logout" immediately to exit.
6. After logging in, you will be redirected to the “Main Dashboard” page.
7. Locate the flag icon next to your profile picture.
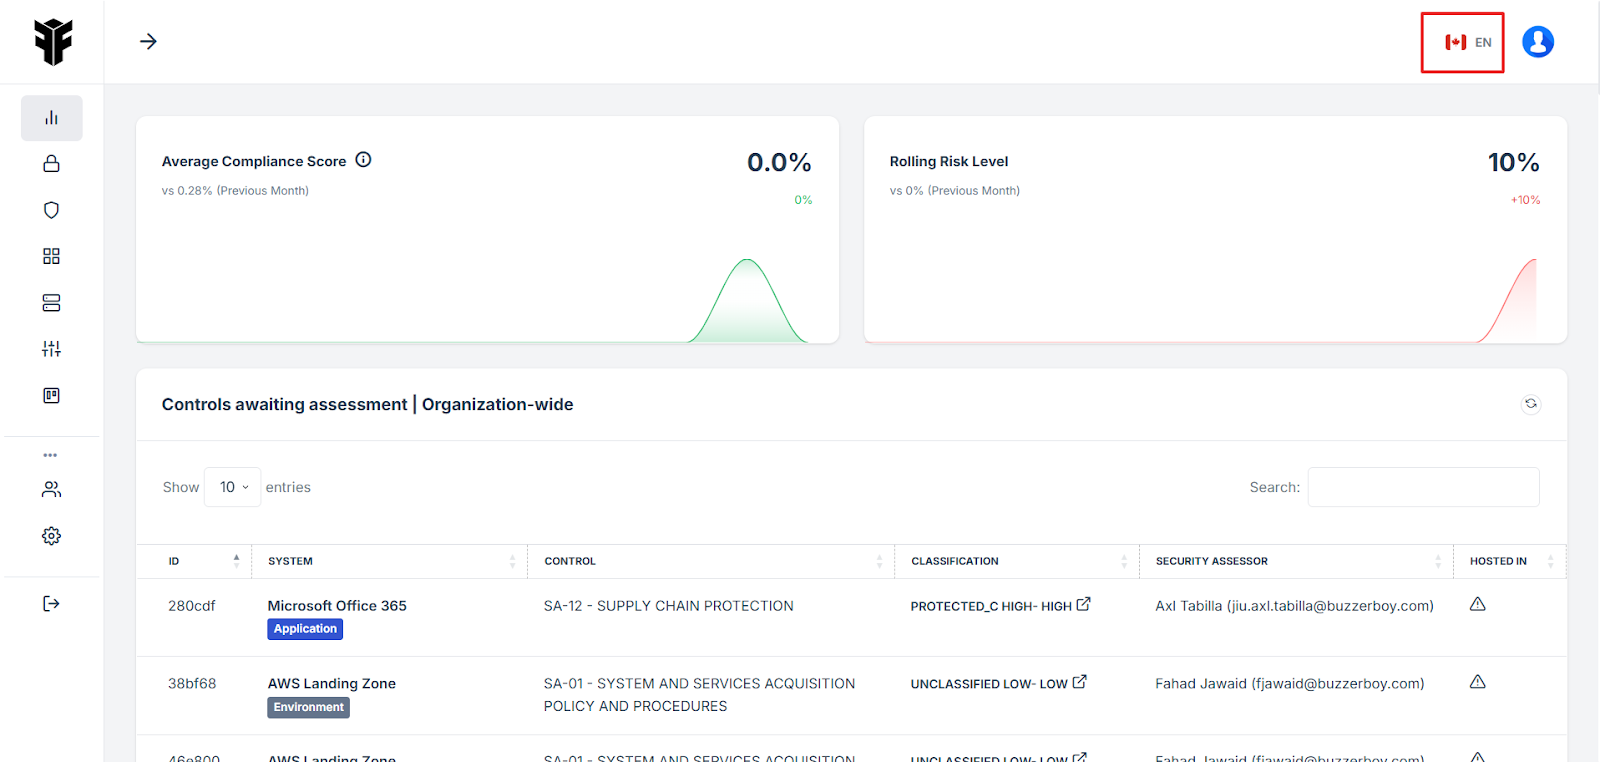
8. Click the flag icon and select your preferred language from the dropdown menu.
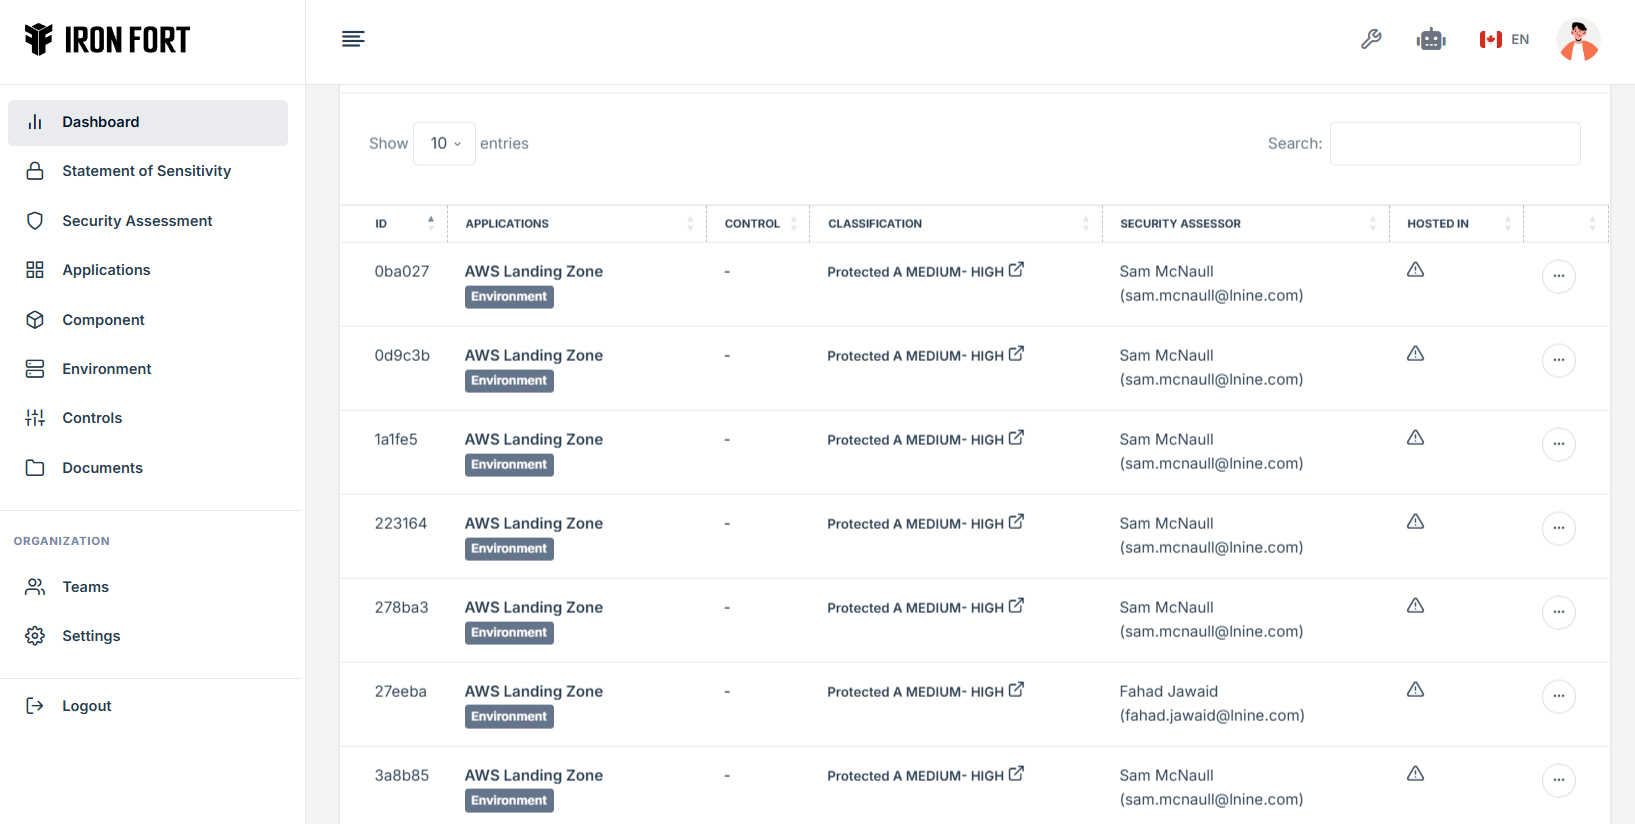
1. Go to the Main Dashboard
NOTE: Ensure you are logged into your account and on the dashboard. (Click here to see the steps on how to log in in Iron Fort)
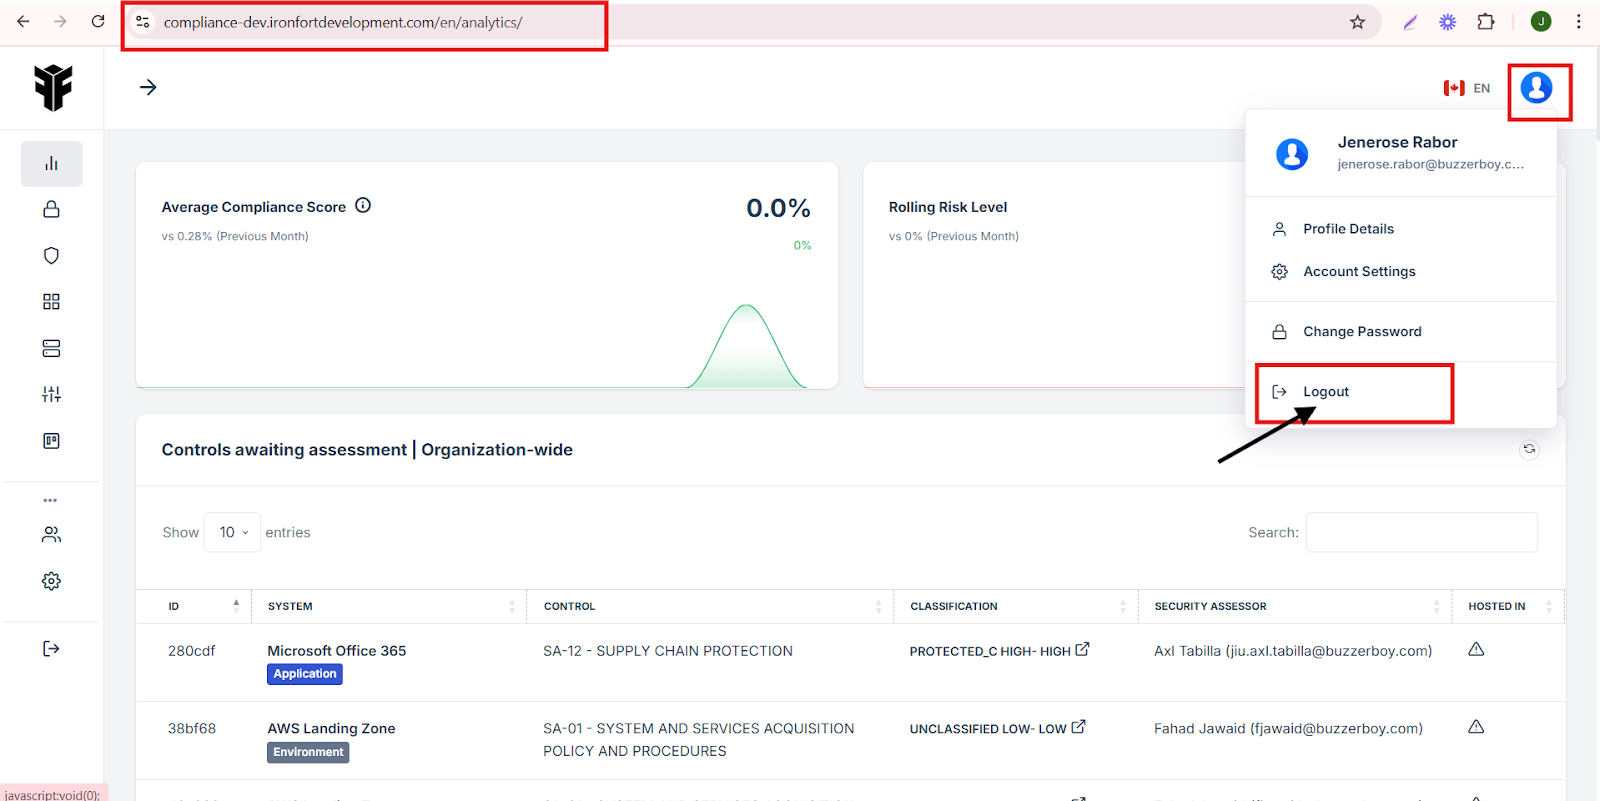
2. Click on Your Profile Picture
Locate your profile icon in the top-right corner of the page.
3. Click on the Logout button in the dropdown menu
1. Go to the Main Dashboard
Ensure you are logged into your Iron-Fort account (Click here to see the steps on how to log in in Iron Fort)
2. You should see the dashboard with various features and analytics.
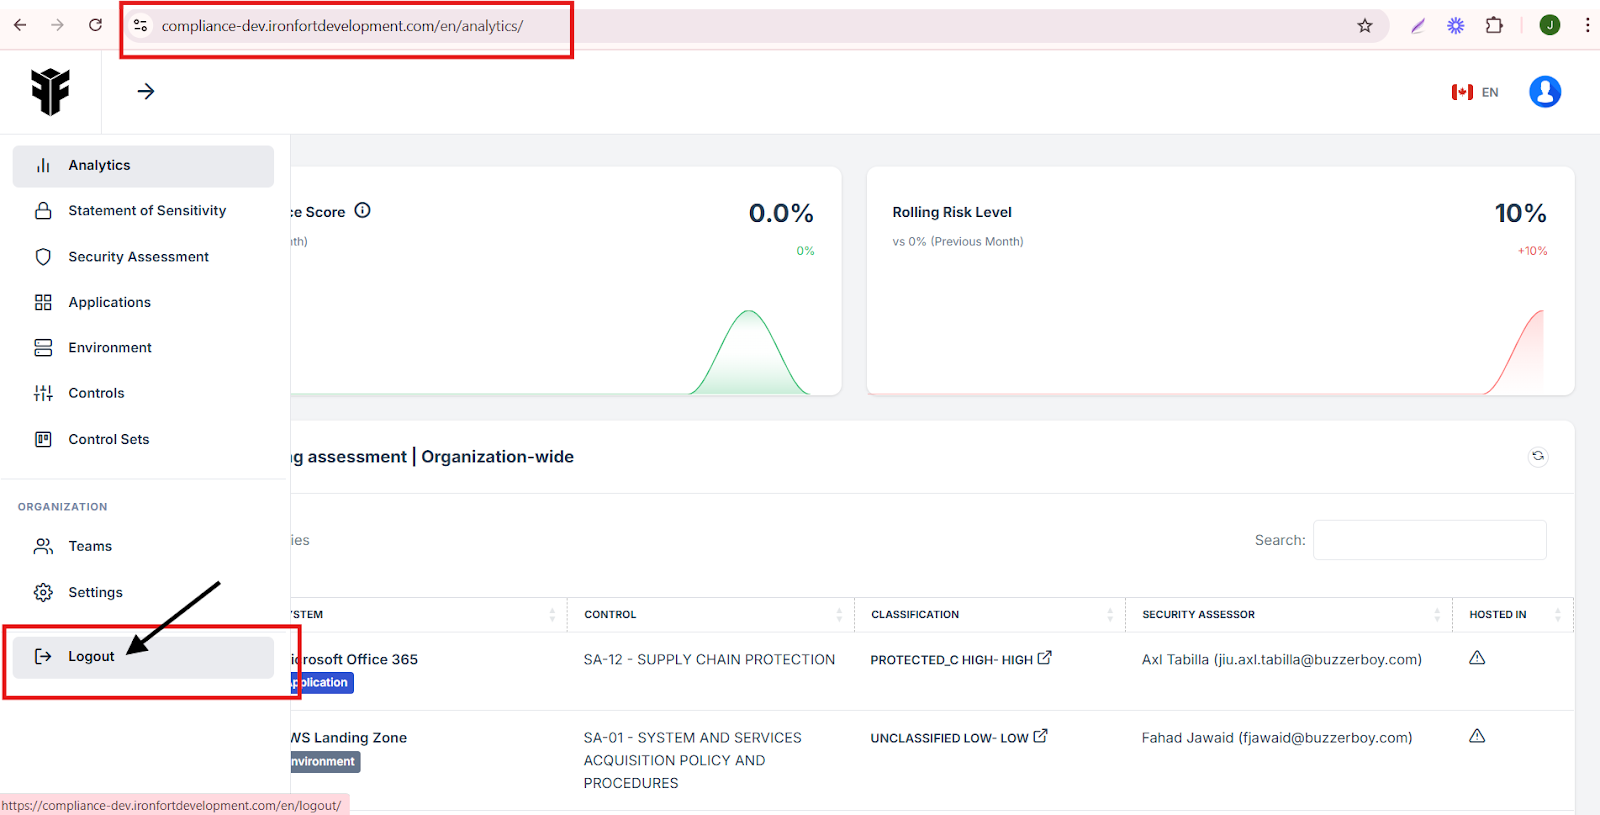
3. Locate the Sidebar Menu
(Move your mouse cursor to the vertical menu on the left side of the screen, below the Iron Fort logo)
4. Scroll down to the bottom of the menu and find the Logout Button.
5. Click the Logout button to sign out of your account.
-
Create a tenant key
- Navigate to your organization’s Iron Fort Compliance login page
- Log In to Your Account (Enter your username and password to log in).
- Check your email for the One-Time Password (OTP) sent on your email and enter the OTP to proceed.
- On the dashboard, move your cursor to the left-side menu bar to reveal the navigation panel.
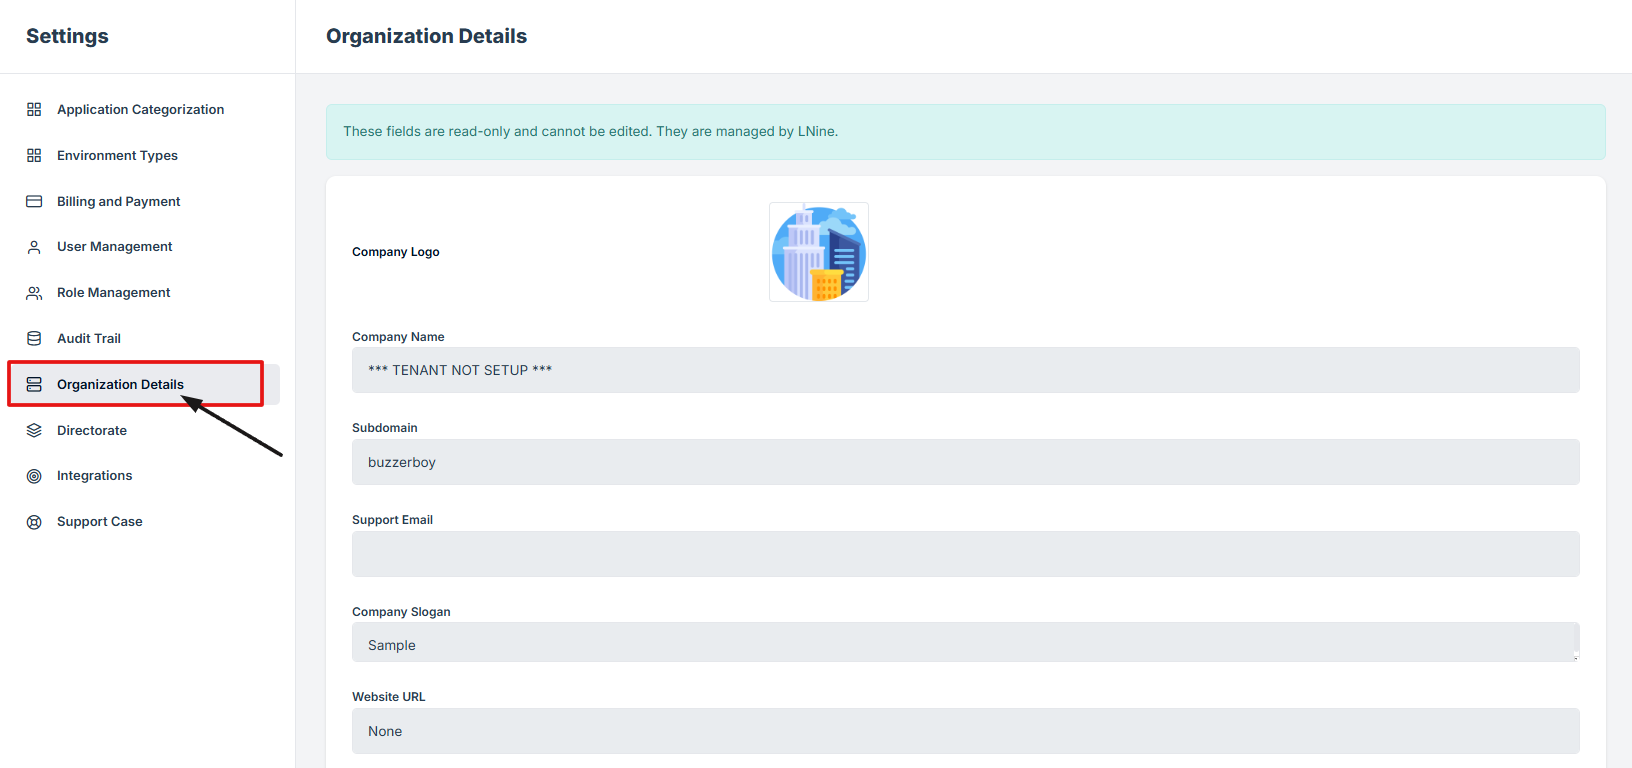
- Under the Organization section, find and click on Settings.
- In the Settings menu, locate and click on Organization Details.
- Scroll down within the Organization Details section
- Click the Show Tenant Key button to reveal your assigned tenant key
- Important Notes
1. Navigate to your organization’s Iron Fort Compliance login page
For example: https://compliance-demo.ironfortdemos.com/en/login/?next=/en
2. Log In to Your Account (Enter your username and password to log in).
3. Check your email for the One-Time Password (OTP) sent on your email and enter the OTP to proceed.
4. On the dashboard, move your cursor to the left-side menu bar to reveal the navigation panel.
5. Under the Organization section, find and click on Settings.
6. In the Settings menu, locate and click on Organization Details.
7. Scroll down within the Organization Details section and look for the Tenant Key field, which will be masked for security.
8. Click the Show Tenant Key button to reveal your assigned tenant key.
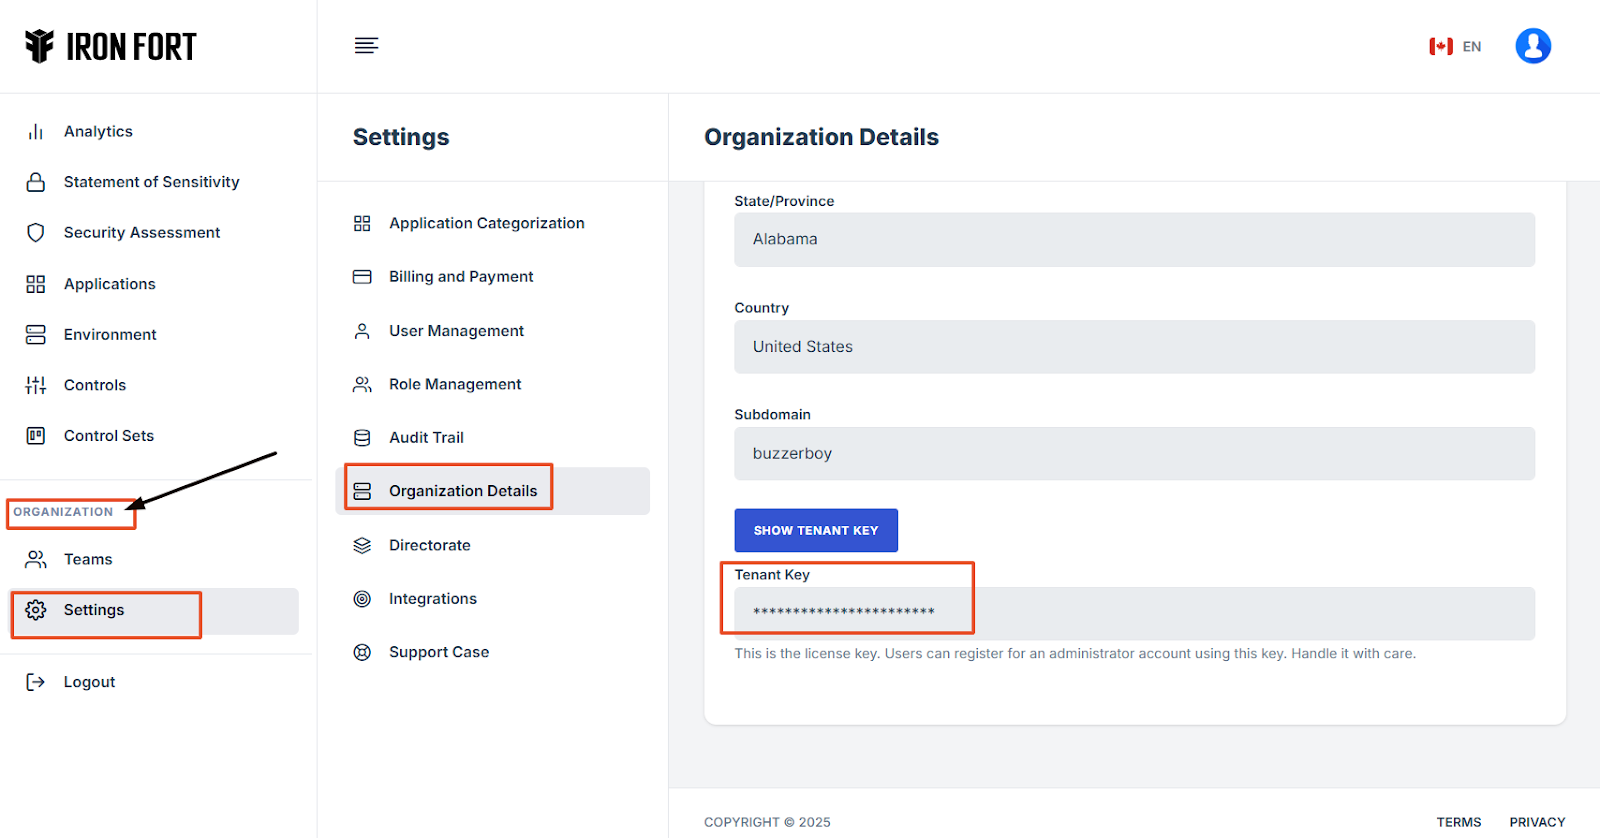
1. The Iron Fort team is responsible for assigning tenant keys to organizations.
2. To obtain a tenant key, contact the Iron Fort administrator if you do not see one assigned to your account.
3. Handle your tenant key securely, as it is required for registering administrator accounts.
-
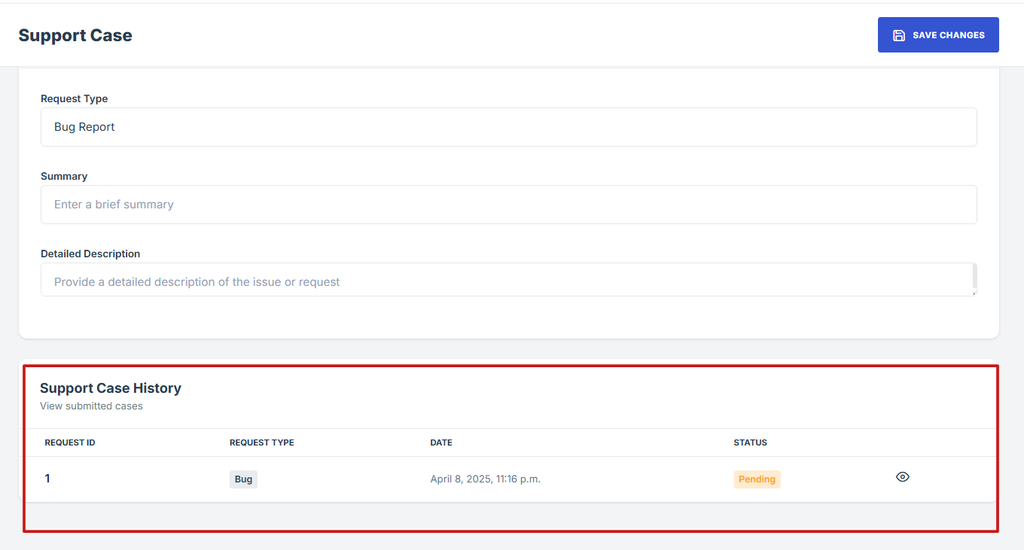
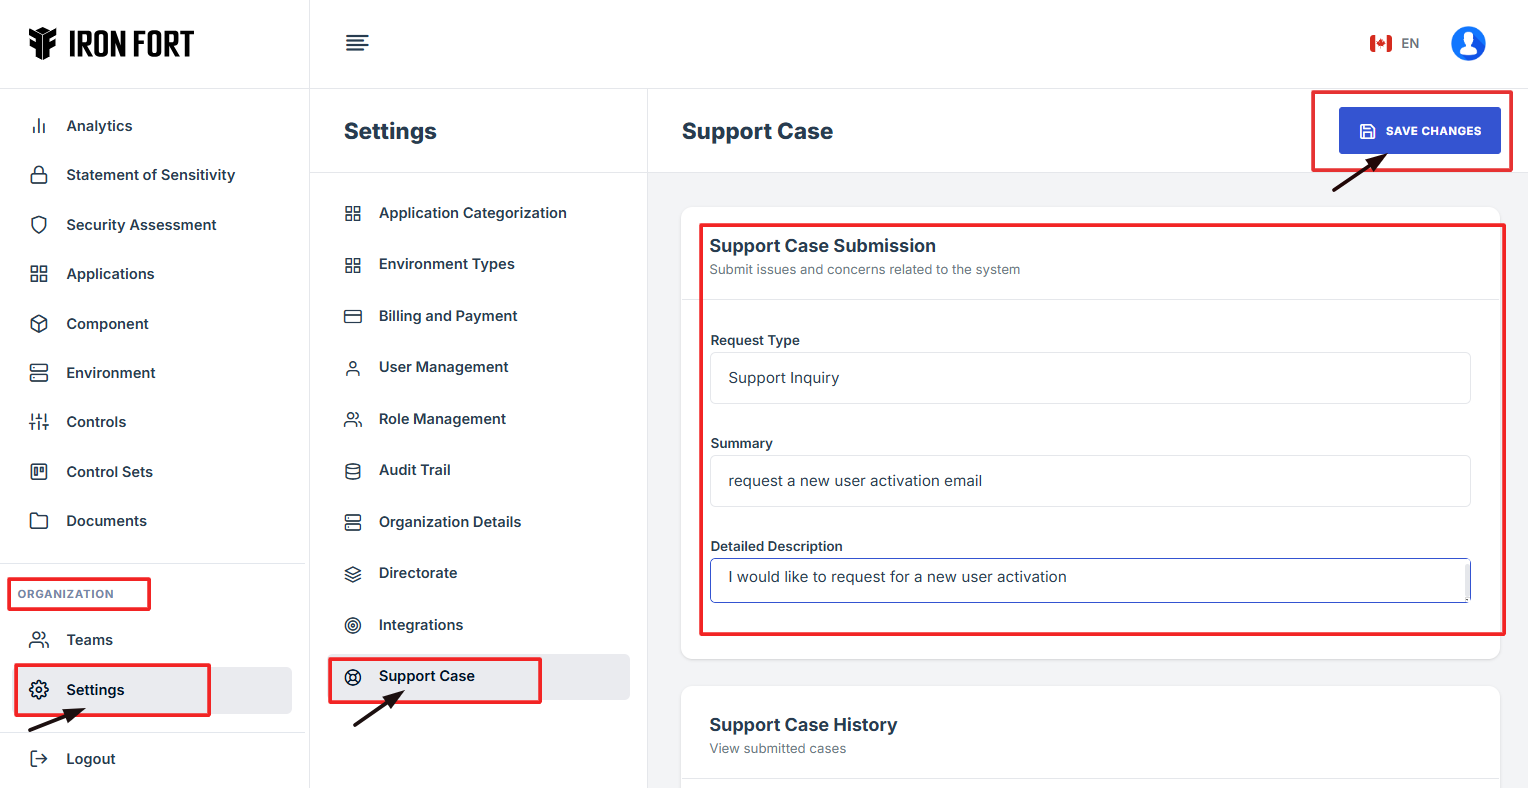
Create a Support Case
- Navigate to your organization’s Iron Fort Compliance login page
- Log In to Your Account (Enter your username and password to log in).
- Check your email for the One-Time Password (OTP) sent on your email and enter the OTP to proceed.
- Once logged in, a welcome prompt will appear displaying
- Once on the main dashboard, move your mouse cursor to the vertical menu on the left side of the screen.
- Under the "Organization" section, click on "Settings."
- In the Settings menu, locate and click on "Support Case."
- Under Support Case Submission, provide the necessary details for your request.
- Choose the type of support case you want to submit
- Briefly describe the issue, request, or question in the summary.
- Provide a more detailed explanation
- Click "Save Changes" to submit your support case.
1. Navigate to your organization’s Iron Fort Compliance login page
For example: https://compliance-demo.ironfortdemos.com/en/login/?next=/en
2. Log In to Your Account (Enter your username and password to log in).
3. Check your email for the One-Time Password (OTP) sent on your email and enter the OTP to proceed.
4. Once logged in, a welcome prompt will appear displaying
-
Tenant Key Information: Verifying your system access
-
User Email: Your registered email for auditing purposes
-
Last Login Details: To track your previous access
-
Iron Fort Support Email: For any login issues or concerns
NOTE: If you recognize the details and are authorized, click "OK" to continue. However, if you are not an authorized user, click "Logout" immediately to exit.
5. Once on the main dashboard, move your mouse cursor to the vertical menu on the left side of the screen.
6. Under the "Organization" section, click on "Settings."
7. In the Settings menu, locate and click on "Support Case."
8. Under Support Case Submission, provide the necessary details for your request.

9. Choose the type of support case you want to submit
Bug Report – Report issues related to the CRM system.
Feature Request – Suggest new features or enhancements.
Support Inquiry – Ask general questions about the platform.
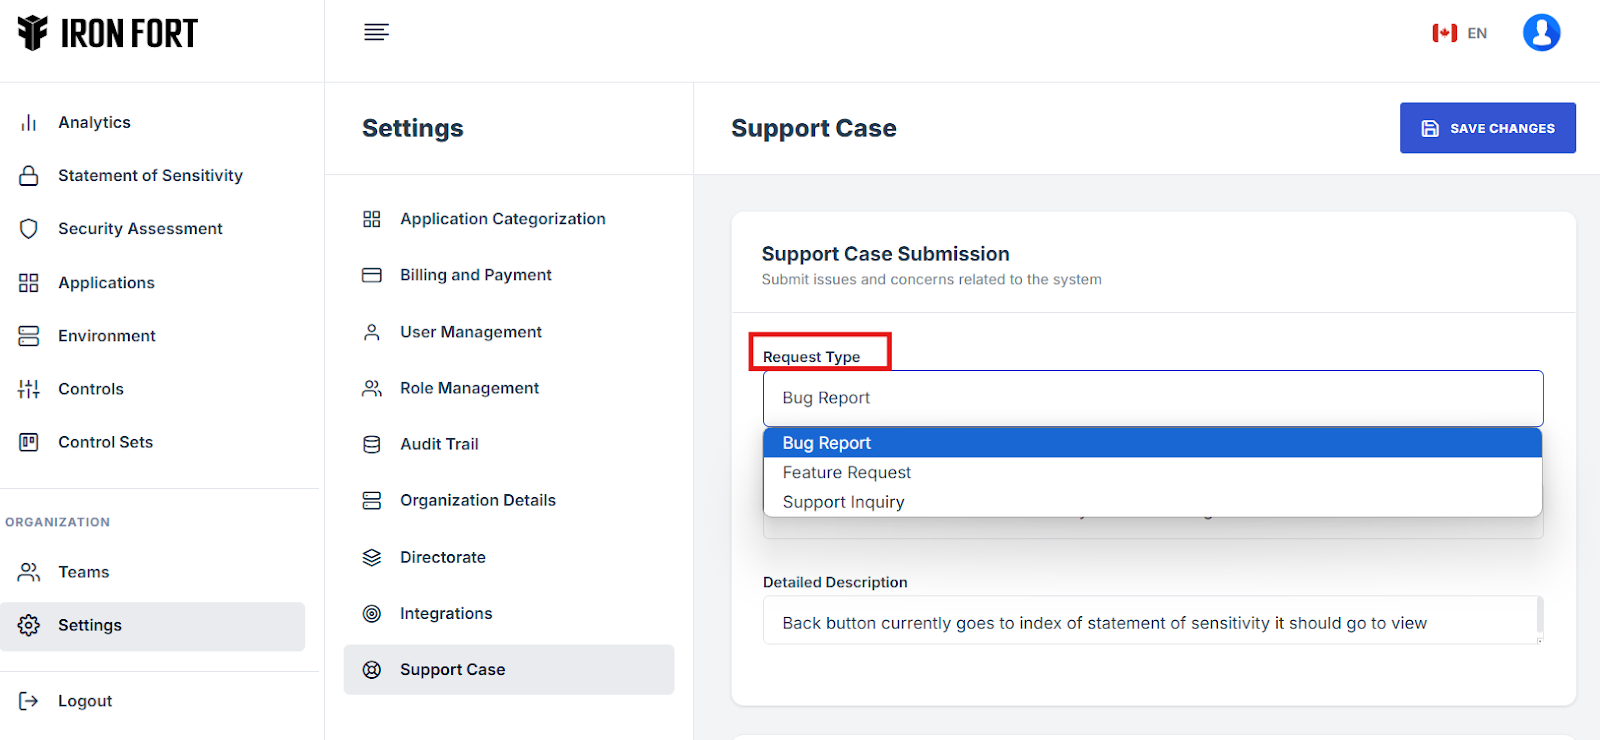
10. Briefly describe the issue, request, or question in the summary.
11. Provide a more detailed explanation, including steps to reproduce an issue (for bugs)
Why a feature is needed (for feature requests), or specific details for a support inquiry.
12. Click "Save Changes" to submit your support case.
-
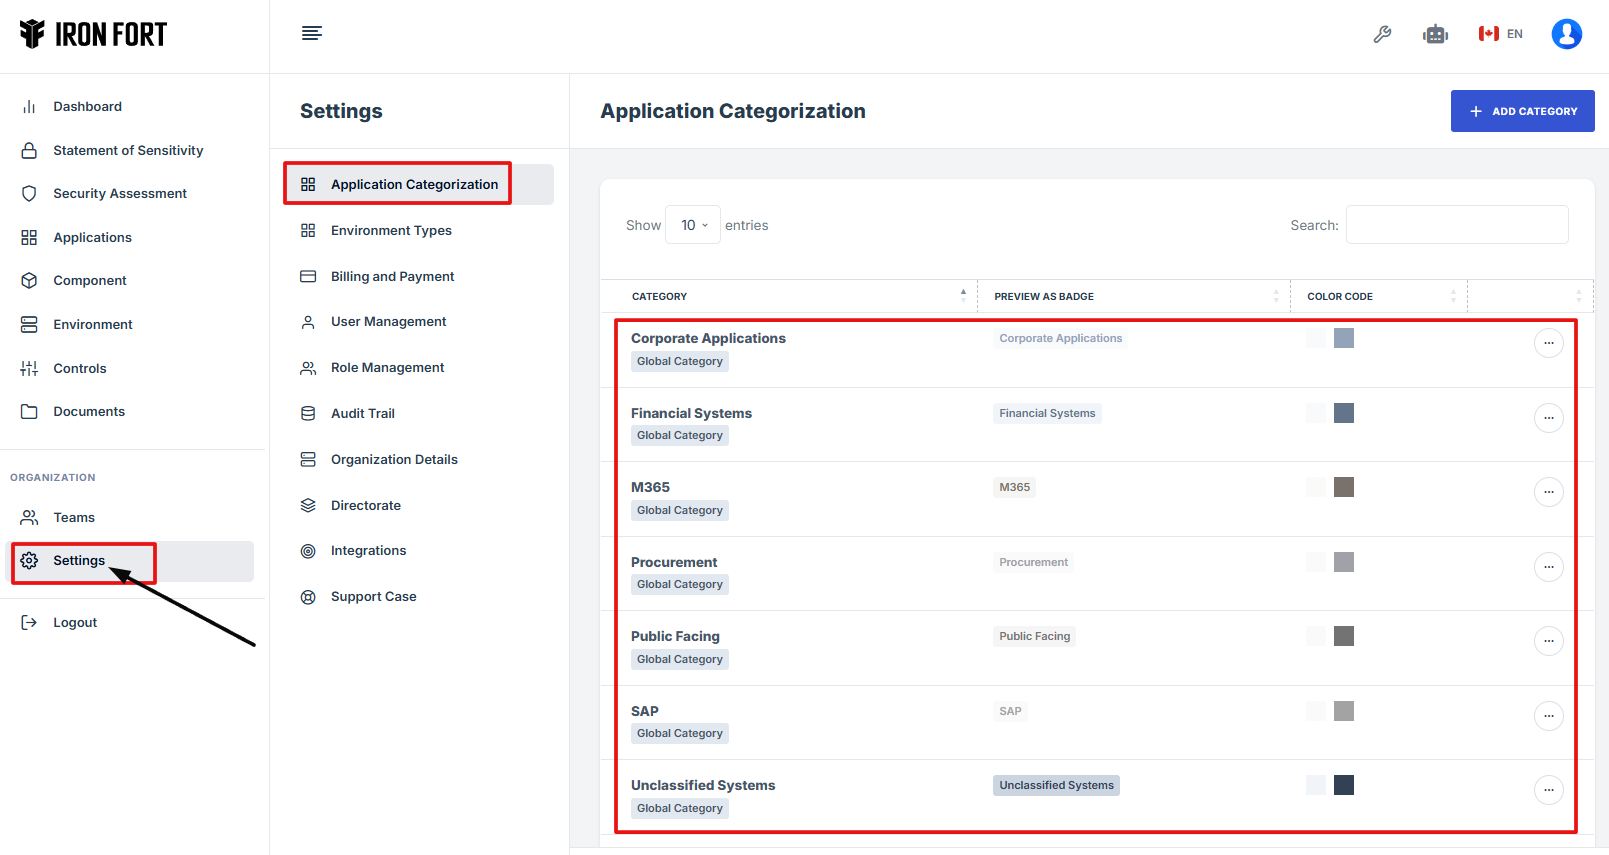
How To: Setup Application Categorization
- Navigate to your organization’s Iron Fort Compliance login page
- Log in to Your Account
- Check your email for the One-Time Password (OTP) sent on your email and enter the OTP to proceed
- Once logged in, a welcome prompt will appear displaying
- Move your cursor to the left side of the dashboard to display the menu.
- In the left-side menu, locate the "ORGANIZATION" section
- Click “settings” under the organization tab
- From the settings menu, click “Application Categorization.”
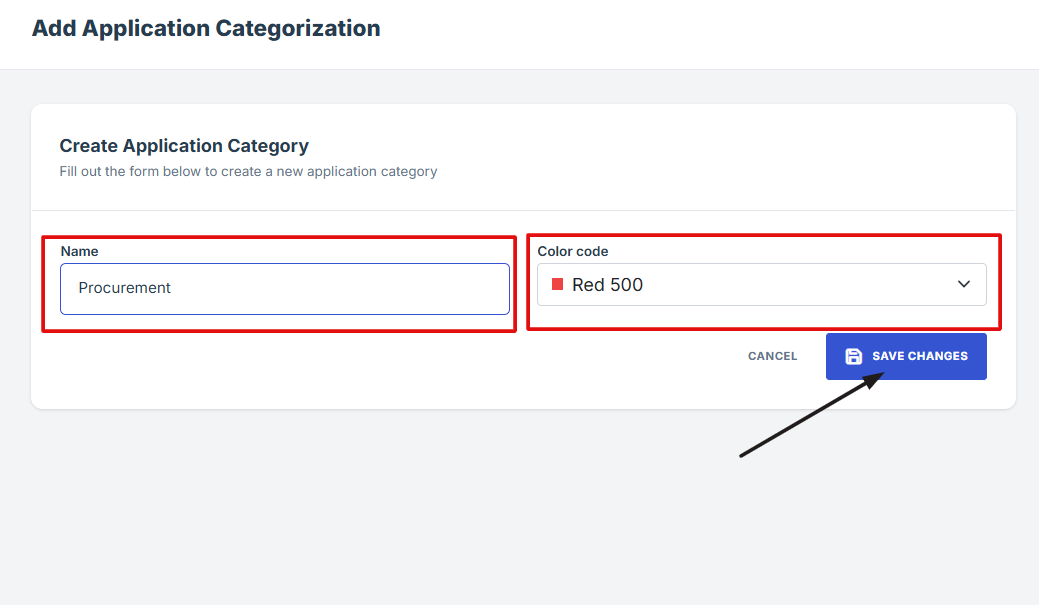
- Click the “Add Category” button to create a new application category
- Enter a Category Name that does not already exist in the system to avoid duplication
- Select a Color Code for the category to help visually distinguish different application categories
- Click “Save” to finalize the new category
1. Navigate to your organization’s Iron Fort Compliance login page
For example: https://compliance-demo.ironfortdemos.com/en/login/?next=/en
2. Log in to Your Account
Enter your email and password to log in.

3. Check your email for the One-Time Password (OTP) sent on your email and enter the OTP to proceed.

4. Once logged in, a welcome prompt will appear displaying
-
Tenant Key Information: Verifying your system access
-
User Email: Your registered email for auditing purposes
-
Last Login Details: To track your previous access
-
Iron Fort Support Email: For any login issues or concerns
NOTE: If you recognize the details and are authorized, click "OK" to continue. However, if you are not an authorized user, click "Logout" immediately to exit.
5. Move your cursor to the left side of the dashboard to display the menu.
6. In the left-side menu, locate the "ORGANIZATION" section.
7. Click “settings” under the organization tab.
8. From the settings menu, click “Application Categorization.”
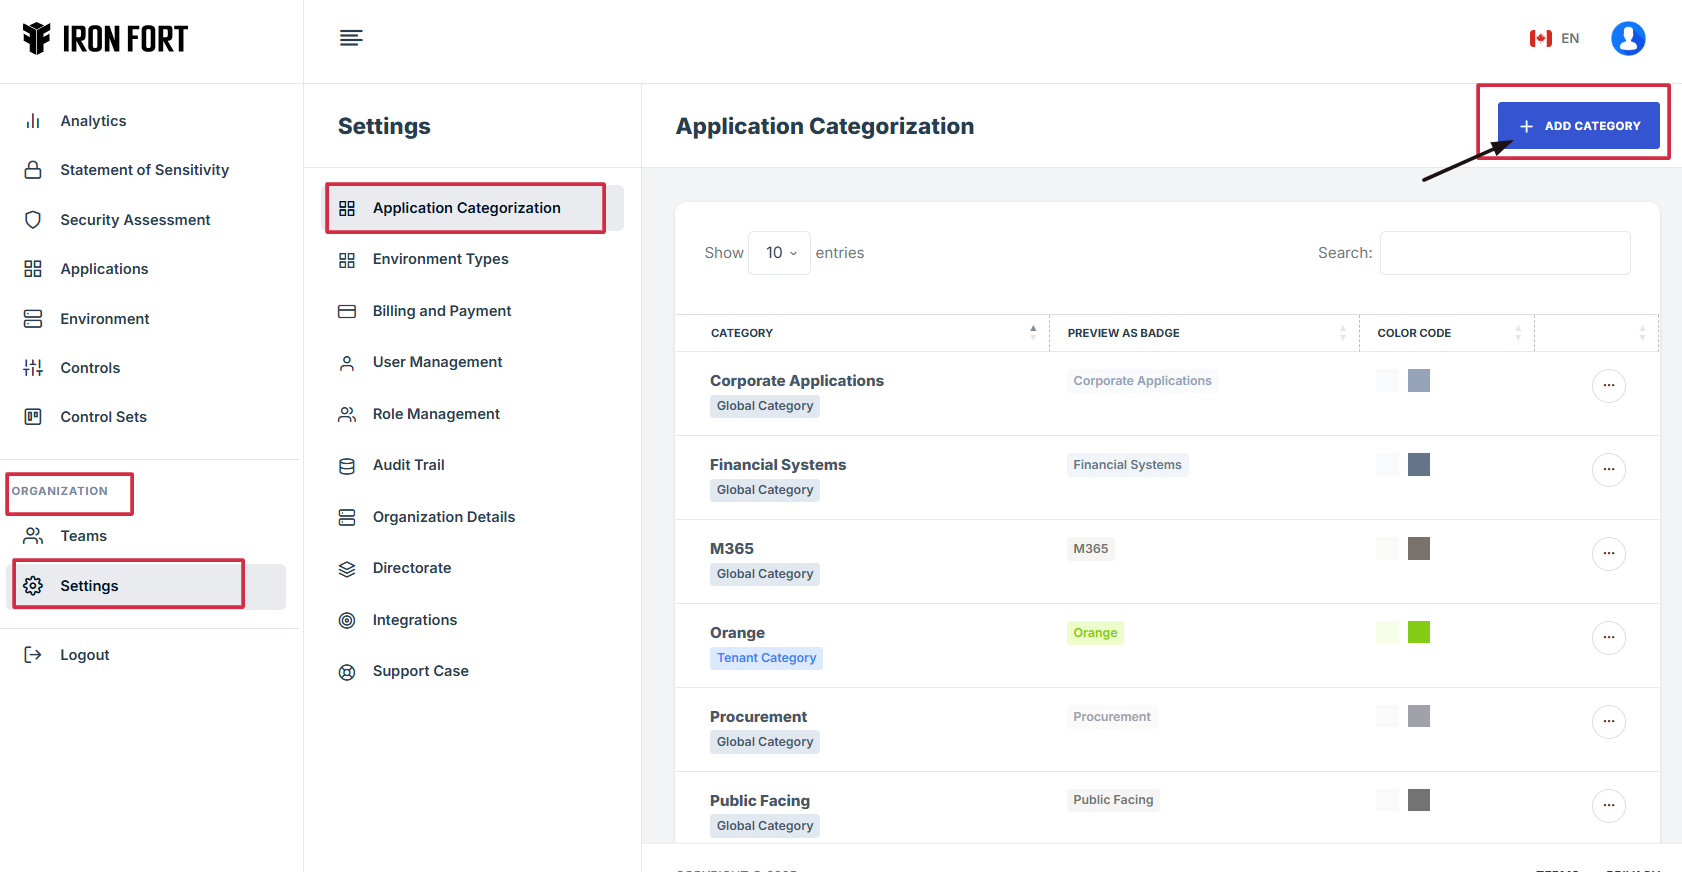
9. Click the “Add Category” button to create a new application category.
10. Enter a Category Name that does not already exist in the system to avoid duplication.
Ensure it is relevant and aligns with the application's purpose.
11. Select a Color Code for the category to help visually distinguish different application categories.
12. Click “Save” to finalize the new category.
-
How To: View Available Roles
- Navigate to your organization’s Iron Fort Compliance login page
- Log in to Your Account
- Check your email for the One-Time Password (OTP) sent on your email and enter the OTP to proceed
- Once logged in, a welcome prompt will appear displaying
- Move your cursor to the left side of the dashboard to display the menu.
- In the left-side menu, locate the "ORGANIZATION" section
- Click on "Settings" to open the settings menu
- Under the Settings menu, find and click on "Role Management"
- View Role Management Details
1. Navigate to your organization’s Iron Fort Compliance login page
For example: https://compliance-demo.ironfortdemos.com/en/login/?next=/en
2. Log in to Your Account
Enter your email and password to log in.
3. Check your email for the One-Time Password (OTP) sent on your email and enter the OTP to proceed.
4. Once logged in, a welcome prompt will appear displaying
-
Tenant Key Information: Verifying your system access
-
User Email: Your registered email for auditing purposes
-
Last Login Details: To track your previous access
-
Iron Fort Support Email: For any login issues or concerns
NOTE: If you recognize the details and are authorized, click "OK" to continue. However, if you are not an authorized user, click "Logout" immediately to exit.
5. Move your cursor to the left side of the dashboard to display the menu.
6. In the left-side menu, locate the "ORGANIZATION" section.
7. Click on "Settings" to open the settings menu.
8. Under the Settings menu, find and click on "Role Management".
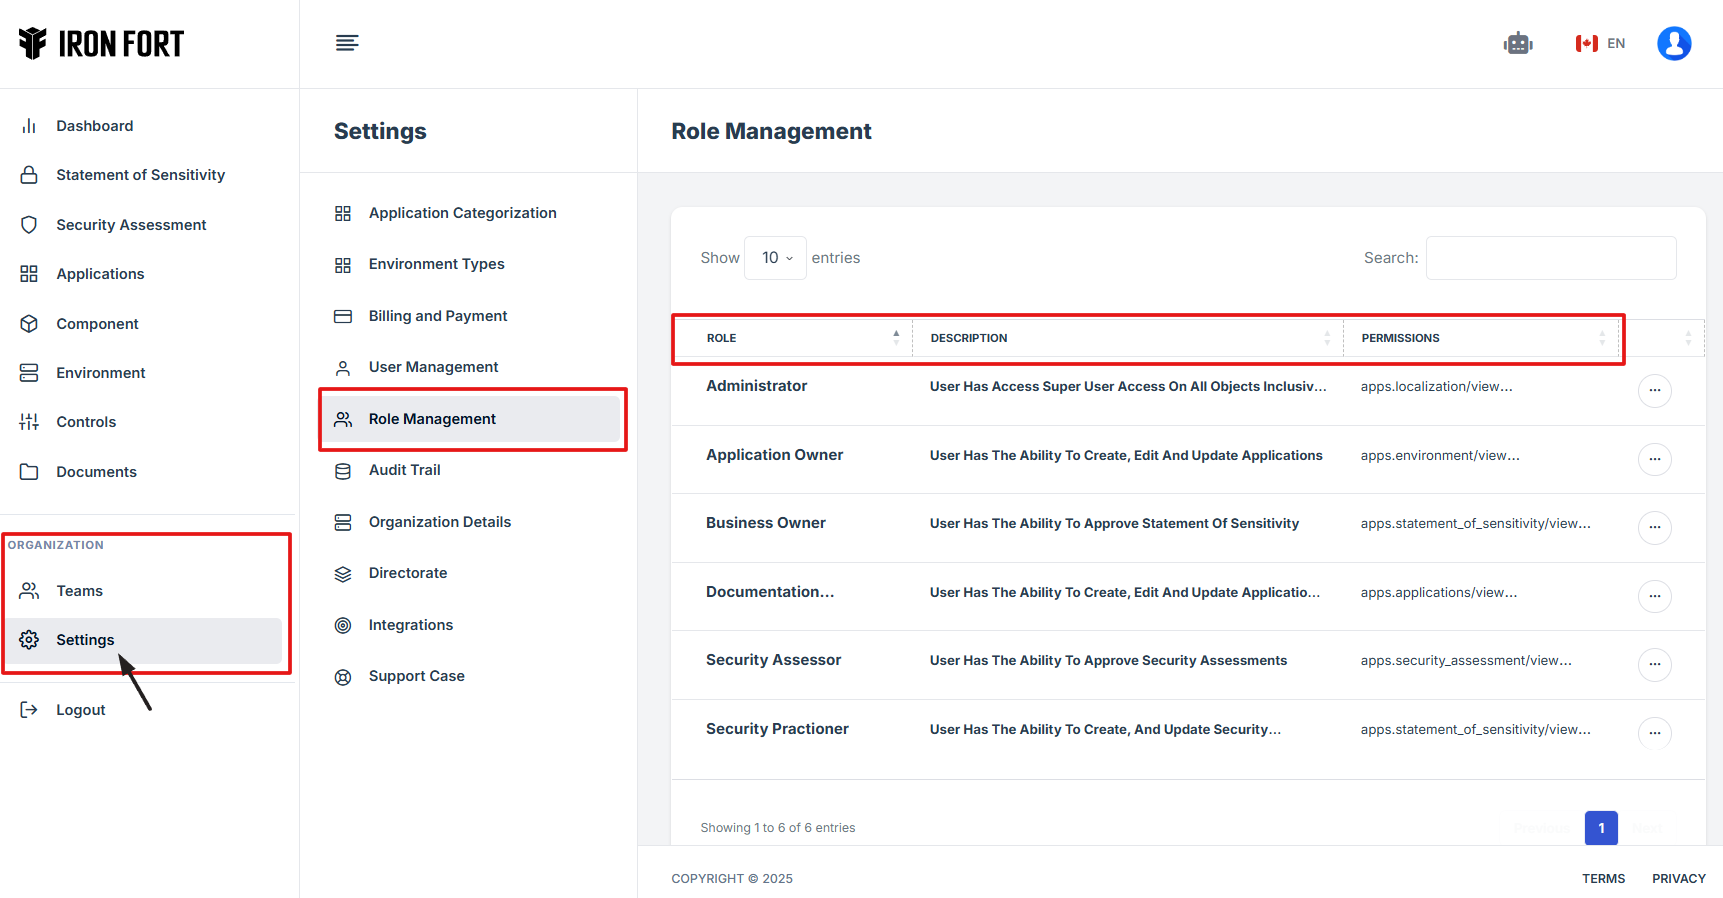
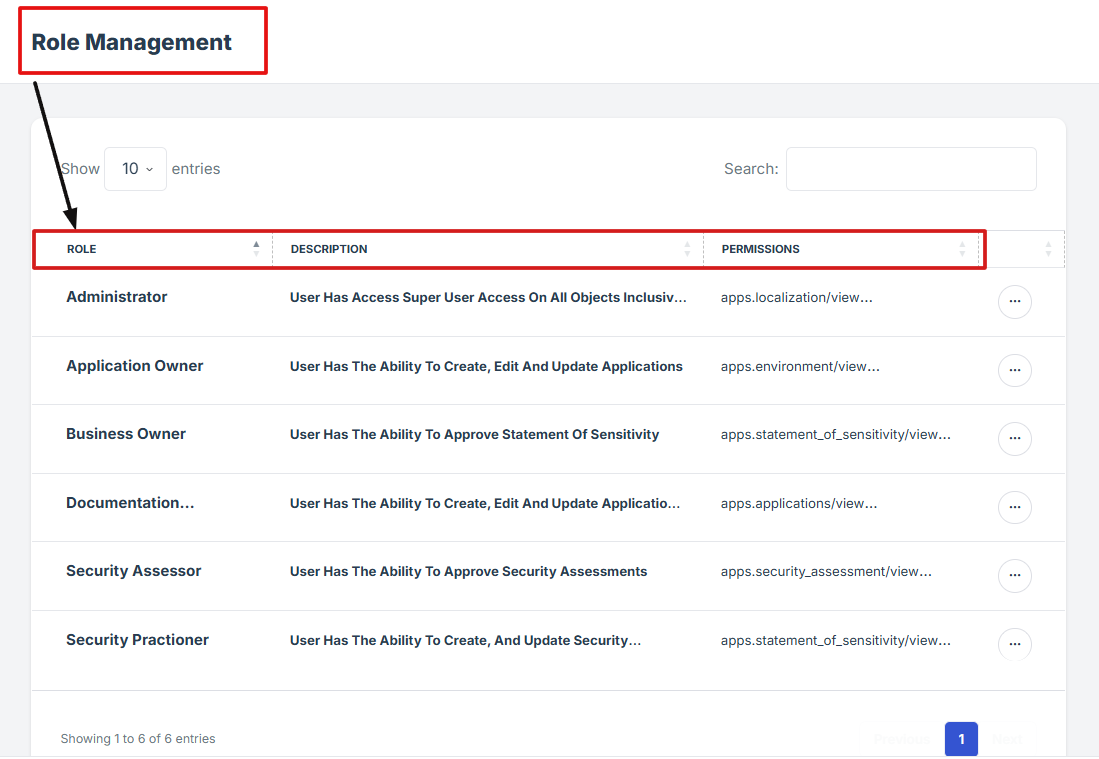
9. View Role Management Details:
You will be redirected to the Role Management page.
-
Here, you can see different roles, descriptions, and associated permissions.
Business Owner – Responsible for approving key business-related statements and ensuring compliance with organizational policies.
Security Practitioner – Manages and enforces security measures, overseeing the configuration and protection of critical assets.
Security Assessor – Conducts assessments and evaluations to identify vulnerabilities and ensure security compliance.
Administrator – Maintains system access, oversees user permissions, and ensures smooth operation of platform functionalities.
Application Owner – Oversees application management, including creation, modification, and user access control.
Role defines a set of permissions and responsibilities assigned to a user within the system. Roles determine what actions a user can perform and what data they can access.
Key Aspects of a Role:
Permissions – Each role comes with specific access rights (e.g., view, edit, approve, or manage settings).
User Responsibilities – Roles define what tasks a user is allowed to perform within the CRM.
Security Control – Ensures that only authorized users can access sensitive data or make changes.
Common Roles in Iron Fort CRM:
Business Owner – Can approve statements and oversee business-related processes.
Security Practitioner – Can create and update security-related records.
Security Assessor – Can approve security assessments.
Administrator – Has superuser access to all objects.
Application Owner – Can create, edit, and manage applications.
-
How To: Request changes to a Role?
- Navigate to your organization’s Iron Fort Compliance login page
- Log in to Your Account
- Check your email for the One-Time Password (OTP) sent on your email and enter the OTP to proceed
- Once logged in, a welcome prompt will appear displaying
- Move your cursor to the left side of the dashboard to display the menu.
- In the left-side menu, locate the "ORGANIZATION" section
- Under organization, click settings
- From the Settings menu, click "Support Case"
- Fill out the necessary details
- Click "Save Changes" to submit your request.
- Monitor Your Request (You can track)
1. Navigate to your organization’s Iron Fort Compliance login page
For example: https://compliance-demo.ironfortdemos.com/en/login/?next=/en
2. Log in to Your Account
Enter your email and password to log in.
3. Check your email for the One-Time Password (OTP) sent on your email and enter the OTP to proceed.
4. Once logged in, a welcome prompt will appear displaying
-
Tenant Key Information: Verifying your system access
-
User Email: Your registered email for auditing purposes
-
Last Login Details: To track your previous access
-
Iron Fort Support Email: For any login issues or concerns
NOTE: If you recognize the details and are authorized, click "OK" to continue. However, if you are not an authorized user, click "Logout" immediately to exit.
5. Move your cursor to the left side of the dashboard to display the menu.
6. In the left-side menu, locate the "ORGANIZATION" section.
7. Under organization, click settings.
8. From the Settings menu, click "Support Case".

9. Fill out the necessary details:
-
Request Type: This field specifies the category or nature of the request, such as bug report, feature request, or general inquiry.
-
Summary: A brief statement outlining the main purpose of the request, providing a clear and concise topic.
-
Detailed Description: A more in-depth explanation of the request, including relevant details, requirements, and any additional context to help process the request efficiently.
10. Click "Save Changes" to submit your request.
11. Monitor Your Request (You can track):
-
Request ID: Unique number for your request
-
Request Type: Type of issue reported
-
Date: Submission time
-
Status: E.g., Pending, Resolved
-
How To: Monitor a Support Case?
- After submitting a support case to the Iron Fort Support Team
- Scroll down on the Support Case page
- Find the specific support case you wish to monitor.
- After opening the case, carefully review the Support Case Details
- Below, you'll find the Conversation history
- Both the user and the Iron Fort Support Team have the option to upload attachments in the Submit Your Response section.
- Attaching relevant files can help provide better clarity and faster resolution for your support case.
1. After submitting a support case to the Iron Fort Support Team
Your request will be logged and assigned a status for tracking.
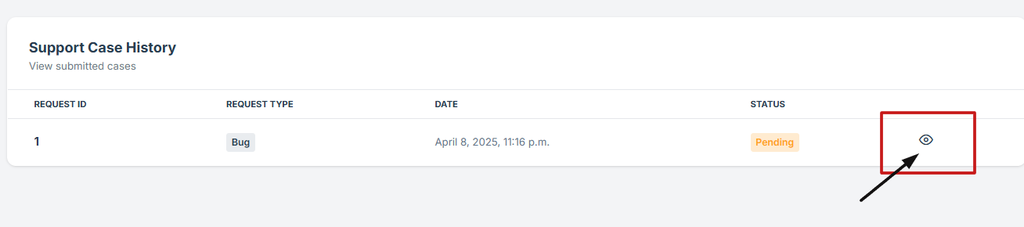
2. Scroll down on the Support Case page
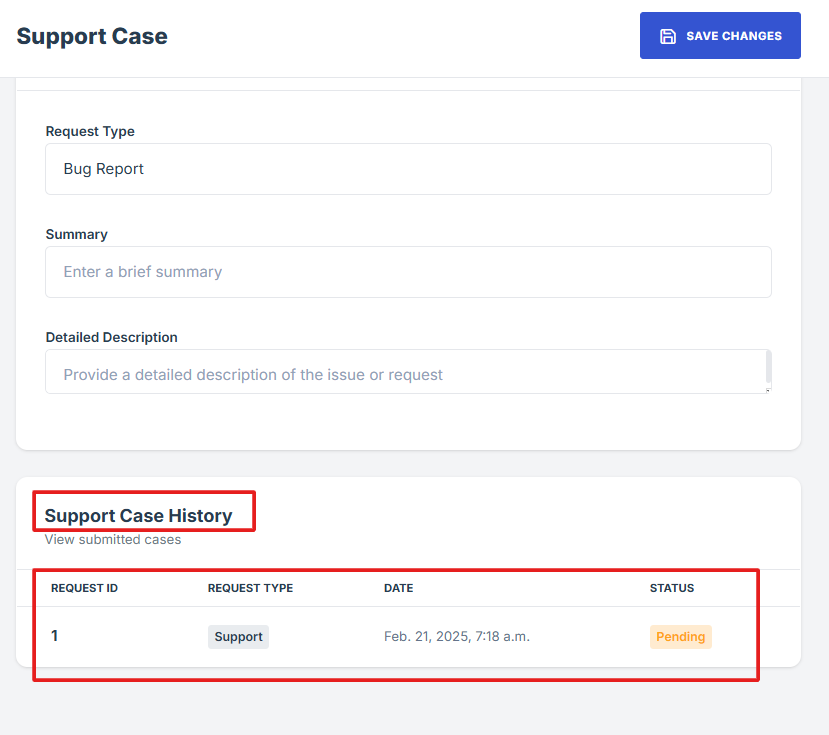
Find the Support Case History section where all submitted cases are listed.
3. Find the specific support case you wish to monitor.
Click the eye icon located beside the case status to open and view more detailed information about your request.
4. After opening the case, carefully review the Support Case Details
Including the Request ID, Request Type, Status, and Summary.
5. Below, you'll find the Conversation history
This section displays all messages exchanged between you and the Iron Fort Support Team.
6. Both the user and the Iron Fort Support Team have the option to upload attachments in the Submit Your Response section.
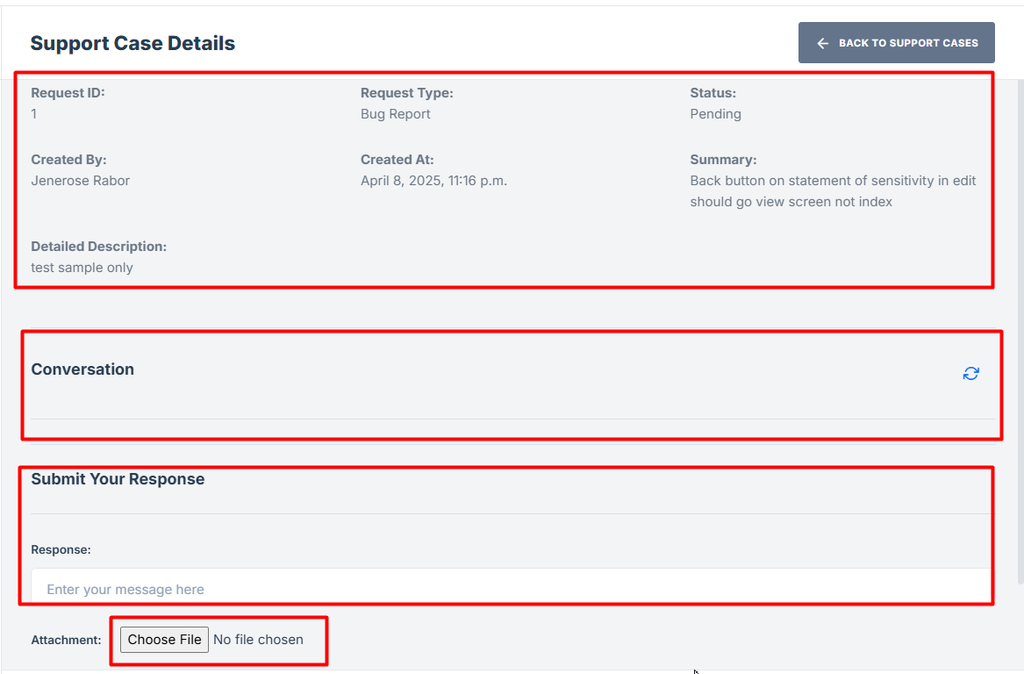
7. Attaching relevant files can help provide better clarity and faster resolution for your support case.
-
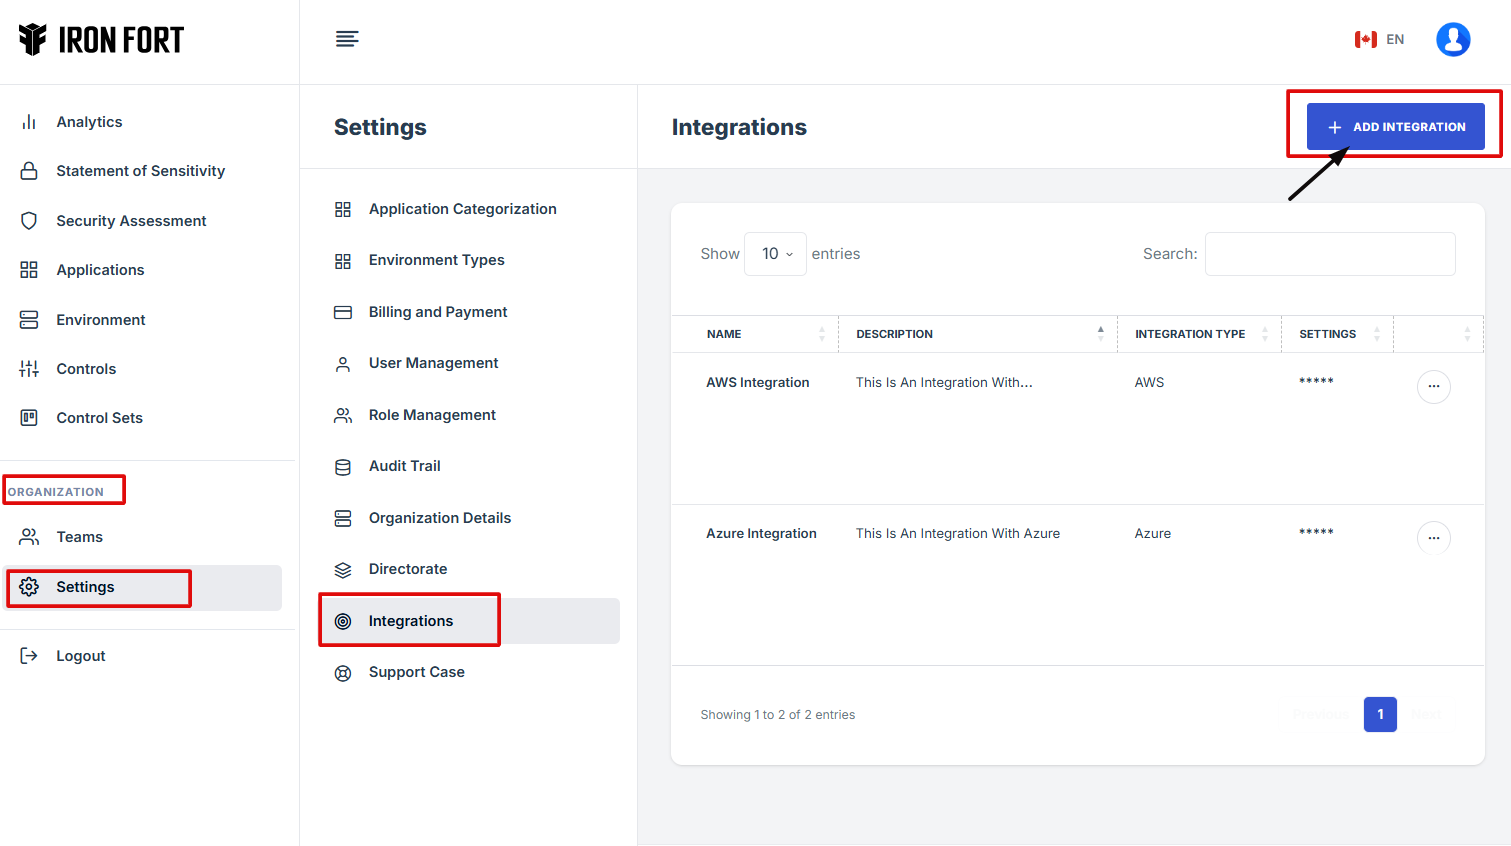
How To: Create an Integration
- Navigate to your organization’s Iron Fort Compliance login page
- Log in to Your Account
- Check your email for the One-Time Password (OTP) sent on your email and enter the OTP to proceed
- Move your cursor to the left side of the dashboard to display the menu.
- In the left-side menu, locate the "ORGANIZATION" section
- From the settings menu, click “Integration.”
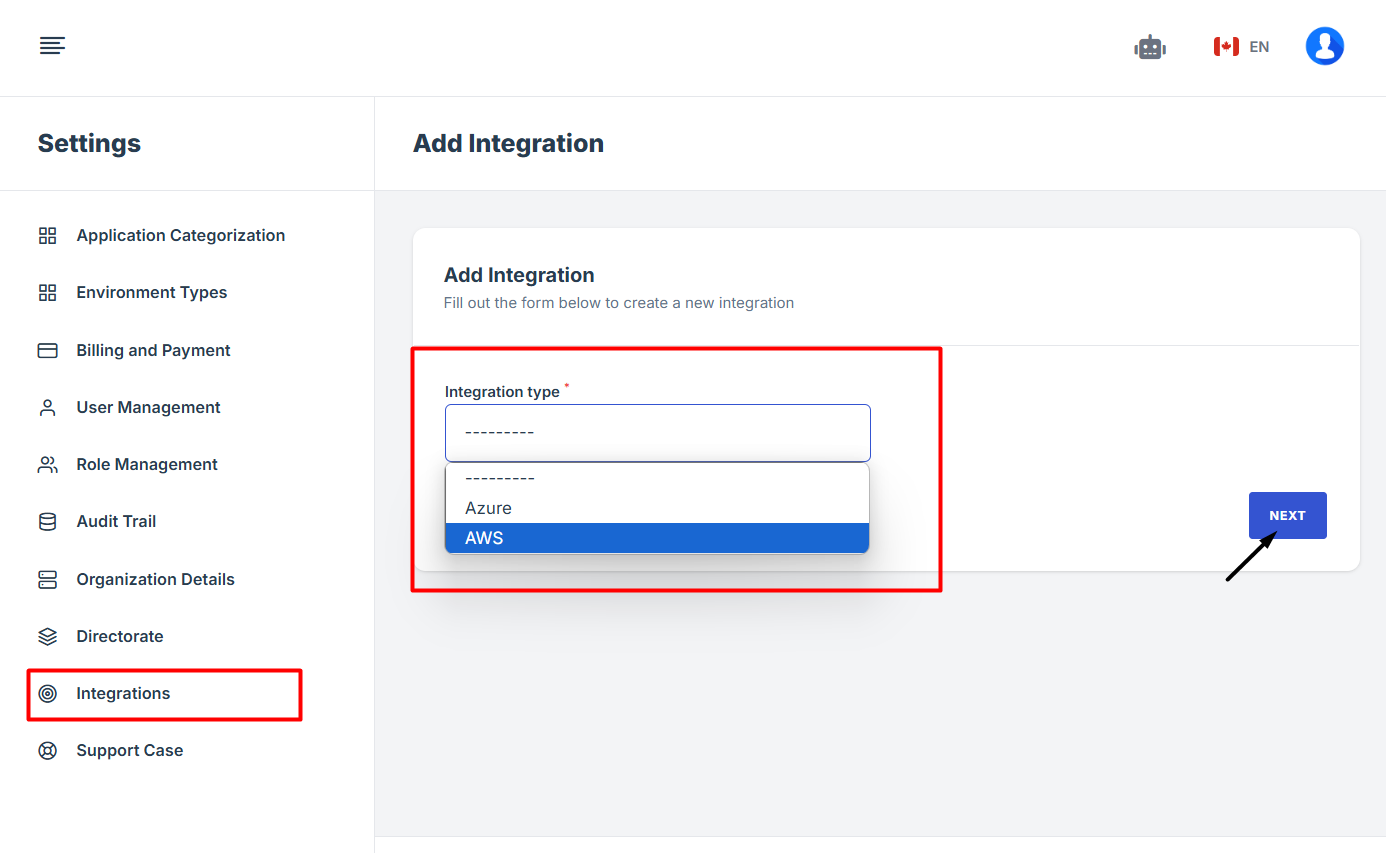
- Click “Add integration” to start creating a new integration.
- Choose the integration type
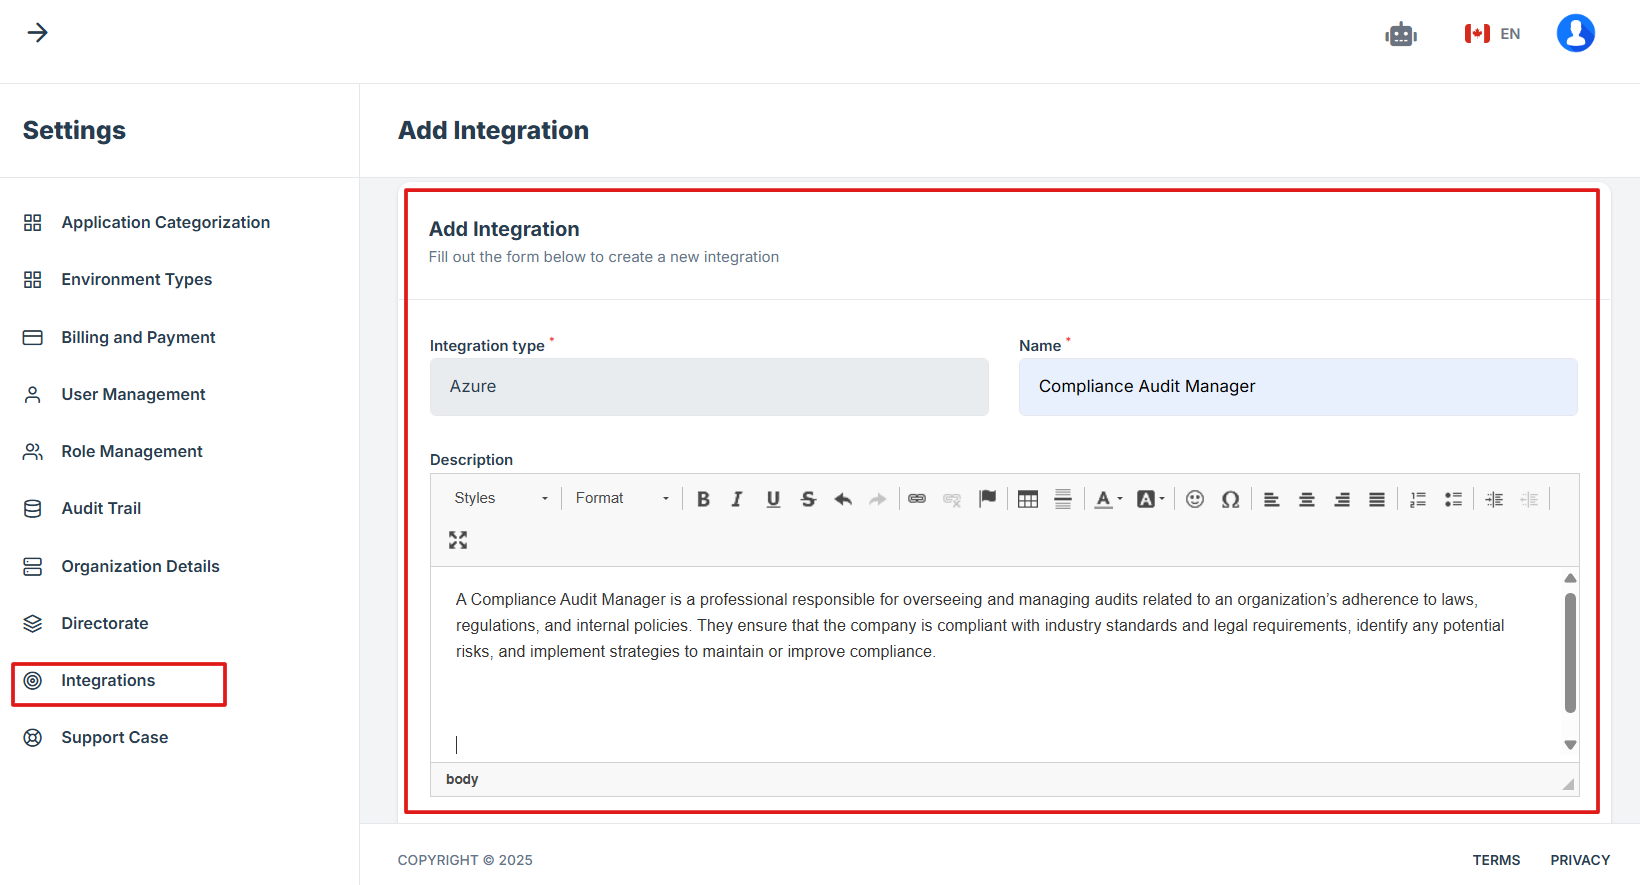
- On the Add Integration page, complete the following fields
- After filling out all required fields, click the "Save Changes" button to complete the integration setup
1. Navigate to your organization’s Iron Fort Compliance login page
For example: https://compliance-demo.ironfortdemos.com/en/login/?next=/en
2. Log in to Your Account
Enter your email and password to log in.
3. Check your email for the One-Time Password (OTP) sent on your email and enter the OTP to proceed.
4. Move your cursor to the left side of the dashboard to display the menu.
5. In the left-side menu, locate the "ORGANIZATION" section.
6. From the settings menu, click “Integration.”
7. Click “Add integration” to start creating a new integration.
8. Choose the integration type
9. On the Add Integration page, complete the following fields:
Name: This should be a descriptive name that identifies the integration's purpose.
Integration: This defines the service or platform the integration is associated with.
Description: Provide details about the integration, its purpose, and how it functions.
Integration Settings: This section defines specific parameters for the integration. Enter configuration settings in JSON format.
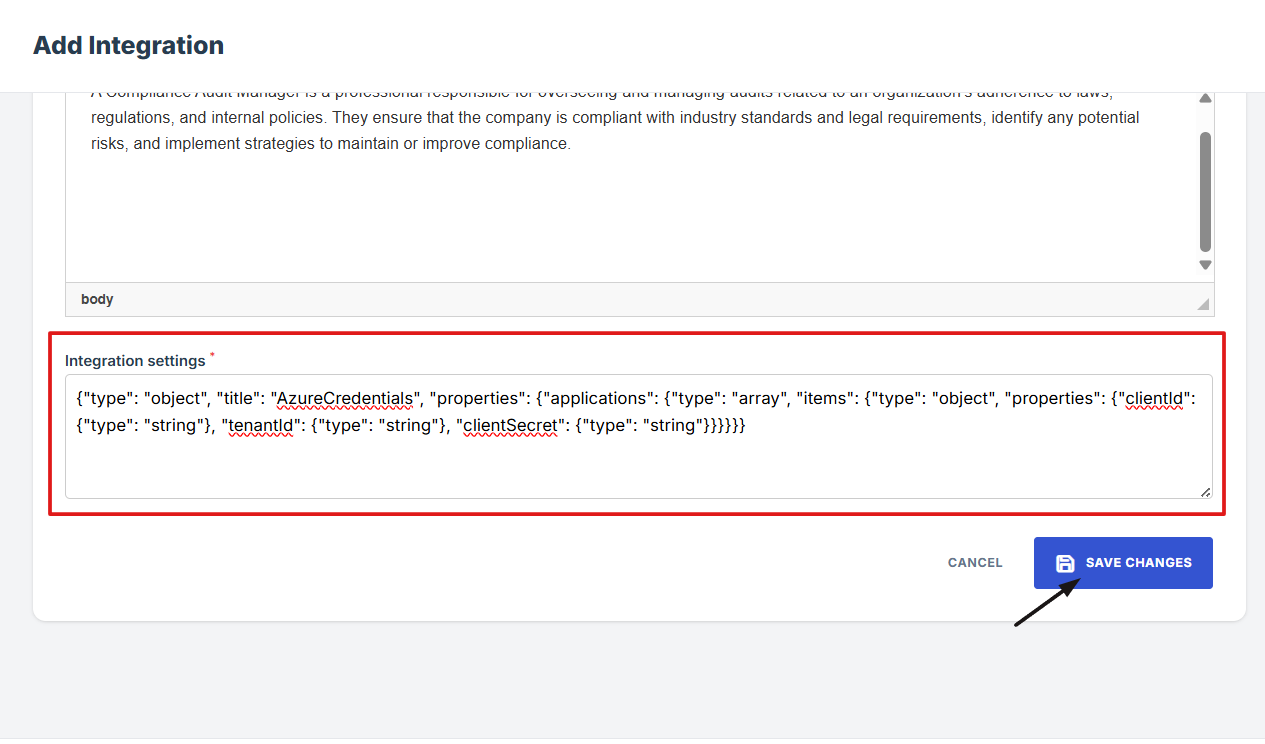
10. After filling out all required fields, click the "Save Changes" button to complete the integration setup.
-
How To: Activate a user account
- Step 1: Contact Iron Fort Support
- Step 2: Check Your Company Email
- Step 3: Open the Activation Email
- Step 4: Check the expiration date on the invite
- Step 5: Complete Your Profile
- Step 6: Add Additional Information (Optional)
- Step 7: Set Your Preferences
- Step 8: Click "Save Changes" to finalize your setup.
Step 1: Contact Iron Fort Support
Reach out to the Iron Fort team to request account activation.
Step 2: Check Your Company Email
Once your account is set up, the user will receive an activation invite in your company email inbox.
Step 3: Open the Activation Email
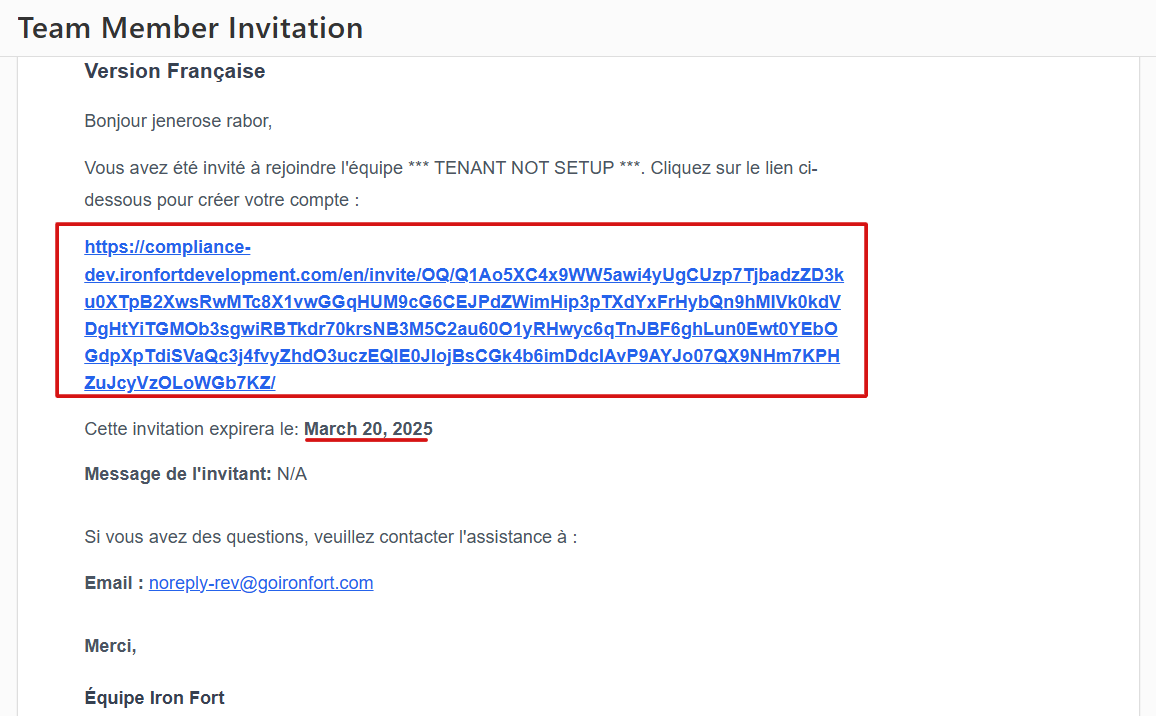
- Locate the email from Iron Fort.
- The invitation will be available in both French and English versions.
Step 4: Check the expiration date on the invite
Make sure to access the activation link before it expires.
Step 5: Complete Your Profile
-
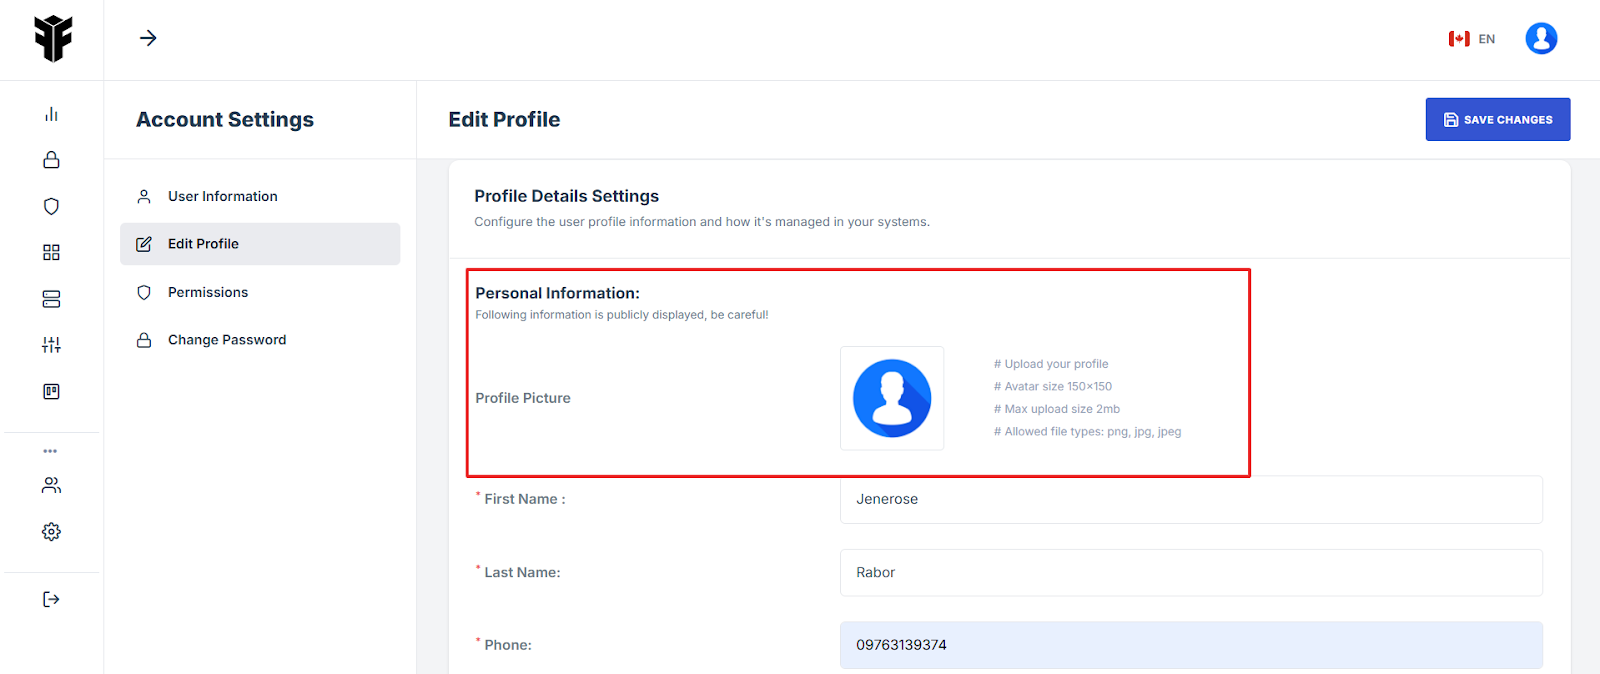
Upon clicking the activation link, the user will be redirected to the Edit Profile page. Fill out the required details: (Note: Fields marked with an asterisk (*) are mandatory)
-
Upload a Profile Picture
-
Enter Your First Name and Last Name
-
Provide Your Postal Code
-
Input Your Job Title

Step 6: Add Additional Information (Optional)
The user may also provide:
-
Company Name
-
Website URL
-
LinkedIn Profile

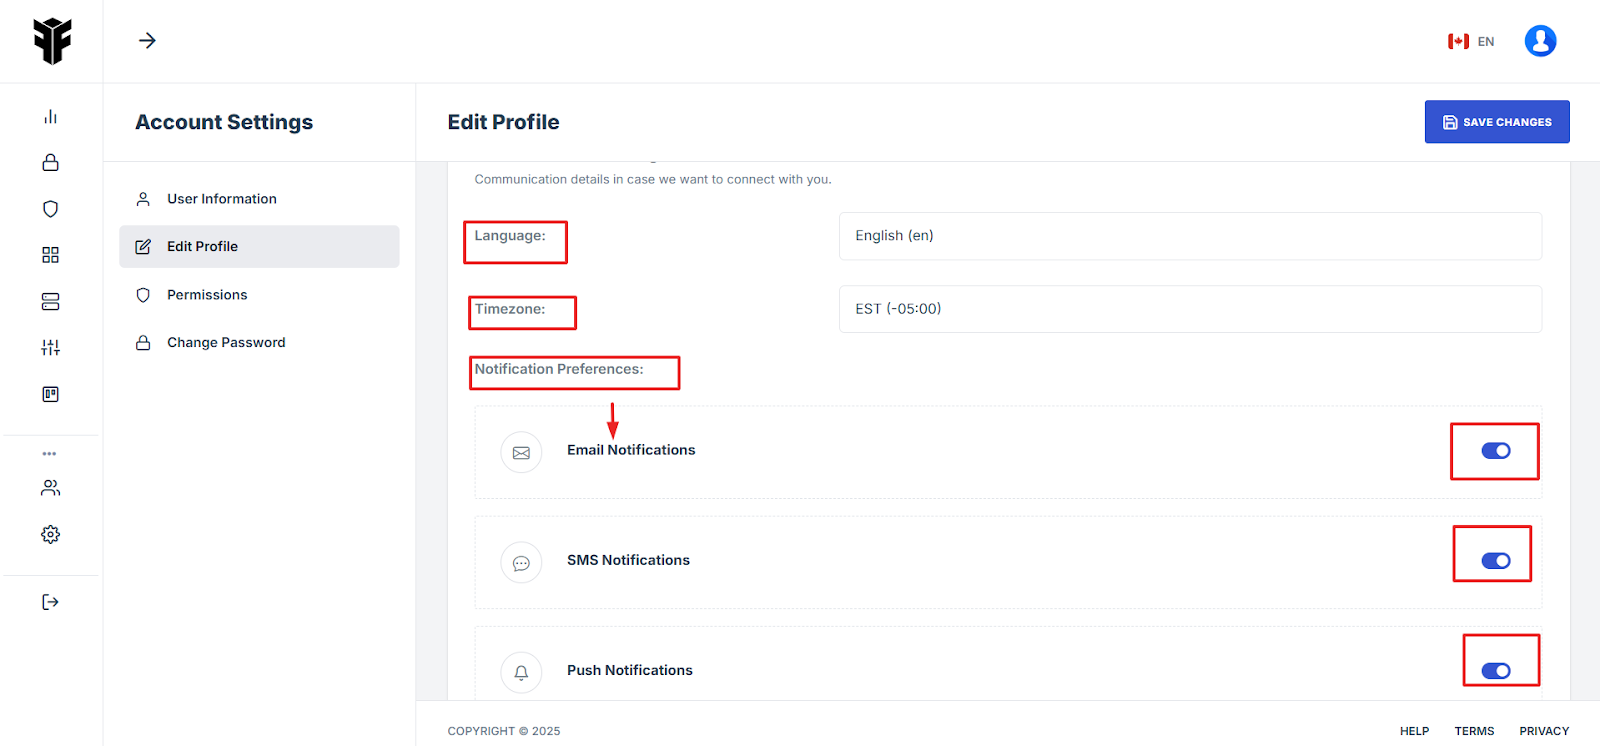
Step 7: Set Your Preferences
-
Choose your Preferred Language and Timezone
-
Manage Notification Preferences (Email, SMS, Push Notifications)
Step 8: Click "Save Changes" to finalize your setup.
-
A confirmation prompt will appear—click "Yes, save it" to complete the process.
-
Once completed, the user account is now activated and ready for use!

-
How To: Resend an OTP Code
- Navigate to your organization’s Iron Fort Compliance login page
- Log in to Your Account
- Check your email for the One-Time Password (OTP) sent on your email and enter the OTP to proceed.
- If you did not received an OTP on your email, click resend below.
- Check your email again for the new OTP and enter it to complete the login process.
1. Navigate to your organization’s Iron Fort Compliance login page
For example: https://compliance-demo.ironfortdemos.com/en/login/?next=/en
2. Log in to Your Account
Enter your email and password to log in.
3. Check your email for the One-Time Password (OTP) sent on your email and enter the OTP to proceed.
4. If you did not received an OTP on your email, click resend below.

5. Check your email again for the new OTP and enter it to complete the login process.
-
How To: Request a new user activation email
- Navigate to your organization’s Iron Fort Compliance login page
- Log in to Your Account
- Check your email for the One-Time Password (OTP) sent on your email and enter the OTP to proceed.
- Move your cursor to the left side of the dashboard to reveal the menu.
- In the left-side menu, locate the "ORGANIZATION" section.
- Under organization, click settings.
- From the Settings menu, click "Support Case".
- Fill out the necessary details
- Click "Save Changes" to submit your request.
- Monitor Your Request (You can track)
1. Navigate to your organization’s Iron Fort Compliance login page
For example: https://compliance-demo.ironfortdemos.com/en/login/?next=/en
2. Log in to Your Account
Enter your email and password to log in.
3. Check your email for the One-Time Password (OTP) sent on your email and enter the OTP to proceed.
4. Move your cursor to the left side of the dashboard to reveal the menu.
5. In the left-side menu, locate the "ORGANIZATION" section.
6. Under organization, click settings.
7. From the Settings menu, click "Support Case".
8. Fill out the necessary details.
-
Request Type: This field specifies the category or nature of the request, such as bug report, feature request, or general inquiry.
-
Summary: A brief statement outlining the main purpose of the request, providing a clear and concise topic.
-
Detailed Description: A more in-depth explanation of the request, including relevant details, requirements, and any additional context to help process the request efficiently.
9. Click "Save Changes" to submit your request.
10. Monitor Your Request (You can track).
-
Request ID: Unique number for your request
-
Request Type: Type of issue reported
-
Date: Submission time
-
Status: E.g., Pending, Resolved
-
How To: Login
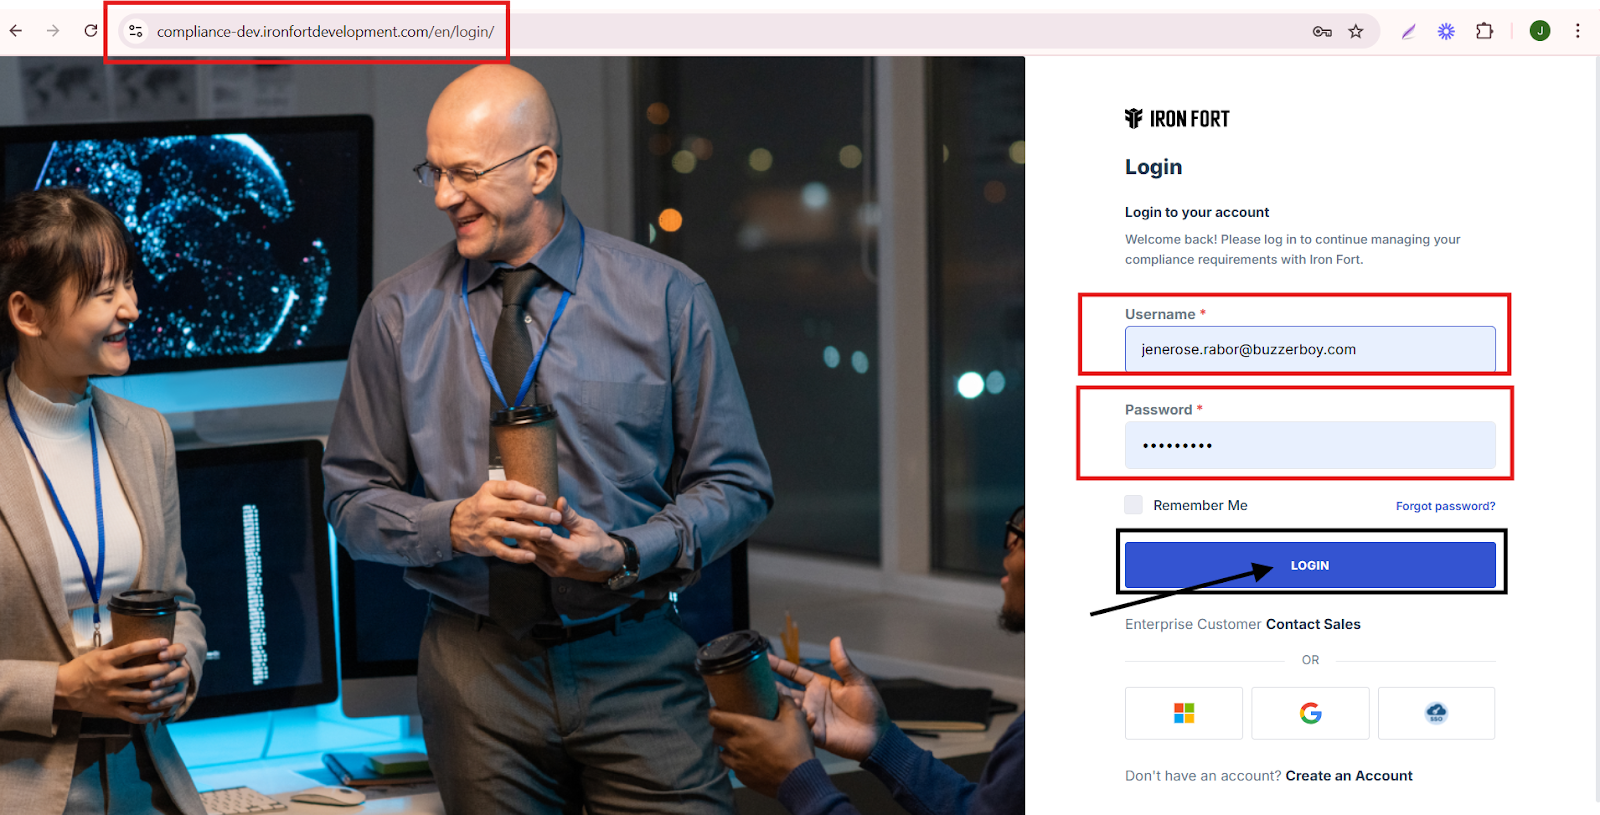
- Navigate to your organization’s Iron Fort Compliance login page
- Log In to Your Account (Enter your username and password to log in).
- Wait for a One-Time Password (OTP) that will be sent to your registered email.
- Enter the OTP to verify your identity and click “validate.”
- Once logged in, a welcome prompt will appear displaying:
- You will then be directed to the dashboard page.
1. Navigate to your organization’s Iron Fort Compliance login page
For example: https://compliance-demo.ironfortdemos.com/en/login/?next=/en
2. Log In to Your Account (Enter your username and password to log in).
3. Wait for a One-Time Password (OTP) that will be sent to your registered email.
4. Enter the OTP to verify your identity and click “validate.”
5. Once logged in, a welcome prompt will appear displaying
-
Tenant Key Information: Verifying your system access
-
User Email: Your registered email for auditing purposes
-
Last Login Details: To track your previous access
-
Iron Fort Support Email: For any login issues or concerns
NOTE: If you recognize the details and are authorized, click "OK" to continue. However, if you are not an authorized user, click "Logout" immediately to exit.
6. You will then be directed to the dashboard page.
-
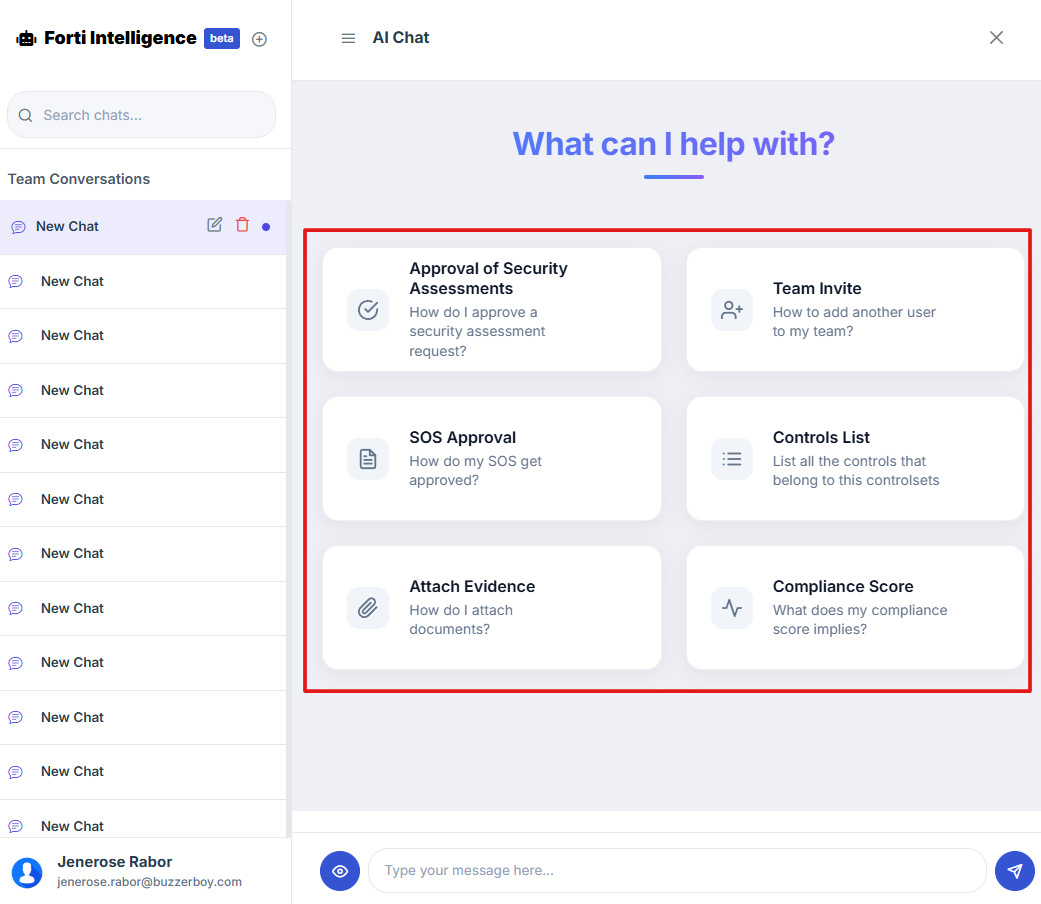
How To: Navigate to the Suggestion Page via Forti Chat
- Log in to Iron fort: How To: Login
- Locate and click the Chat AI tab at the top-right corner on the dashboard screen.
- Once you're on the Forti Chat page, look for the "+" (Add New Chat) icon next to the Forti Intelligence title.
- After clicking the “+” icon, you will be directed to the Suggestions page, where you can select from various help topics.

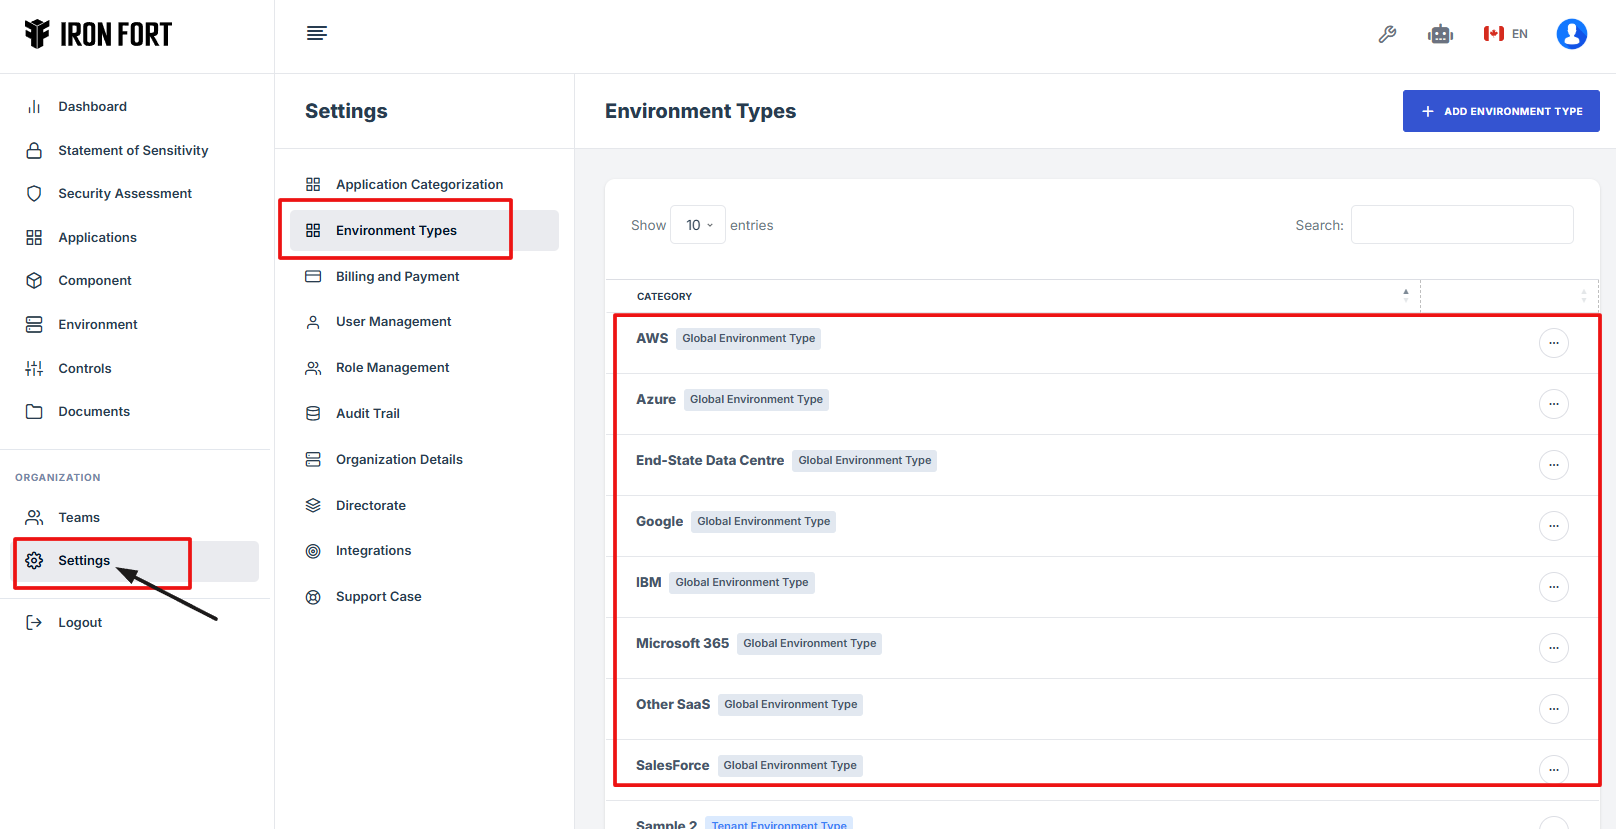
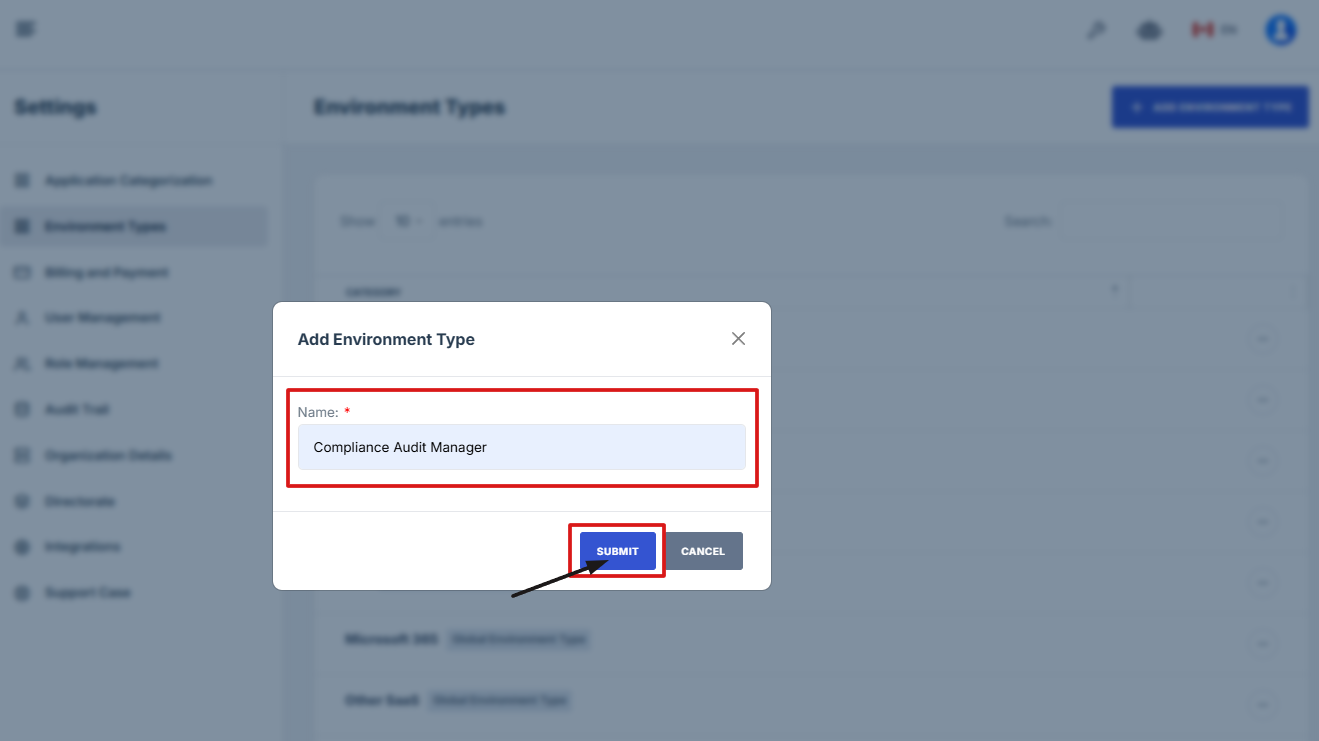
1. Log in to Iron fort: How To: Login
2. Locate and click Settings on the dashboard.

3. Go to the Settings page and click on the Environment Types tab.
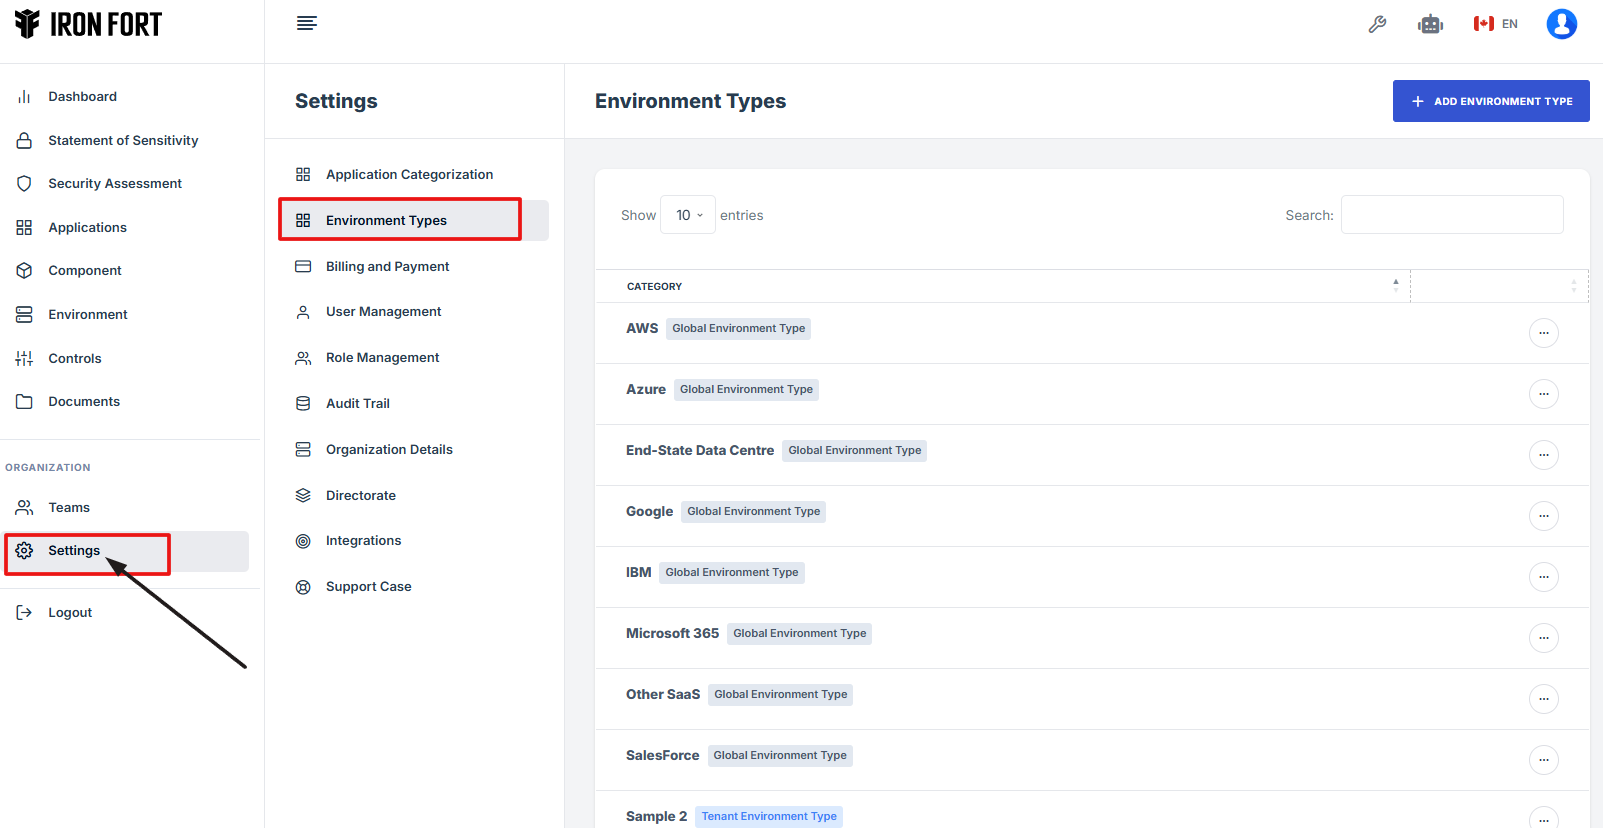
4. Click the "Add Environment Type" button to start.

5. Type the name of the environment type, then click Submit to save it.
-
How To: Navigate to User Management under Settings
- Log in to Iron fort: How To: Login
- Locate and click Settings on the dashboard.
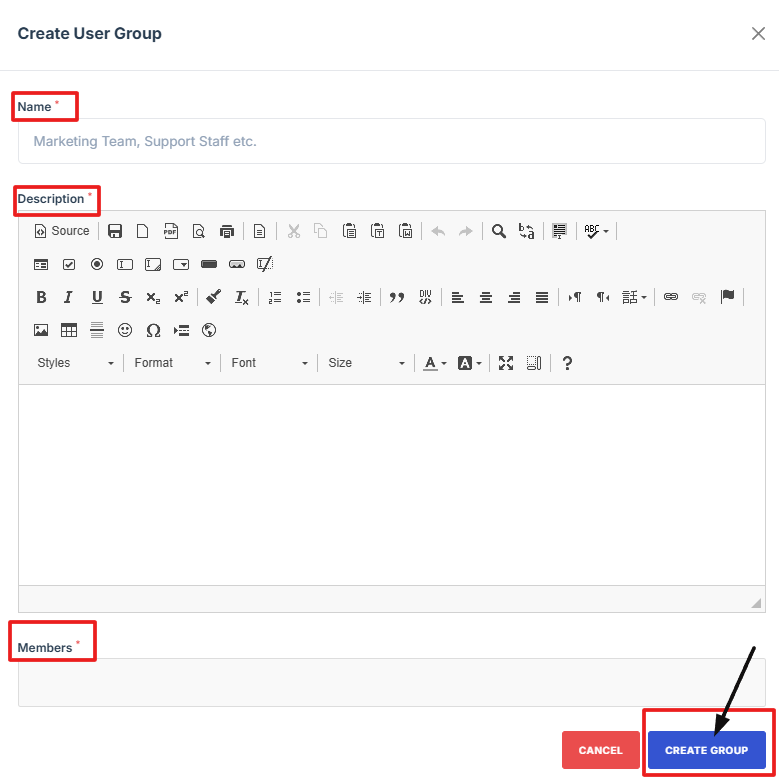
- On the Settings page, click User Management where you can manage users and create new groups.
- Click Create Group to start making a new user group.
- Fill in the required details such as the group name, description, and select members to add to the group.
- Click Create Group to save and finish creating the group.


-
How To: Open and Edit a Team Member’s Profile from User Management
- Log in to Iron fort: How To: Login
- Locate and click Settings on the dashboard.
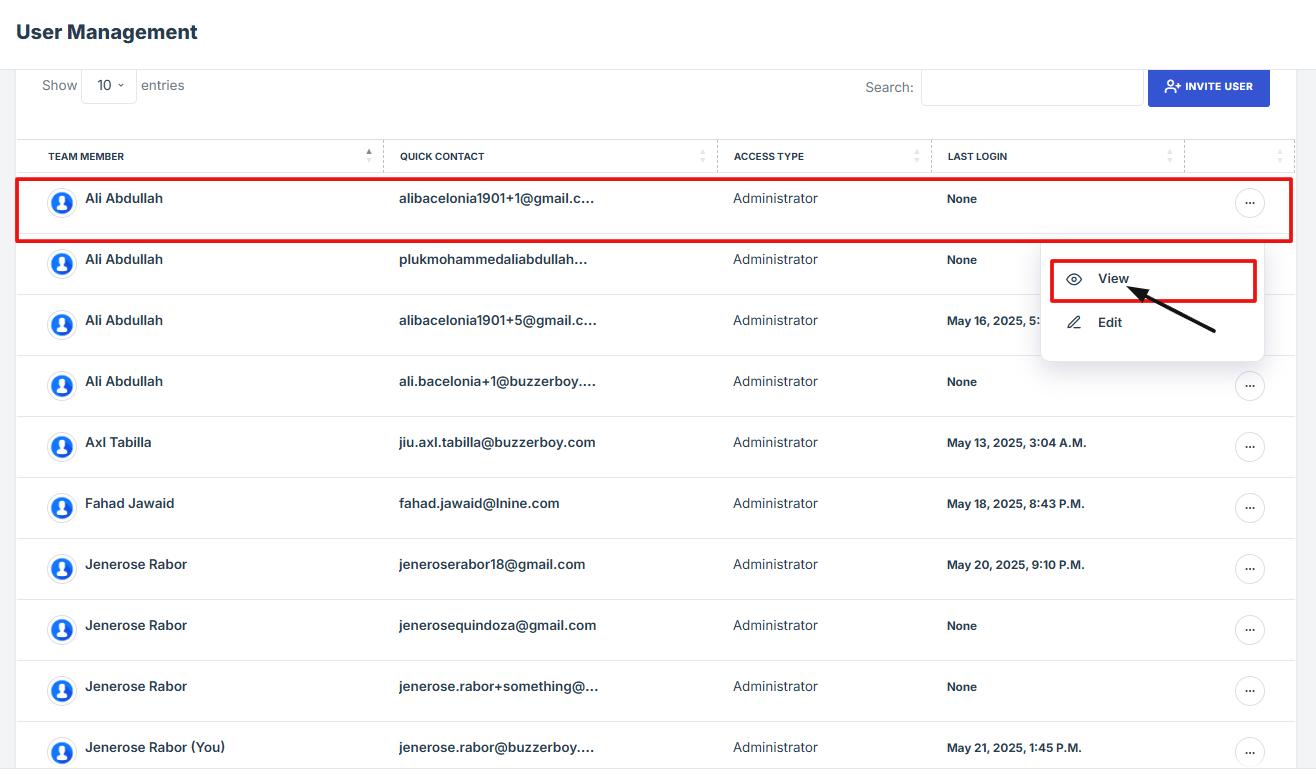
- On the Settings page, click the User Management tab to manage your team members.
- Scroll down to find the team member you want to view.
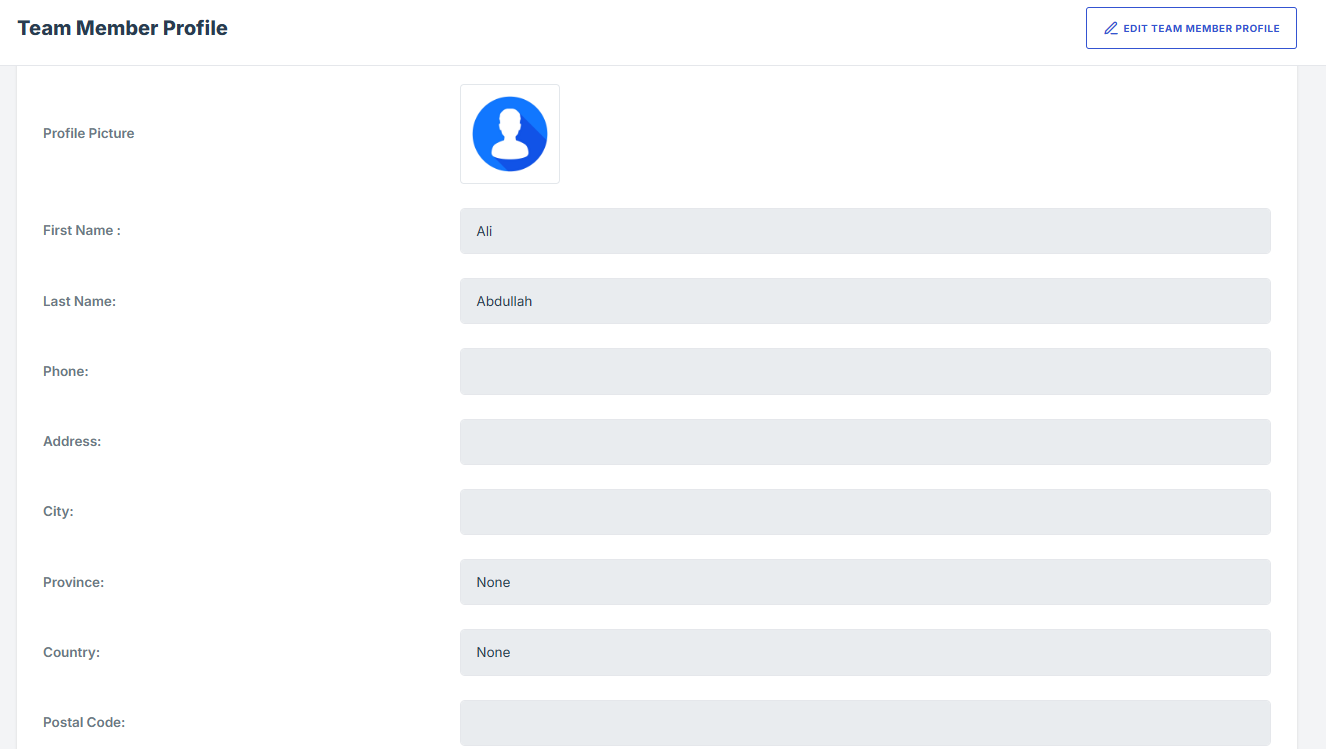
- Click the three-dot menu next to their name, then select View to see their profile details.
- You’ll be taken to a page showing all their information.
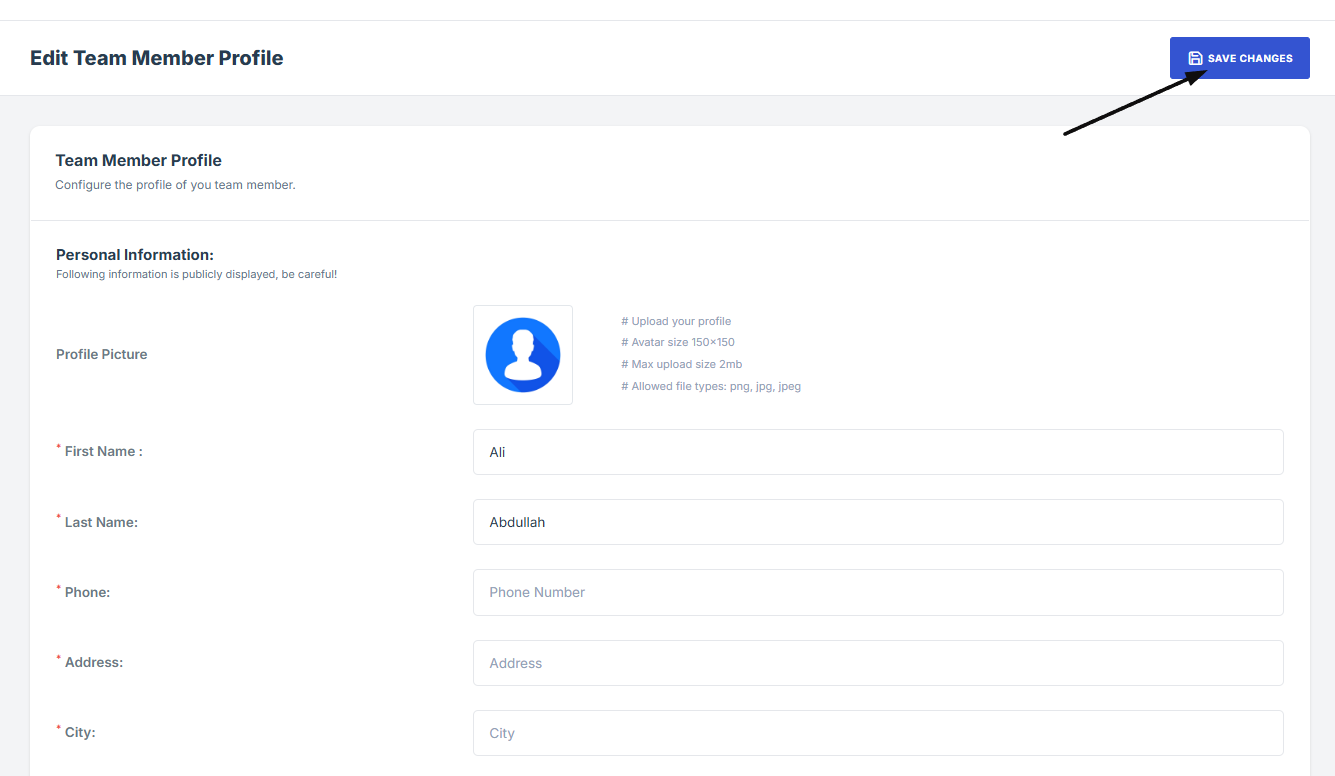
- To edit a team member’s profile, go back to the User Management list and click the three-dot menu next to their name.
- Select Edit from the dropdown menu.
- You’ll be taken to the edit profile page. Make any necessary changes, then click Save Changes to update the profile.
1. Log in to Iron fort: How To: Login
2. Locate and click Settings on the dashboard.

3. On the Settings page, click the User Management tab to manage your team members.

4. Scroll down to find the team member you want to view.

5. Click the three-dot menu next to their name, then select View to see their profile details.
6. You’ll be taken to a page showing all their information.
7. To edit a team member’s profile, go back to the User Management list and click the three-dot menu next to their name.
8. Select Edit from the dropdown menu.

9. You’ll be taken to the edit profile page. Make any necessary changes, then click Save Changes to update the profile.

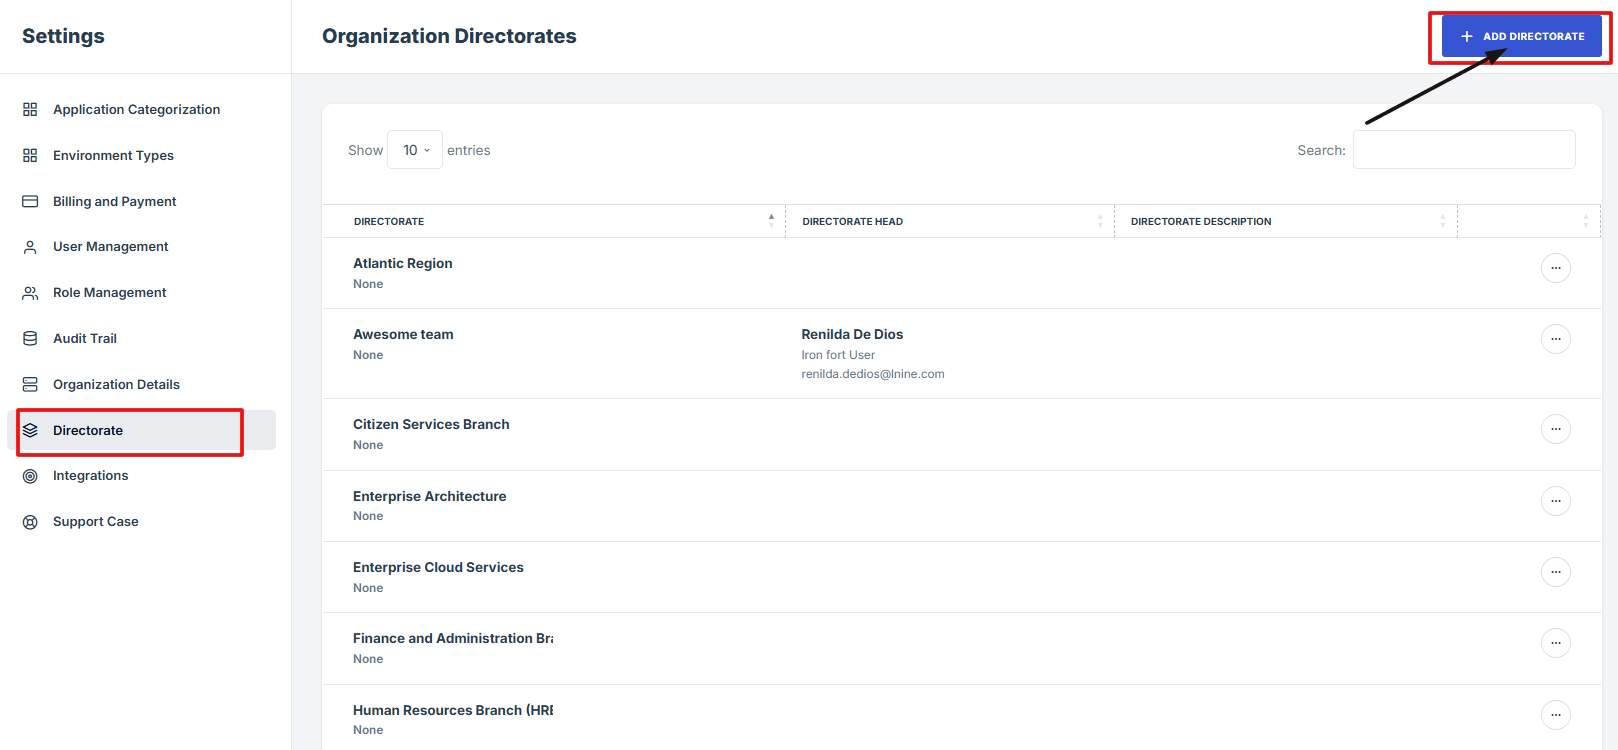
The Directorate section helps organize your company or department into smaller groups or teams, such as regions, branches, or specific service units. Each directorate can have its own team leader and description, making it easier to manage responsibilities and communication within your organization.

-
How To: Add Directorate
- Log in to Iron fort: How To: Login
- Locate and click Settings on the dashboard.
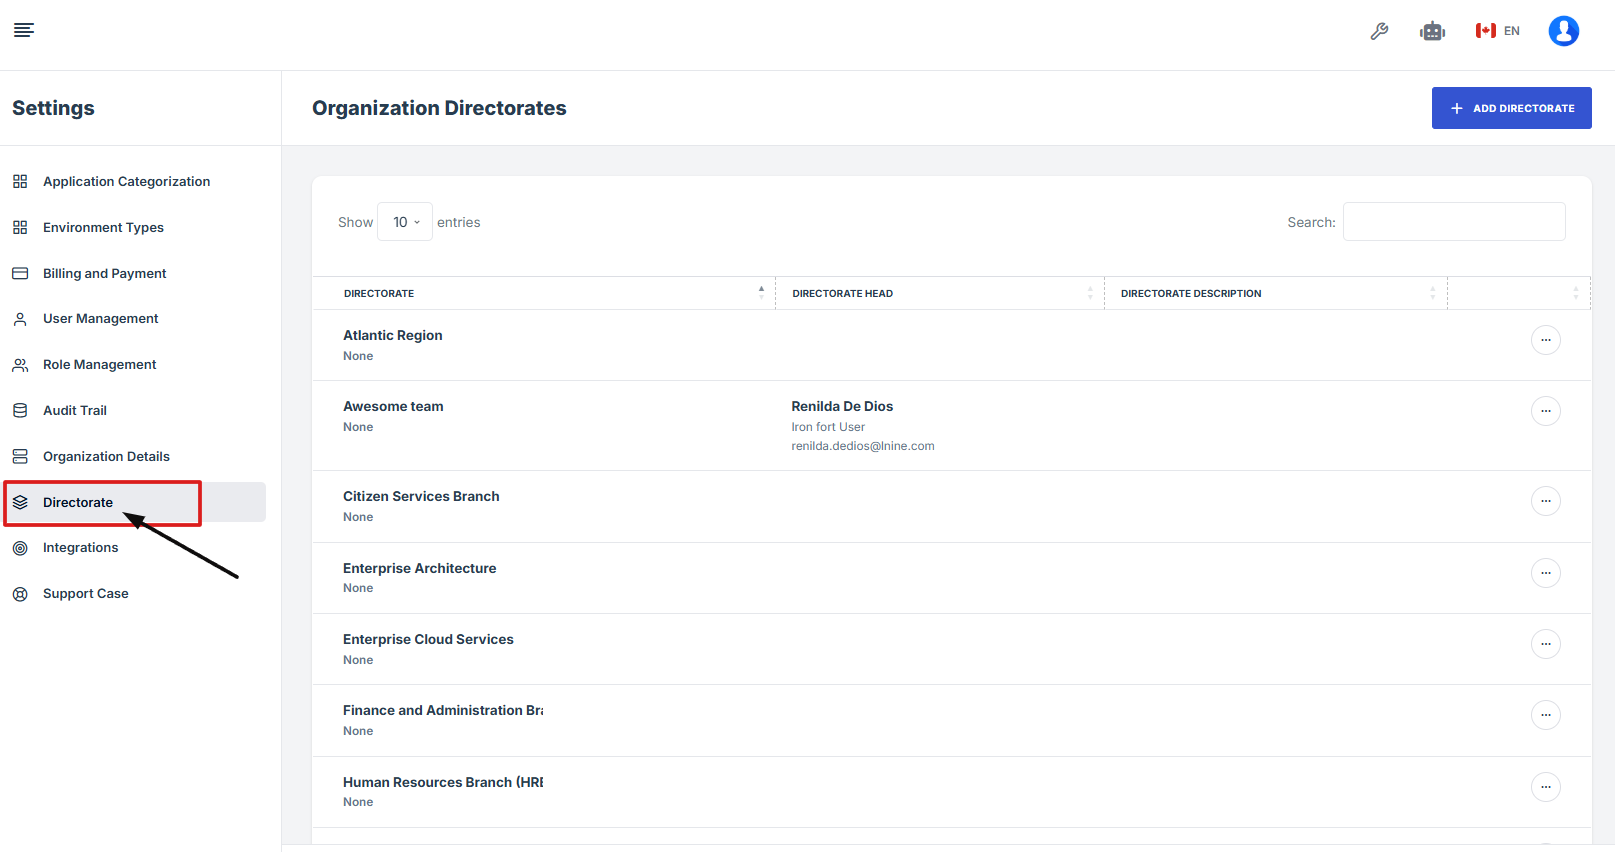
- Go to the Settings page and click on “Directorate” to view a list of all your organization’s groups or branches.
- Click the “Add Directorate” button to create a new group.
- Fill in the required details like the name, description, and head of the directorate.
- Once done, click “Save Changes” to add the new directorate to the list.
1. Log in to Iron fort: How To: Login
2. Locate and click Settings on the dashboard.

3. Go to the Settings page and click on “Directorate” to view a list of all your organization’s groups or branches.
4. Click the “Add Directorate” button to create a new group.
5. Fill in the required details like the name, description, and head of the directorate.
6. Once done, click “Save Changes” to add the new directorate to the list.

The Integration feature allows your platform to connect and work smoothly with other tools, applications, or systems that your organization uses. This helps reduce manual work and ensures that data is shared automatically between systems.
By setting up integrations, users can streamline workflows, improve accuracy, and save time.


-
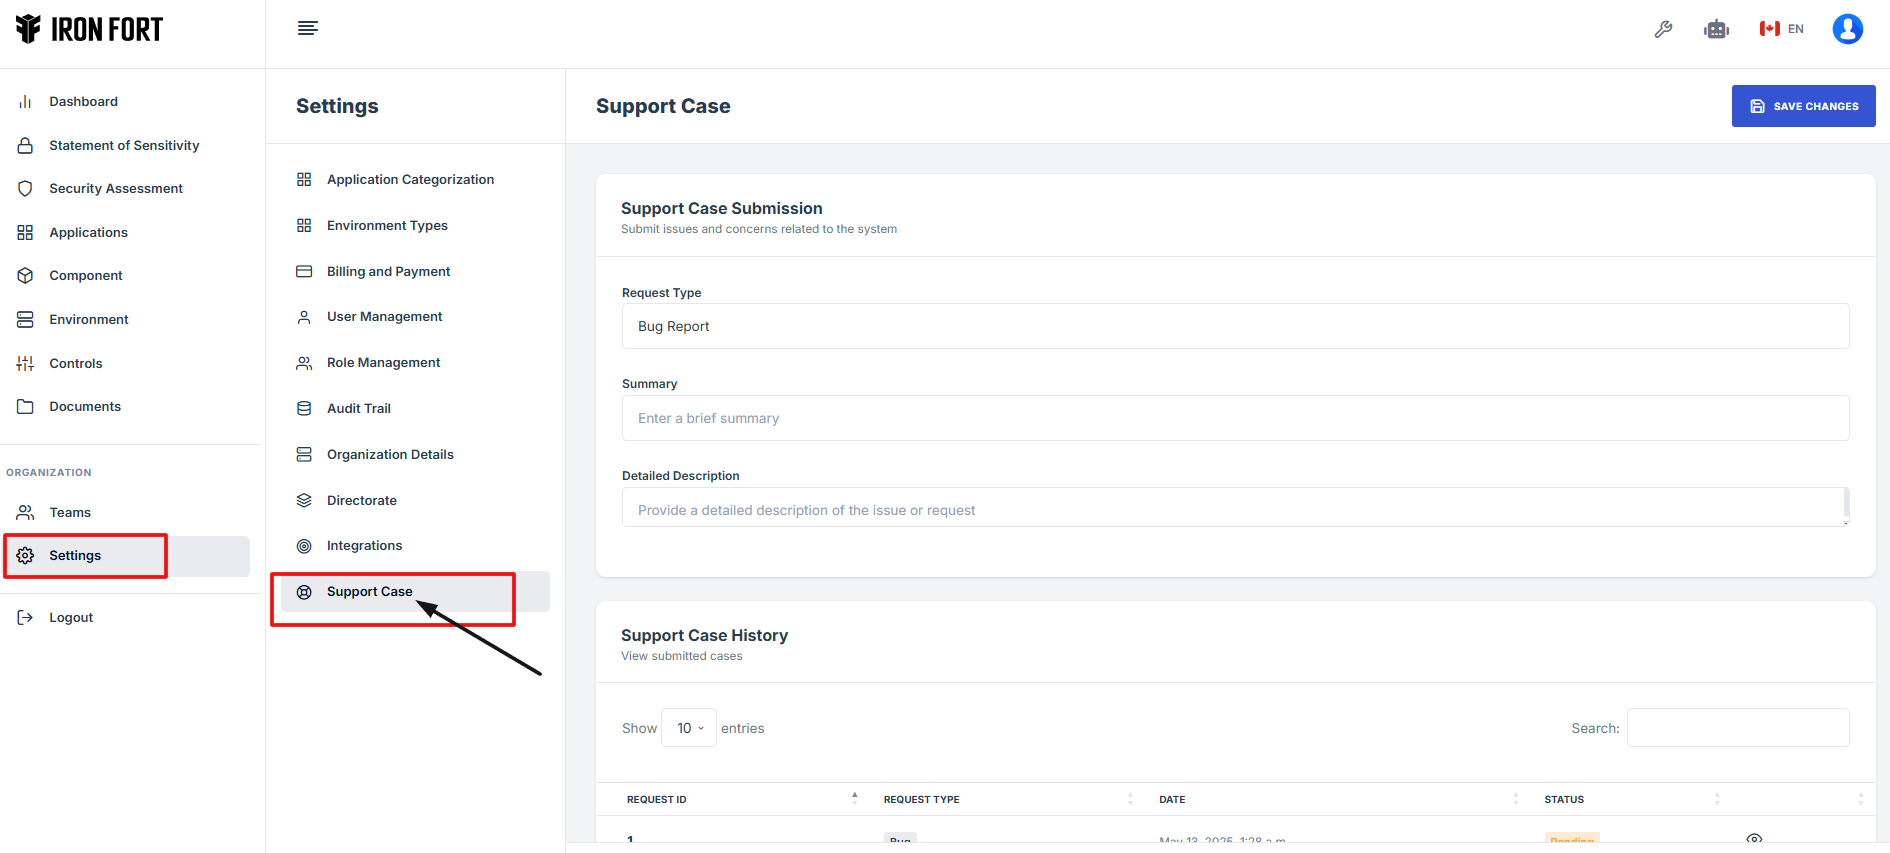
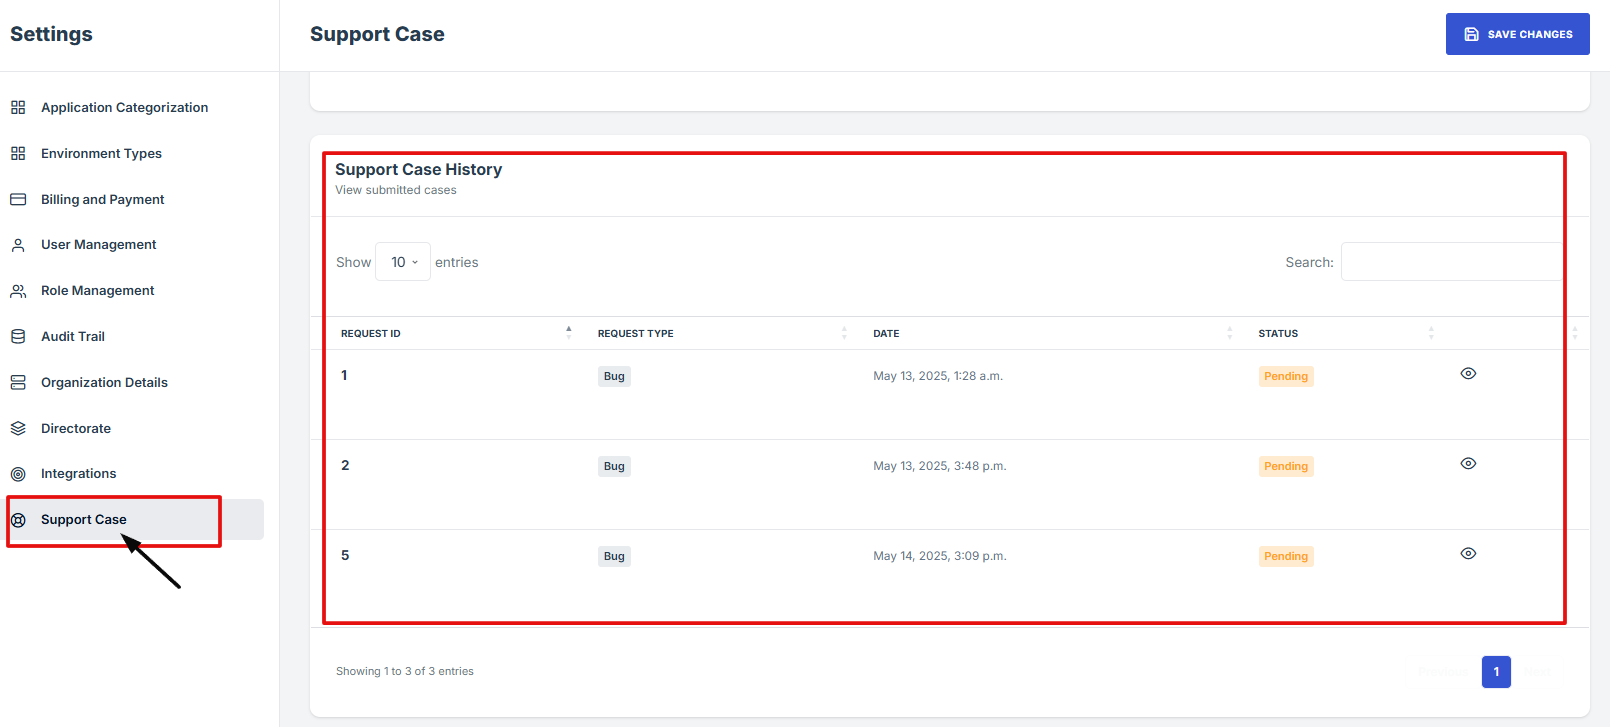
How To: Navigate to Support Case History
- Log in to Iron fort: How To: Login
- Locate and click Settings on the dashboard.
- Go to the Settings page and click on “Support case” section where you can view and manage all your support tickets.
- On the Support Case page, scroll down to find Support Case History and see a detailed list of your past support cases.
Support Case History lets you keep track of all your past support requests and their updates in one place. You can also have conversations directly with the support team to manage and follow up on your reported issues or requests. This feature helps you easily review previous cases, stay updated on progress, and ensures smooth communication for faster problem resolution.

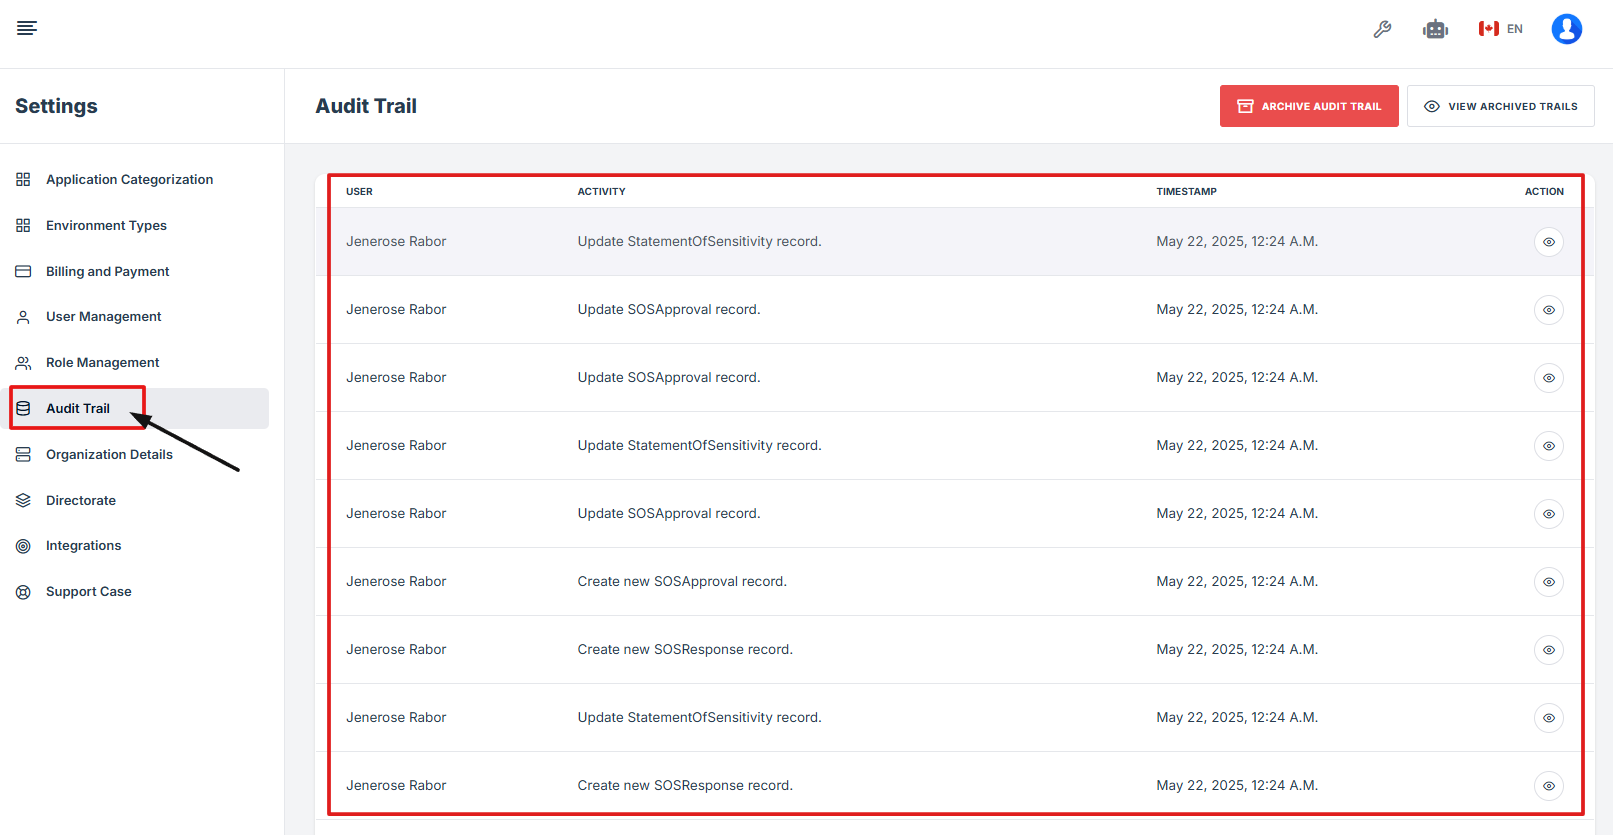
Audit Trails provide a comprehensive log of user actions and system changes within your account. This feature enables you to monitor activities such as logins, updates, and configuration changes, offering full transparency and accountability. By maintaining a clear record of events, Audit Trails support security, compliance, and efficient issue resolution.


-
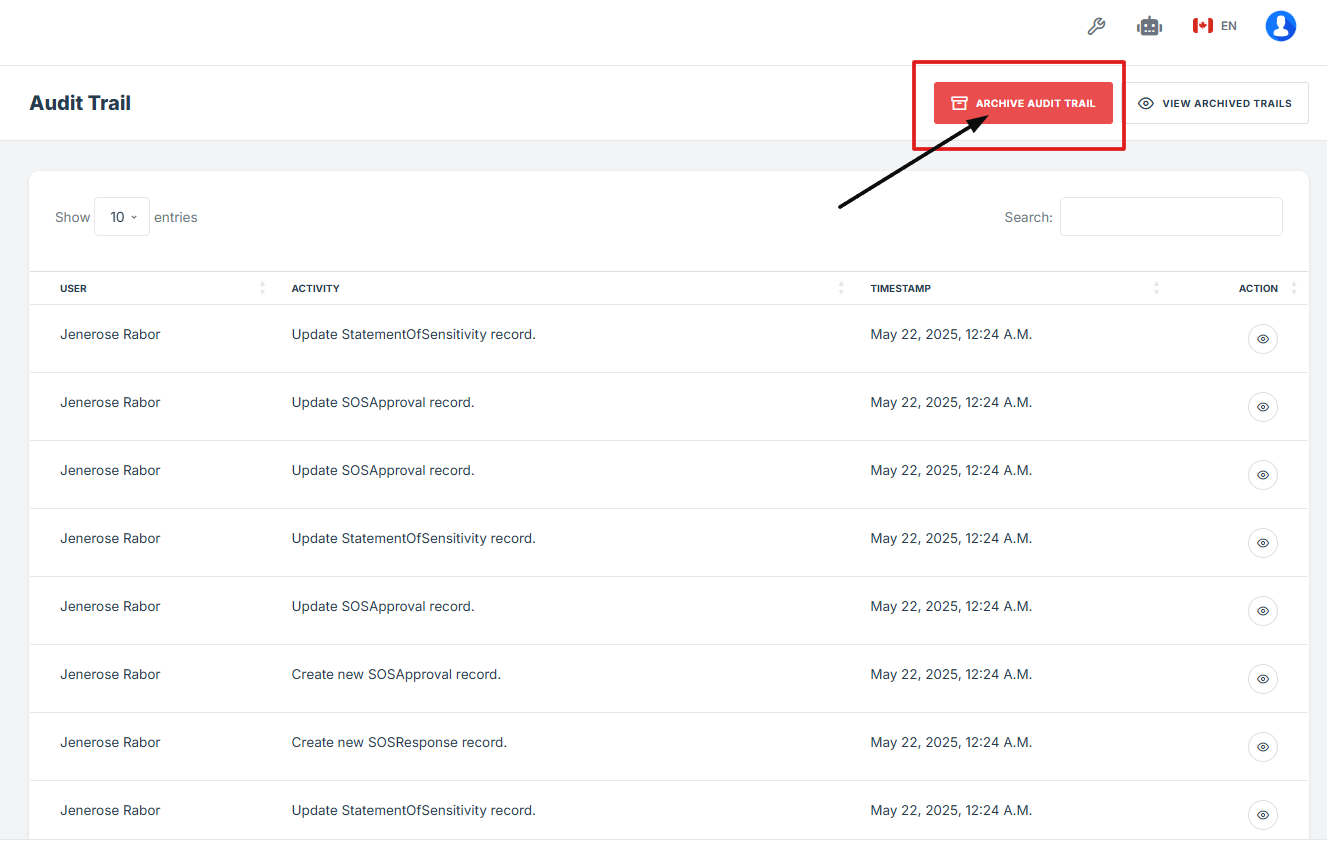
How To: Navigate to Archive Audit Trails under Settings
- Log in to Iron fort: How To: Login
- Locate and click Settings on the dashboard.
- Go to the Settings page and click on “Audit Trails” to view a detailed log of user activities and system changes.
- On the Audit Trails page, go to the top right corner and click Archive Audit Trail to add a new archive entry.

1. Navigate to add a new Archive entry: How To: Navigate to Archive Audit Trails under Settings
2. On the Archive Audit Trail page, choose the Start Date and End Date, then enter a short description.
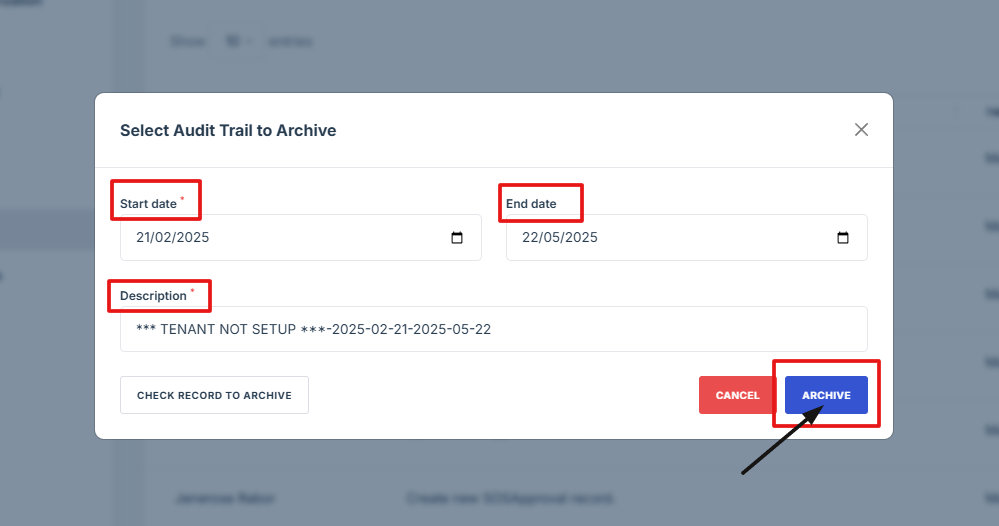
3. After filling in the details, click the Archive button to create the archive entry.
1. Log in to Iron fort: How To: Login
2. Locate and click Settings on the dashboard.

3. Go to the Settings page and click on Audit Trails to access the activity logs.
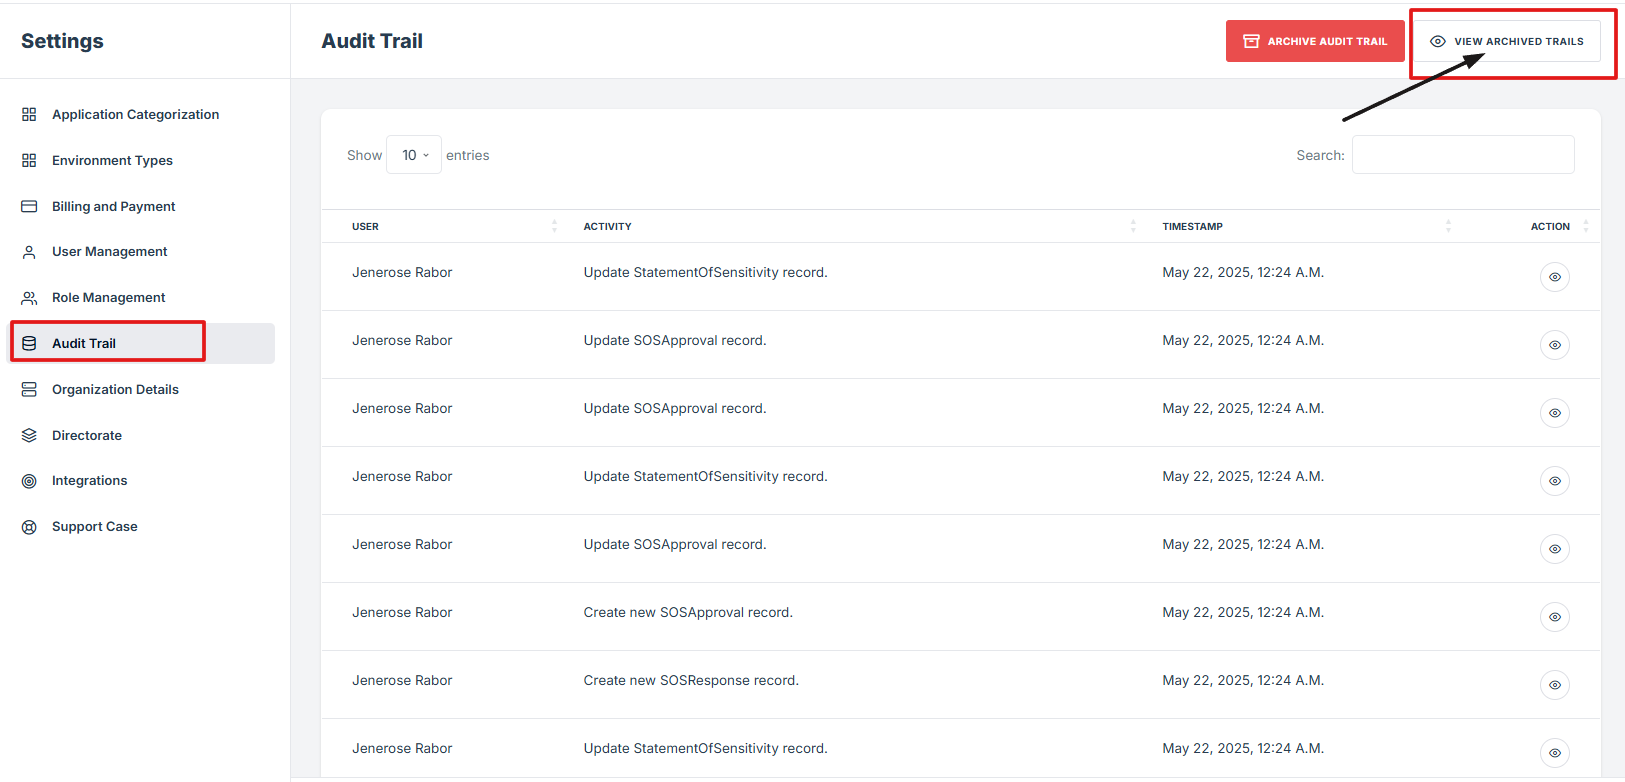
4. On the Audit Trails page, click View Archived Trails to see a list of saved audit records with their details.

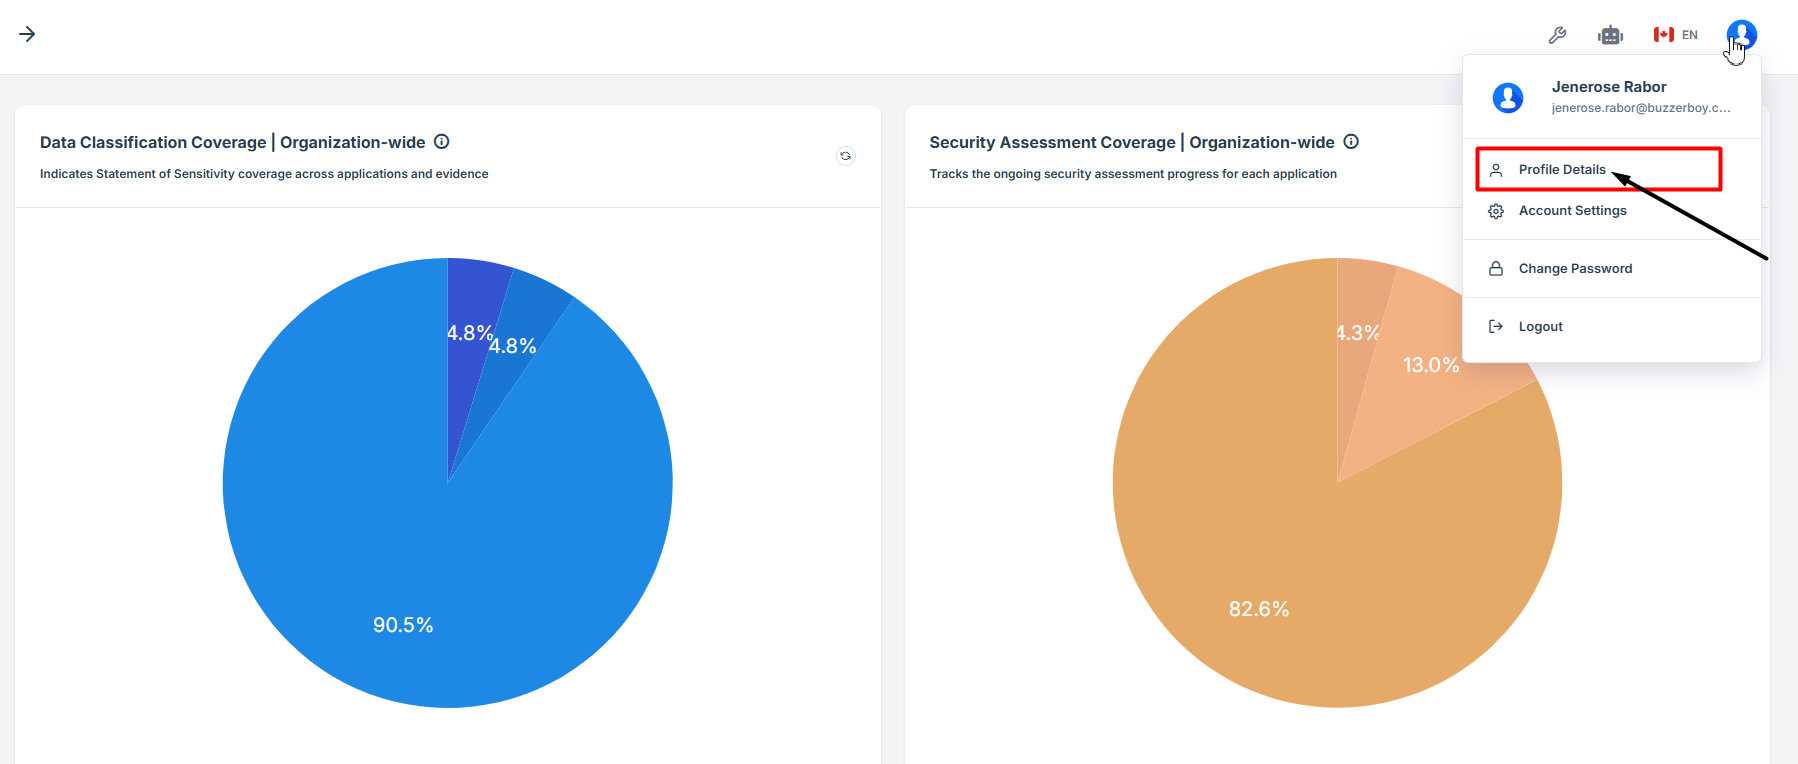
User Profile allows you to manage your personal account information, such as your name, email address, and contact details. This feature helps keep your profile up to date and ensures smooth communication within the system. You can also change your password and other preferences to maintain account security and personalize your experience.
1. Log in to Iron fort: How To: Login
2. From the dashboard, go to the top right corner and click your profile picture.
3. In the dropdown menu, click Profile Details.
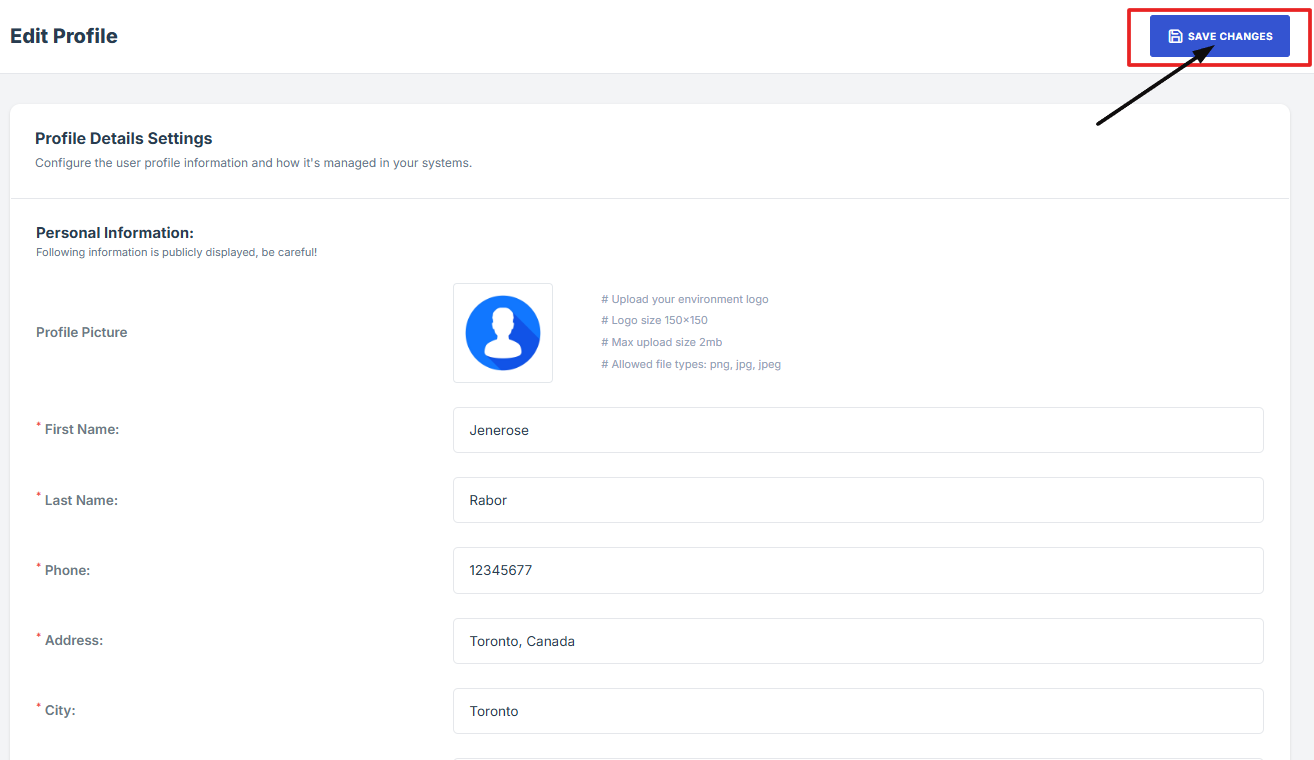
4. On the Profile Details page, click Edit Profile to make changes.
5. After updating your information, click Save Changes to apply.
1. Log in to Iron fort: How To: Login
2. Locate and click Settings on the dashboard.

3. Go to the Settings page and click on “Audit Trails” to view a detailed log of user activities and system changes.
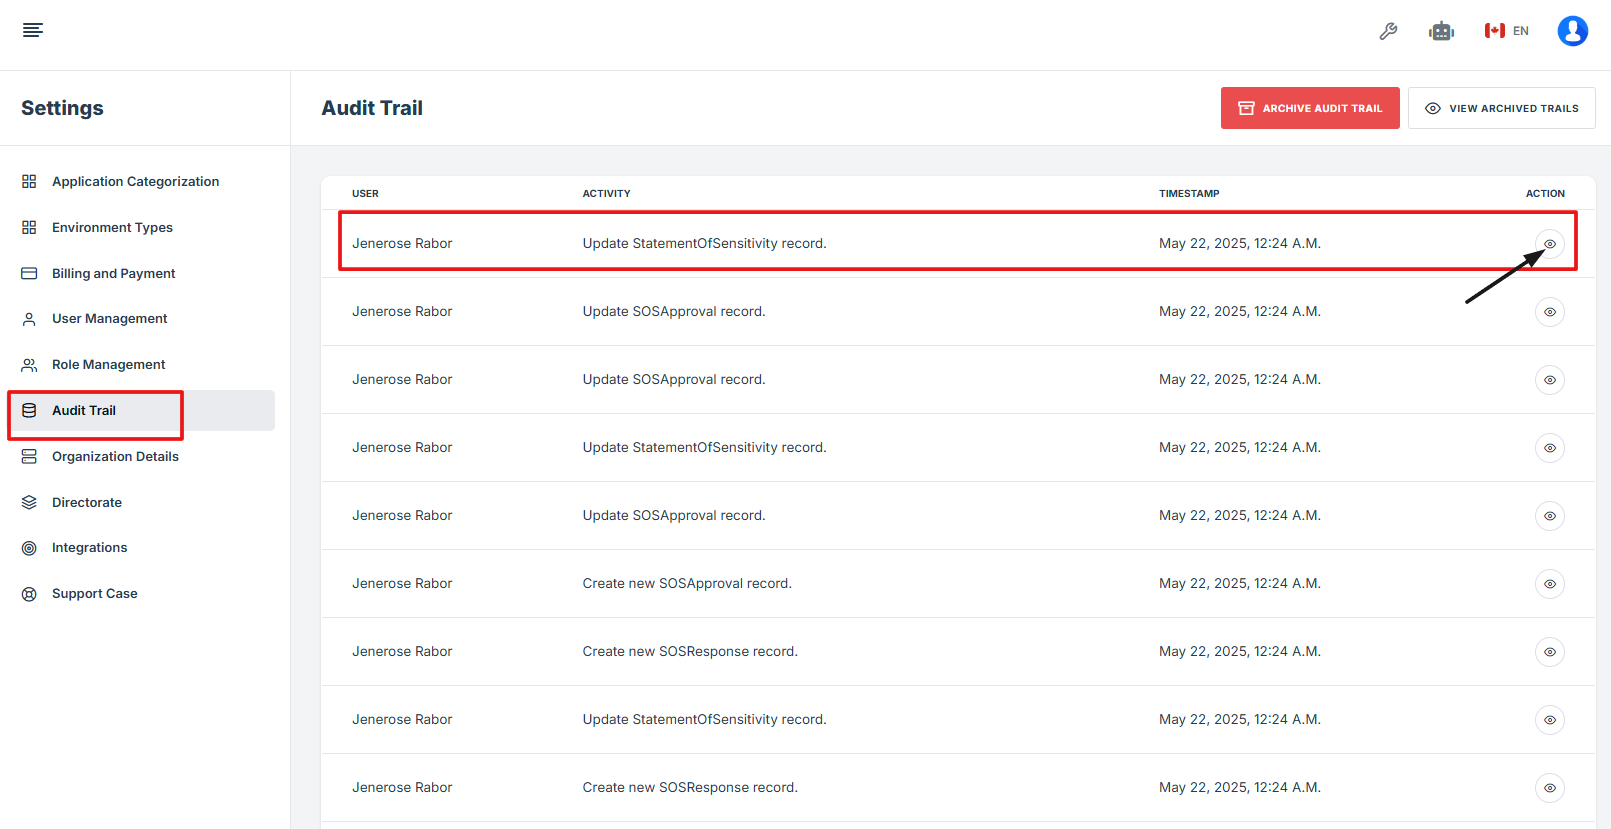
4. To see the details of the archived record, click the eye icon under the Action column.
-
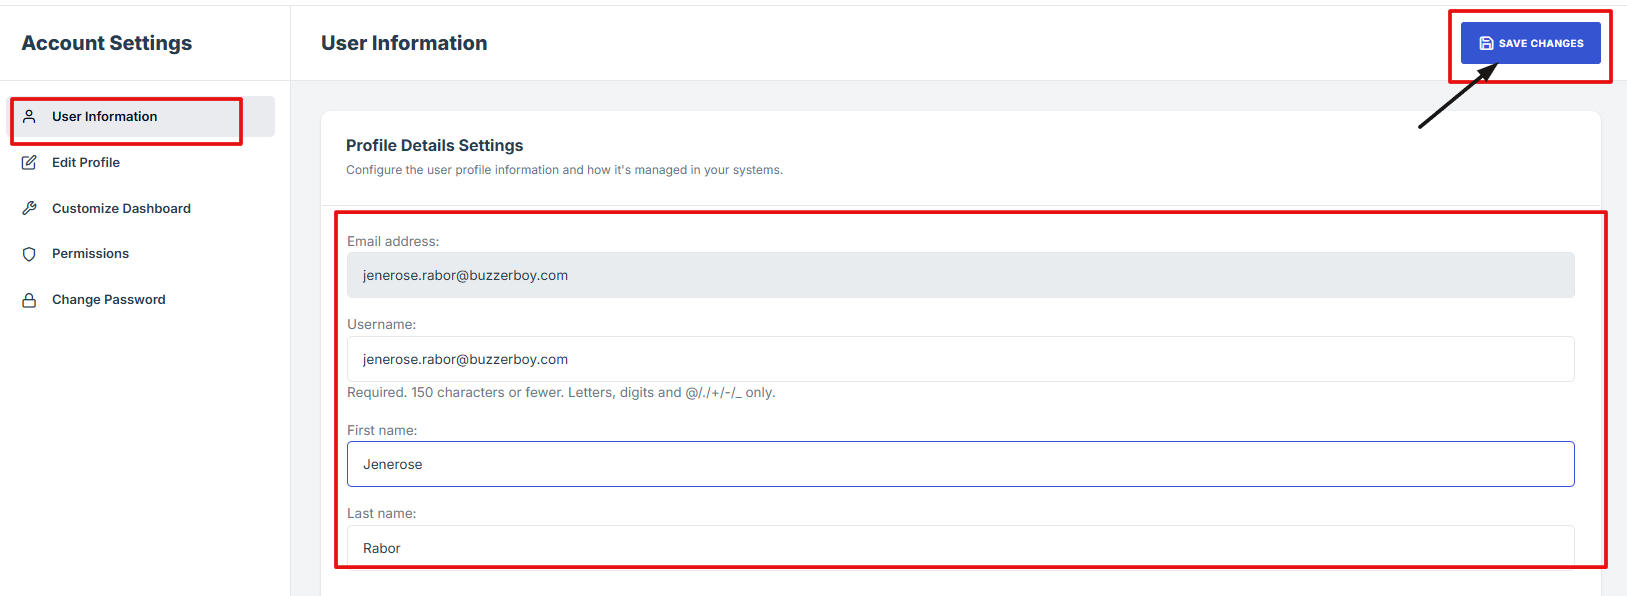
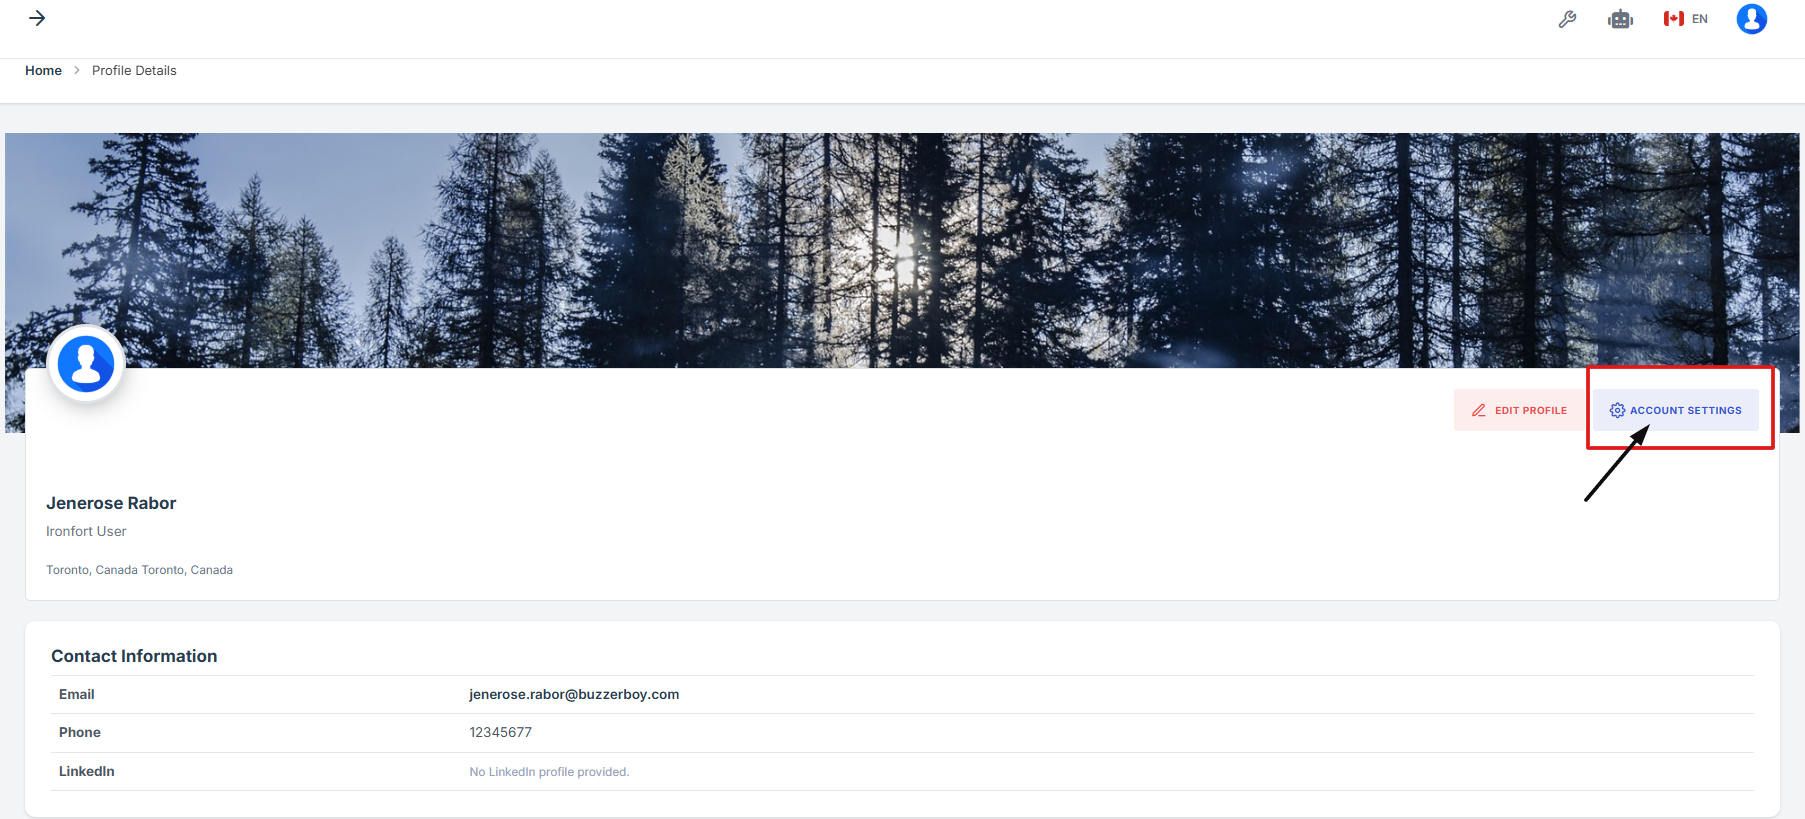
How To: Edit Your Account Settings and Save Changes
- Log in to Iron fort: How To: Login
- From the dashboard, go to the top right corner and click your profile picture.
- In the dropdown menu, click Profile Details.
- On the Profile Details page, click Accounting Settings to make changes.
- Update your information under User Information and click Save Changes.
1. Log in to Iron fort: How To: Login
2. From the dashboard, go to the top right corner and click your profile picture.

3. In the dropdown menu, click Profile Details.

4. On the Profile Details page, click Accounting Settings to make changes.
5. Update your information under User Information and click Save Changes.