How To Guidelines in Dashboard
Discover comprehensive guidelines for utilizing the Dashboard features in Iron Fort Compliance. This guide provides insights into navigating widgets, managing assessments, and enhancing compliance efficiency.
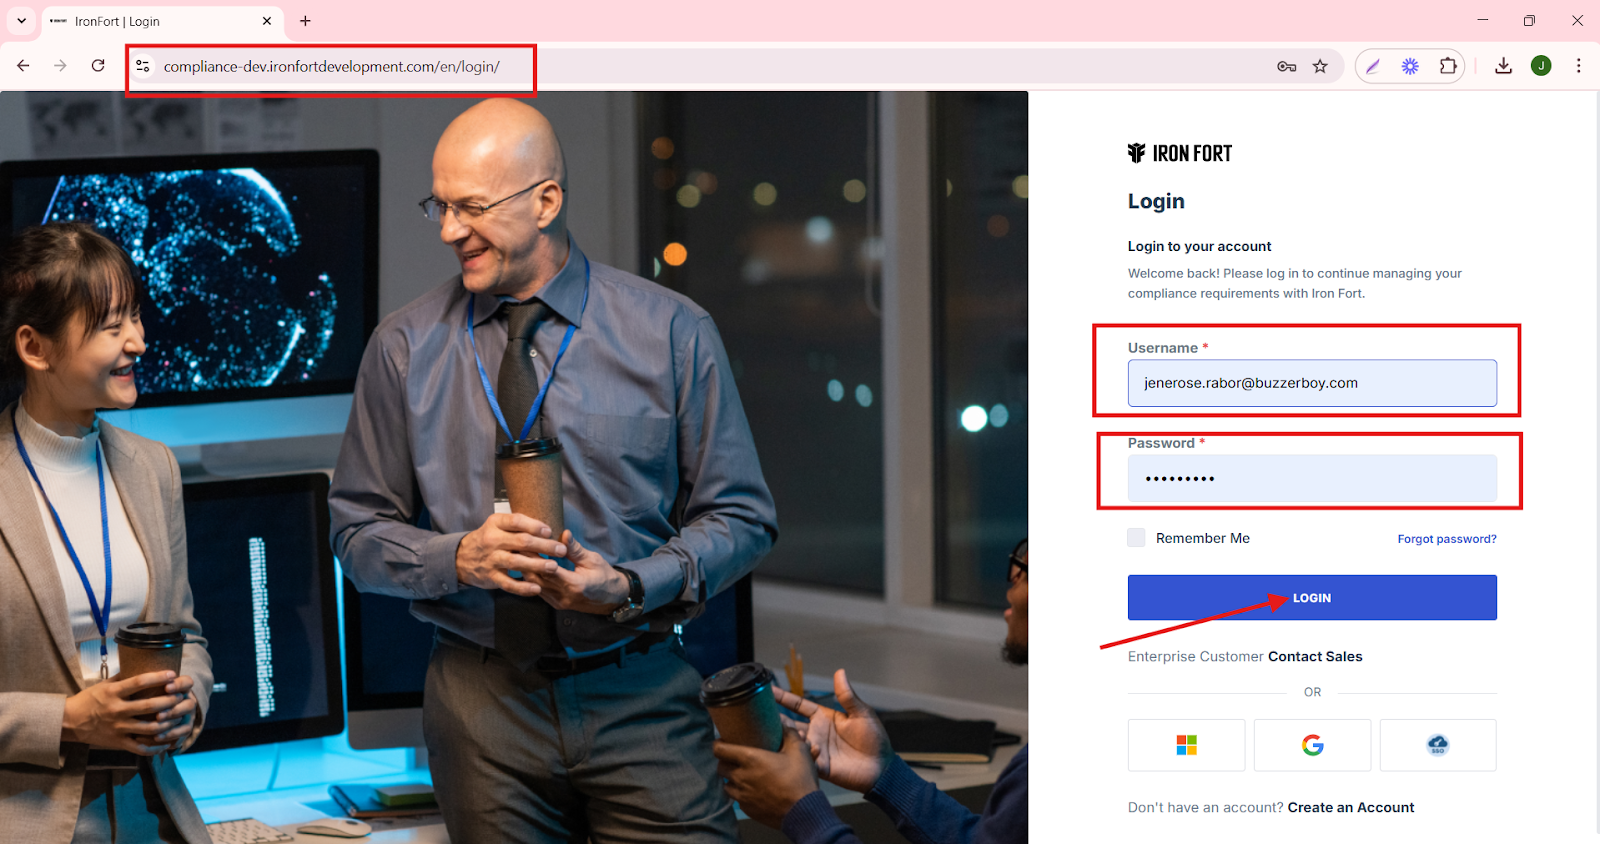
STEP 1: Navigate to your organization’s Iron Fort Compliance login page
-
For example: https://compliance-demo.ironfortdemos.com/en/login/?next=/en
-
Log In to Your Account (Enter your username and password to log in).
STEP 2: Verify Identity
-
Wait for a One-Time Password (OTP) that will be sent to your registered email.
-
Enter the OTP to verify your identity and click “validate.”

Once logged in, a welcome prompt will appear displaying
-
Tenant Key Information: Verifying your system access
-
User Email: Your registered email for auditing purposes
-
Last Login Details: To track your previous access
-
Iron Fort Support Email: For any login issues or concerns
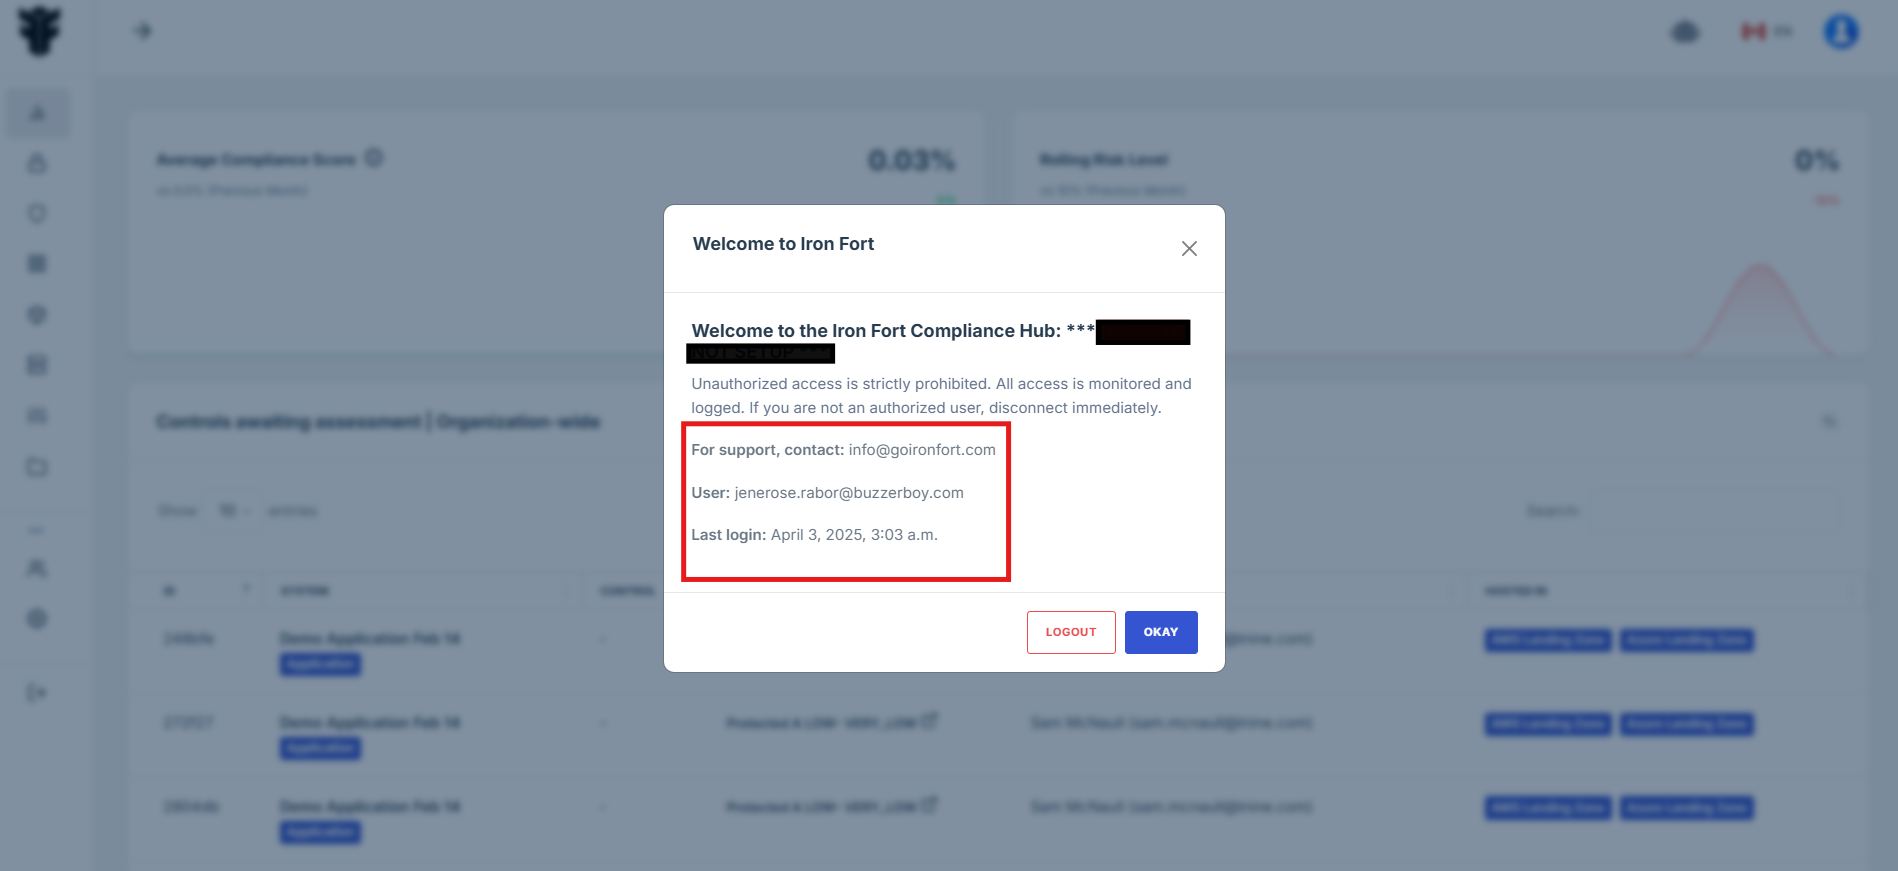
NOTE: If you recognize the details and are authorized, click "OK" to continue. However, if you are not an authorized user, click "Logout" immediately to exit.
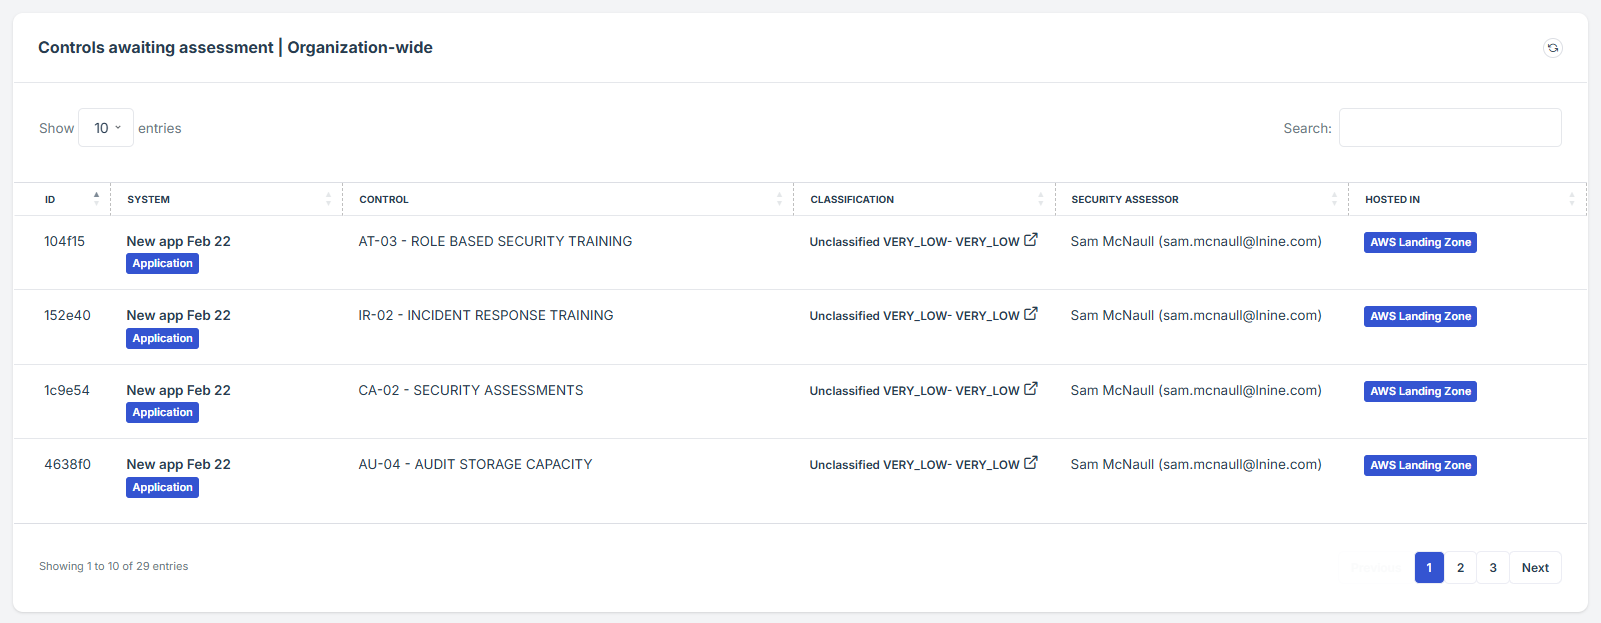
STEP 3: Locate the Controls-Awaiting Assessment Widget
-
Once logged in, the user will be redirected to the Dashboard/Analytics.
-
Scroll down slightly until the Controls-Awaiting Assessment Widget is visible.
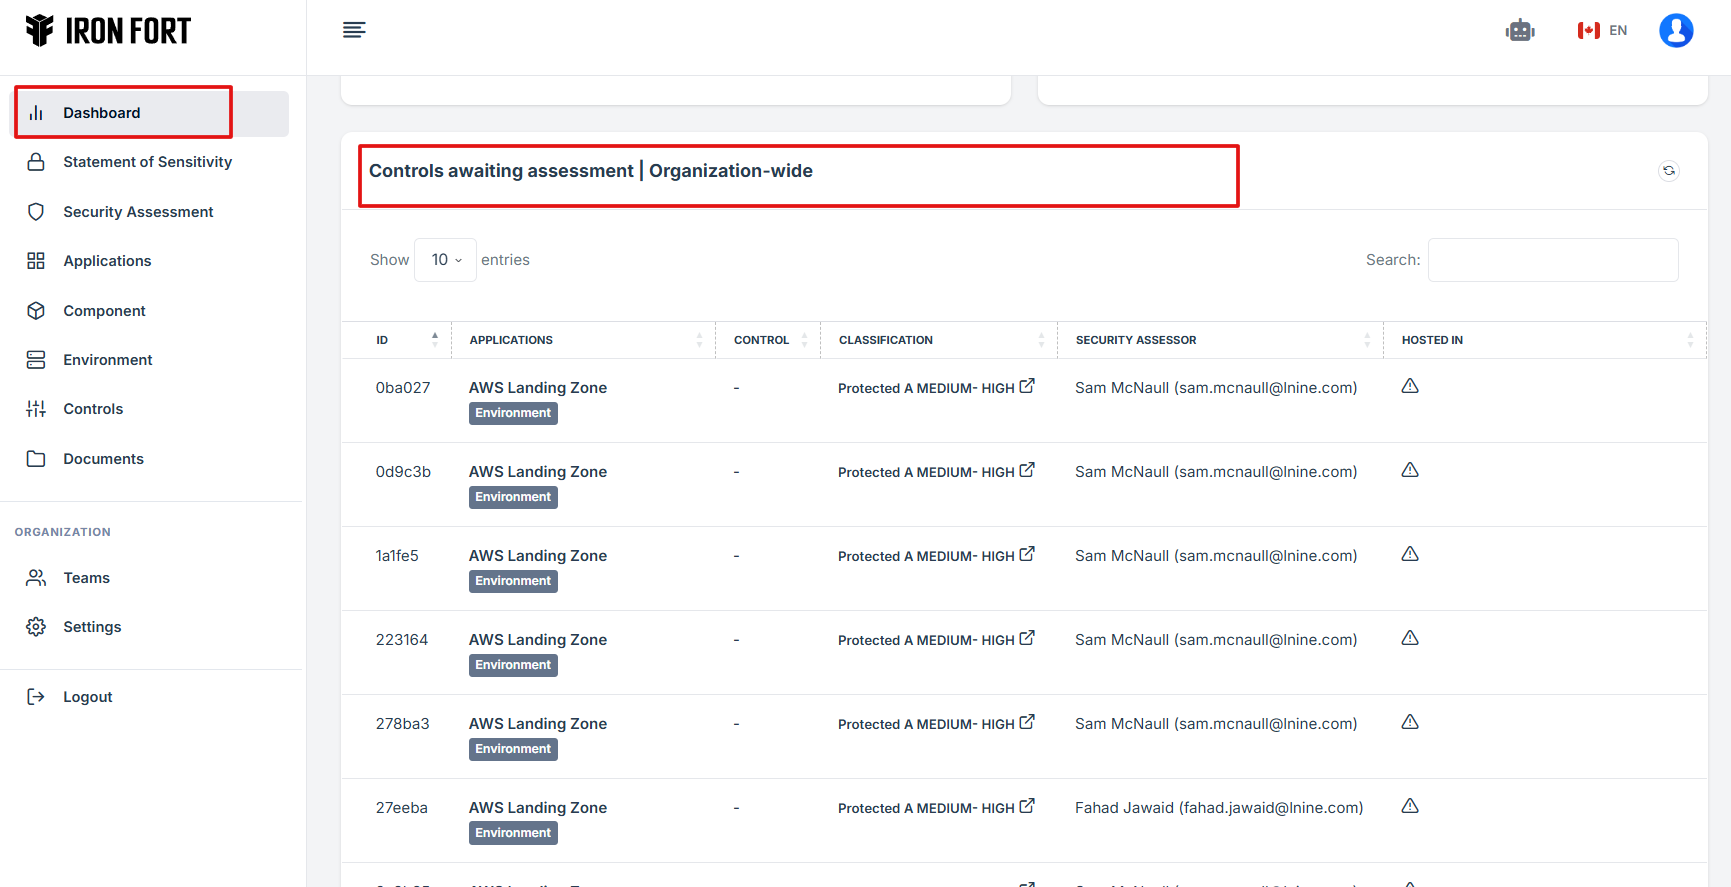
STEP 4: Review Pending Assessments
-
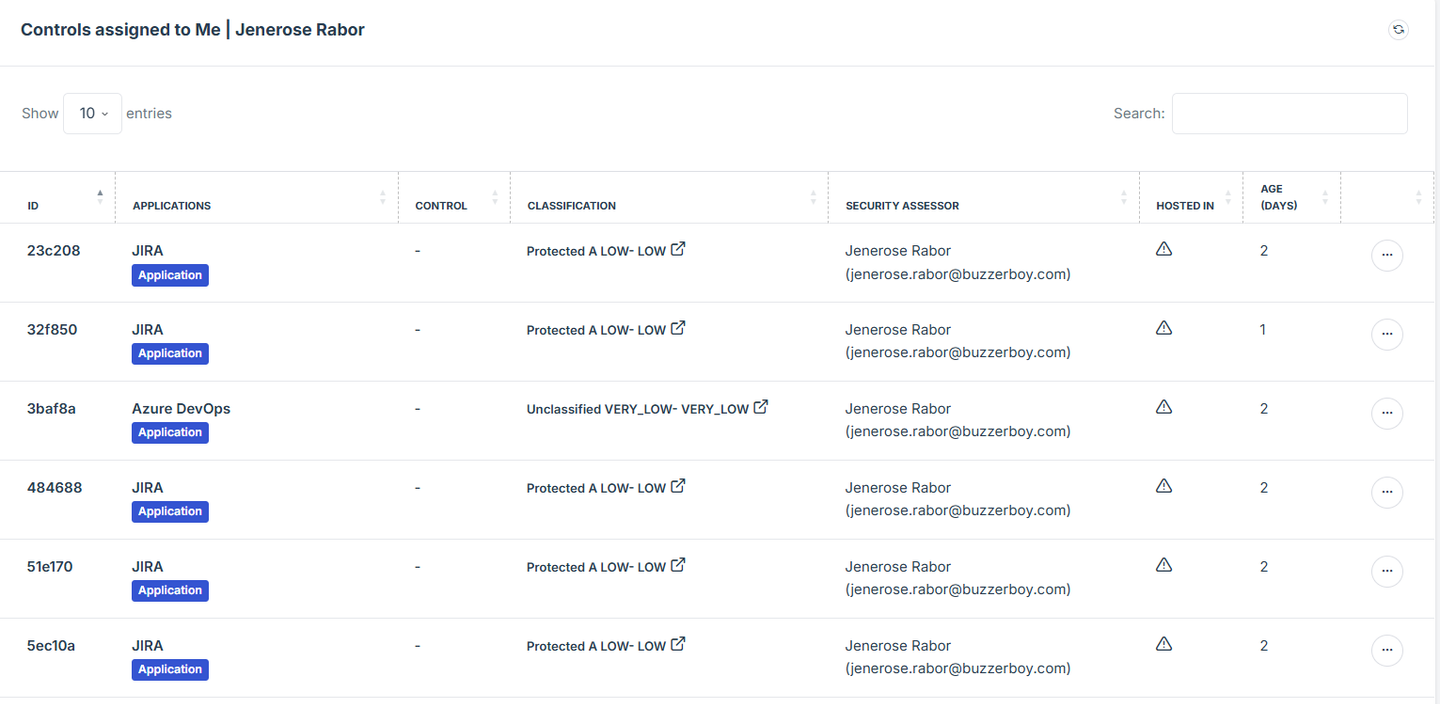
The widget provides a shortcut for the user to view pending approval requests submitted under Controls.
-
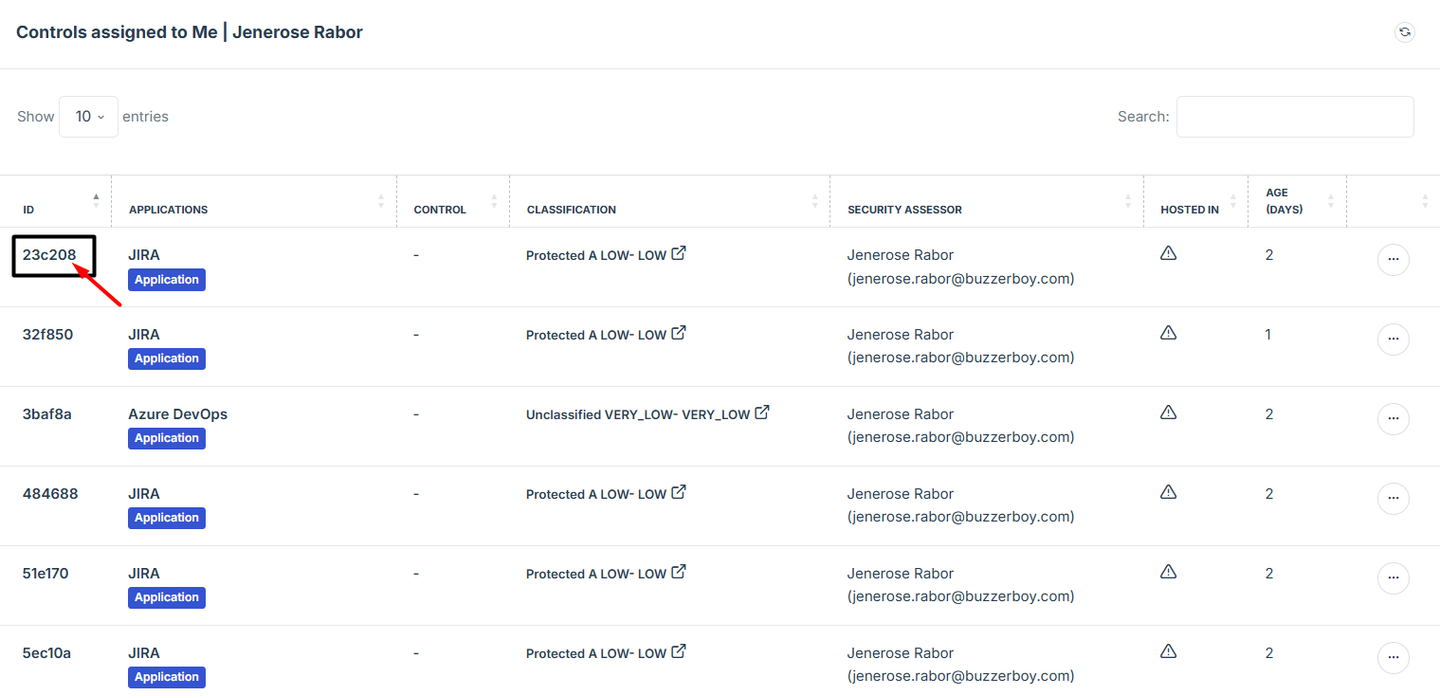
Each request is assigned an ID number for easy tracking.
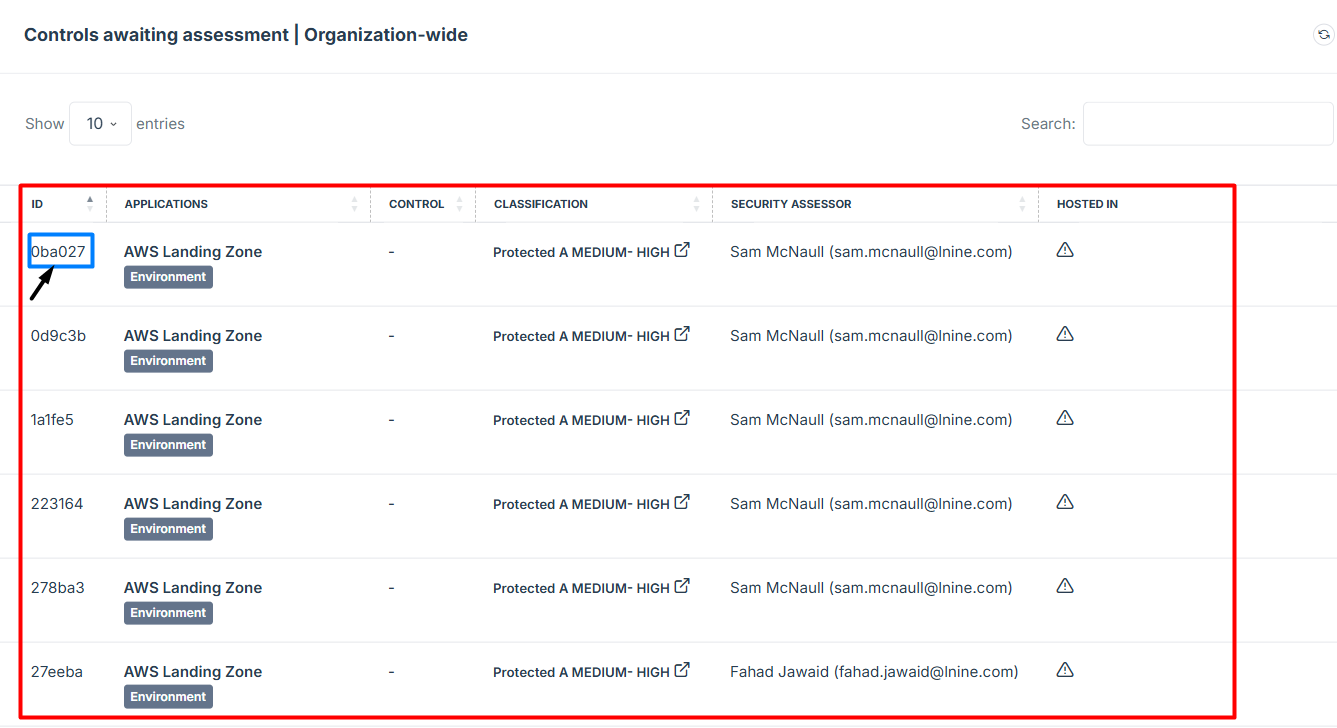
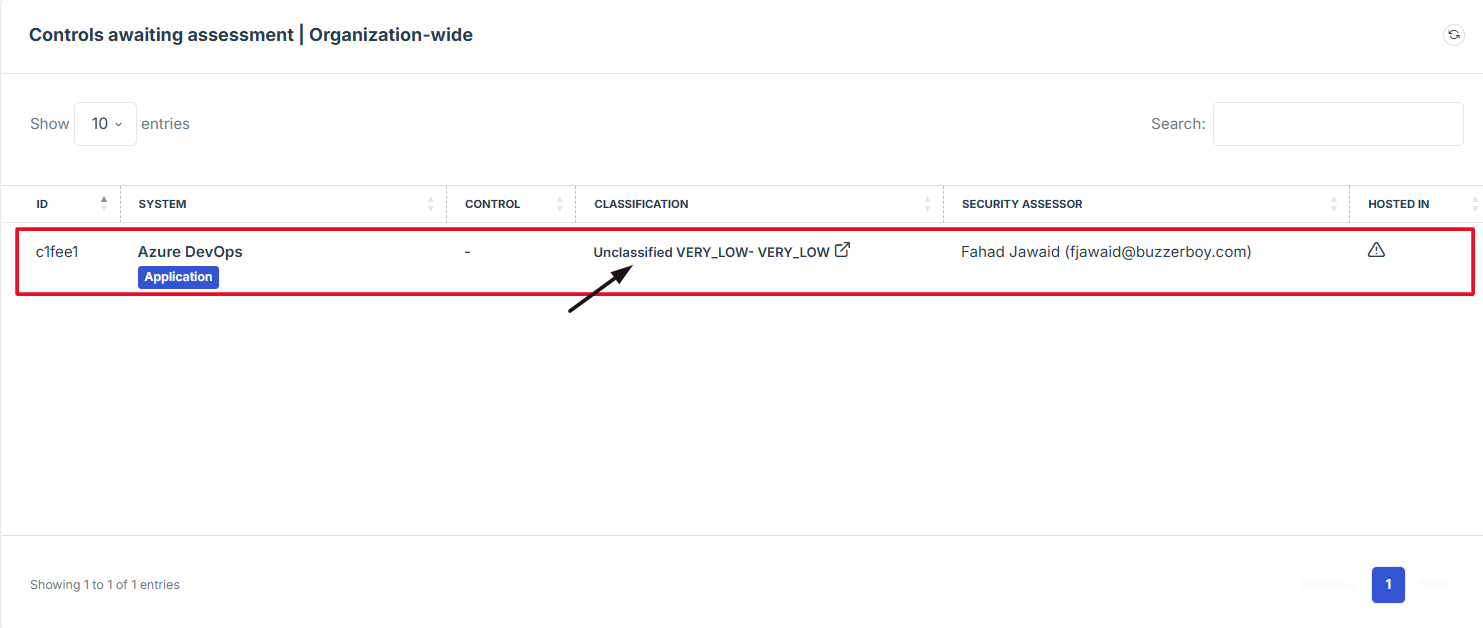
STEP 5: Access Pending Control Details
-
If the user clicks on the classification tab of a pending request, the user will be redirected to the detailed view of the pending control assessment, where the status and additional details can be reviewed.
STEP 6: Follow Up on Pending Assessments
-
If the assessment is still pending and requires follow-up, the user should contact the Iron Fort team for assistance.
-
How To: Plan of Action Measurements (PoAM) Widget
- STEP 1: Navigate to your organization’s Iron Fort Compliance login page
- STEP 2: Verify Identity
- STEP 3: Create a Plan of Action Measurement (POAM) under security assessment
- STEP 4: Field out the important details needed in POAM
- STEP 5: Locate the Plan of Action Measurements (POAM) Widget
- STEP 6: Access Pending Approval Requests
- STEP 7: Follow Up on Pending Assessments
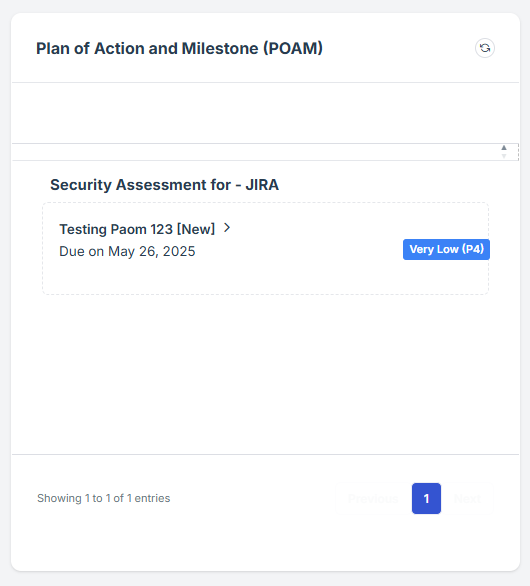
Plan of Action and Milestones (PoAM) Widget designed to streamline and manage your organization's compliance tasks effectively.
Key Features of the PoAM Widget:
-
Centralized Compliance Documentation: Maintain all compliance-related documents in one secure location, ensuring easy access and organization.
-
Automated Notifications & Alerts: Receive timely updates on upcoming audits, document expirations, and compliance changes to stay proactive in your compliance efforts.
-
Data Security: Safeguard sensitive information with robust security measures, aligning with privacy regulations.
-
Collaboration Tools: Enhance team collaboration by assigning tasks, setting permissions, and ensuring everyone has the necessary information.
STEP 1: Navigate to your organization’s Iron Fort Compliance login page
-
For example: https://compliance-demo.ironfortdemos.com/en/login/?next=/en
-
Log In to Your Account (Enter your username and password to log in).
STEP 2: Verify Identity
-
Wait for a One-Time Password (OTP) that will be sent to your registered email.
-
Enter the OTP to verify your identity and click “validate.”
Once logged in, a welcome prompt will appear displaying
-
Tenant Key Information: Verifying your system access
-
User Email: Your registered email for auditing purposes
-
Last Login Details: To track your previous access
-
Iron Fort Support Email: For any login issues or concerns
NOTE: If you recognize the details and are authorized, click "OK" to continue. However, if you are not an authorized user, click "Logout" immediately to exit.
STEP 3: Create a Plan of Action Measurement (POAM) under security assessment
-
Navigate to security assessment and under overview section scroll down and locate POAM section.
-
Click “Add new” to create a POAM.
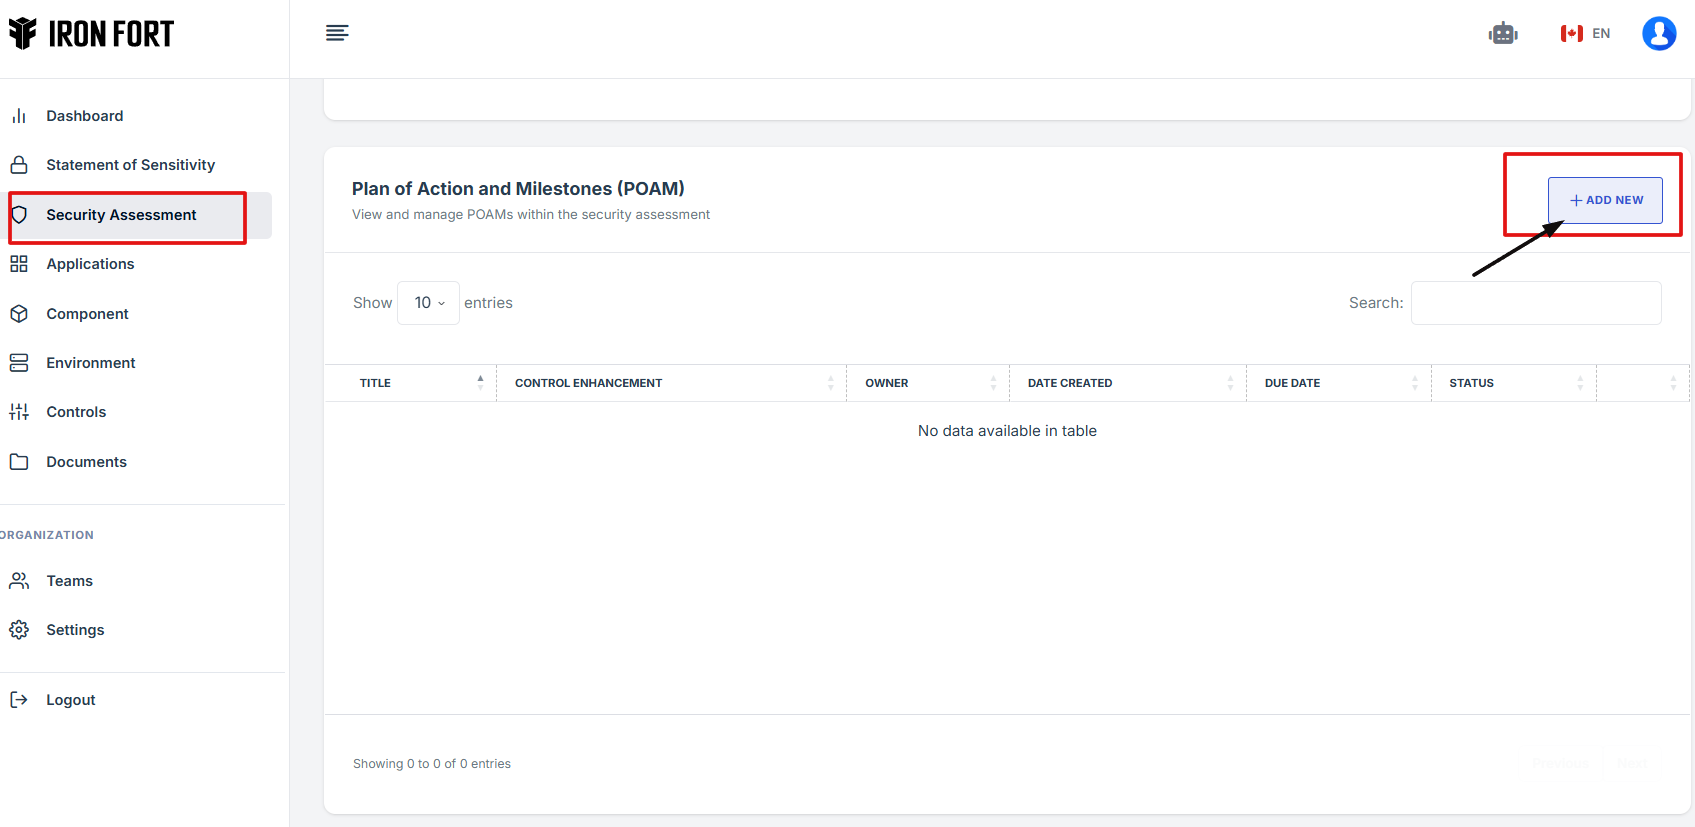
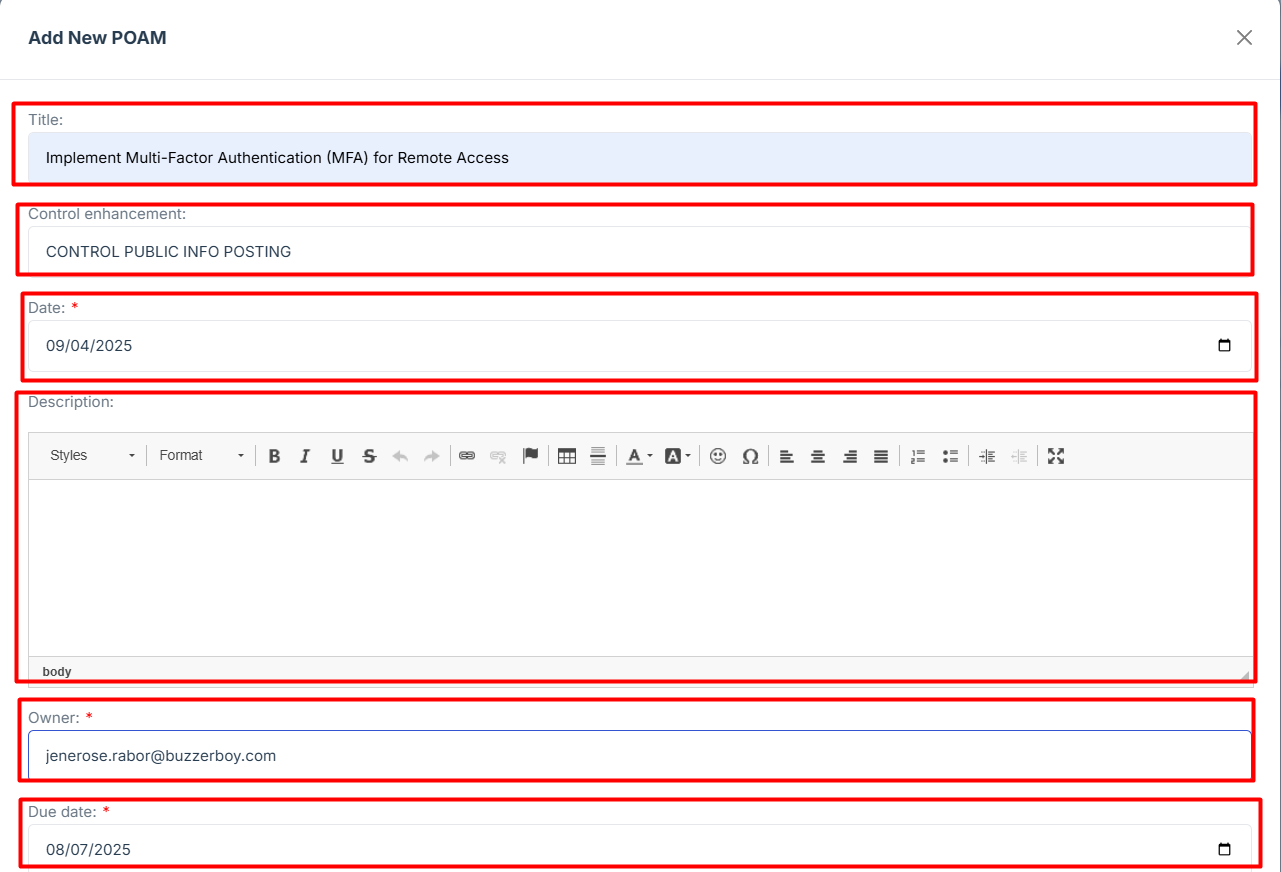
STEP 4: Field out the important details needed in POAM.
-
Title: Briefly describes the specific action or remediation plan being implemented.
-
Control Enhancement: Identifies the control or sub-control related to the deficiency or area of improvement.
-
Date: Indicates the date the POA&M entry was created or initiated.
-
Owner: Assigns responsibility to a specific individual who will oversee or complete the action.
-
Due date: Specifies the deadline for completing the corrective action.
-
Description: Provides additional details, background information, or steps needed to complete the action.
STEP 5: Locate the Plan of Action Measurements (POAM) Widget
-
Once logged in, the user will be redirected to the Dashboard.
-
Scroll down slightly until the Plan of Action Measurements (POAM) Widget is visible.
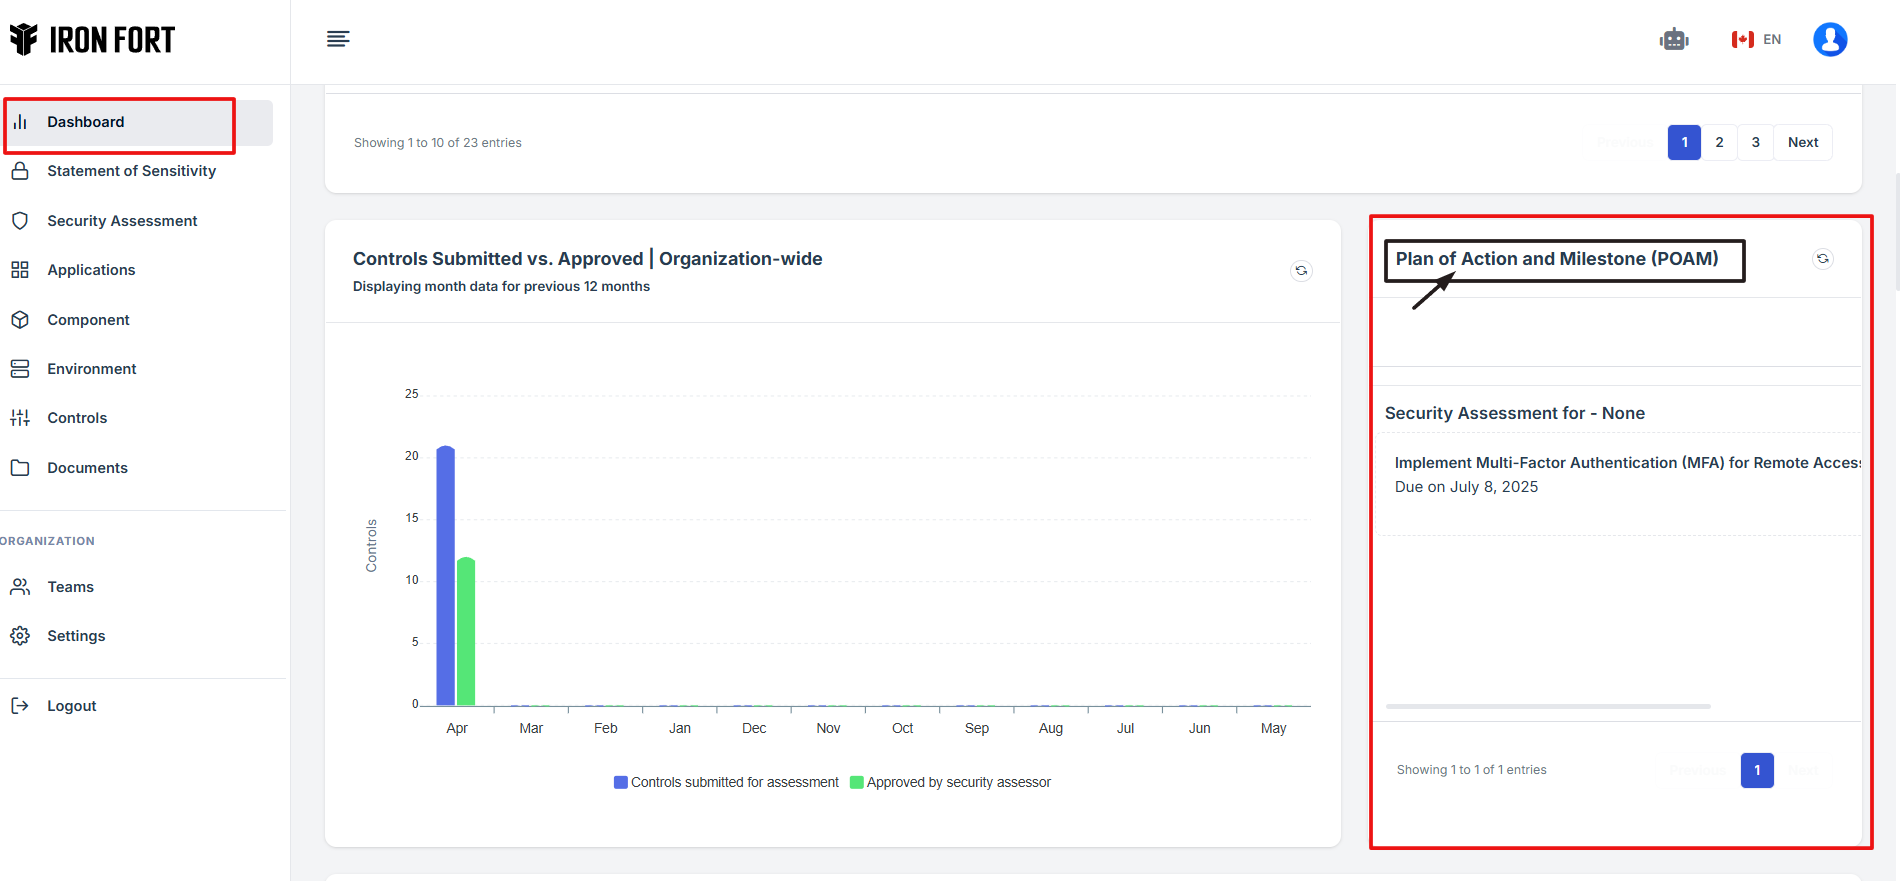
STEP 6: Access Pending Approval Requests
-
The widget provides a shortcut for the user to view pending approval requests submitted under Plan of Action Measurements (POAM).
-
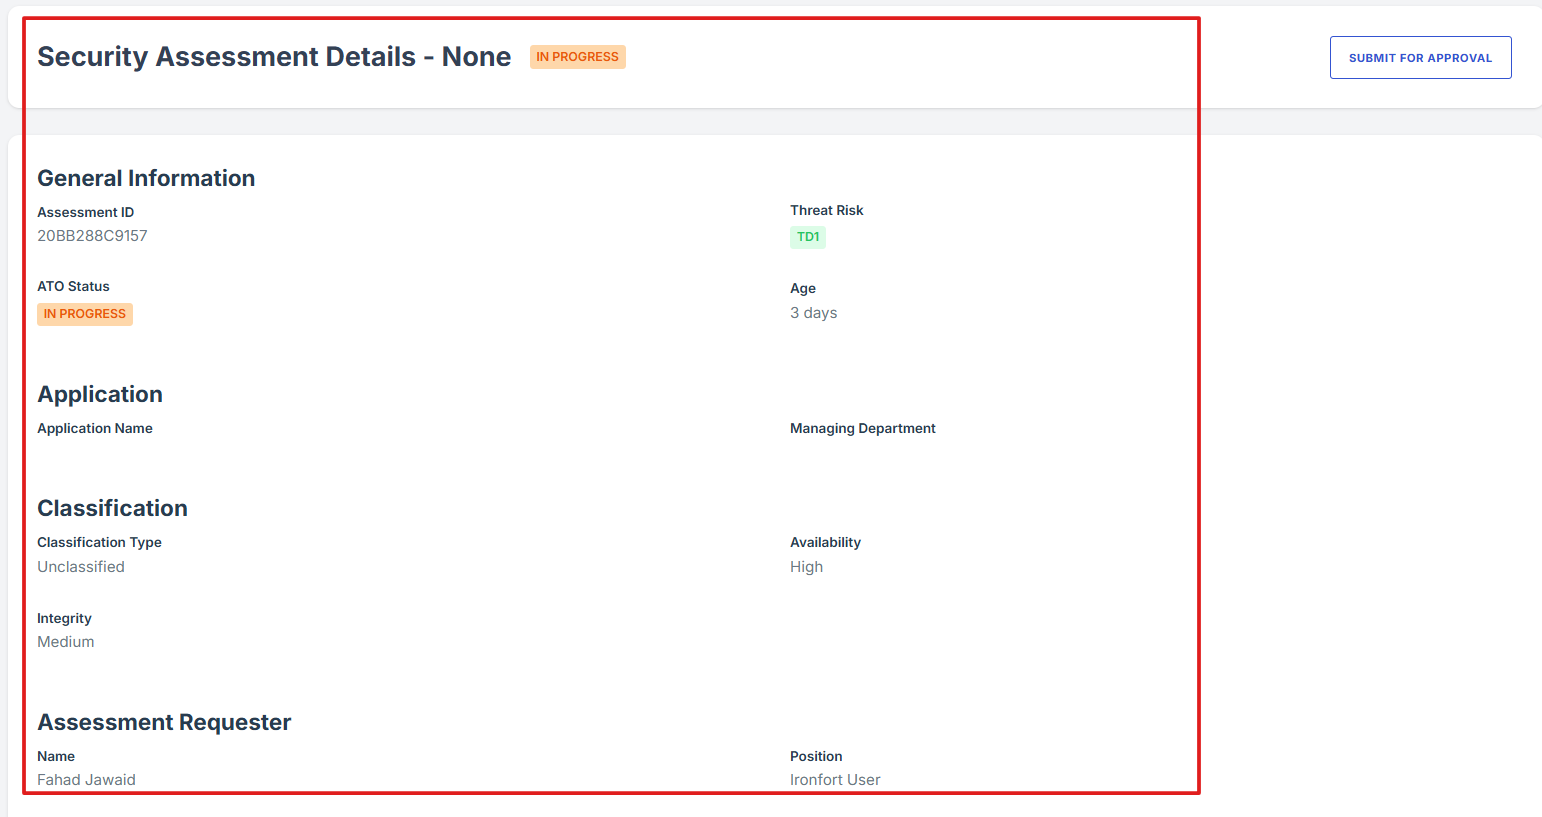
If the user clicks on the NAME of a pending request, the user will be redirected to the detailed view of the pending Plan of Action Measurements details, where the status and additional details can be reviewed.
STEP 7: Follow Up on Pending Assessments
If the assessment is still pending and requires follow-up, the user should contact the Iron Fort team for assistance.
-
How To: Statement of Sensitivity awaiting review
- STEP 1: Navigate to your organization’s Iron Fort Compliance login page
- STEP 2: Verify Identity
- STEP 3: Locate the Statement of Sensitivity awaiting review
- STEP 4: Monitor and Review Data Sensitivity Assessments
- STEP 5: Access Detailed Pending Assessment Information
- STEP 6: Follow Up on Pending Assessments
STEP 1: Navigate to your organization’s Iron Fort Compliance login page
-
For example: https://compliance-demo.ironfortdemos.com/en/login/?next=/en
-
Log In to Your Account (Enter your username and password to log in).
STEP 2: Verify Identity
-
Wait for a One-Time Password (OTP) that will be sent to your registered email.
-
Enter the OTP to verify your identity and click “validate.”
Once logged in, a welcome prompt will appear displaying
-
Tenant Key Information: Verifying your system access
-
User Email: Your registered email for auditing purposes
-
Last Login Details: To track your previous access
-
Iron Fort Support Email: For any login issues or concerns
NOTE: If you recognize the details and are authorized, click "OK" to continue. However, if you are not an authorized user, click "Logout" immediately to exit.
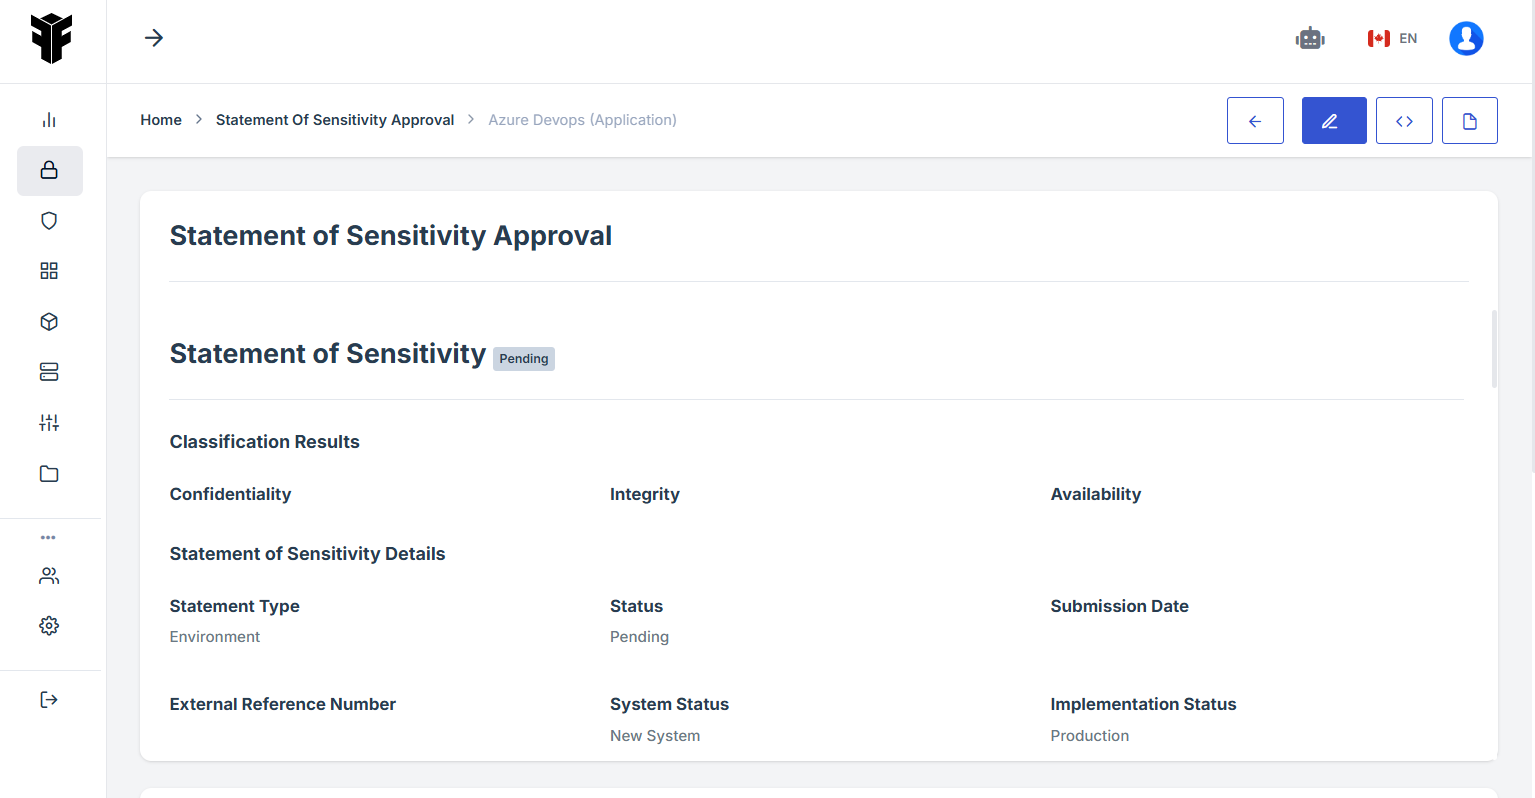
STEP 3: Locate the Statement of Sensitivity awaiting review
-
Once logged in, the user will be redirected to the Dashboard/Analytics.
-
Scroll down slightly until the Statement of Sensitivity awaiting review is visible.
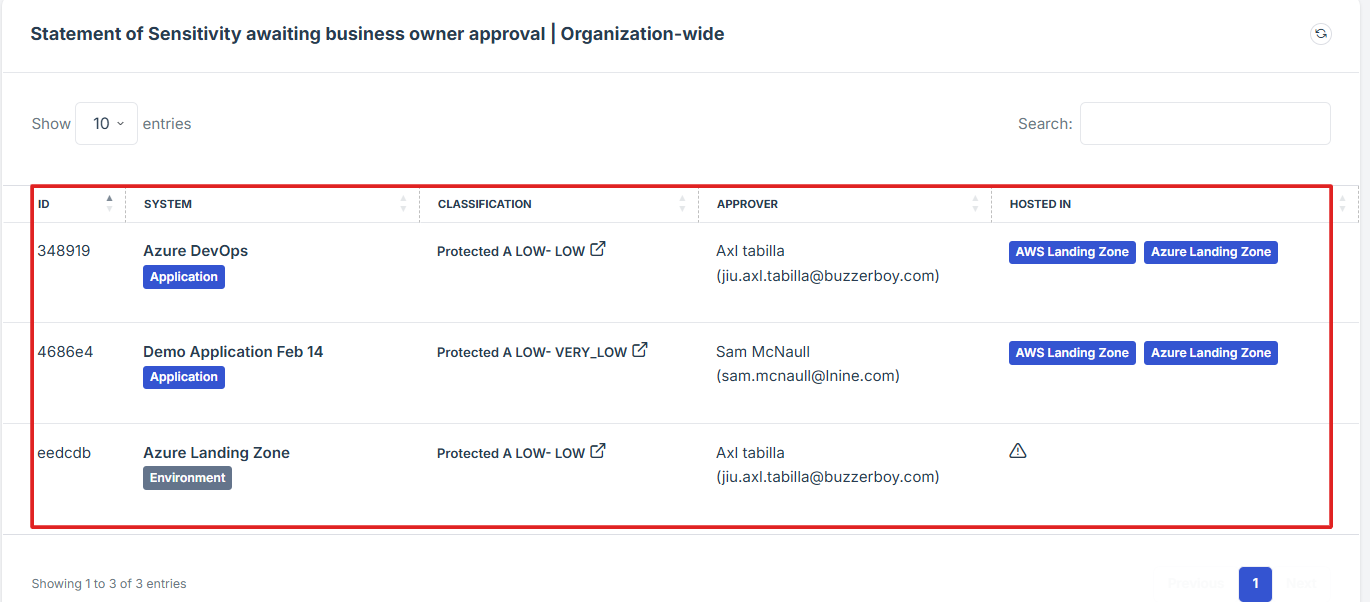
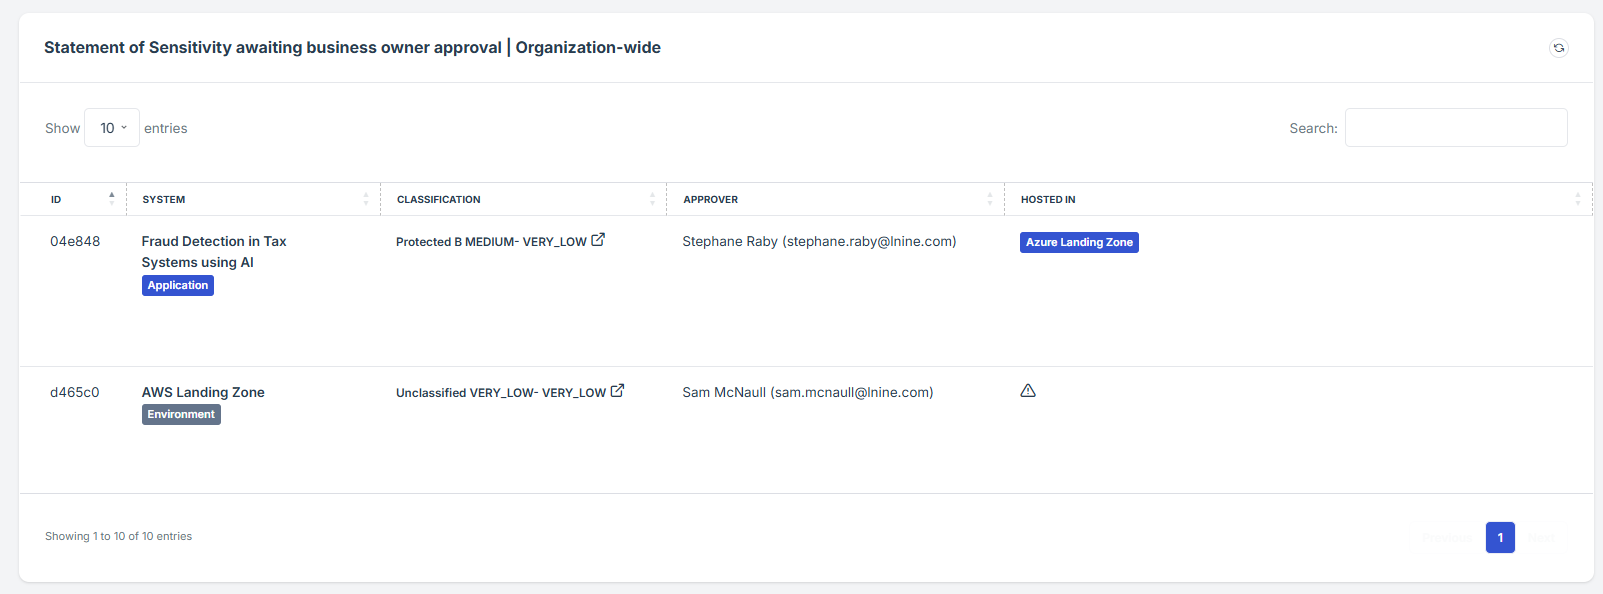
STEP 4: Monitor and Review Data Sensitivity Assessments
-
Items marked as "awaiting review" indicate that certain data classifications or sensitivity assessments are pending evaluation.
-
This enables users to effectively monitor and manage the sensitivity classifications of their data, ensuring compliance and enhancing overall data security.
-
The widget provides a shortcut for the user to view pending approval requests submitted under Statement of Sensitivity.
STEP 5: Access Detailed Pending Assessment Information
-
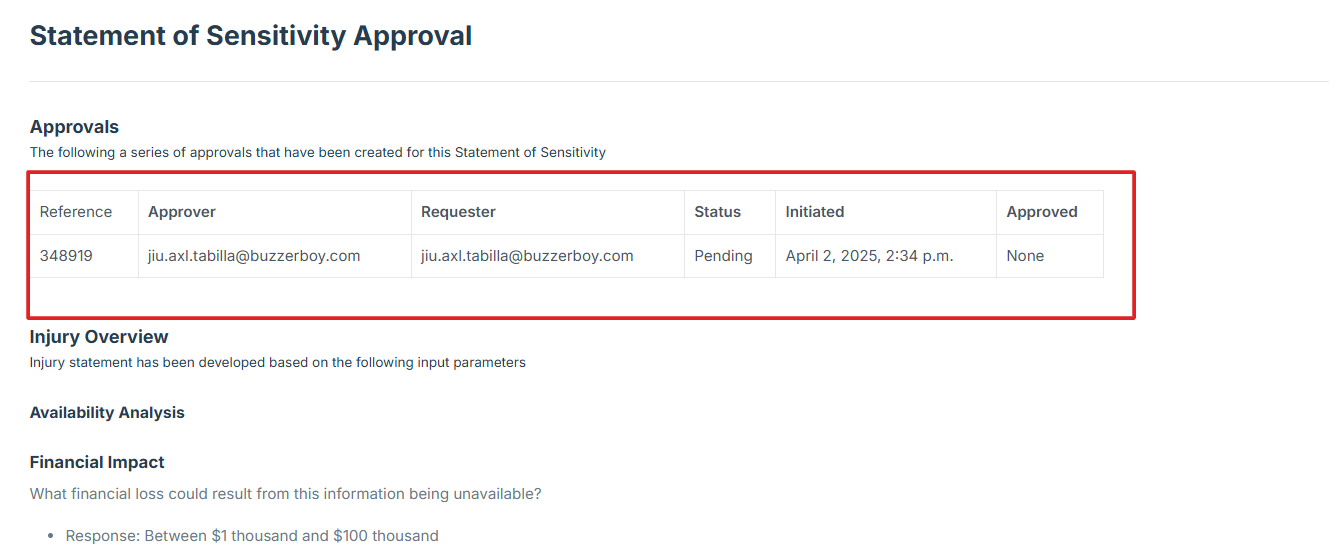
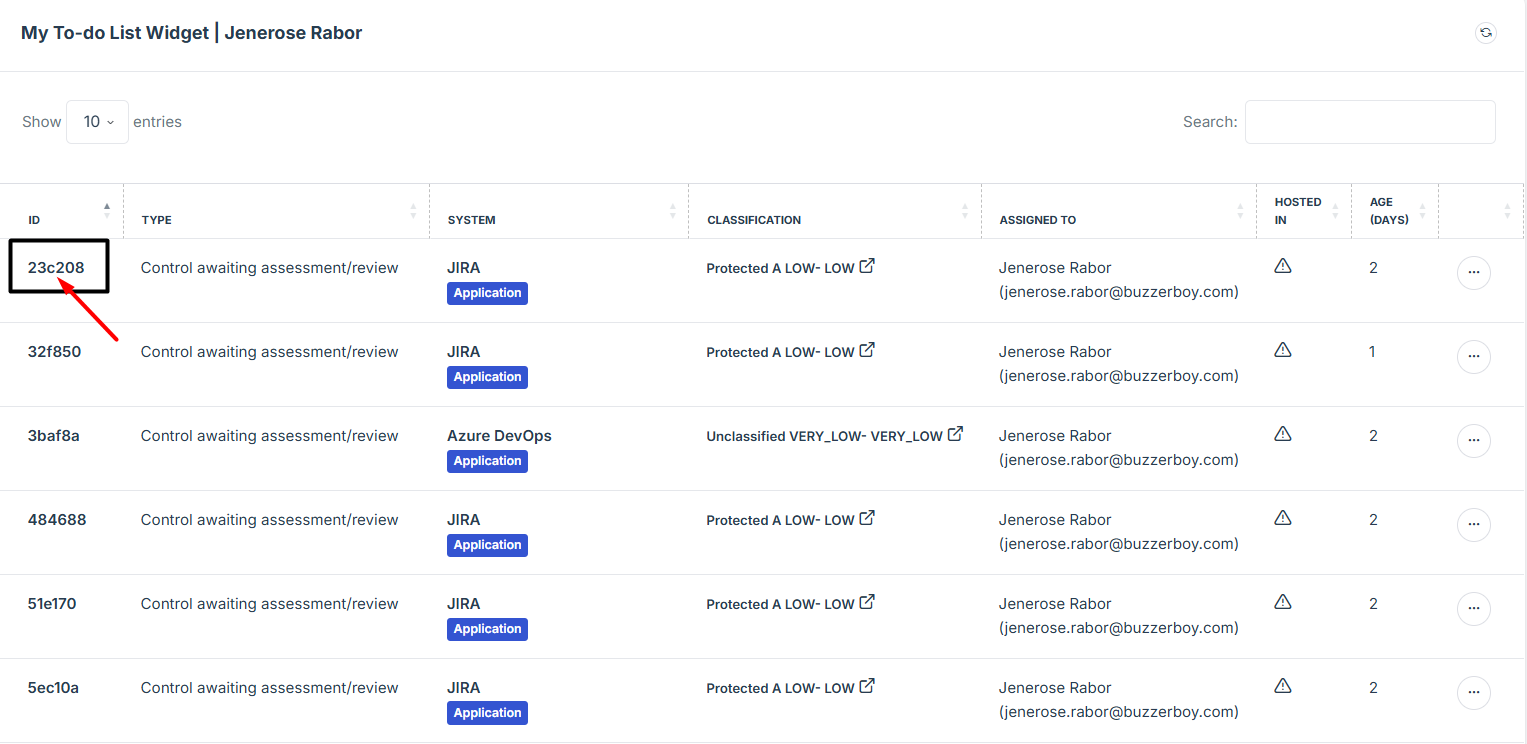
If the user click on the ID number of a pending request, the user will be redirect to the detailed view of the pending assessment, where the status and additional details can be reviewed.
-
The user can also access detailed information about when the request was submitted and the designated contact person authorized to approve the request.
-
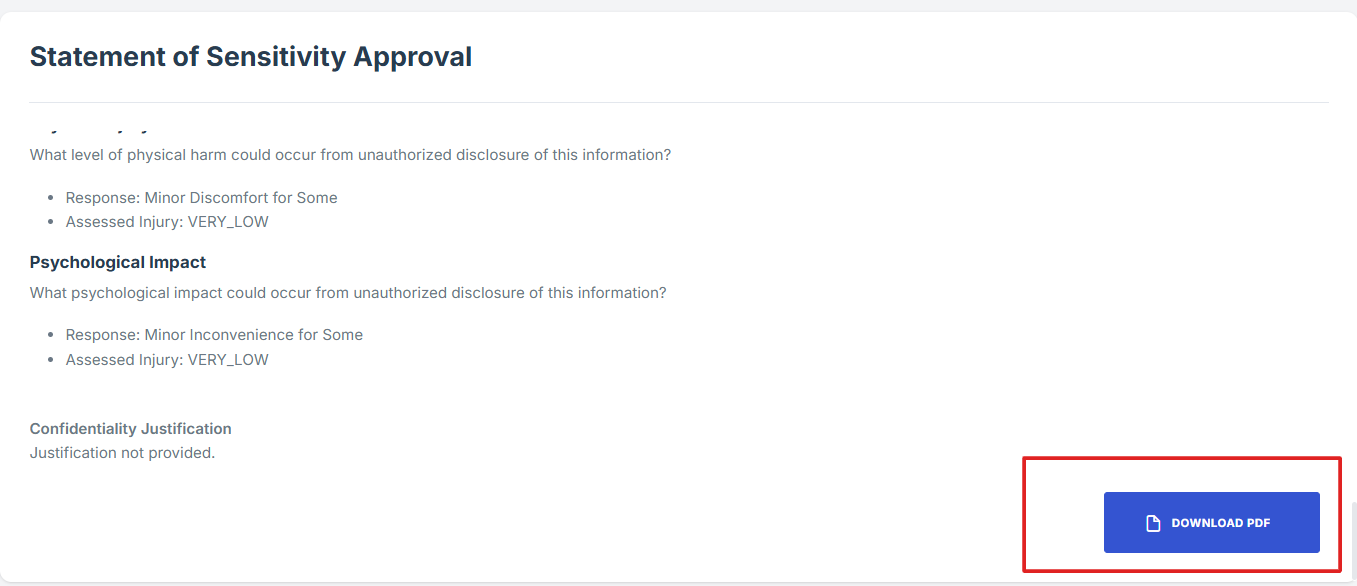
The user can also download the file in PDF format if they wish. This allows them to keep a record of the request, including its status, submission details, and the contact person responsible for approval.
STEP 6: Follow Up on Pending Assessments
-
If the assessment is still pending and requires follow-up, the user should contact the Iron Fort team for assistance.
STEP 1: Navigate to your organization’s Iron Fort Compliance login page
-
For example: https://compliance-demo.ironfortdemos.com/en/login/?next=/en
-
Log In to Your Account (Enter your username and password to log in).
STEP 2: Verify Identity
-
Wait for a One-Time Password (OTP) that will be sent to your registered email.
-
Enter the OTP to verify your identity and click “validate.”
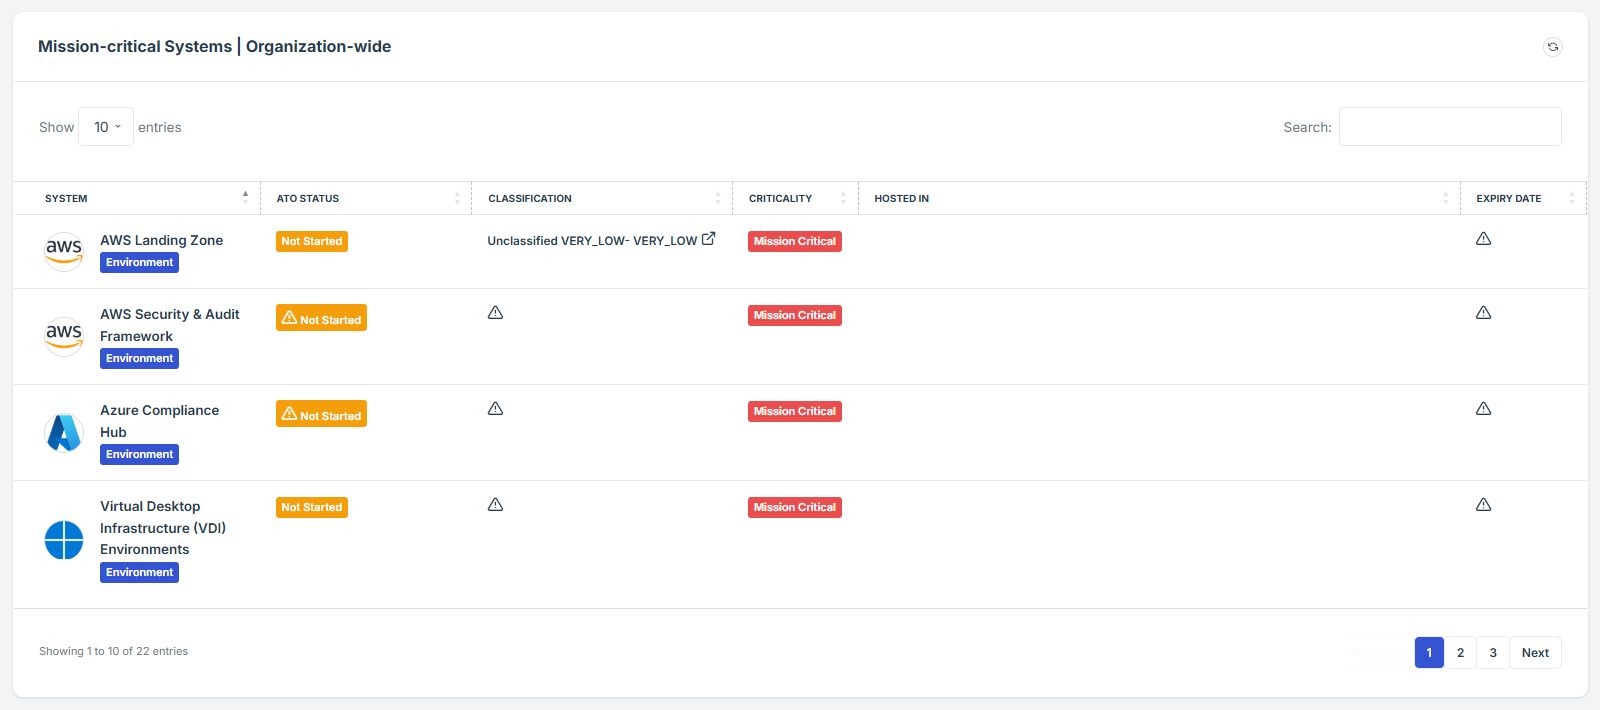
STEP 3: Locate the Mission Critical Systems widget
-
Once logged in, the user will be redirected to the Dashboard/Analytics.
-
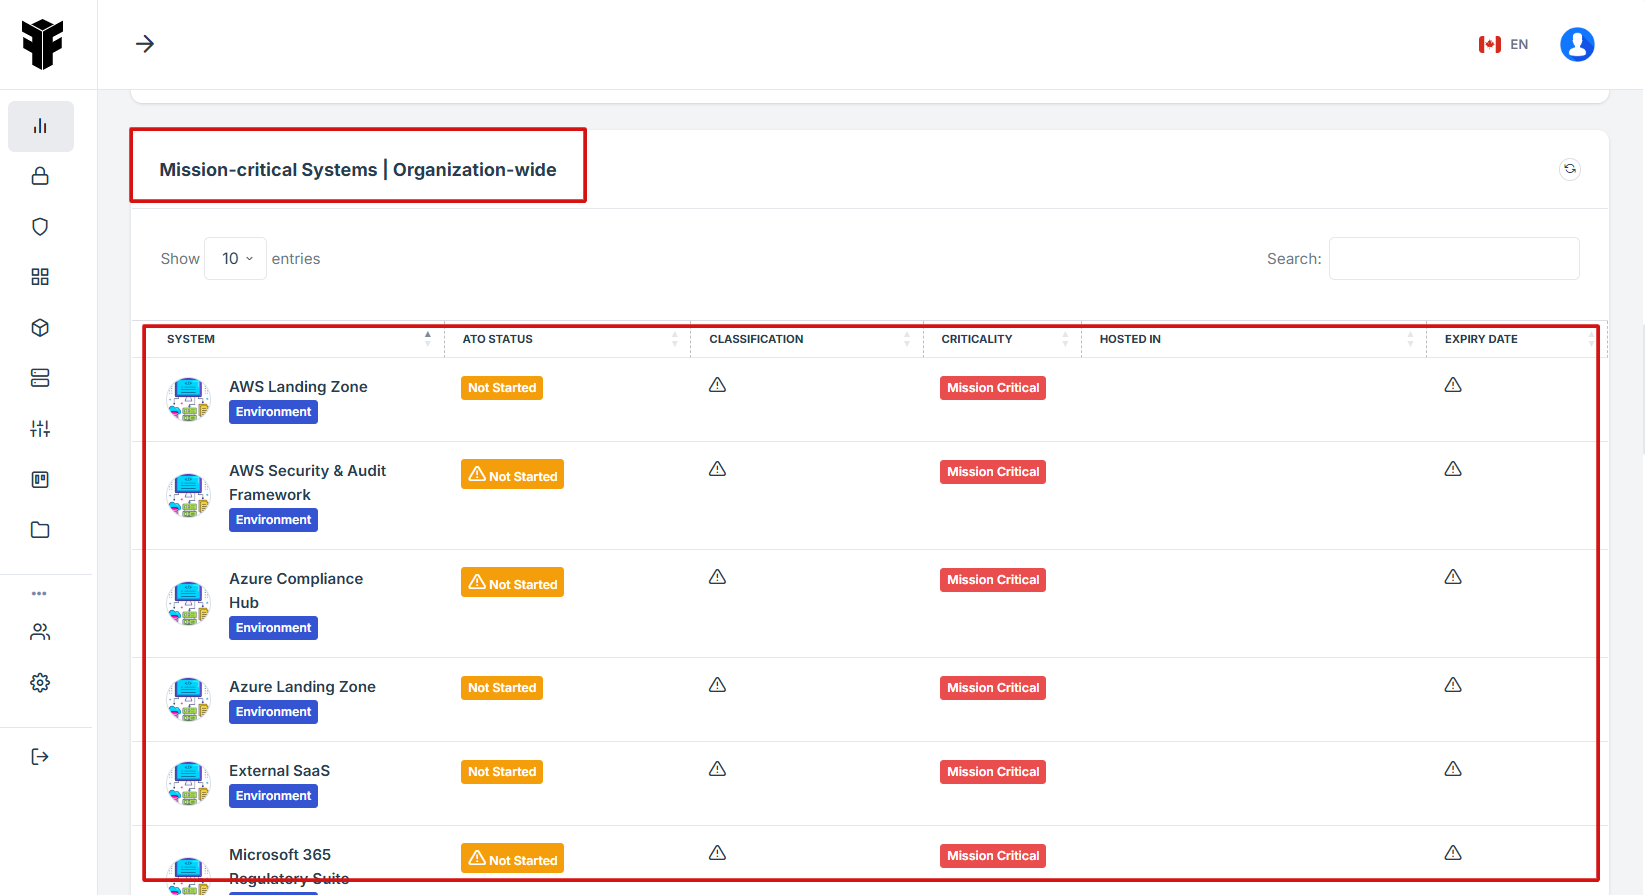
Scroll down slightly until the Mission Critical Systems widget is visible.
STEP 4: Review Pending Assessments
-
The widget ensures critical systems meet regulatory standards and security requirements and it reduces downtime by proactively managing risks and tracking system statuses.
-
The widget provides a shortcut review of each mission critical details.
STEP 5: Key Features of Mission Critical Systems
-
Risk Classification & Compliance Tracking – Helps organizations categorize their critical systems and ensure they meet security and compliance requirements.
-
Automated Monitoring & Alerts – Provides real-time status updates on system health, security vulnerabilities, and compliance gaps.
-
Centralized Dashboard – Displays all mission-critical systems in one place, offering an overview of their current state, including ATO (Authority to Operate) status and classification.
-
Lifecycle Management – Tracks system authorizations, updates, and expirations to prevent compliance lapses.
-
Hosting Information – Identifies where systems are hosted (e.g., AWS, Azure, or on-premises).

STEP 6: Access each Mission-critical Systems Details
-
If the user click on the system name it will direct to the detailed view of the system details, where the status and additional details can be reviewed.

STEP 1: Navigate to your organization’s Iron Fort Compliance login page
-
For example: https://compliance-demo.ironfortdemos.com/en/login/?next=/en
-
Log In to Your Account (Enter your username and password to log in).
STEP 2: Verify Identity
-
Wait for a One-Time Password (OTP) that will be sent to your registered email.
-
Enter the OTP to verify your identity and click “validate.”
Once logged in, a welcome prompt will appear displaying
-
Tenant Key Information: Verifying your system access
-
User Email: Your registered email for auditing purposes
-
Last Login Details: To track your previous access
-
Iron Fort Support Email: For any login issues or concerns
NOTE: If you recognize the details and are authorized, click "OK" to continue. However, if you are not an authorized user, click "Logout" immediately to exit.
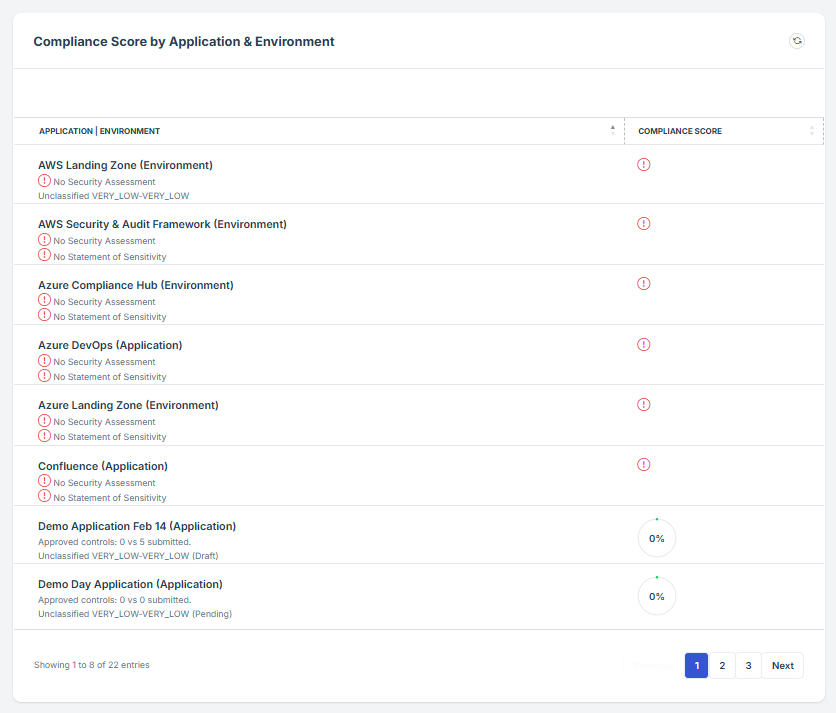
STEP 3: Locate the Compliance Score by Environment widget
-
Once logged in, the user will be redirected to the Dashboard/Analytics.
-
Scroll down slightly until the Compliance Score by Environment widget is visible.
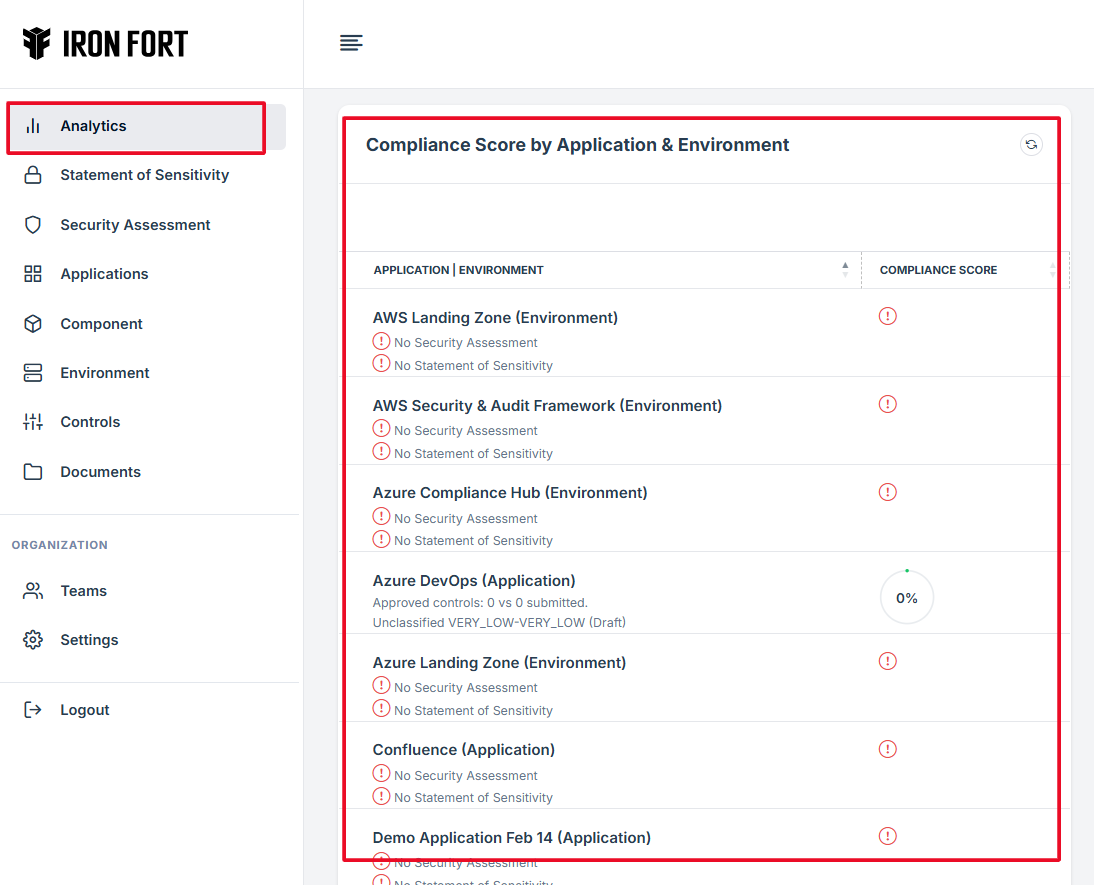
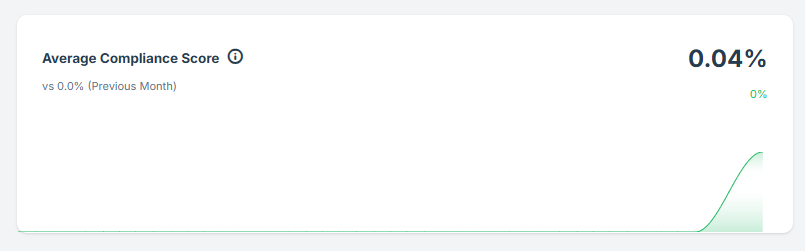
STEP 4: Overview of Compliance Scores and Assessments
-
This allows users to see the display compliance levels of various environments such as development, testing, and production.
-
This scoring system provides a quantifiable measure of how well each environment aligns with regulatory and organizational requirements.
-
The widget provides a shortcut review of each Compliance score by environment.
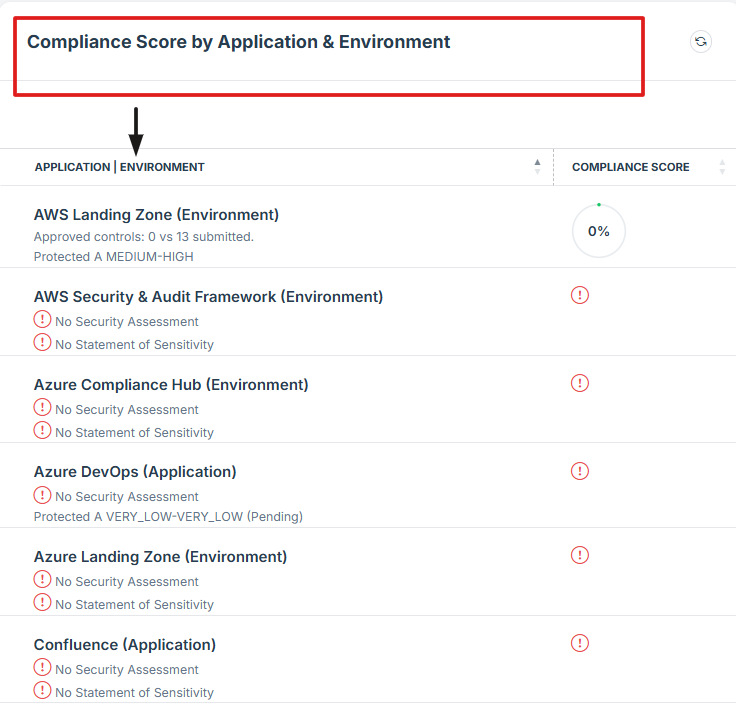
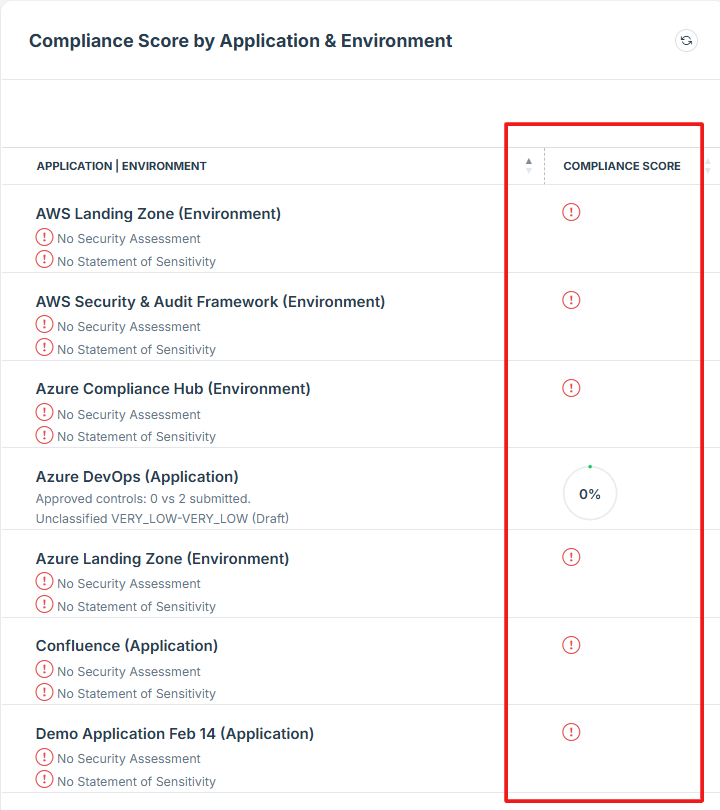
STEP 5: Review Pending Assessments
-
If the user clicks on the NAME of a pending request, the user will be redirected to the detailed view of the pending assessment, where the status and additional details can be reviewed.
-
The compliance score is used to track and measure the effectiveness of security controls across applications, systems, and environments.
STEP 6: Follow Up on Pending Assessments
-
If the assessment is still pending and requires follow-up, the user should contact the Iron Fort team for assistance.
STEP 1: Navigate to your organization’s Iron Fort Compliance login page
-
For example: https://compliance-demo.ironfortdemos.com/en/login/?next=/en
-
Log In to Your Account (Enter your username and password to log in).
STEP 2: Verify Identity
-
Wait for a One-Time Password (OTP) that will be sent to your registered email.
-
Enter the OTP to verify your identity and click “validate.”
STEP 3: Locate the Residual Risks Register widget
-
Once logged in, the user will be redirected to the Dashboard/Analytics.
-
Scroll down slightly until the Residual Risks Register widget is visible.

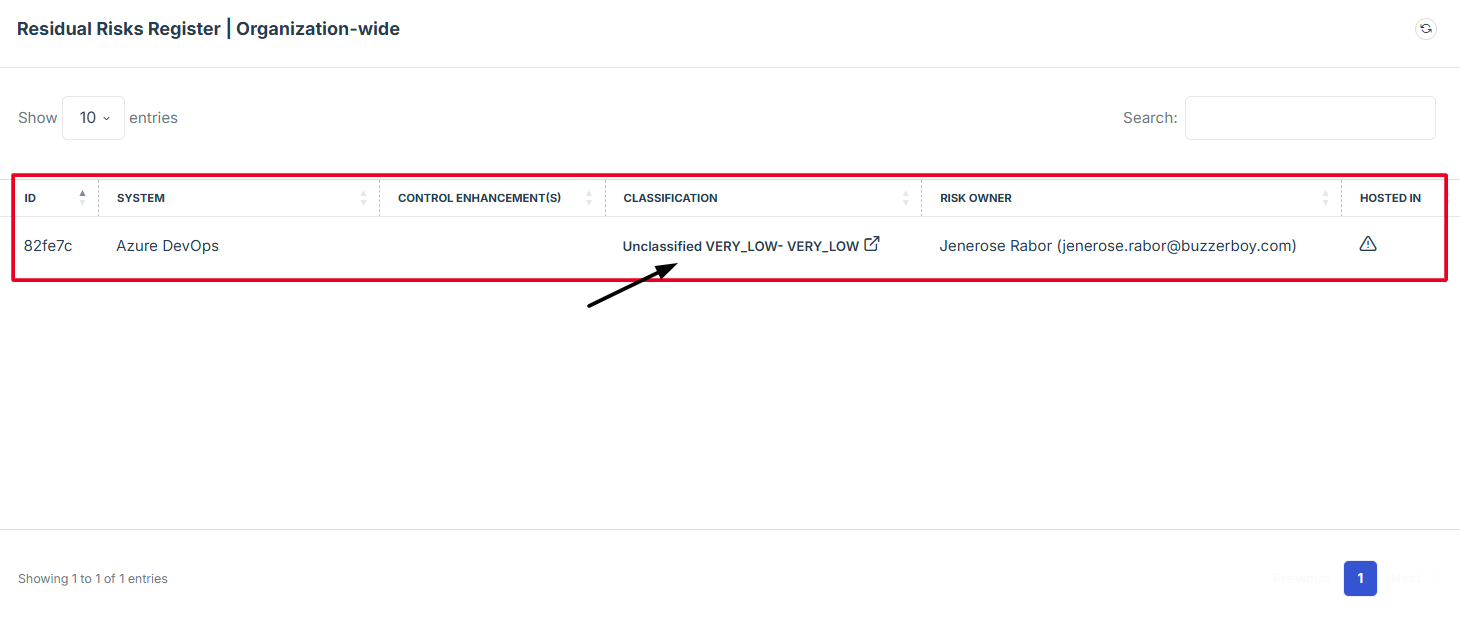
STEP 4: Overview of Residual Risks Register
-
This allows user to see a detailed recording of residual risks, including their nature, potential impact, and current mitigation measures.
-
This also provides a clear overview of all residual risks, facilitating better understanding and prioritization.
-
The widget provides a shortcut review of each Residual Risks Register.
STEP 5: Review Pending Assessments
-
If the user clicks on the classification details of a pending request, the user will be redirected to the detailed view of the pending assessment, where the status and additional details can be reviewed.
STEP 6: Follow Up on Pending Assessments
-
If the assessment is still pending and requires follow-up, the user should contact the Iron Fort team for assistance.
STEP 1: Navigate to your organization’s Iron Fort Compliance login page
-
For example: https://compliance-demo.ironfortdemos.com/en/login/?next=/en
-
Log In to Your Account (Enter your username and password to log in).
STEP 2: Verify Identity
-
Wait for a One-Time Password (OTP) that will be sent to your registered email.
-
Enter the OTP to verify your identity and click “validate.”
Once logged in, a welcome prompt will appear displaying
-
Tenant Key Information: Verifying your system access
-
User Email: Your registered email for auditing purposes
-
Last Login Details: To track your previous access
-
Iron Fort Support Email: For any login issues or concerns
NOTE: If you recognize the details and are authorized, click "OK" to continue. However, if you are not an authorized user, click "Logout" immediately to exit.
STEP 3: Locate the Data Classification Coverage widget
-
Once logged in, the user will be redirected to the Dashboard.
-
Scroll down slightly until the Data Classification coverage widget is visible.
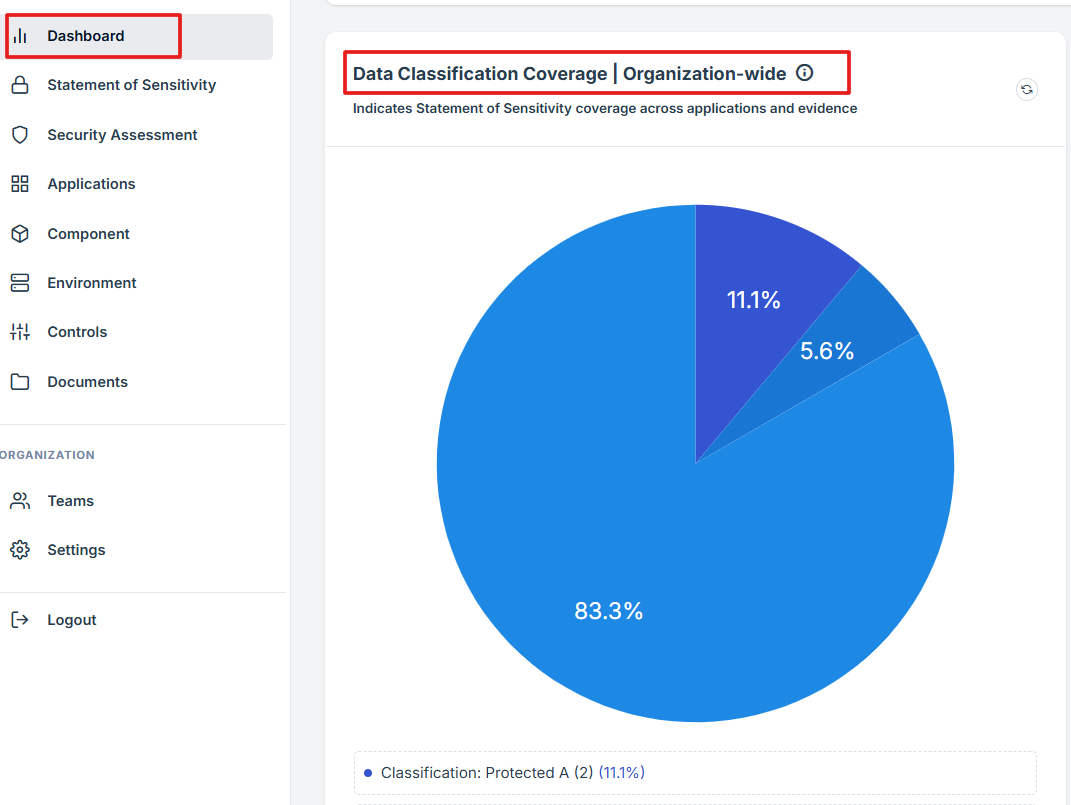
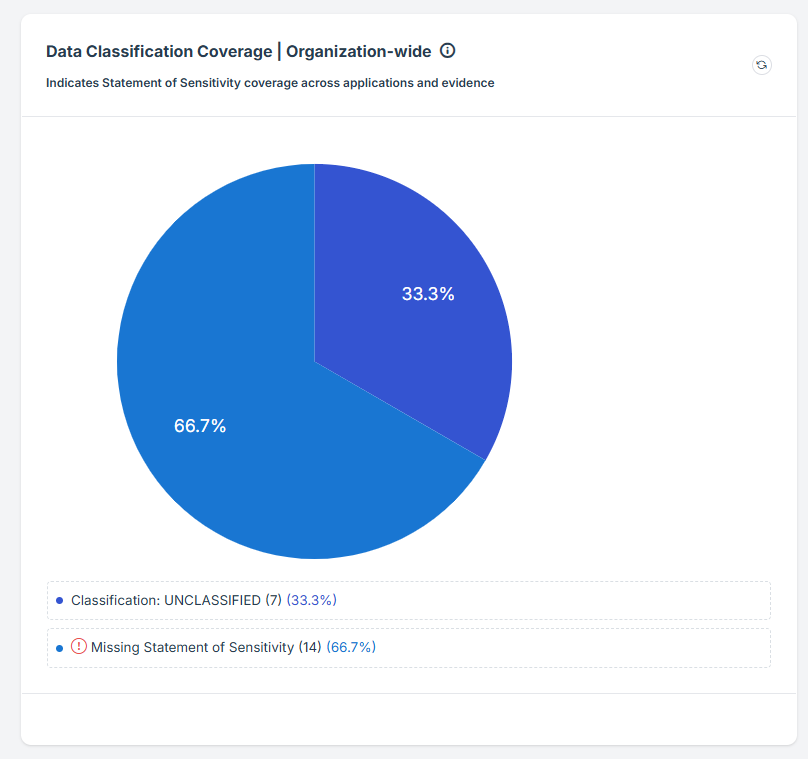
STEP 4: Overview of Data Classification Coverage
-
This allows user to ensures all organizational data is appropriately categorized based on its sensitivity and importance.
-
This process involves assigning classification levels to data, such as public, internal, confidential, or restricted, to facilitate proper handling, storage, and access controls.
-
This feature enables organizations to monitor compliance metrics comprehensively, facilitating informed decision-making and proactive risk management.
-
The widget provides a shortcut review of each Data Classification Coverage.
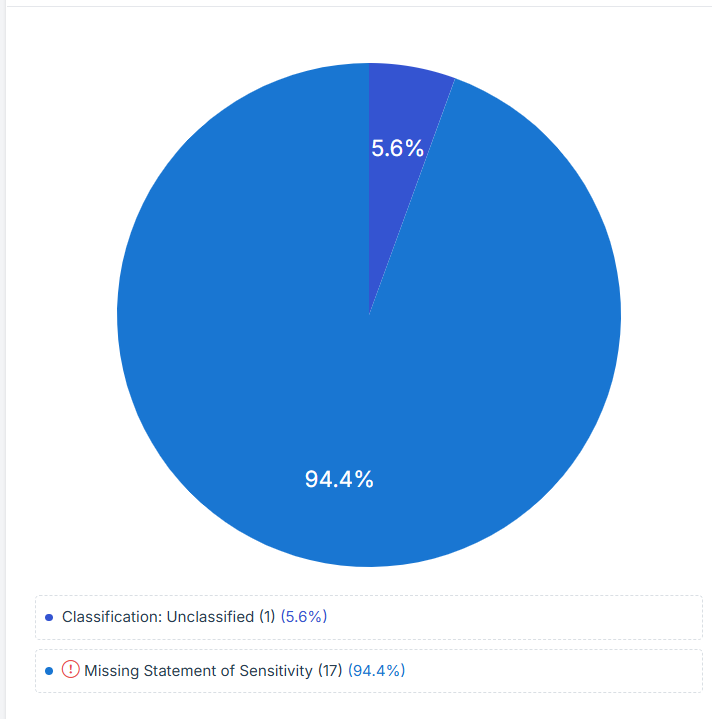
STEP 5: Data Classification Levels
The percentages indicate the proportion of data in each classification status relative to the total data being assessed.
-
Classification: Unclassified:
-
This represents the data that has been identified but not yet assigned a classification level.
-
Unclassified data can be a risk as it lacks proper categorization, which may lead to inappropriate handling or insufficient security measures.
-
Unclassified data can be a risk as it lacks proper categorization, which may lead to inappropriate handling or insufficient security measures.
-
-
Missing Statement of Sensitivity:
-
Addressing this issue is critical to ensure that sensitive information is properly protected and managed according to regulatory and internal security standards.
-
STEP 1: Navigate to your organization’s Iron Fort Compliance login page
-
For example: https://compliance-demo.ironfortdemos.com/en/login/?next=/en
-
Log In to Your Account (Enter your username and password to log in).
STEP 2: Verify Identity
-
Wait for a One-Time Password (OTP) that will be sent to your registered email.
-
Enter the OTP to verify your identity and click “validate.”
Once logged in, a welcome prompt will appear displaying
-
Tenant Key Information: Verifying your system access
-
User Email: Your registered email for auditing purposes
-
Last Login Details: To track your previous access
-
Iron Fort Support Email: For any login issues or concerns
NOTE: If you recognize the details and are authorized, click "OK" to continue. However, if you are not an authorized user, click "Logout" immediately to exit.
STEP 3: Locate the Security Assessment Coverage widget
-
Once logged in, the user will be redirected to the Dashboard/Analytics.
-
Scroll down slightly until the Security Assessment coverage widget is visible.
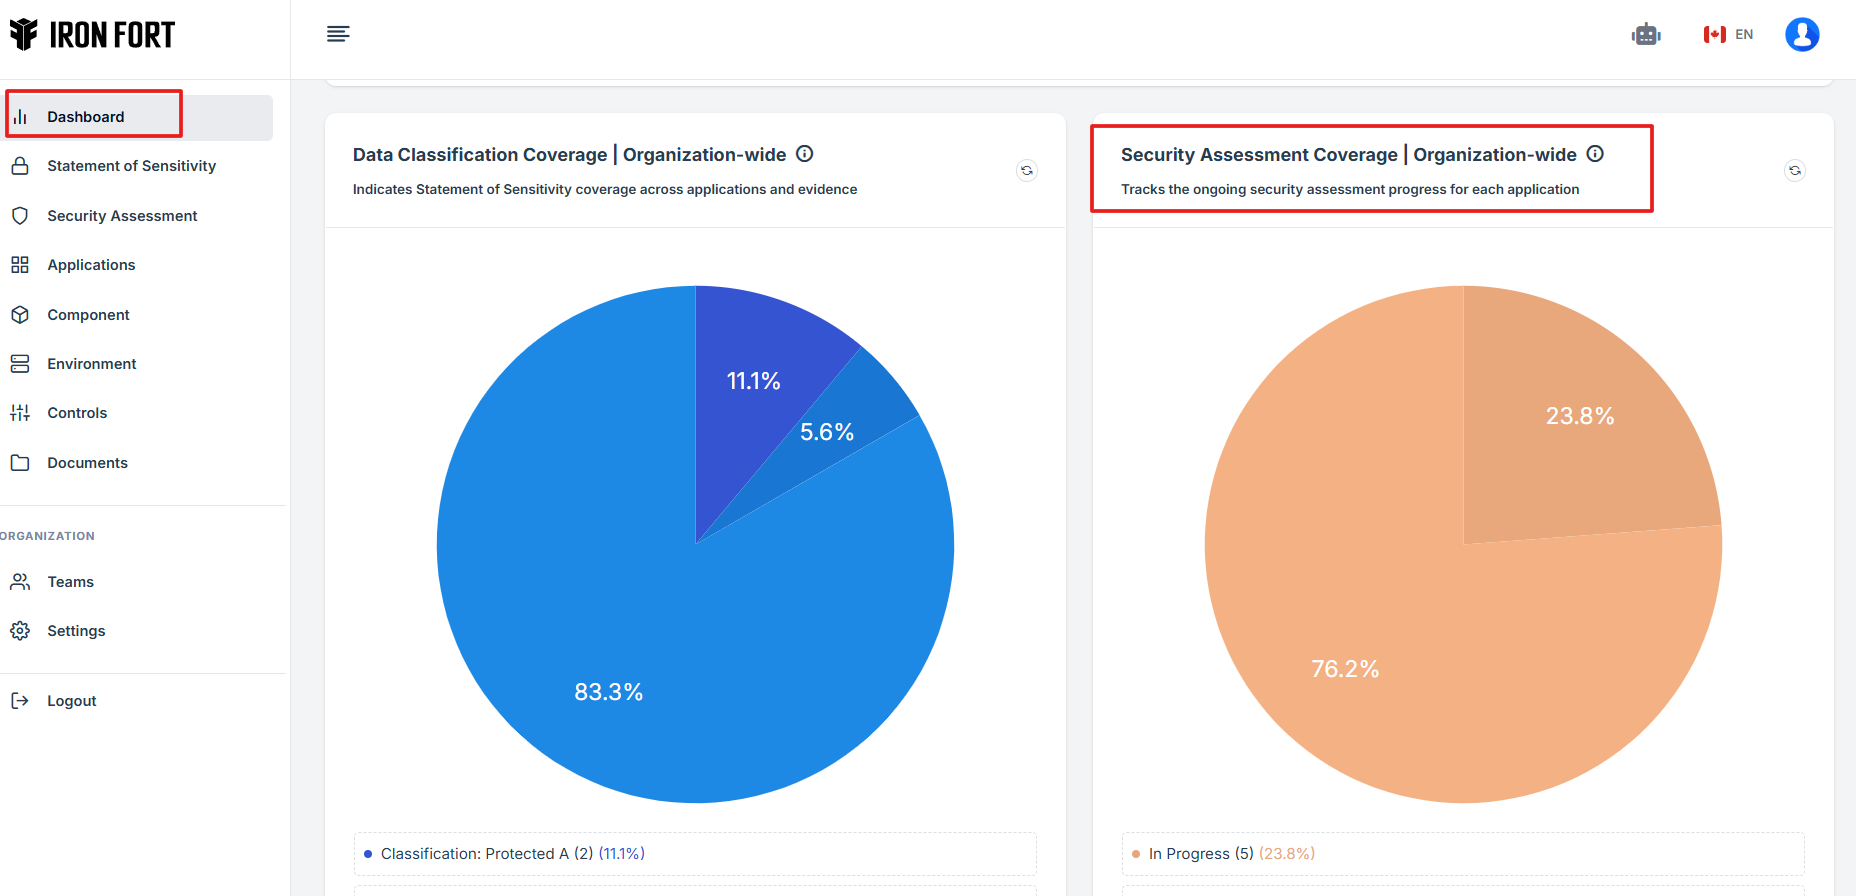
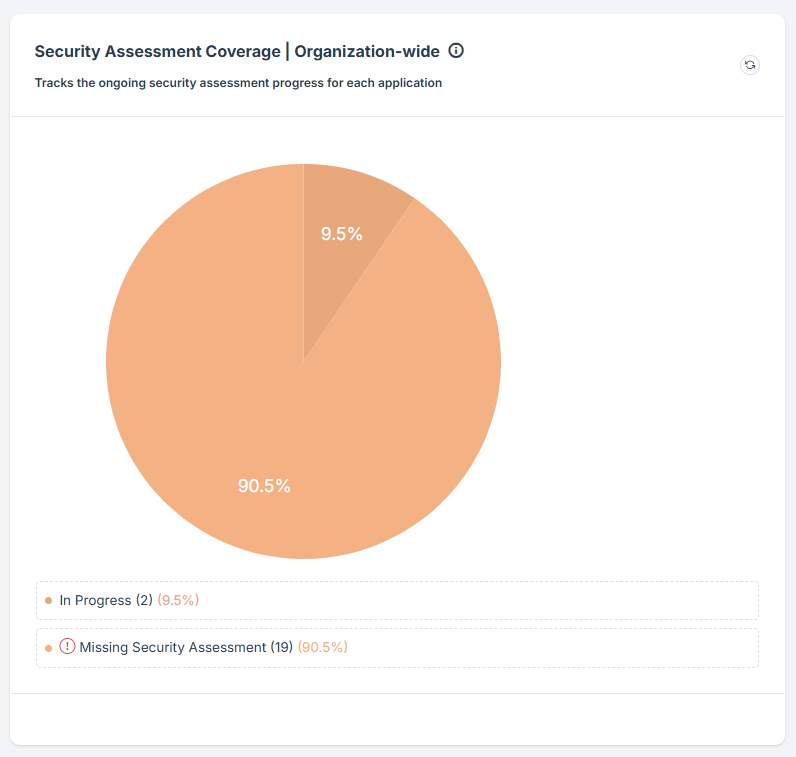
STEP 4: Overview of Security Assessment Coverage
-
This ensures that all users' data and organizational systems and processes meet stringent security requirements.
-
This feature enables organizations to identify security gaps, improve risk management, and maintain compliance with security standards.
-
This feature streamlines security management, making it easier to address vulnerabilities and enforce strong security policies.
-
The widget provides a shortcut review of each Residual Risks Register.
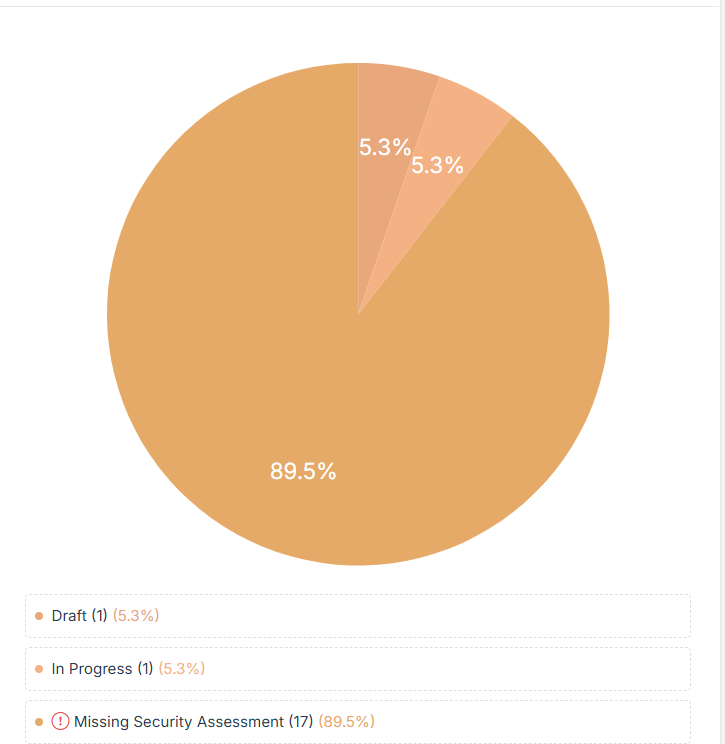
STEP 5: Status Categories
The percentages indicate the proportion of applications in each category relative to the total number of applications being assessed.
-
Draft:
-
This represents security assessments that have been started but are still in the initial phase.
-
These assessments may contain partial information and require further review before submission.
-
The low percentage indicates only a small number of assessments are in this phase.
-
-
In Progress:
-
These assessments are actively being worked on and are in the process of completion.
-
They might be under review, awaiting additional inputs, or requiring approvals.
-
This indicates that a small portion of security assessments are being actively managed.
-
-
Missing Security Assessment:
-
This represents the largest portion of applications that lack a security assessment altogether.
-
These applications have not undergone any form of security evaluation, which poses a potential security risk.
-
STEP 1: Navigate to your organization’s Iron Fort Compliance login page
-
For example: https://compliance-demo.ironfortdemos.com/en/login/?next=/en
-
Log In to Your Account (Enter your username and password to log in).
STEP 2: Verify Identity
-
Wait for a One-Time Password (OTP) that will be sent to your registered email.
-
Enter the OTP to verify your identity and click “validate.”
Once logged in, a welcome prompt will appear displaying
-
Tenant Key Information: Verifying your system access
-
User Email: Your registered email for auditing purposes
-
Last Login Details: To track your previous access
-
Iron Fort Support Email: For any login issues or concerns
NOTE: If you recognize the details and are authorized, click "OK" to continue. However, if you are not an authorized user, click "Logout" immediately to exit.
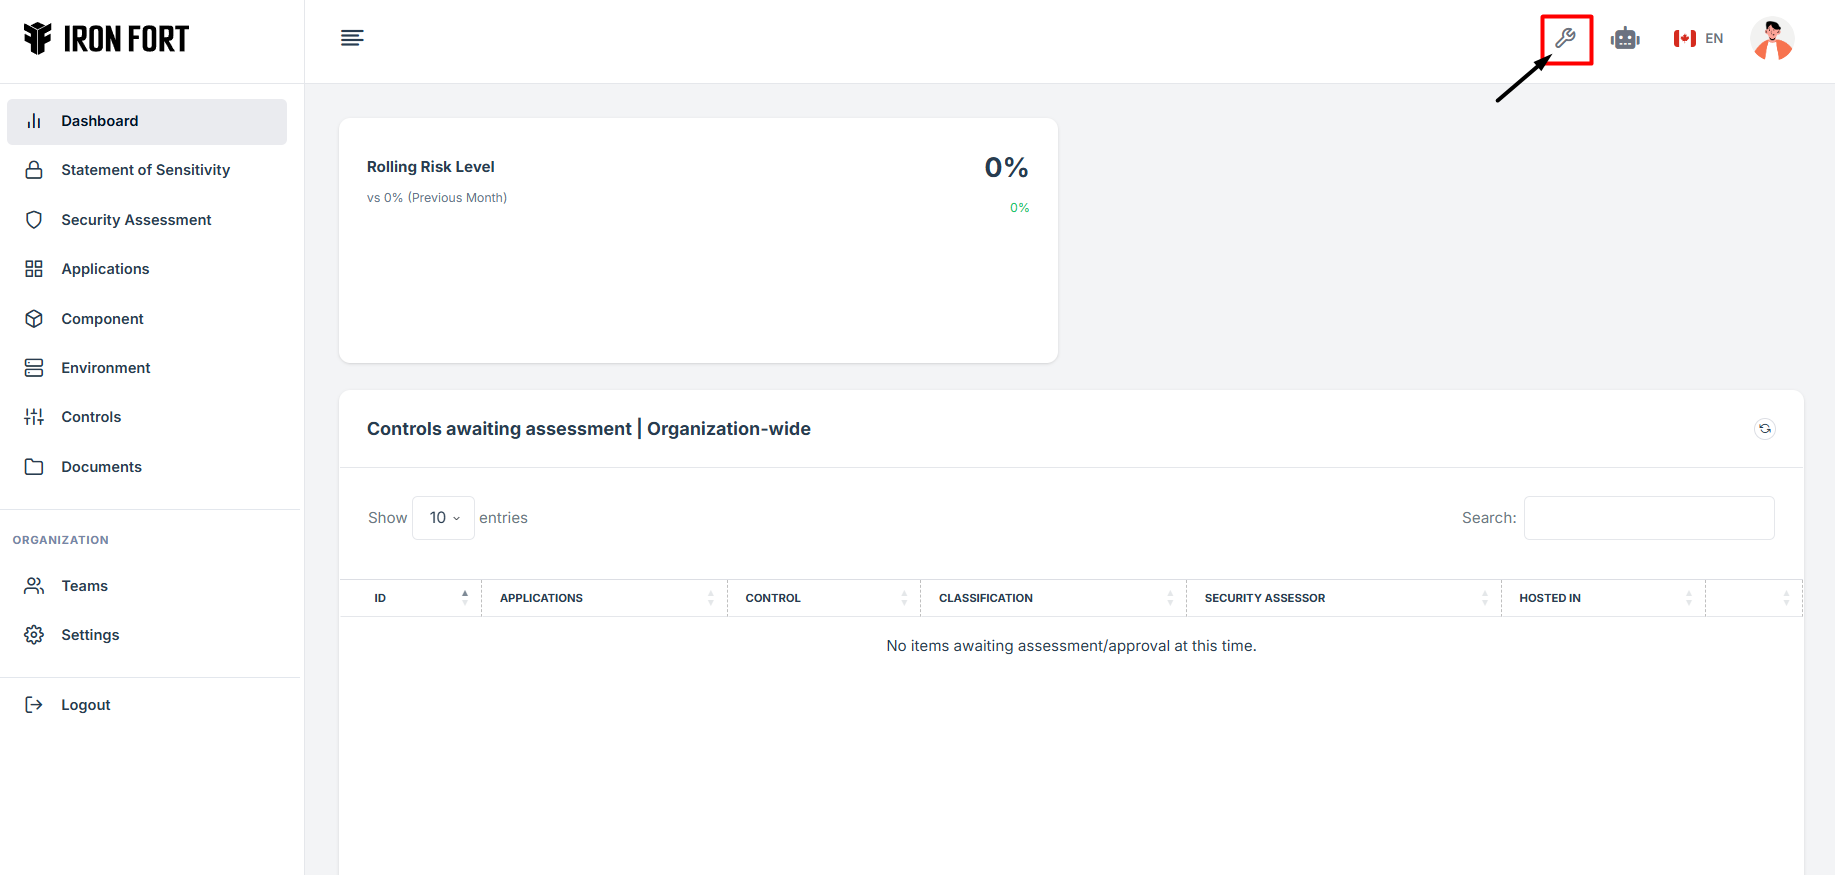
STEP 3: Locate the Customize Icon
-
Once logged in, the user will be redirected to the Dashboard.
-
Click the settings icon on the top right.
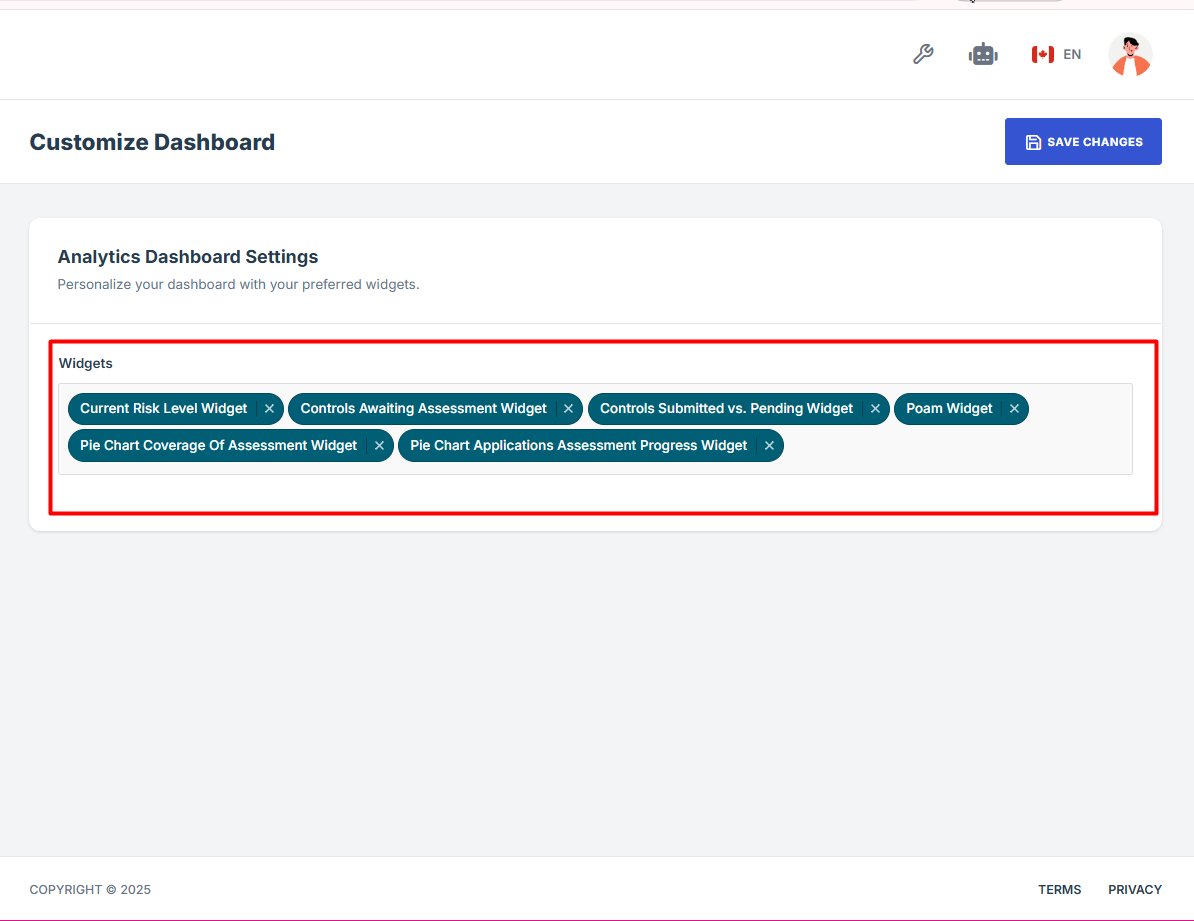
STEP 4: Customized your Dashboard
-
On the Customize page, find and click the Widget section.
-
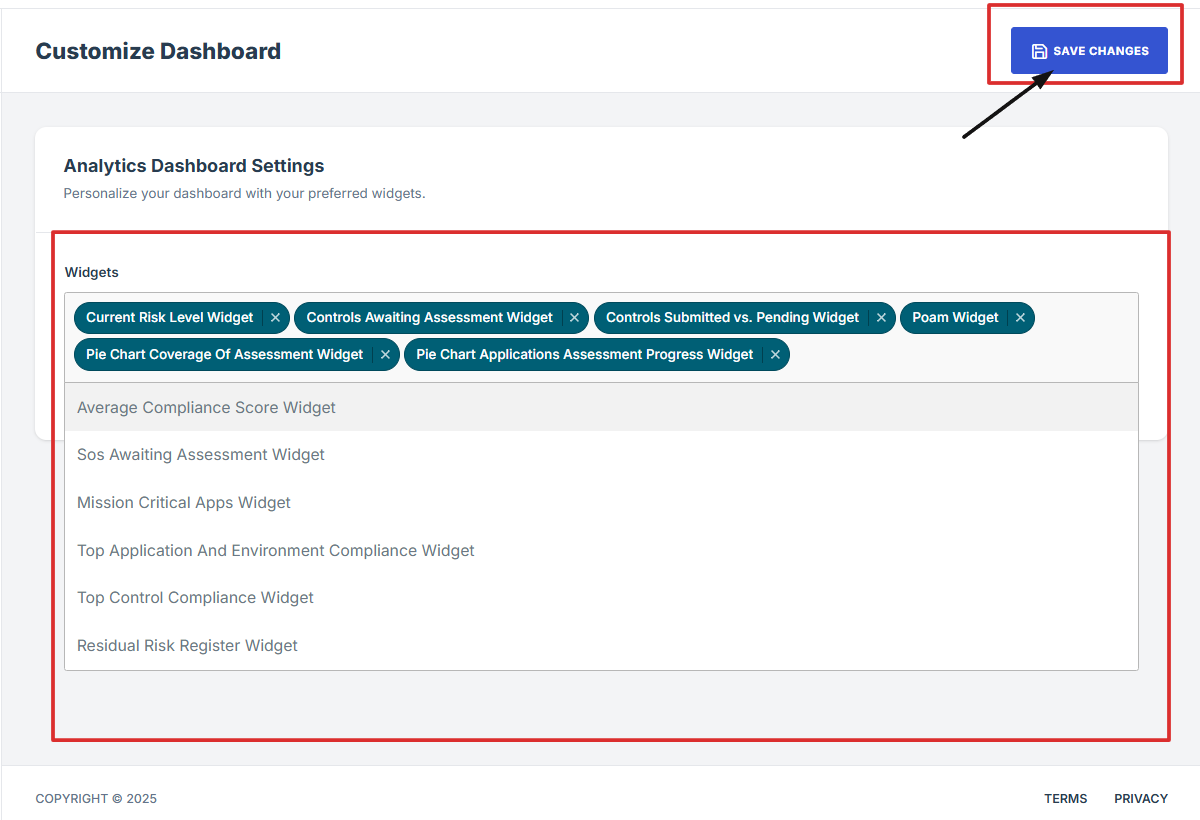
In the dropdown menu, select or unselect the widgets you want to show or hide on your Dashboard.
STEP 5: Save changes
-
After updating your widget selections, click Save Changes to apply them to Dashboard.

My To-do list on the dashboard helps user stay organized by showing all pending tasks in one place. It includes action items such as control reviews, SOS approvals, and Security Assessment approvals. This features make it easy for users to track what needs their attention without switching between different modules.
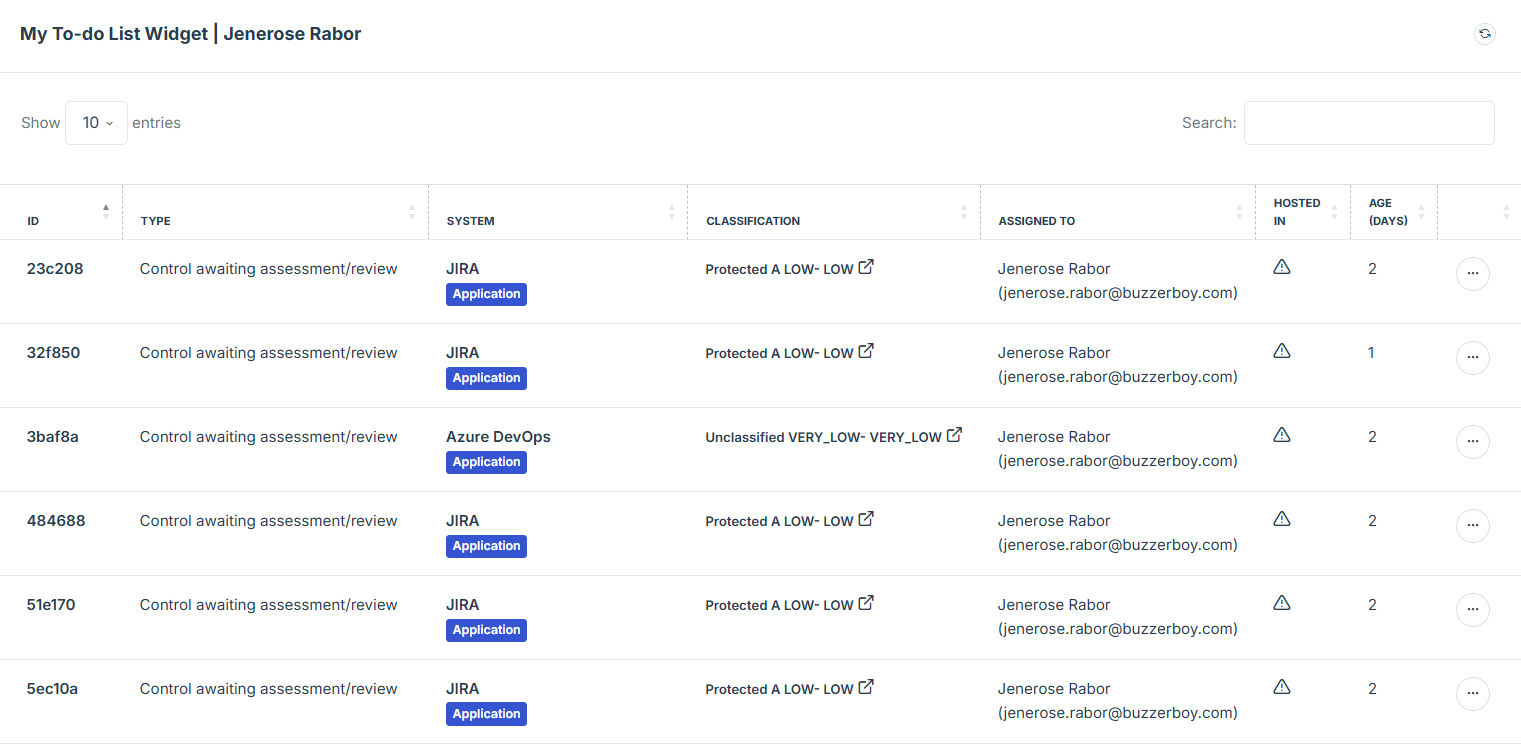
This feature will help easily track and manage controls or evidence that require your assessment. This section only shows specifically assigned to you, so you can focus on what needs your review. It’s designed to simplify your workflow by keeping all pending evidence in one place.