
How To Guidelines in Documents
Explore detailed guidelines for utilizing the Documents feature in Iron Fort Compliance to centralize document management, enhance collaboration, and ensure audit readiness.
Documents is a centralized, secure repository where users can upload, manage, organize, and request essential documents related to their security assessments, applications, environments, and controls. It acts as a "document library" tailored specifically for cybersecurity, compliance, and risk management processes.
Documents Benefits
-
Centralized Management: All important files and evidence are kept in one place, making it easier to access and reference during audits, security reviews, or compliance checks.
-
Improves Organization: Users can categorize documents by Application, Environment, Component, and more. This reduces confusion, especially when dealing with multiple systems or projects.
-
Supports Compliance Requirements: Many security and regulatory standards (like ISO 27001, SOC 2, etc.) require documented evidence. This feature ensures users can easily upload and maintain that evidence.
-
Streamlines Communication: With the Request Documents function, users can directly request missing documents from team members or third parties, minimizing delays and email back-and-forths.
-
Secure Storage: Being part of Iron Fort, it ensures documents are stored securely, respecting sensitivity classifications and access controls.
Why is the Documents feature important?
-
Audit Readiness: When external or internal audits occur, all necessary documentation is ready and easy to access.
-
Proof of Due Diligence: It shows that your organization is serious about security and compliance by maintaining and organizing evidence properly.
-
Reduces Risk: Missing or poorly organized documentation can lead to audit failures, regulatory fines, or missed business opportunities. This feature mitigates that risk.
-
Efficiency and Collaboration: Teams across security, development, and compliance can collaborate more effectively with everything centralized.
What can users upload or use the Documents section for?
-
Security Assessment Artifacts: (e.g., penetration test reports, vulnerability assessments)
-
Application Documentation: (e.g., architecture diagrams, system manuals)
-
Environment Records: (e.g., cloud setup documentation, network configurations)
-
Policy Documents: (e.g., security policies, incident response plans)
-
Compliance Evidence: (e.g., GDPR, HIPAA, PCI-DSS documentation)
- How To: Request a Document
-
When to Request a Document
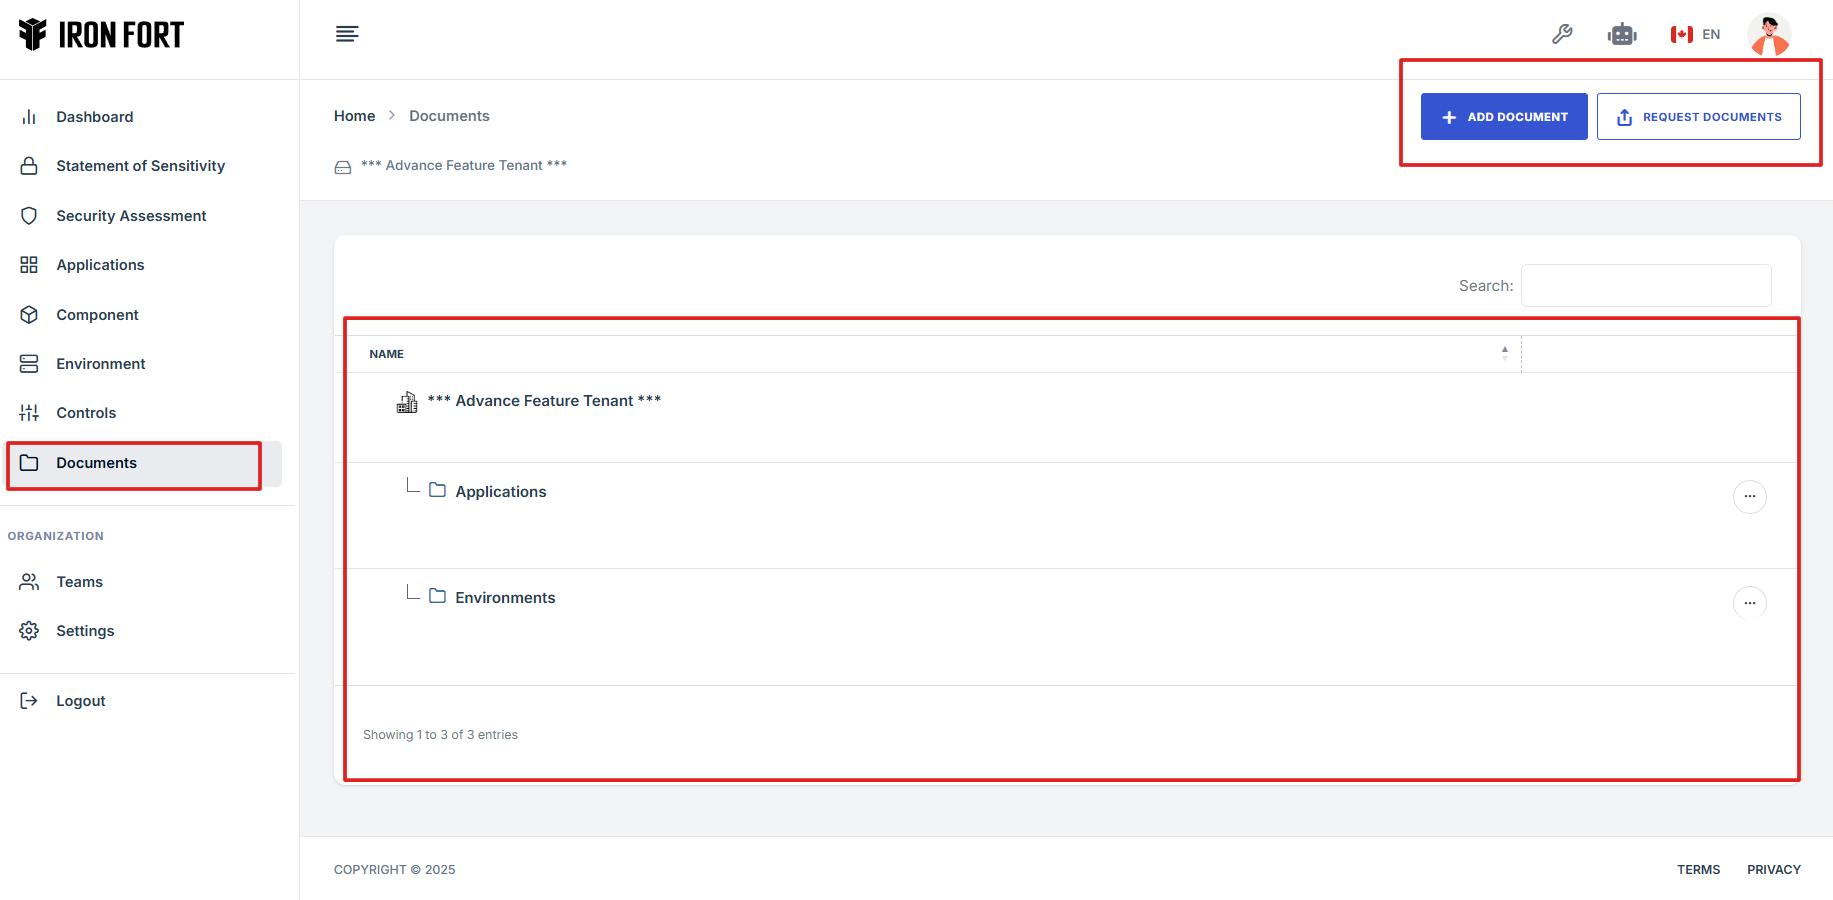
- Log in to Iron fort: How To: Login
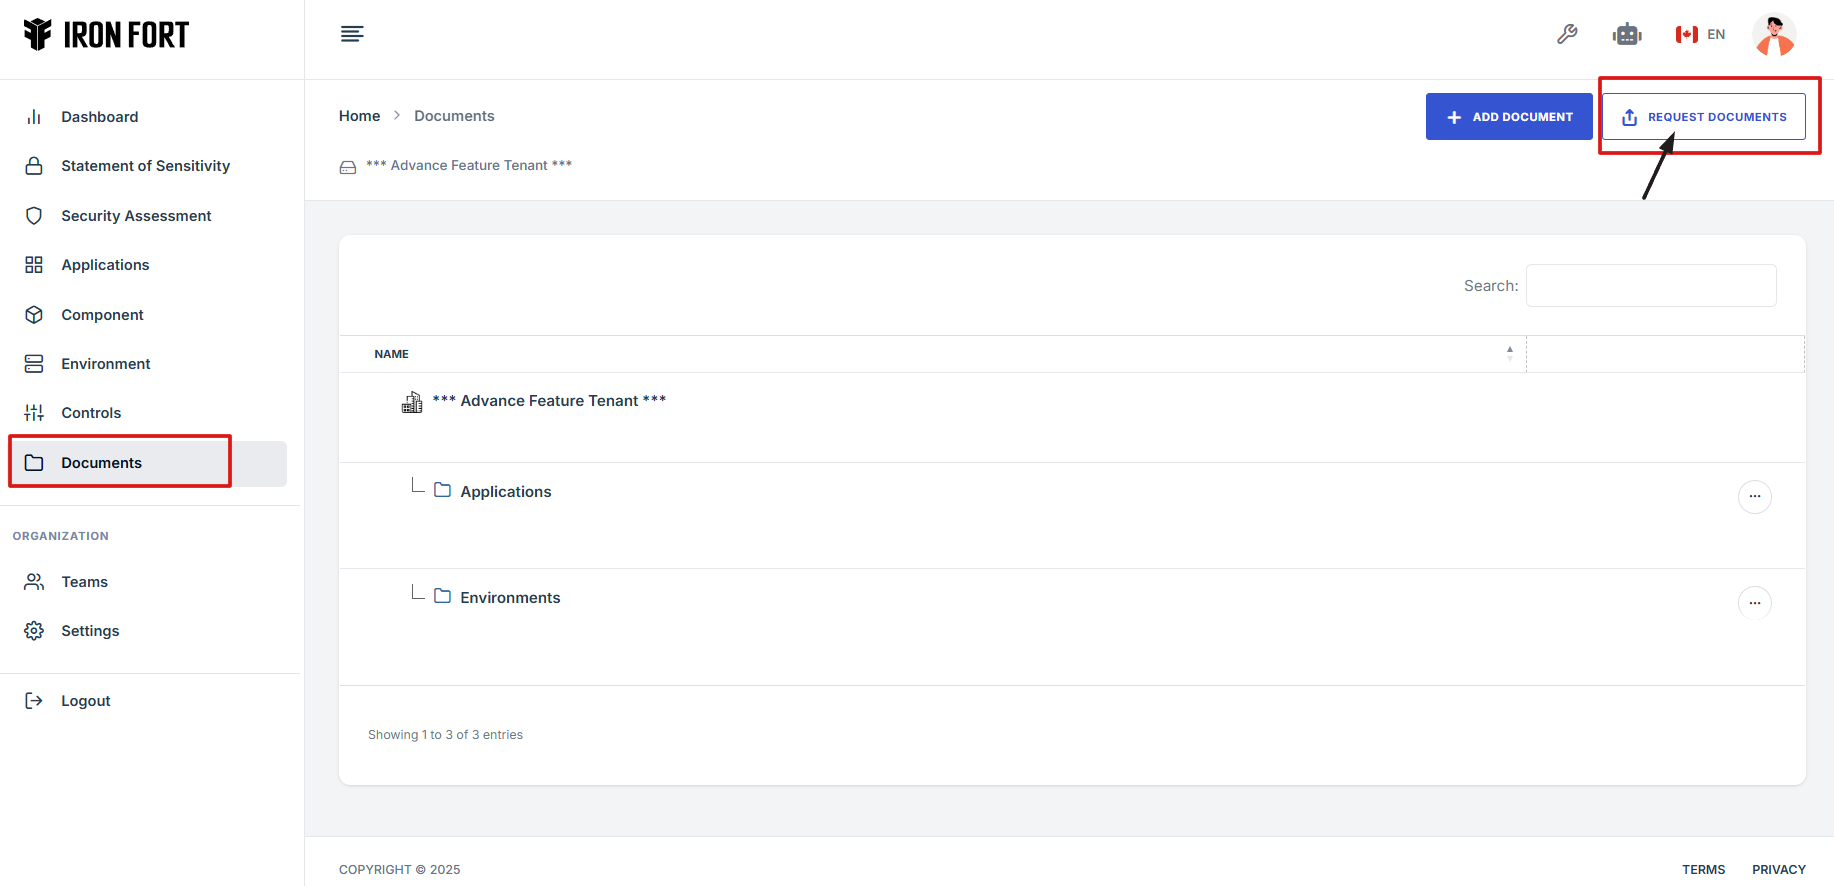
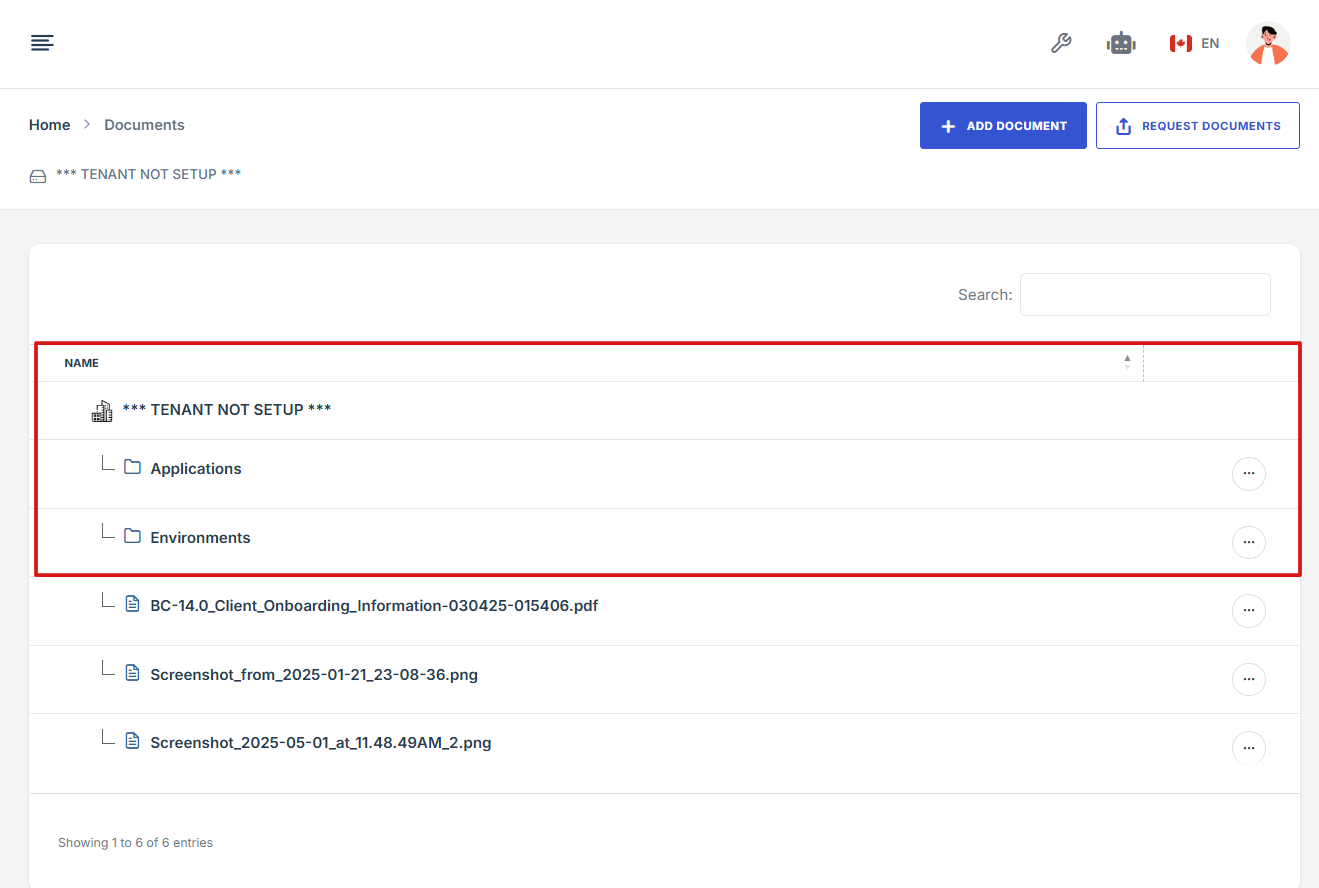
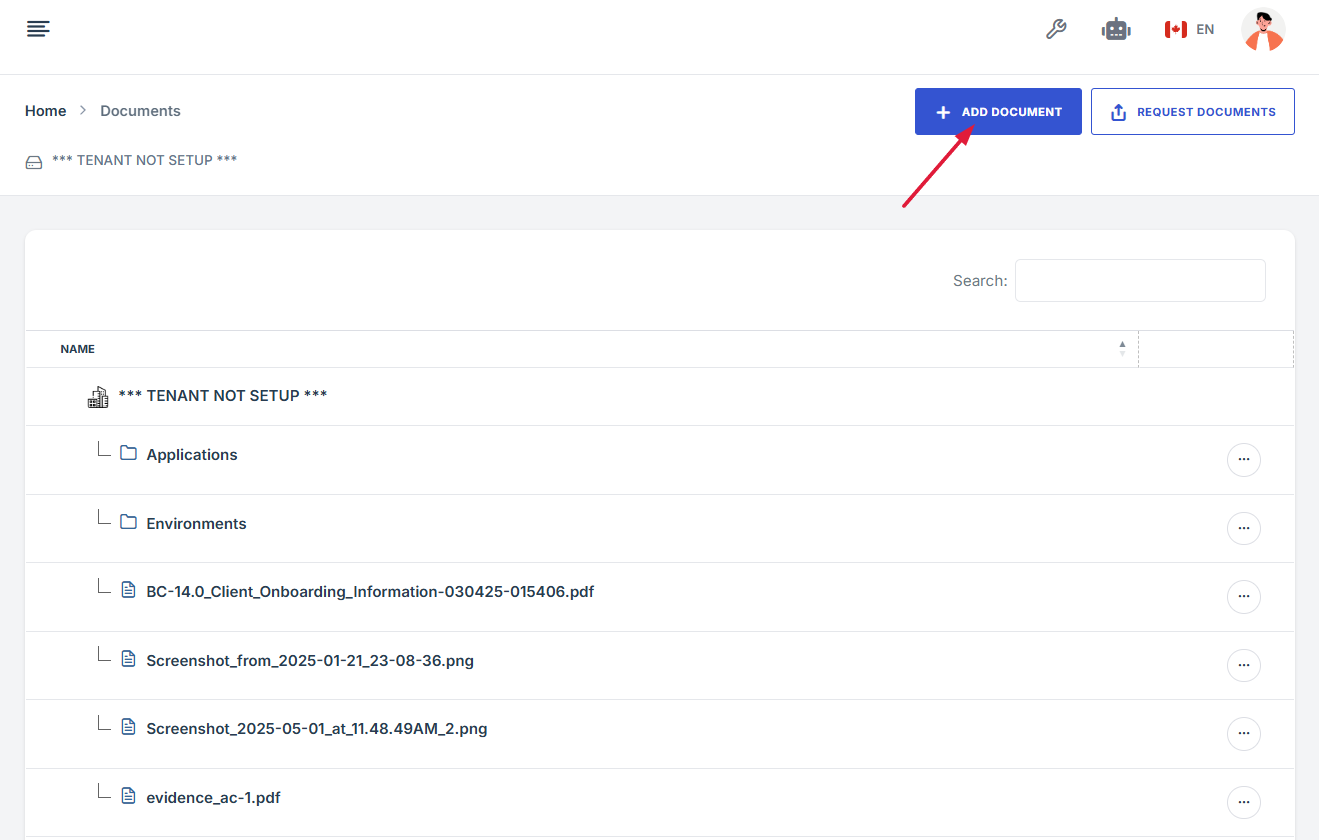
- Locate and click the Documents tab on the dashboard
- Navigate to the top right and click “Request Document.”
- After clicking, you will be directed to the Request Document Details page.
- From the dropdown menu, choose the user you want to request the document from.
- After selecting the user and filling in any required details, click Send Request.
- If the user you want to request from isn’t listed
- The user will received an email
When a user has limited permissions and cannot upload documents directly, an Administrator can submit a document request on their behalf by clicking the "Request Document" button on the Documents page. Once the request is submitted, the user will receive an email containing a secure link where they can upload the required file.
1. Log in to Iron fort: How To: Login
2. Locate and click the Documents tab on the dashboard.
3. Navigate to the top right and click “Request Document.”
4. After clicking, you will be directed to the Request Document Details page.
5. From the dropdown menu, choose the user you want to request the document from.
6. After selecting the user and filling in any required details, click Send Request.
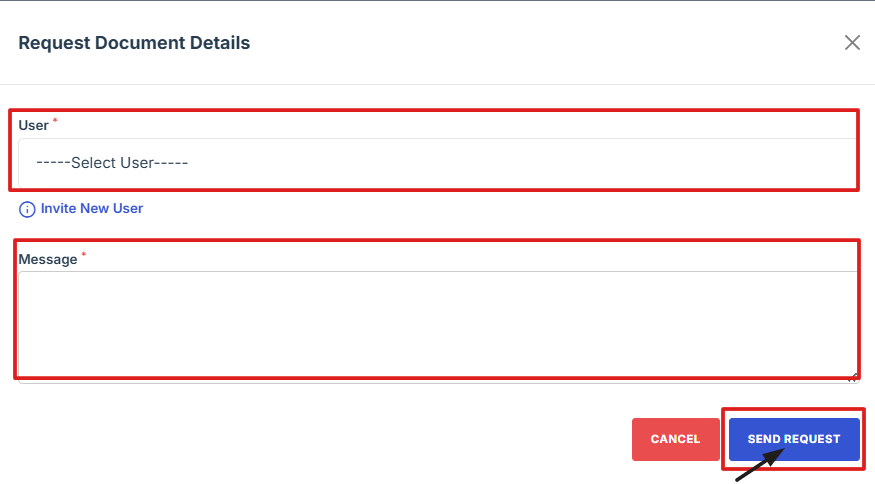
1. Click Invite New User under the dropdown menu.
2. You will be directed to the Team Invite page and fill out the following information:
-
Access Role: Choose what level of permissions or access the user should have inside the platform.
-
Email Address: Enter the email address where the invitation will be sent.
-
First Name: Type the first name of the user you are inviting.
-
Last Name: Type the last name of the user you are inviting.
-
Notes (Optional): You can add extra information or instructions for the invited user.
-
Invitation Expiration Date: Set a date when the invitation link will expire if the user doesn’t accept it.
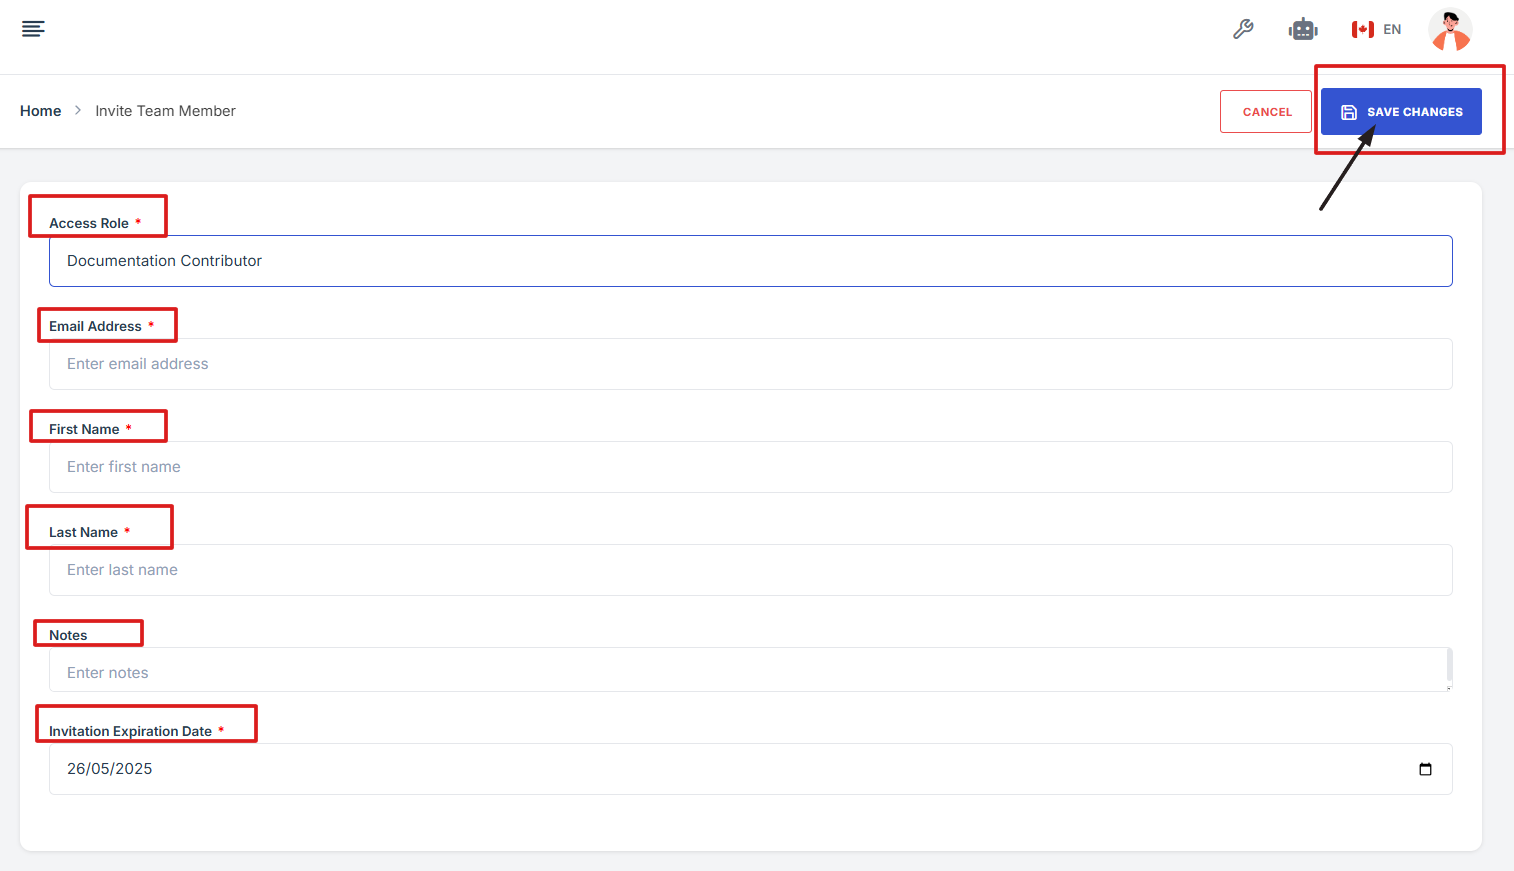
3. After completing the form, click Save Changes to send the invite and finish the process.
1. Click the link provided in the email.
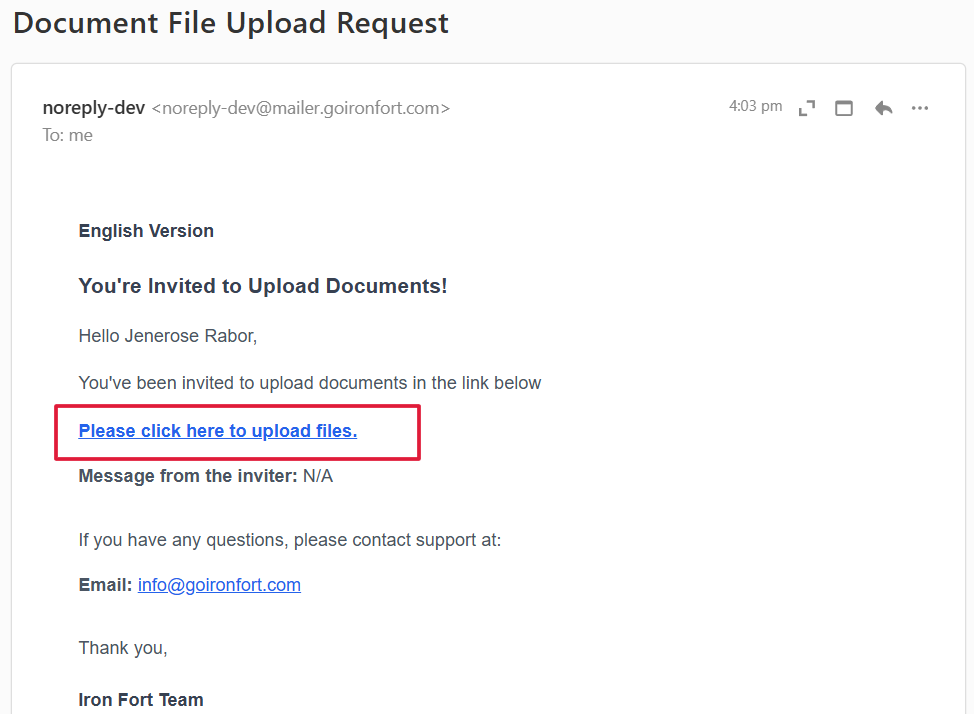
2. You will be redirected to the document upload page. Click “Add Document” to attach and upload the required file.

-
How To: Attach documents to Security Assessment
- Navigate to your organization’s Iron Fort Compliance login page
- Log in to Your Account
- Check your email for the One-Time Password (OTP) sent on your email and enter the OTP to proceed
- Enter the OTP to verify your identity and click “validate.”
- Once logged in, a welcome prompt will appear displaying
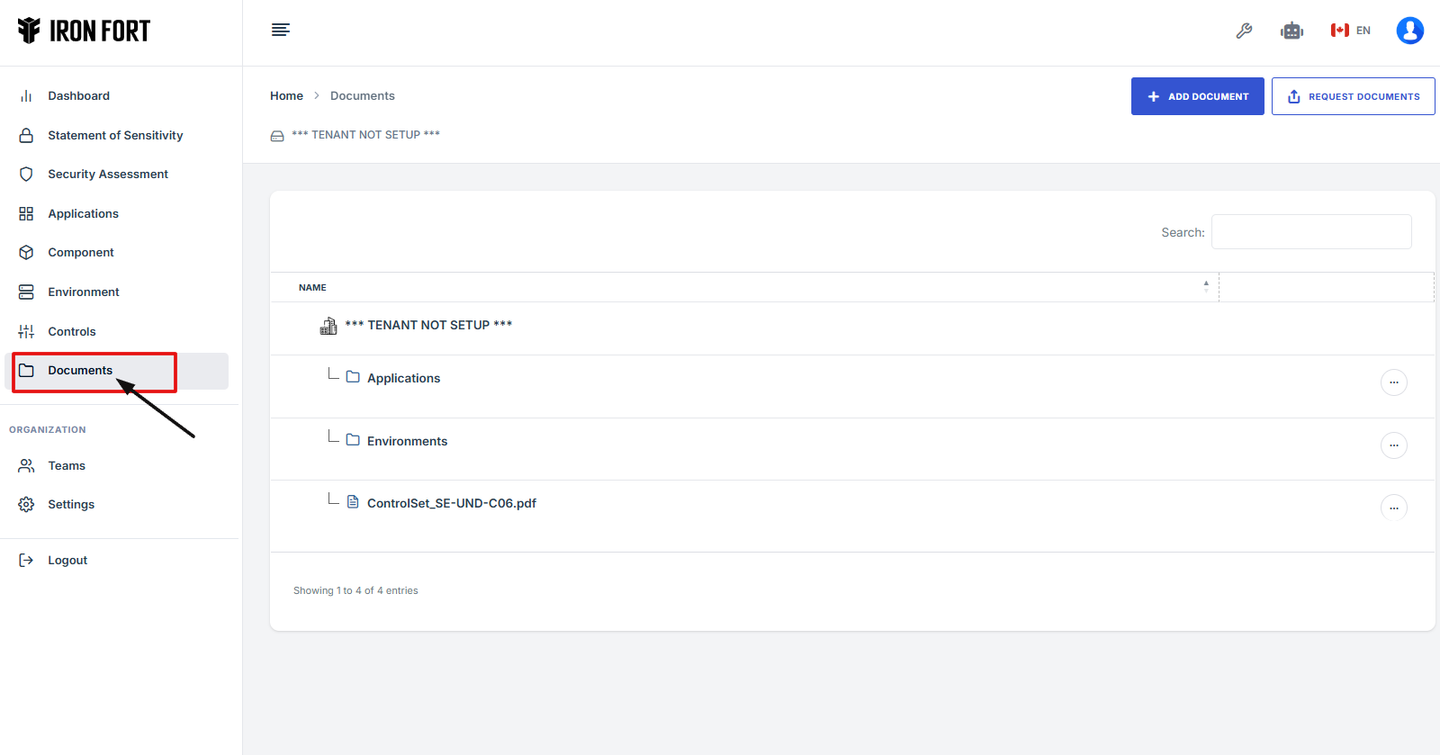
- Move your cursor to the left side of the dashboard to display the menu.
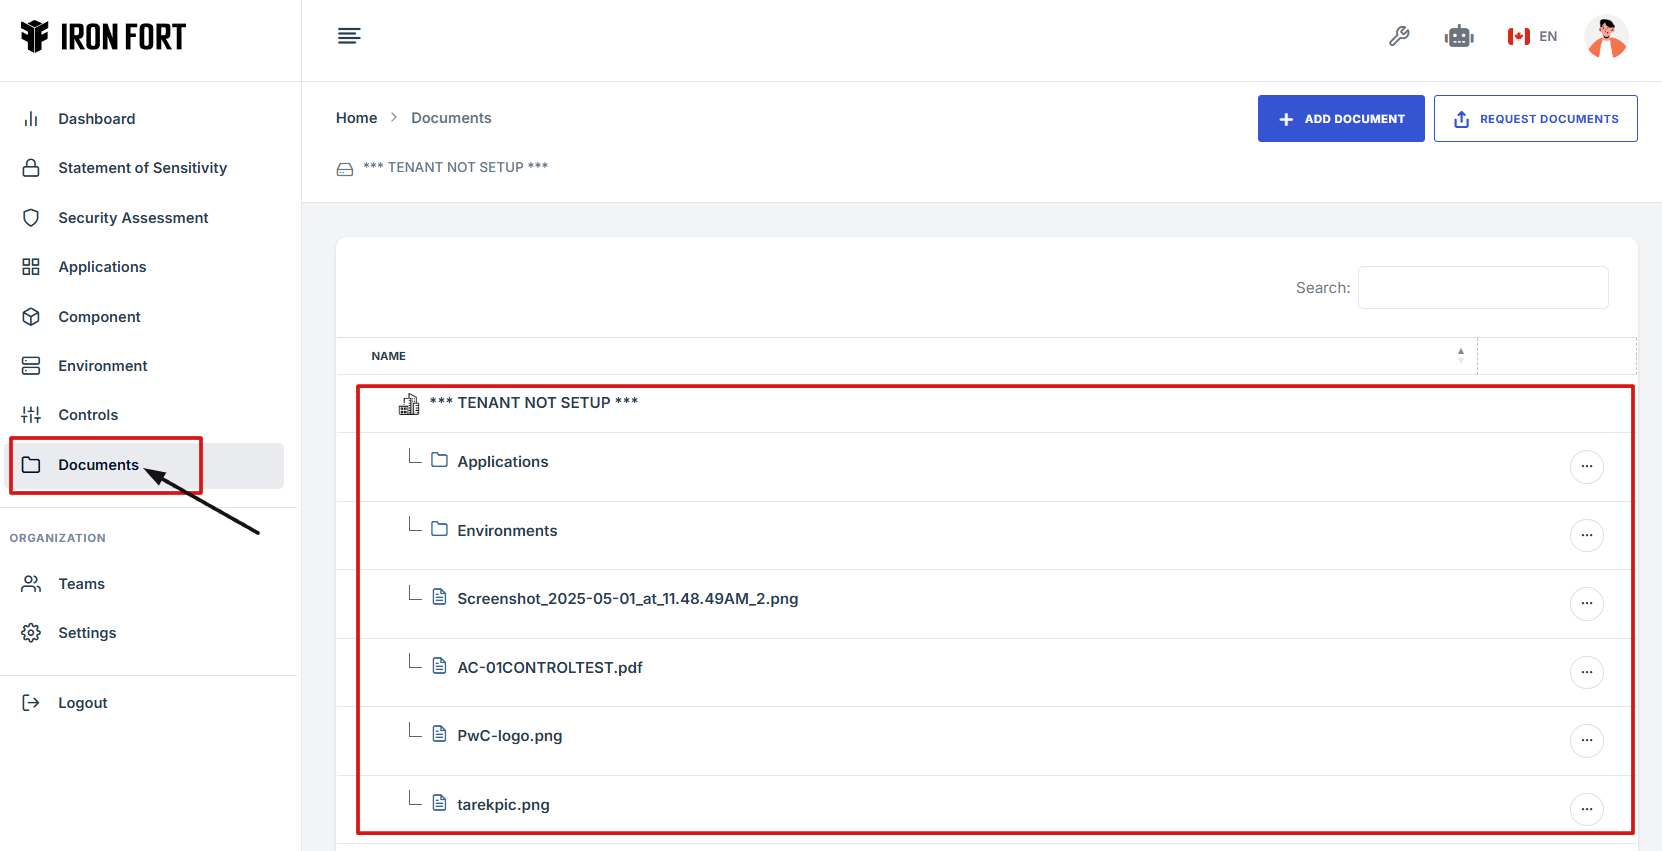
- Locate and click the Documents tab on the dashboard.
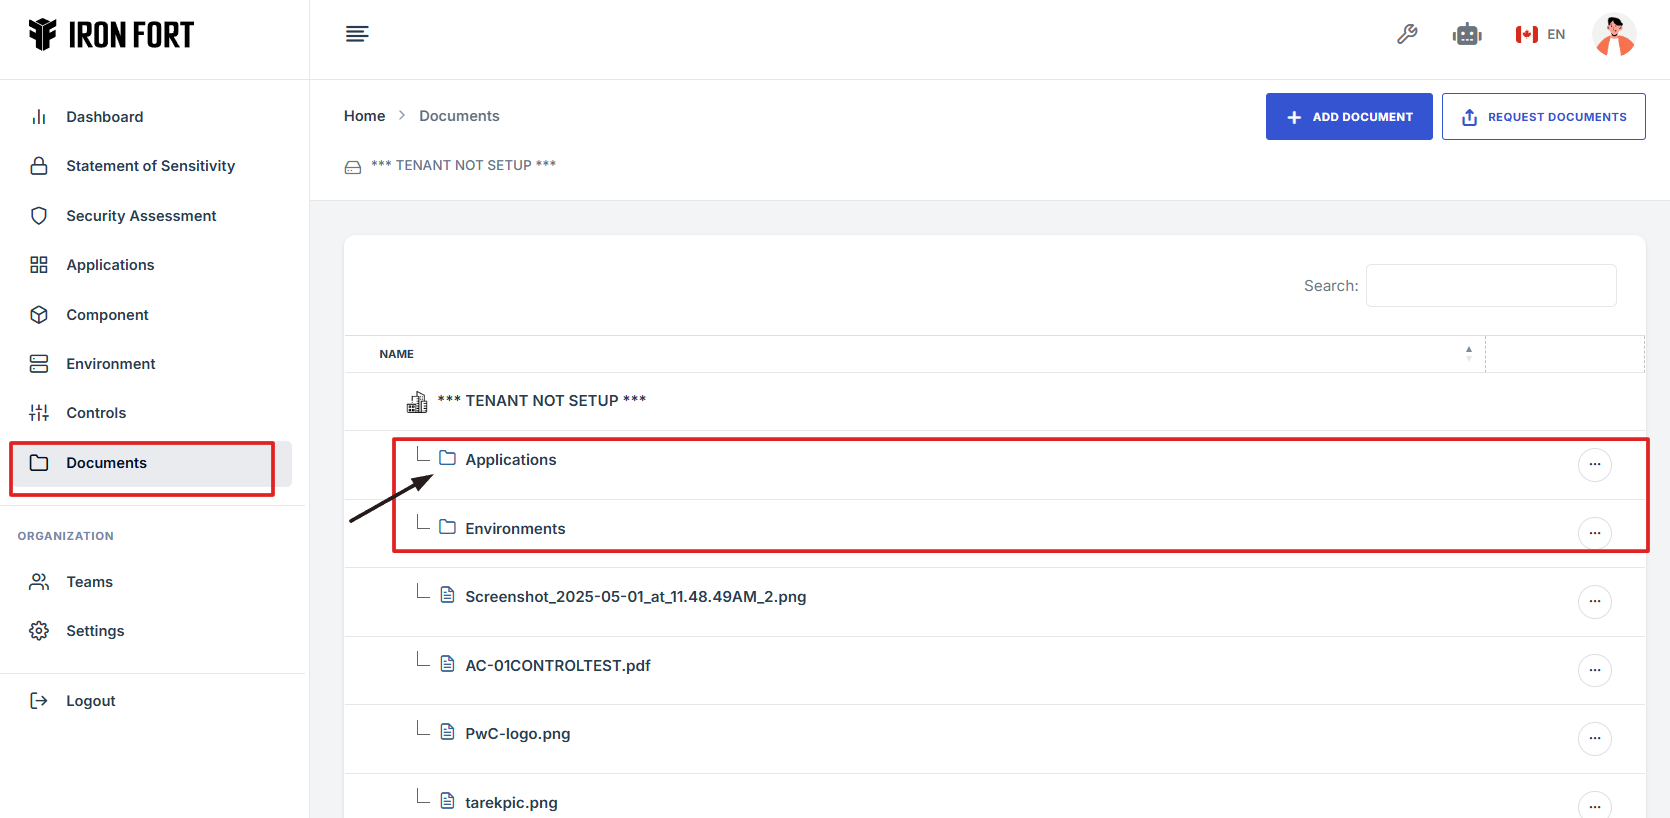
- Choose whether you want to attach the document to an Environment or an Application.
- Click the name of the Application/Environment listed under the Security Assessment where you want to attach a document.
- Under the Application/Environment name, click Security Assessment.
- In the top right corner, click the Add Document button.
- Choose How You Want to Add a Document.
- To Upload a File from Your Computer
- To Upload an External Reference Link
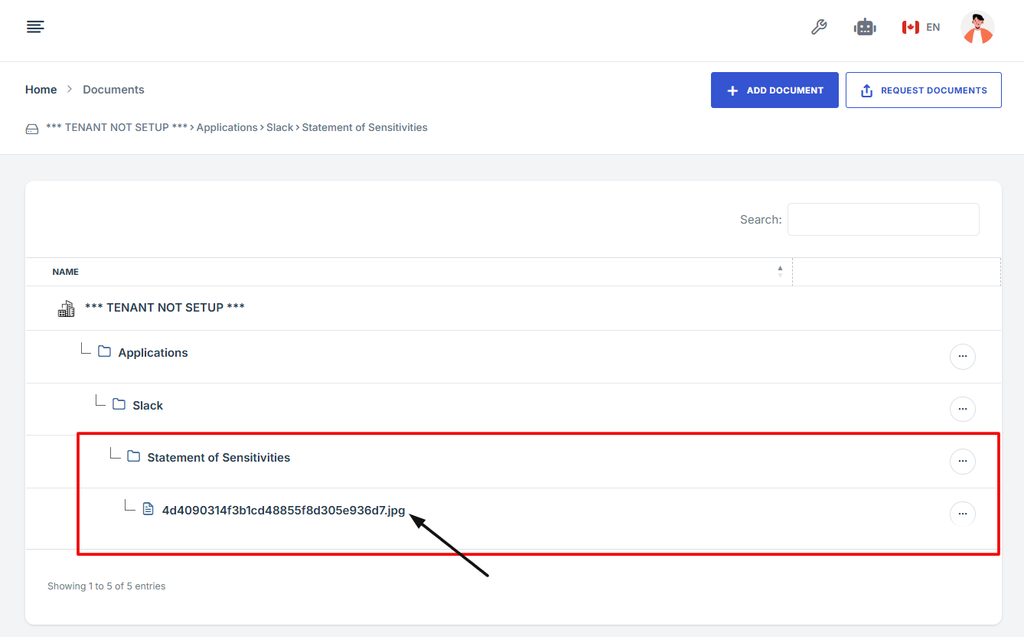
- Once added, the document will automatically be linked to the selected Security Assessment.
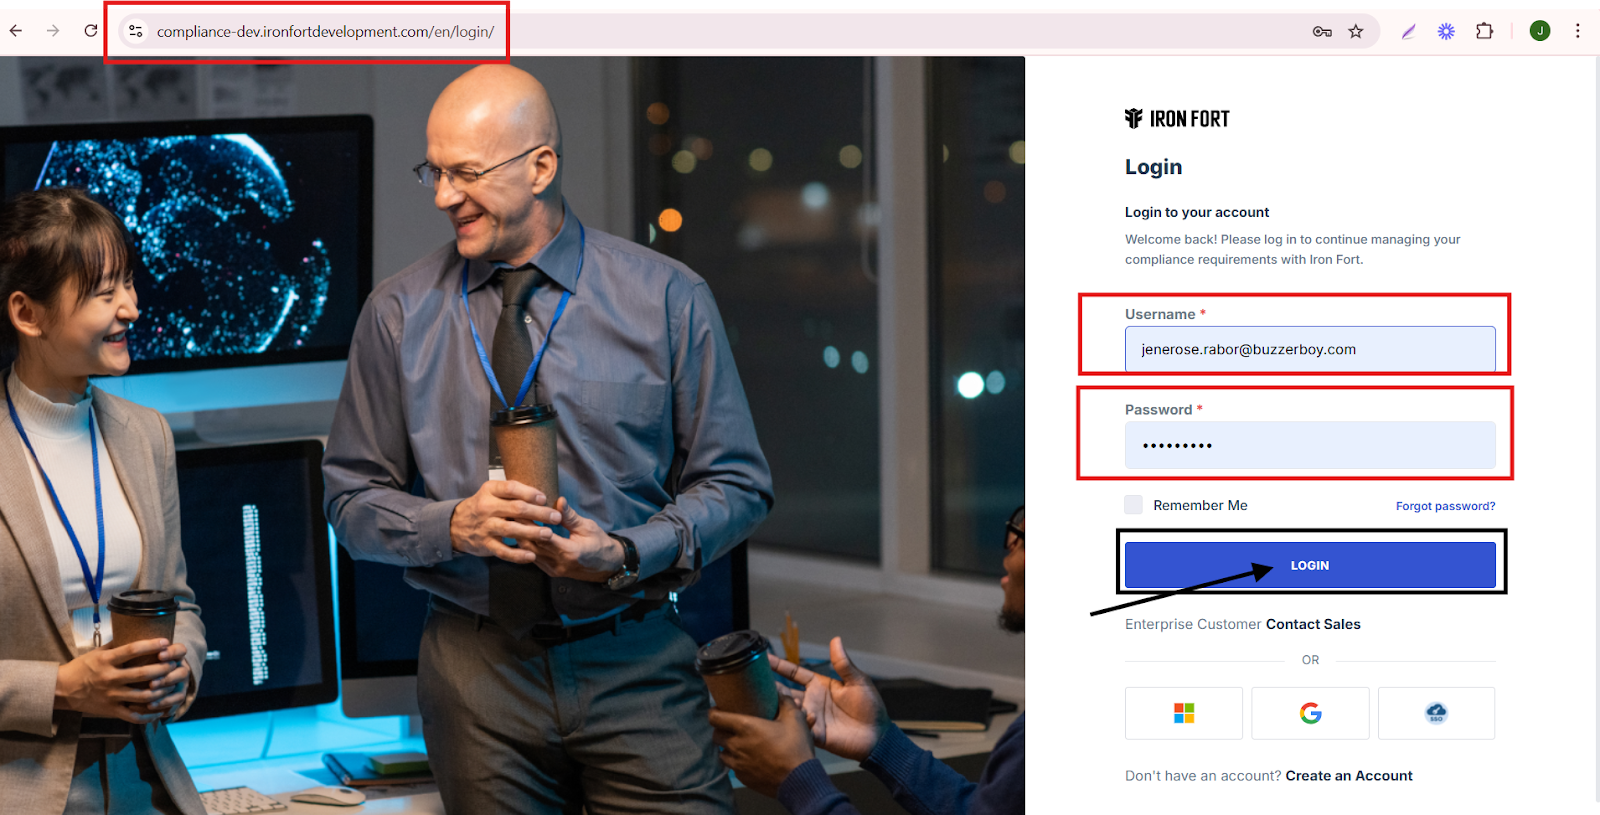
1. Navigate to your organization’s Iron Fort Compliance login page
For example: https://compliance-demo.ironfortdemos.com/en/login/?next=/en
2. Log in to Your Account
Enter your email and password to log in.
3. Check your email for the One-Time Password (OTP) sent on your email and enter the OTP to proceed.
4. Enter the OTP to verify your identity and click “validate.”

5. Once logged in, a welcome prompt will appear displaying
-
Tenant Key Information: Verifying your system access
-
User Email: Your registered email for auditing purposes
-
Last Login Details: To track your previous access
-
Iron Fort Support Email: For any login issues or concerns
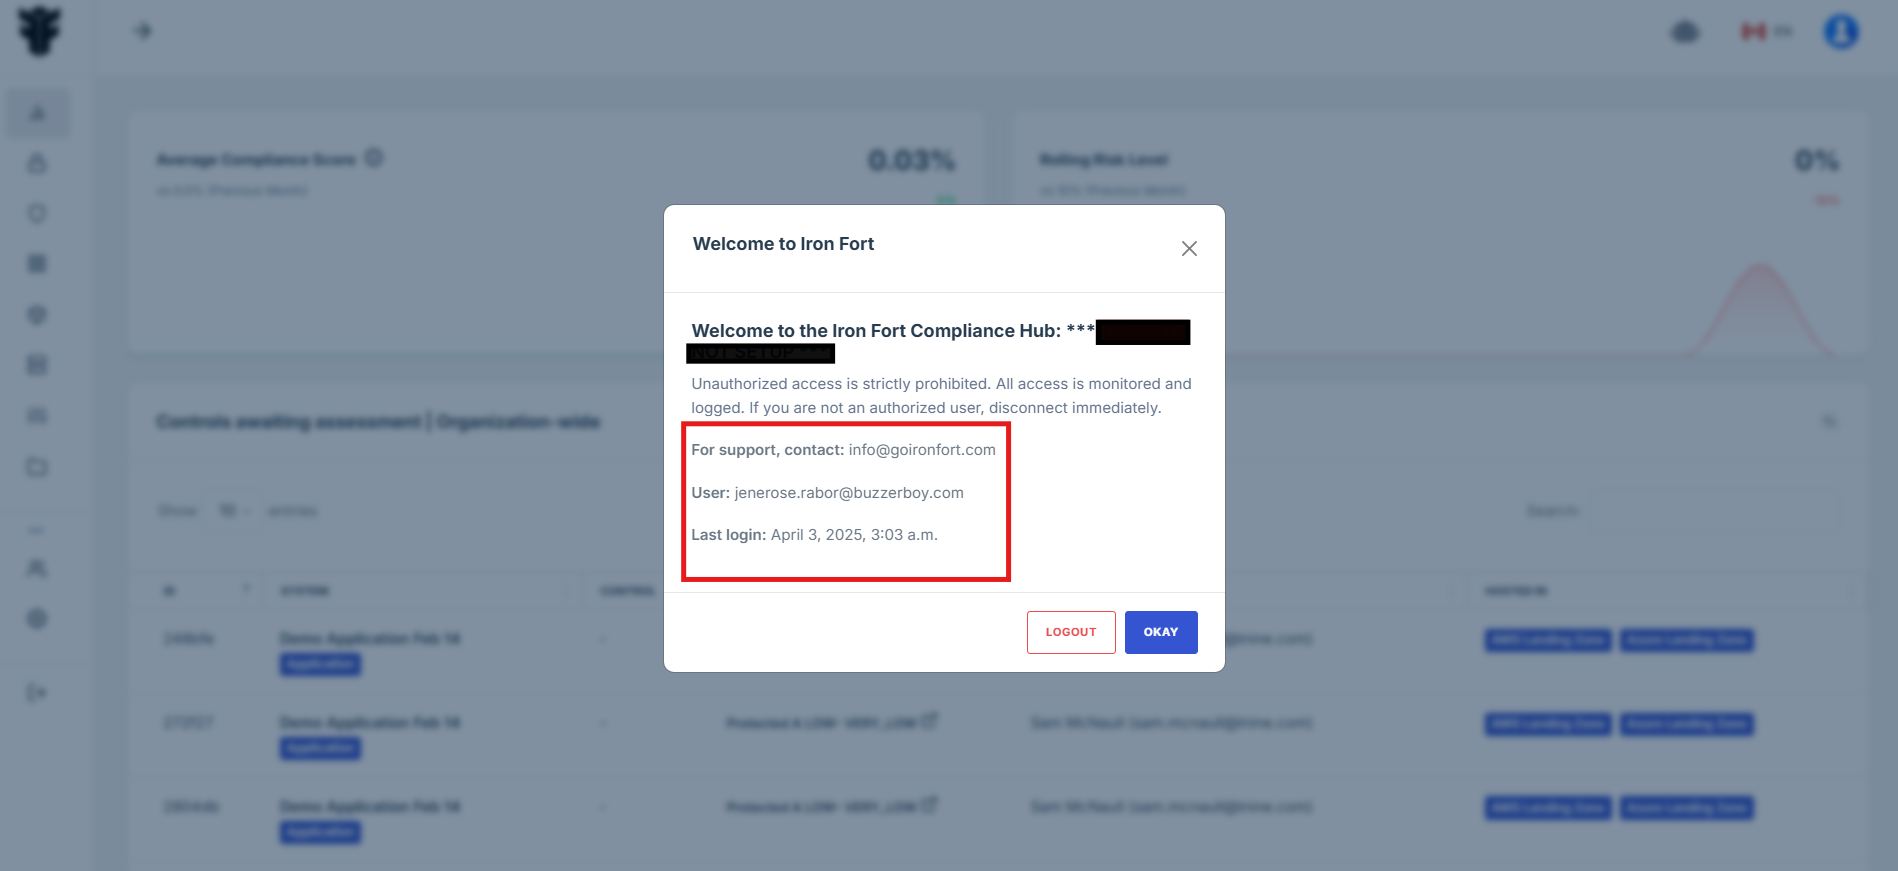
NOTE: If you recognize the details and are authorized, click "OK" to continue. However, if you are not an authorized user, click "Logout" immediately to exit.
6. Move your cursor to the left side of the dashboard to display the menu.
7. Locate and click the Documents tab on the dashboard.
8. Choose whether you want to attach the document to an Environment or an Application.
9. Click the name of the Application/Environment listed under the Security Assessment where you want to attach a document.
10. Under the Application/Environment name, click Security Assessment.
11. In the top right corner, click the Add Document button.
12. Choose How You Want to Add a Document.
-
Upload File: (from your computer)
-
External Reference Link: (link to an external document)
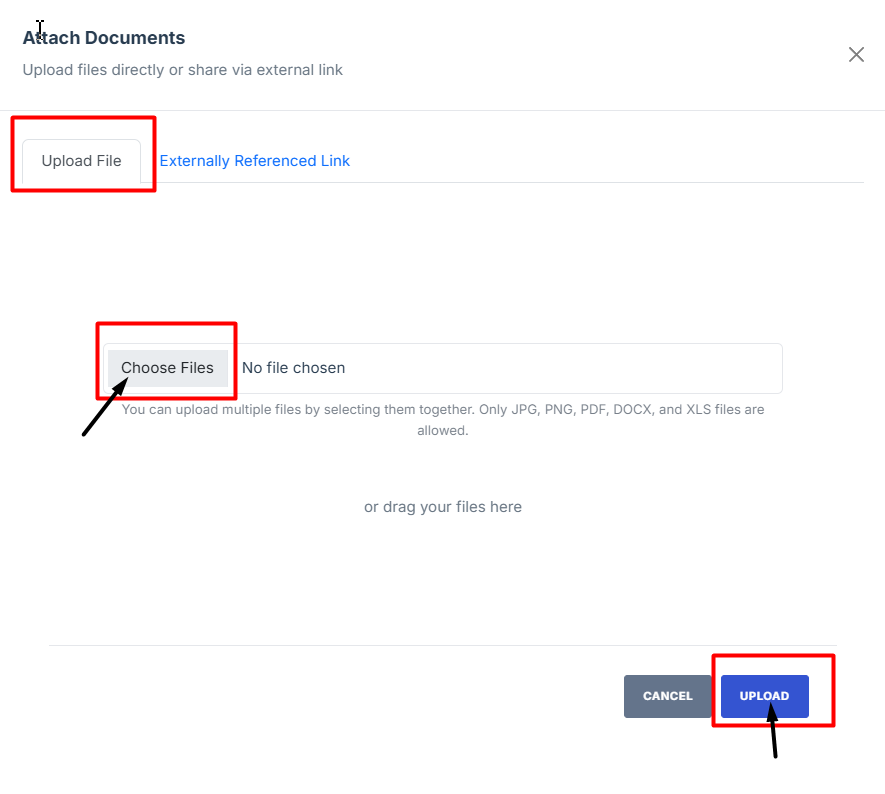
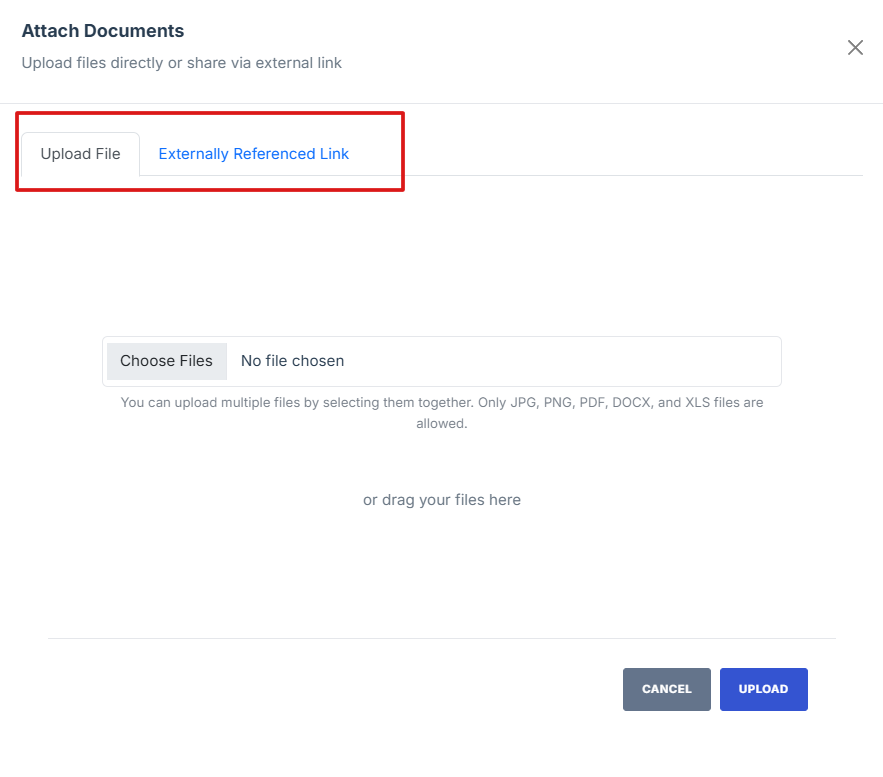
13. To Upload a File from Your Computer:
- Click the Upload File tab.
- Click Choose File and select the document you want to upload.
- After selecting the file, click Save to upload and store the document.

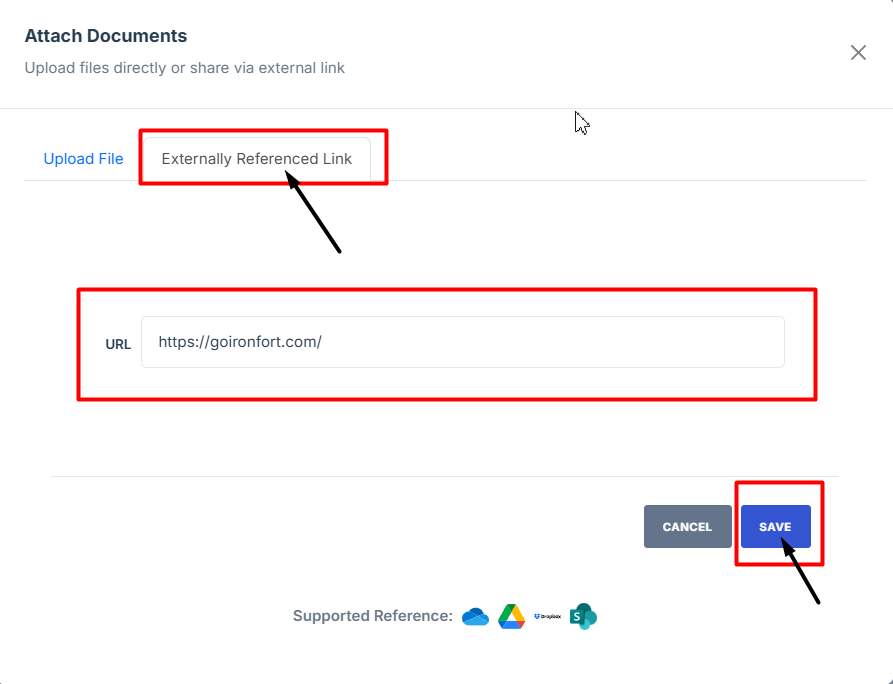
14. To Upload an External Reference Link:
-
Click the External Reference Link tab.
-
Enter or paste the URL of the document.
-
Click Save to store the link in your documents list.

15. Once added, the document will automatically be linked to the selected Security Assessment.
-
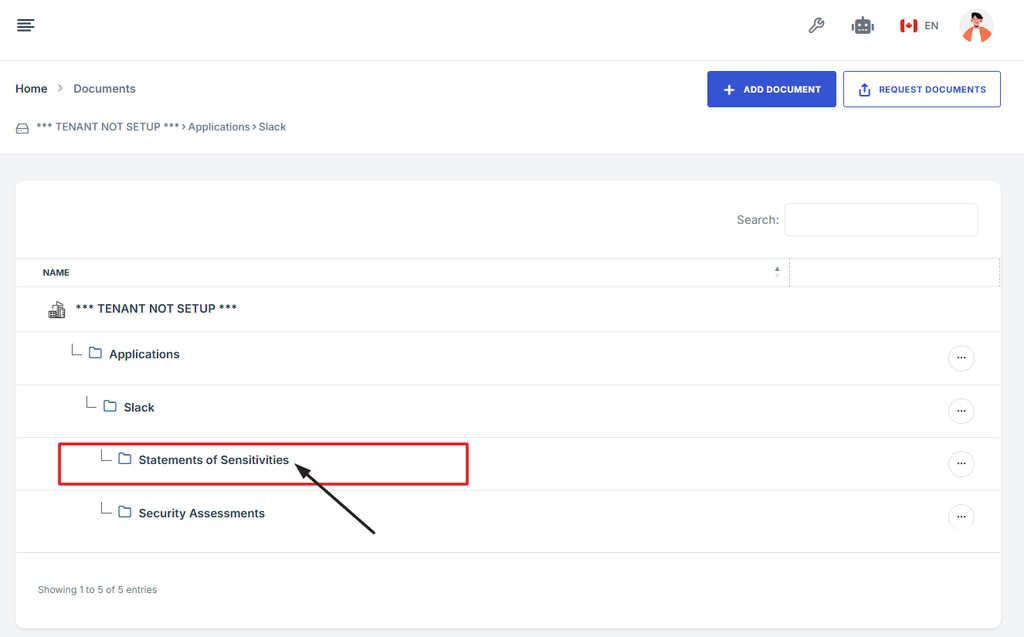
How To: Attach documents to Statement of Sensitivity
- Navigate to your organization’s Iron Fort Compliance login page
- Log in to Your Account
- Check your email for the One-Time Password (OTP) sent on your email and enter the OTP to proceed
- Enter the OTP to verify your identity and click “validate.”
- Once logged in, a welcome prompt will appear displaying
- Move your cursor to the left side of the dashboard to display the menu.
- Locate and click the Documents tab on the dashboard.
- Choose whether you want to attach the document to an Environment or an Application.
- Click the name of the Application/Environment listed under the Security Assessment where you want to attach a document.
- Under the Application/Environment name, click Statement of Sensitivity.
- In the top right corner, click the Add Document button.
- Choose How You Want to Add a Document.
- To Upload a File from Your Computer
- To Upload an External Reference Link
- Once added, the document will automatically be linked to the selected Statement of Sensitivity.
1. Navigate to your organization’s Iron Fort Compliance login page
For example: https://compliance-demo.ironfortdemos.com/en/login/?next=/en
2. Log in to Your Account
Enter your email and password to log in.
3. Check your email for the One-Time Password (OTP) sent on your email and enter the OTP to proceed.
4. Enter the OTP to verify your identity and click “validate.”
5. Once logged in, a welcome prompt will appear displaying
-
Tenant Key Information: Verifying your system access
-
User Email: Your registered email for auditing purposes
-
Last Login Details: To track your previous access
-
Iron Fort Support Email: For any login issues or concerns
NOTE: If you recognize the details and are authorized, click "OK" to continue. However, if you are not an authorized user, click "Logout" immediately to exit.
6. Move your cursor to the left side of the dashboard to display the menu.
7. Locate and click the Documents tab on the dashboard.
8. Choose whether you want to attach the document to an Environment or an Application.

9. Click the name of the Application/Environment listed under the Security Assessment where you want to attach a document.
10. Under the Application/Environment name, click Statement of Sensitivity.
11. In the top right corner, click the Add Document button.
12. Choose How You Want to Add a Document.
-
Upload File: (from your computer)
-
External Reference Link: (link to an external document)
13. To Upload a File from Your Computer:
- Click the Upload File tab.
- Click Choose File and select the document you want to upload.
- After selecting the file, click Save to upload and store the document.
14. To Upload an External Reference Link:
-
Click the External Reference Link tab.
-
Enter or paste the URL of the document.
-
Click Save to store the link in your documents list.
15. Once added, the document will automatically be linked to the selected Statement of Sensitivity.
-
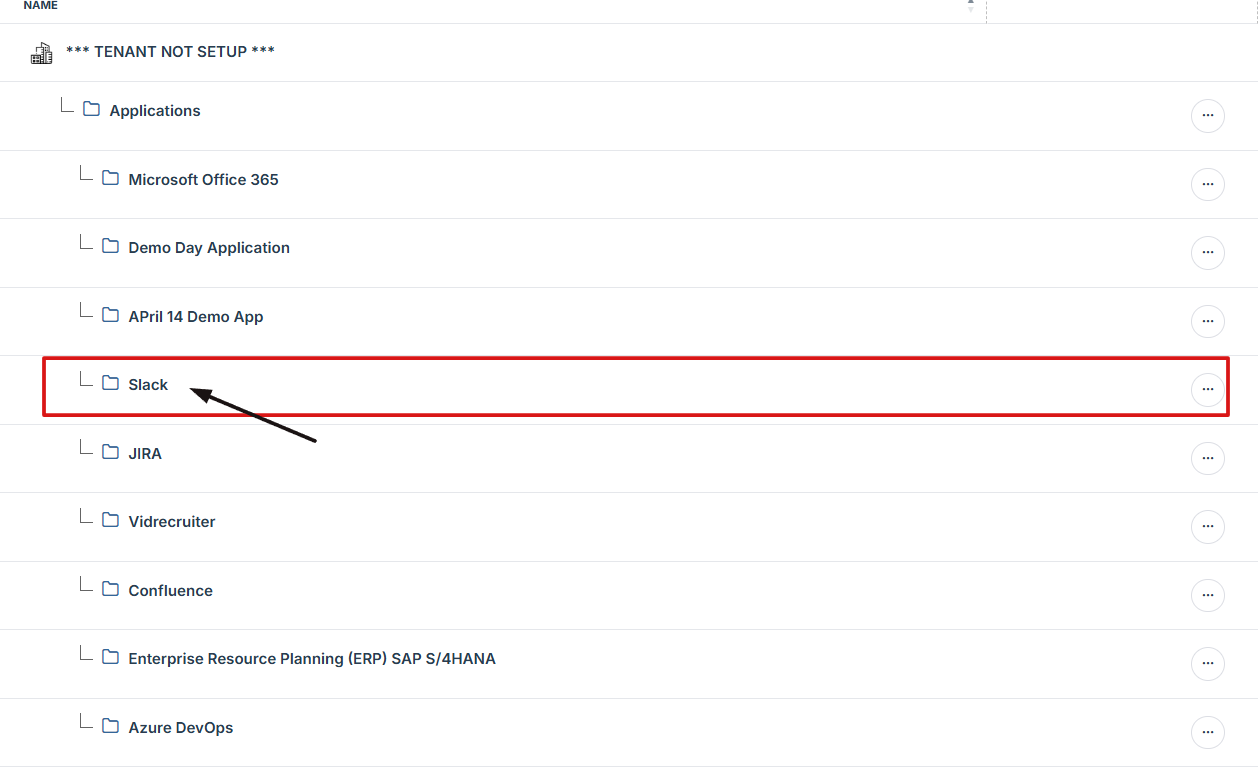
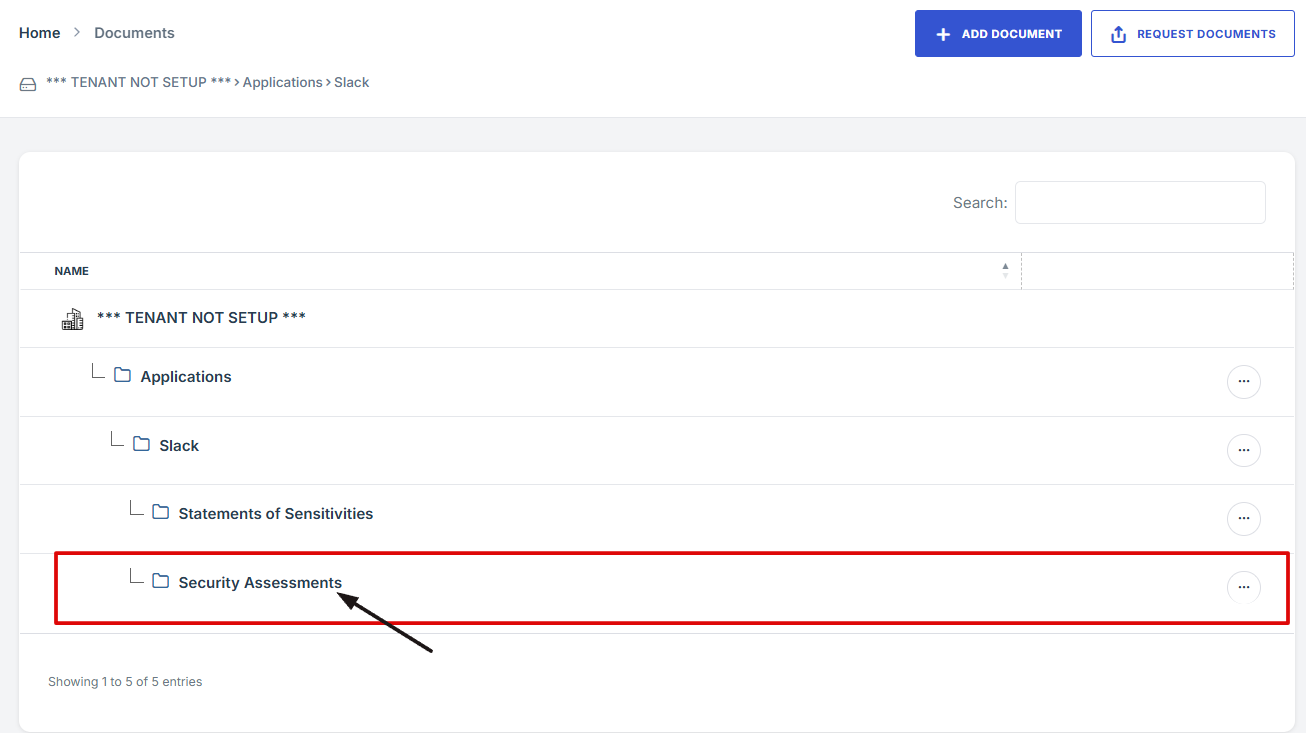
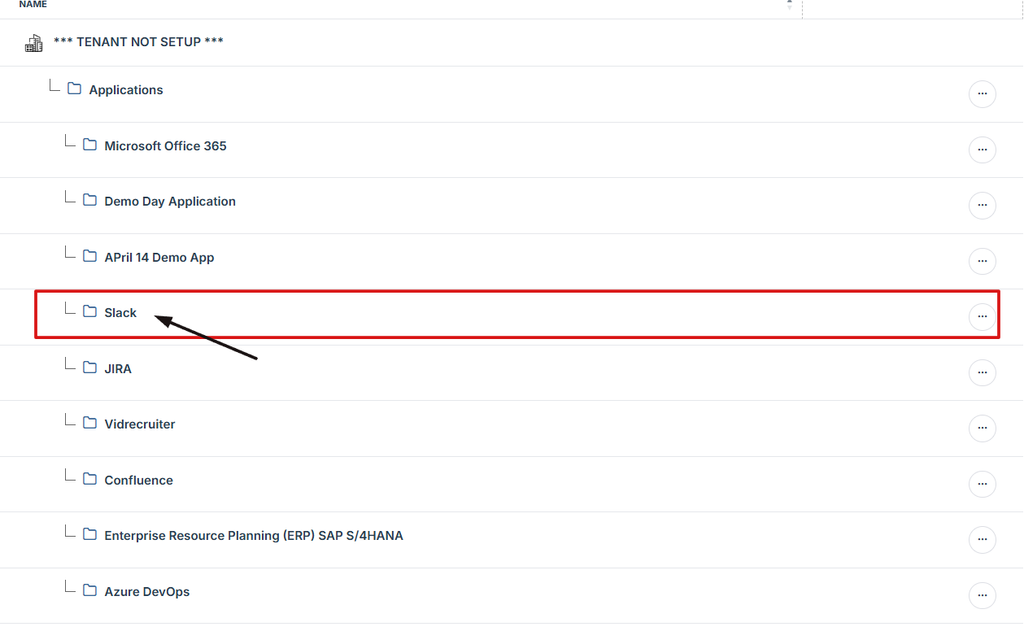
How To: Open a folder in Documents
- Navigate to your organization’s Iron Fort Compliance login page
- Log in to Your Account
- Check your email for the One-Time Password (OTP) sent on your email and enter the OTP to proceed
- Enter the OTP to verify your identity and click “validate.”
- Once logged in, a welcome prompt will appear displaying
- Move your cursor to the left side of the dashboard to display the menu.
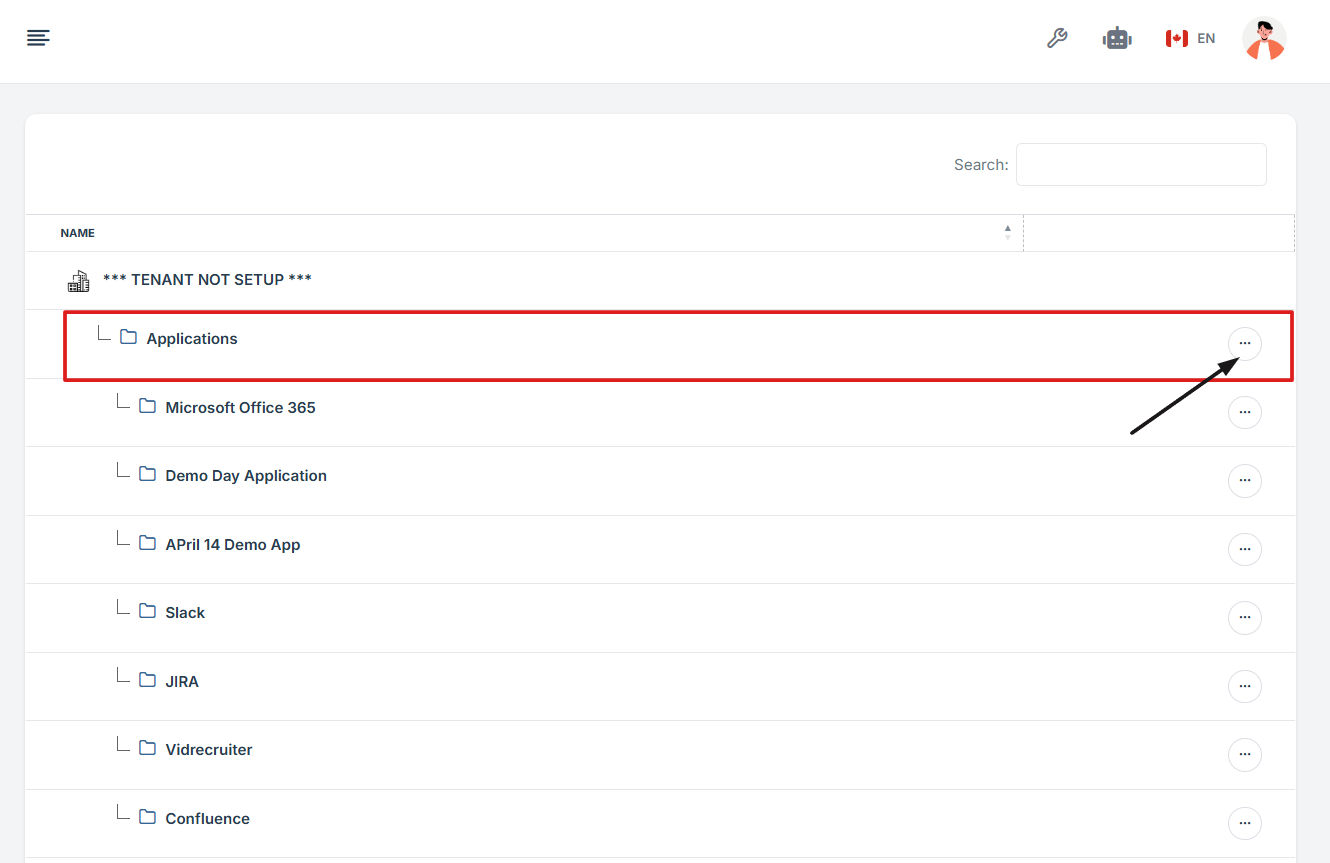
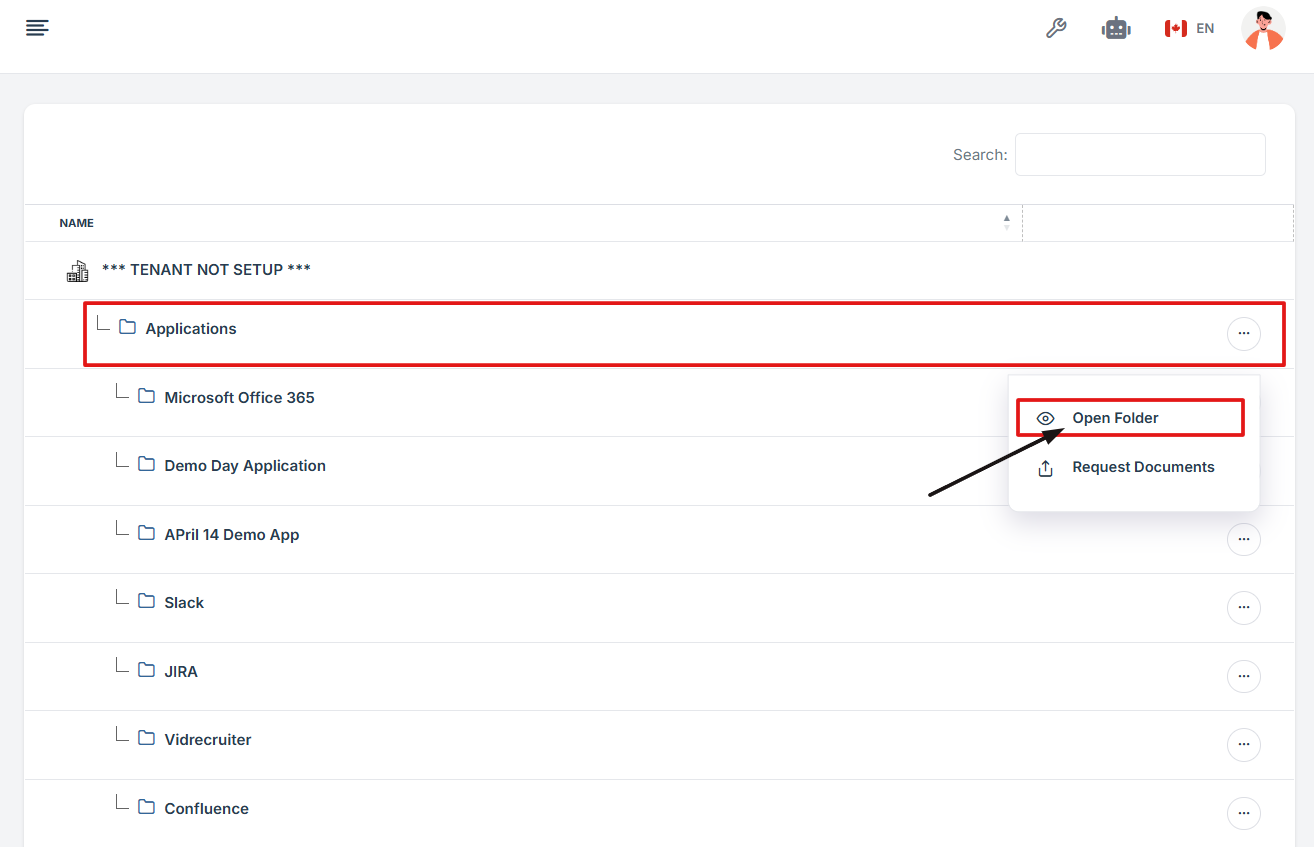
- Locate and click the Documents tab on the dashboard.
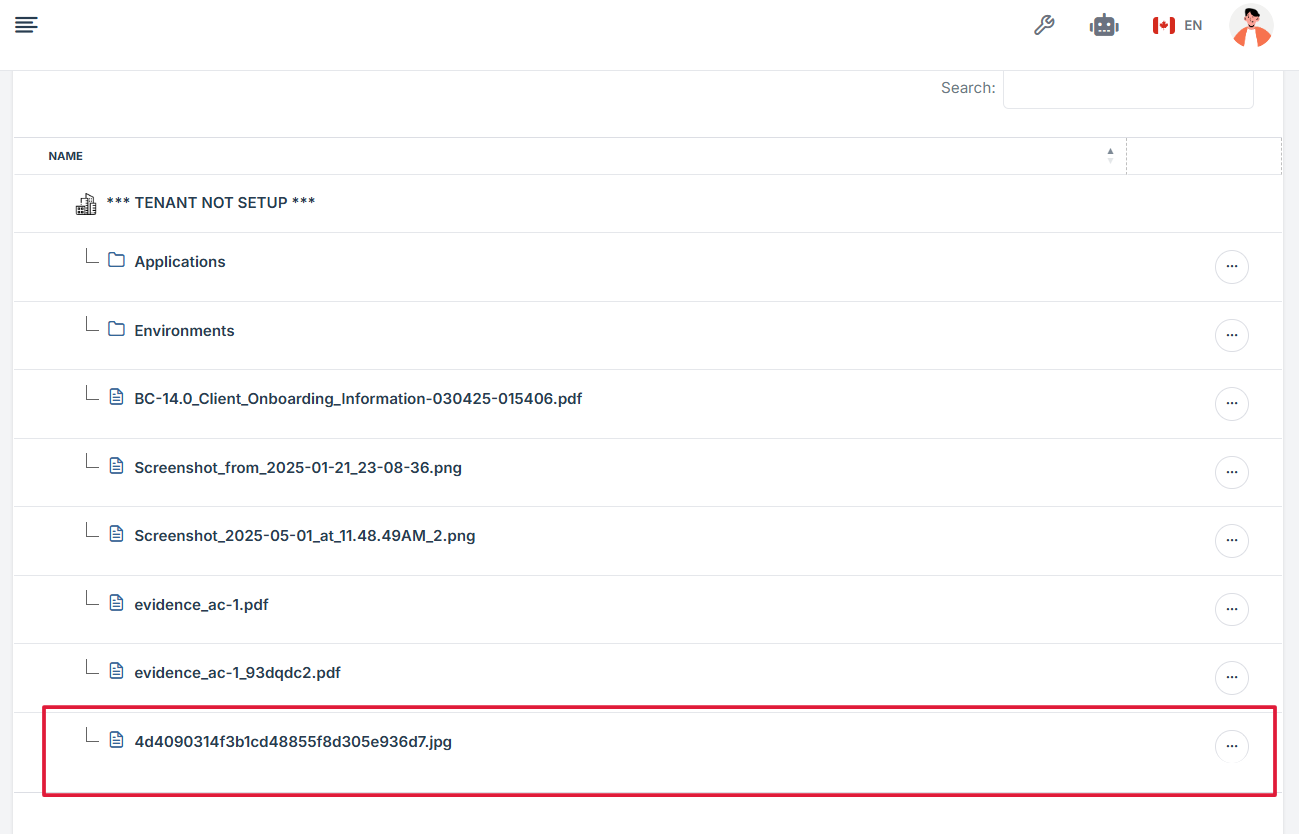
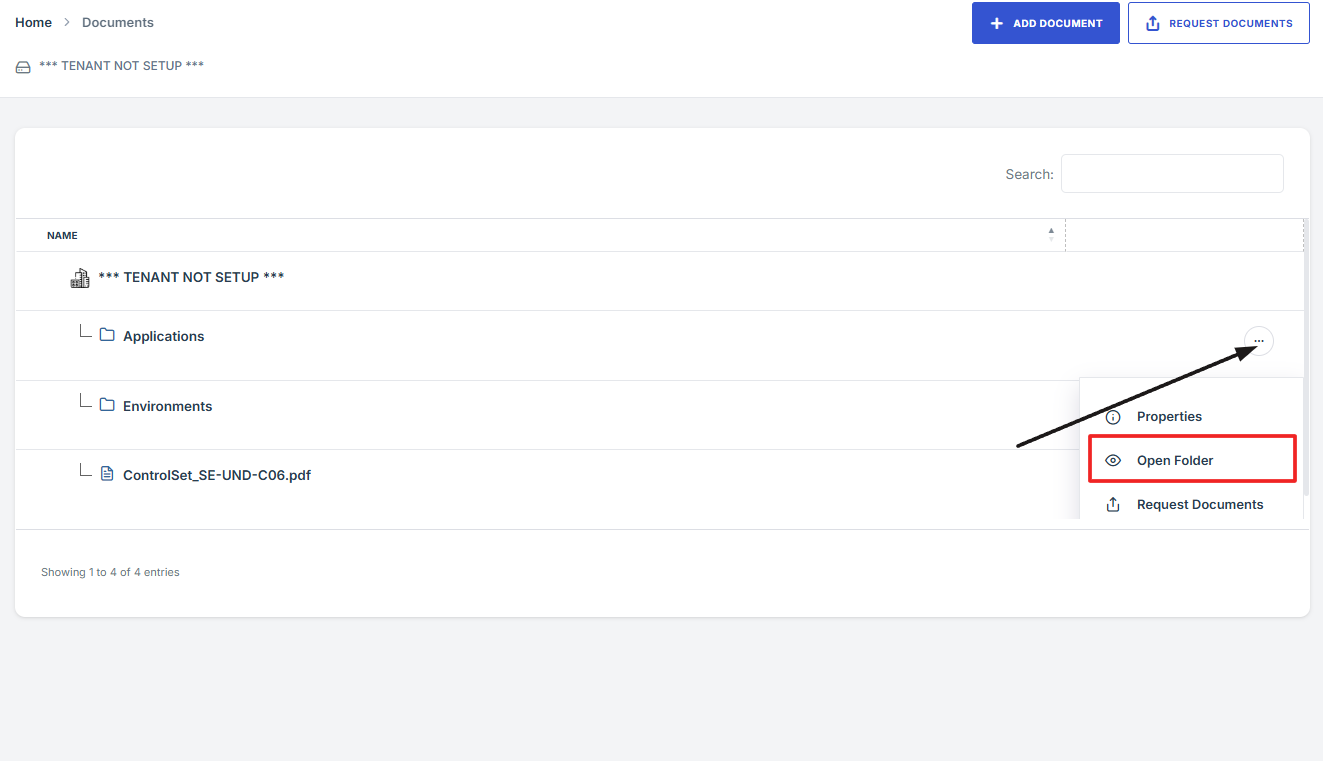
- On the Document page, find the folder you want to open.
- Click the three dots on the right side of the folder.
- Select "Open folder" from the menu.
1. Navigate to your organization’s Iron Fort Compliance login page
For example: https://compliance-demo.ironfortdemos.com/en/login/?next=/en
2. Log in to Your Account
Enter your email and password to log in.
3. Check your email for the One-Time Password (OTP) sent on your email and enter the OTP to proceed.
4. Enter the OTP to verify your identity and click “validate.”
5. Once logged in, a welcome prompt will appear displaying
-
Tenant Key Information: Verifying your system access
-
User Email: Your registered email for auditing purposes
-
Last Login Details: To track your previous access
-
Iron Fort Support Email: For any login issues or concerns
NOTE: If you recognize the details and are authorized, click "OK" to continue. However, if you are not an authorized user, click "Logout" immediately to exit.
6. Move your cursor to the left side of the dashboard to display the menu.
7. Locate and click the Documents tab on the dashboard.
8. On the Document page, find the folder you want to open.
9. Click the three dots on the right side of the folder.
10. Select "Open folder" from the menu.
-
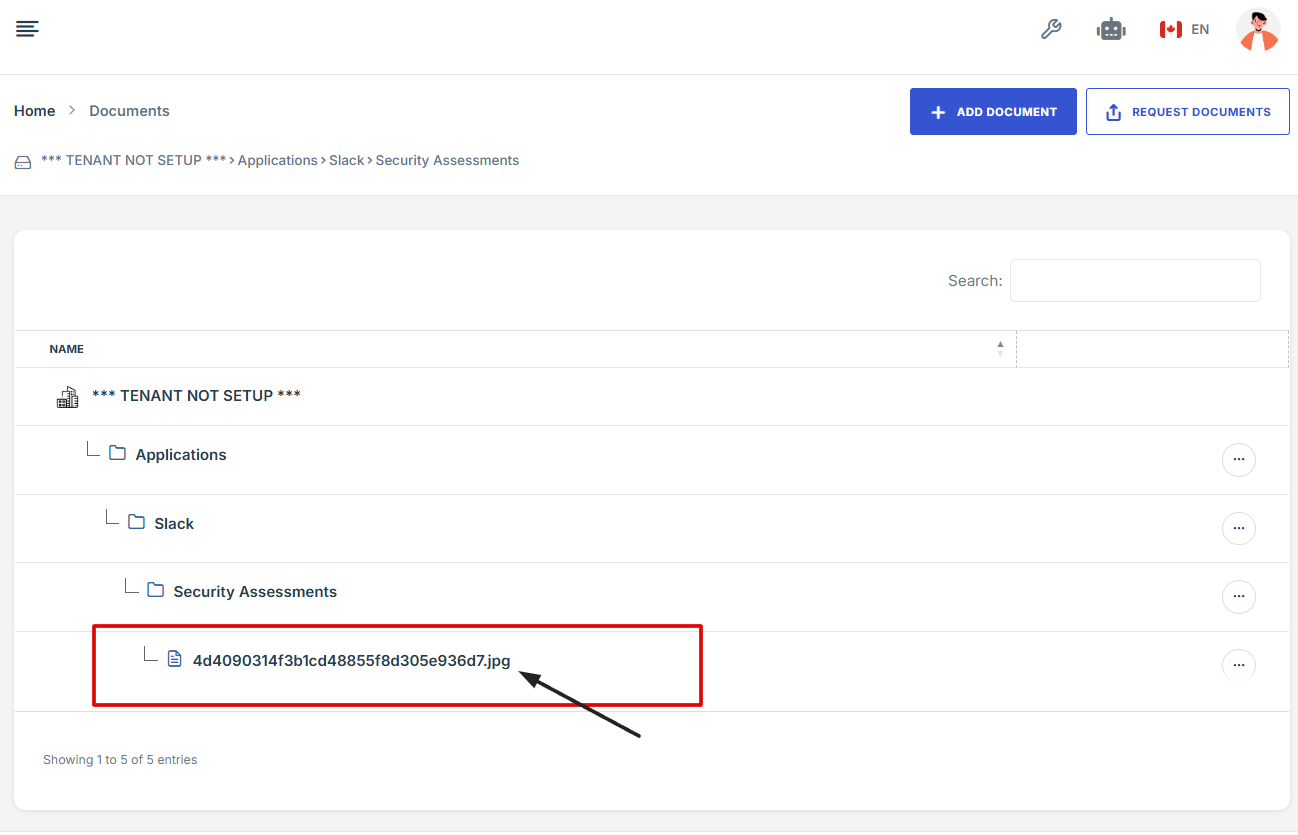
How To: Open a file in Documents
- Navigate to your organization’s Iron Fort Compliance login page
- Log in to Your Account
- Check your email for the One-Time Password (OTP) sent on your email and enter the OTP to proceed
- Enter the OTP to verify your identity and click “validate.”
- Once logged in, a welcome prompt will appear displaying
- Move your cursor to the left side of the dashboard to display the menu.
- Locate and click the Documents tab on the dashboard.
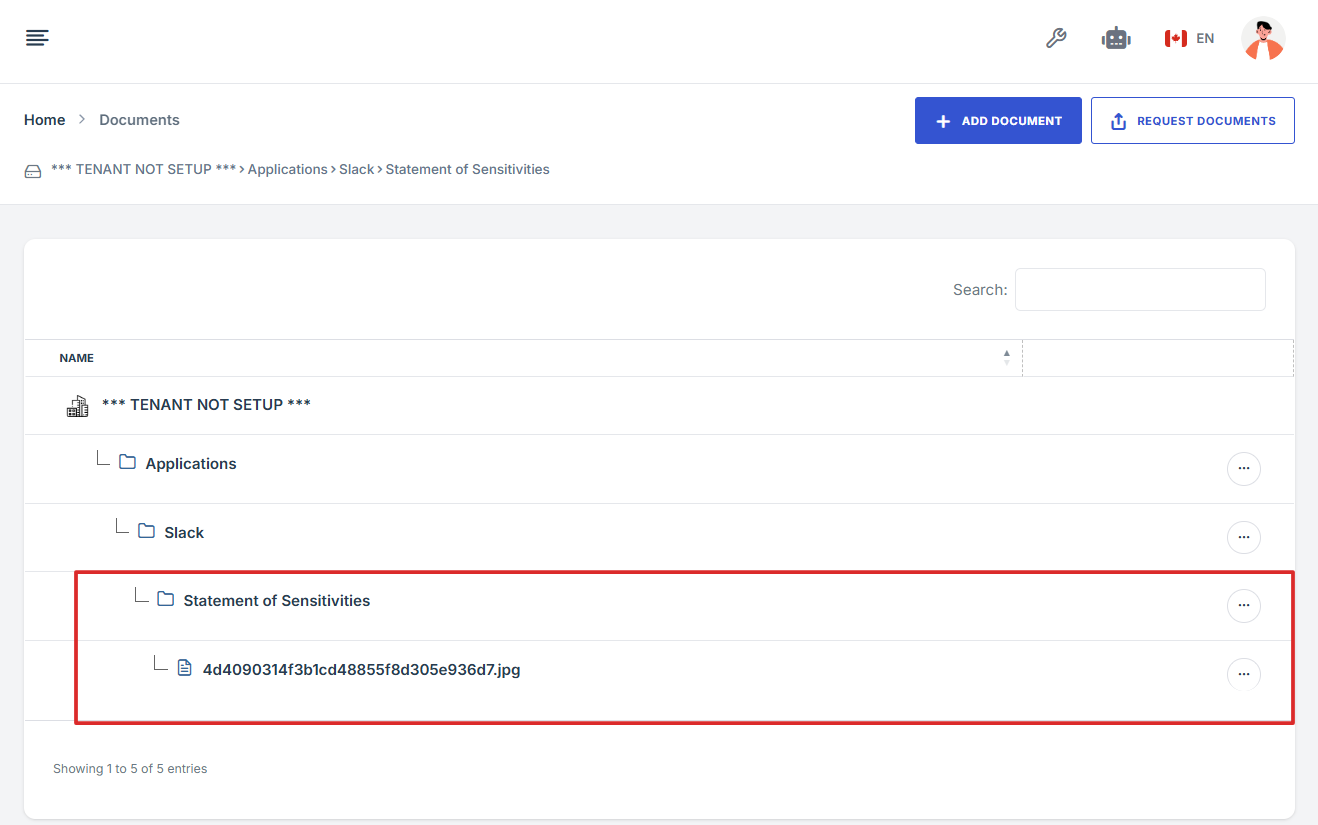
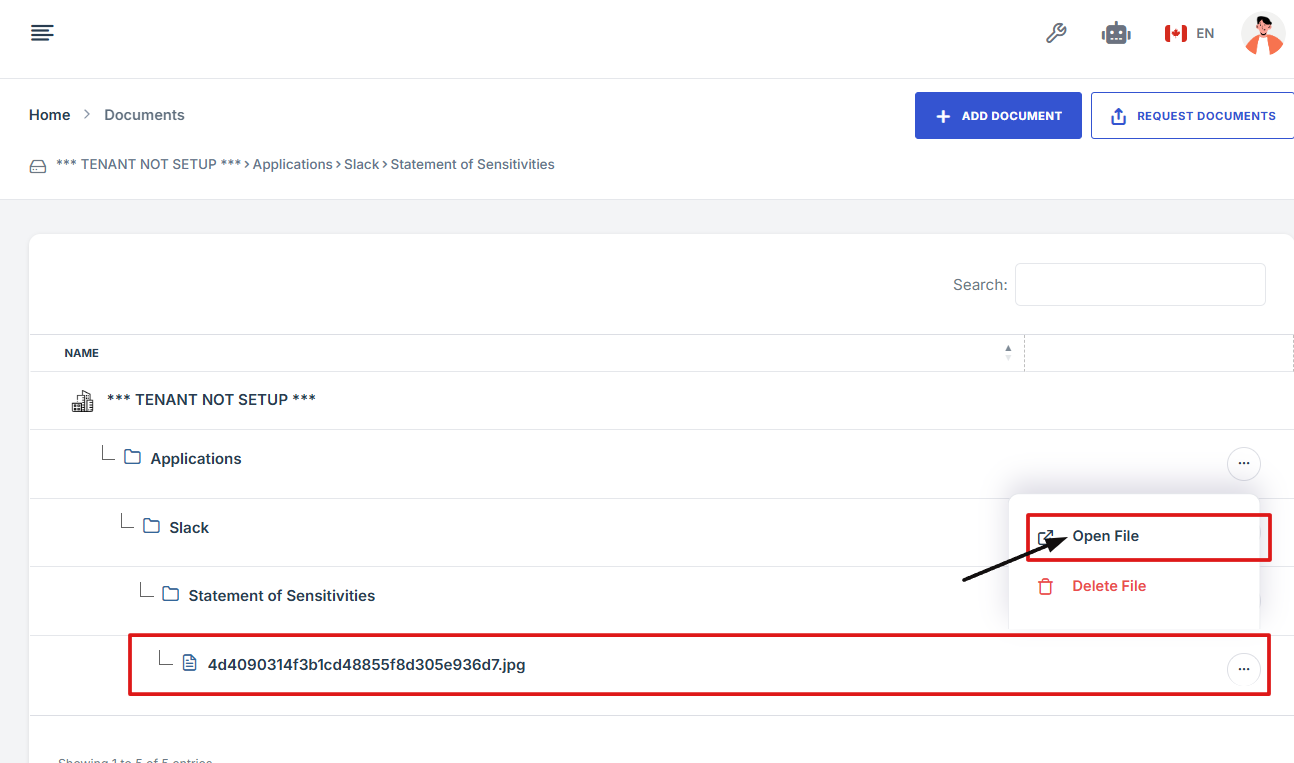
- On the Document page, open a folder.
- Inside the folder, find the file you want to open and click the three dots on the right side of the file.
- From the menu that appears, select "Open file" to view the document.
1. Navigate to your organization’s Iron Fort Compliance login page
For example: https://compliance-demo.ironfortdemos.com/en/login/?next=/en
2. Log in to Your Account
Enter your email and password to log in.
3. Check your email for the One-Time Password (OTP) sent on your email and enter the OTP to proceed.
4. Enter the OTP to verify your identity and click “validate.”
5. Once logged in, a welcome prompt will appear displaying
-
Tenant Key Information: Verifying your system access
-
User Email: Your registered email for auditing purposes
-
Last Login Details: To track your previous access
-
Iron Fort Support Email: For any login issues or concerns
NOTE: If you recognize the details and are authorized, click "OK" to continue. However, if you are not an authorized user, click "Logout" immediately to exit.
6. Move your cursor to the left side of the dashboard to display the menu.
7. Locate and click the Documents tab on the dashboard.
8. On the Document page, open a folder.
9. Inside the folder, find the file you want to open and click the three dots on the right side of the file.
10. From the menu that appears, select "Open file" to view the document.
-
How To: Add a Document in Documents
- Log in to Iron fort: How To: Login
- Locate and click the Documents tab on the dashboard.
- Navigate to the top right and click “Add Document.”
- After clicking, you will be directed to the Attached Documents page
- Choose How You Want to Add a Document.
- To Upload a File from Your Computer:
- To Upload an External Reference Link:
- Navigate to the bottom of the page to confirm that your uploaded document was successfully saved.
1. Log in to Iron fort: How To: Login
2. Locate and click the Documents tab on the dashboard.

3. Navigate to the top right and click “Add Document.”
4. After clicking, you will be directed to the Attached Documents page.
5. Choose How You Want to Add a Document.
-
Upload File: (from your computer)
-
External Reference Link: (link to an external document)
6. To Upload a File from Your Computer:
-
Click the Upload File tab.
-
Click Choose File and select the document you want to upload.
-
After selecting the file, click Save to upload and store the document.

7. To Upload an External Reference Link:
-
Click the External Reference Link tab.
-
Enter or paste the URL of the document.
-
Click Save to store the link in your documents list.

8. Navigate to the bottom of the page to confirm that your uploaded document was successfully saved.
1. Log in to Iron fort: How To: Login
2. Locate and click the Documents tab on the dashboard.
3. Inside the folder list, find and click on the file you want to view to open its overview details.
-
How To: Invite a New User When Requesting a Document
- Log in to Iron fort: How To: Login
- Locate and click the Documents tab on the dashboard.
- Navigate to the top right and click “Request Document.”
- After clicking, you will be directed to the Request Document Details page.
- Click Invite New User under the dropdown menu.
- You will be directed to the Team Invite page and fill out the following information
- After completing the form, click Save Changes to send the invite and finish the process.
- The user will received an email
1. Log in to Iron fort: How To: Login
2. Locate and click the Documents tab on the dashboard.
3. Navigate to the top right and click “Request Document.”

4. After clicking, you will be directed to the Request Document Details page.
5. Click Invite New User under the dropdown menu.
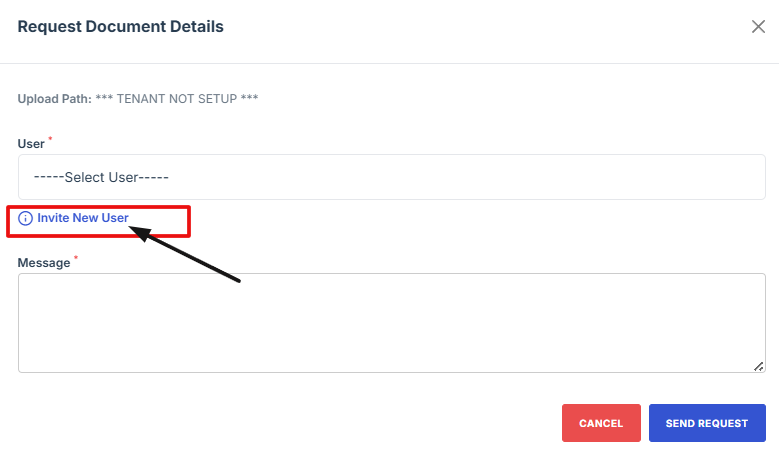
6. You will be directed to the Team Invite page and fill out the following information:
-
Access Role: Choose what level of permissions or access the user should have inside the platform.
-
Email Address: Enter the email address where the invitation will be sent.
-
First Name: Type the first name of the user you are inviting.
-
Last Name: Type the last name of the user you are inviting.
-
Notes (Optional): You can add extra information or instructions for the invited user.
-
Invitation Expiration Date: Set a date when the invitation link will expire if the user doesn’t accept it.

7. After completing the form, click Save Changes to send the invite and finish the process.
1. Click the link provided in the email.

2. You will be redirected to the document upload page. Click “Add Document” to attach and upload the required file.
1. Log in to Iron fort: How To: Login
2. Locate and click the Documents tab on the dashboard.
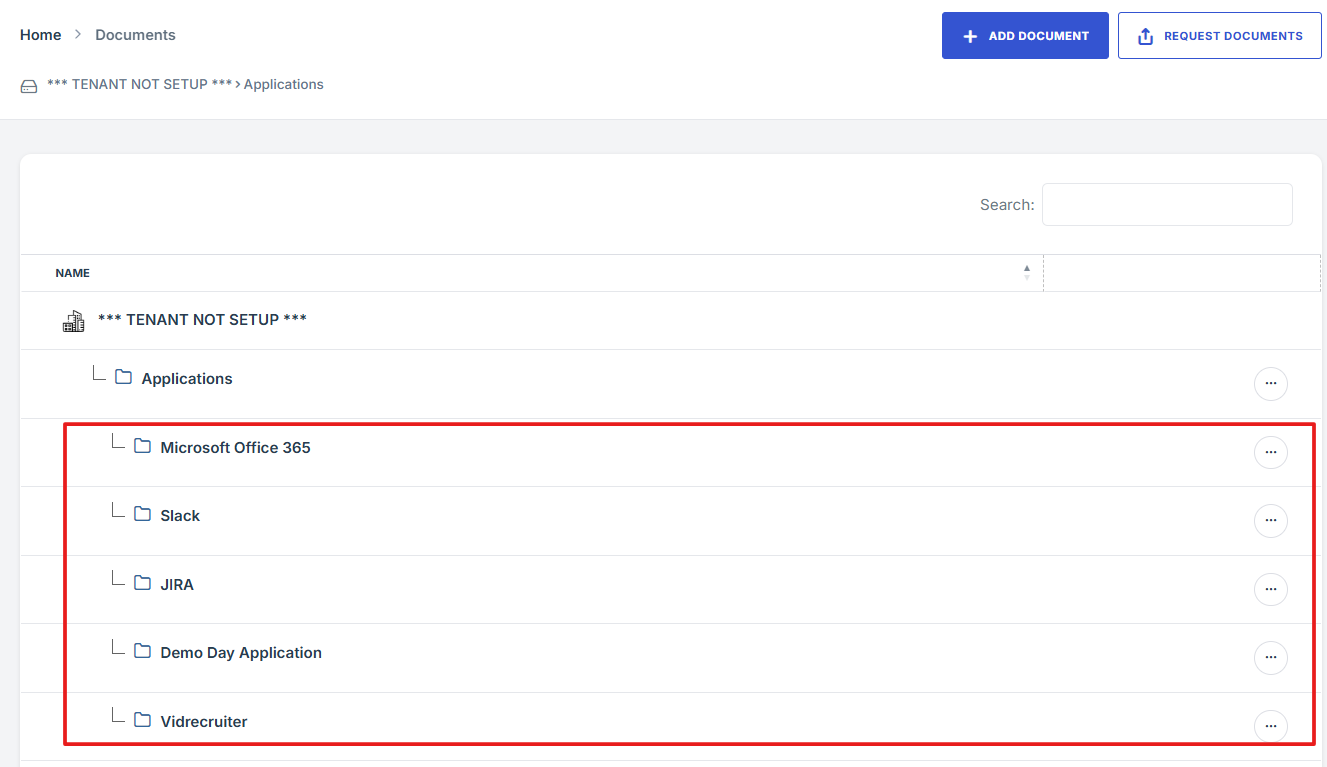
3. Click the three-dot menu (⋮) on the right side of that folder.
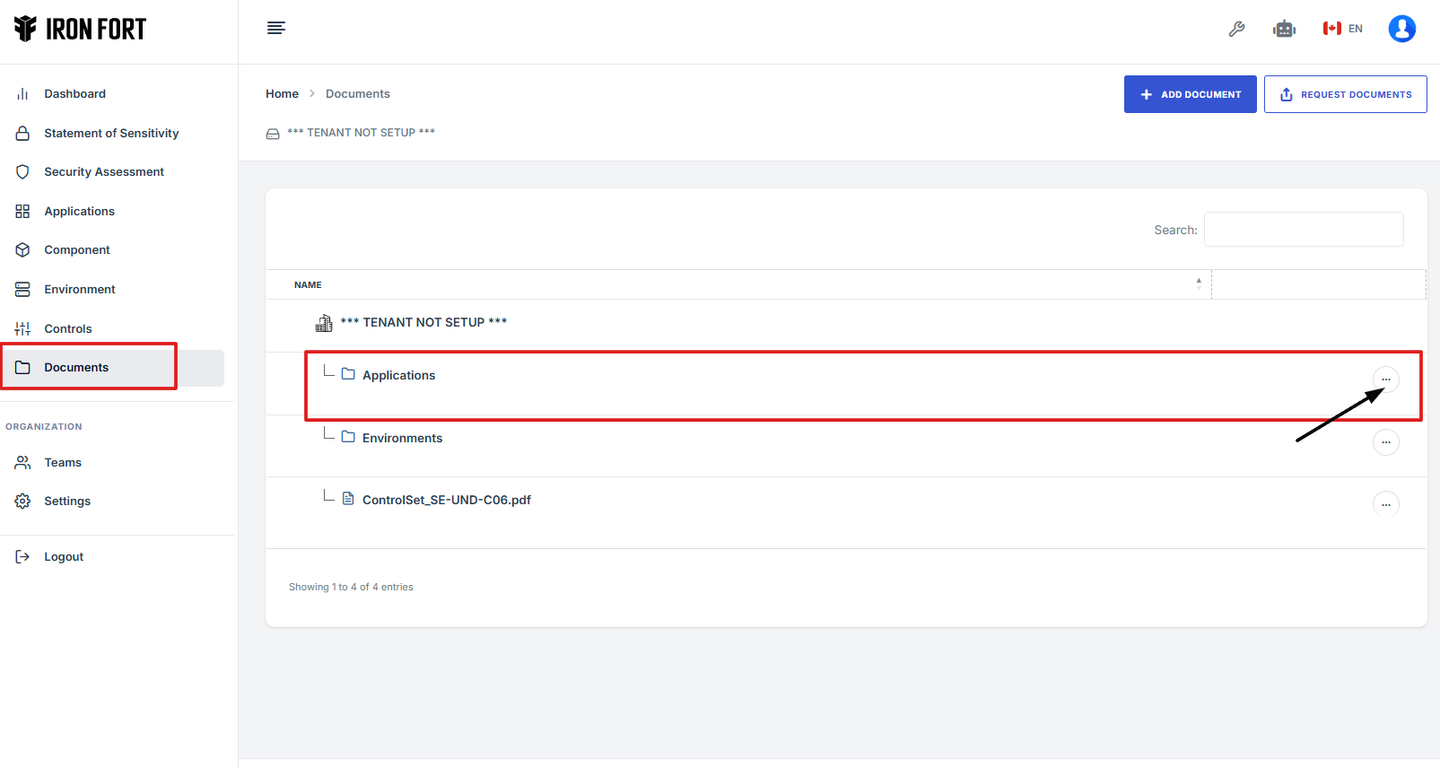
4. From the menu options, click “Open Folder” to view the documents inside.
1. Log in to Iron fort: How To: Login
2. Locate and click the Documents tab on the dashboard.

3. Click the three-dot menu (⋮) on the right side of that folder.

4. From the menu options, click “Request Documents” to view the documents inside.

-
How To: Drag Files on the Document page modal
- Log in to Iron fort: How To: Login
- Locate and click the Documents tab on the dashboard.
- Navigate to the top right and click “Add Document.”
- After clicking, you will be directed to the Attached Documents page.
- Drag the file/document that you want to upload under the attached document modal.
- Click upload to save changes.
1. Log in to Iron fort: How To: Login
2. Locate and click the Documents tab on the dashboard.

3. Navigate to the top right and click “Add Document.”

4. After clicking, you will be directed to the Attached Documents page.
5. Drag the file/document that you want to upload under the attached document modal.
