
How To Guidelines in Security Assessment
This page offers detailed guidelines on conducting security assessments, highlighting their significance in ensuring compliance, mitigating risks, and streamlining audit processes.
Security Assessment is a structured evaluation of an organization's security controls, policies, and infrastructure to ensure compliance with ITSG-33, ISO standards, PCI-DSS, and other regulatory frameworks. It helps businesses track compliance requirements, manage documentation, and stay audit-ready by organizing essential reports and security policies in one place. The platform also identifies and monitors security vulnerabilities, providing actionable insights to mitigate risks effectively. By streamlining the audit process, Iron Fort ensures that leadership and management have all necessary documentation readily available for third-party auditors. This simplifies compliance tracking, reduces cybersecurity risks, and helps organizations avoid penalties or reputational damage due to non-compliance.

Evidence refers to the supporting documentation, justification, or verification provided to demonstrate compliance with a specific security control. It serves as proof that the control is effectively implemented and adhered to within the organization's security framework.
There are two types of evidence artefacts that can be provided:
-
Attached Evident Artefact – This refers to a file that is directly uploaded to the system as proof of compliance. It can include documents, screenshots, reports, configuration files, audit logs, or any other relevant digital evidence. The "Choose File" button allows users to browse and attach the required document.
-
External Evident Artefact – This is a reference to evidence stored outside the system, such as a URL link to an external repository, cloud storage, or a third-party compliance system. Instead of uploading a file, users can enter the location or source of the evidence in the provided text box.

-
Attached Evidence:
- refers to files that are directly uploaded into the system, such as documents, images, reports, or logs that serve as proof of compliance or validation. These files are stored within the platform, ensuring easy access and retrieval when needed.
- Example: a user may upload a PDF security audit report or a configuration file as attached evidence.

-
External evidence:
- refers to references or links to evidence stored outside the system, such as URLs, cloud storage links, or third-party compliance reports. Instead of uploading a file directly, users provide a link to an external source where the evidence is stored.
- Example: Providing a Google Drive link to a security policy document or referencing an external compliance portal.

Attached Evidence is stored inside the system, while External Evidence is stored outside but referenced within the system.
-
How To: Begin an Assessment
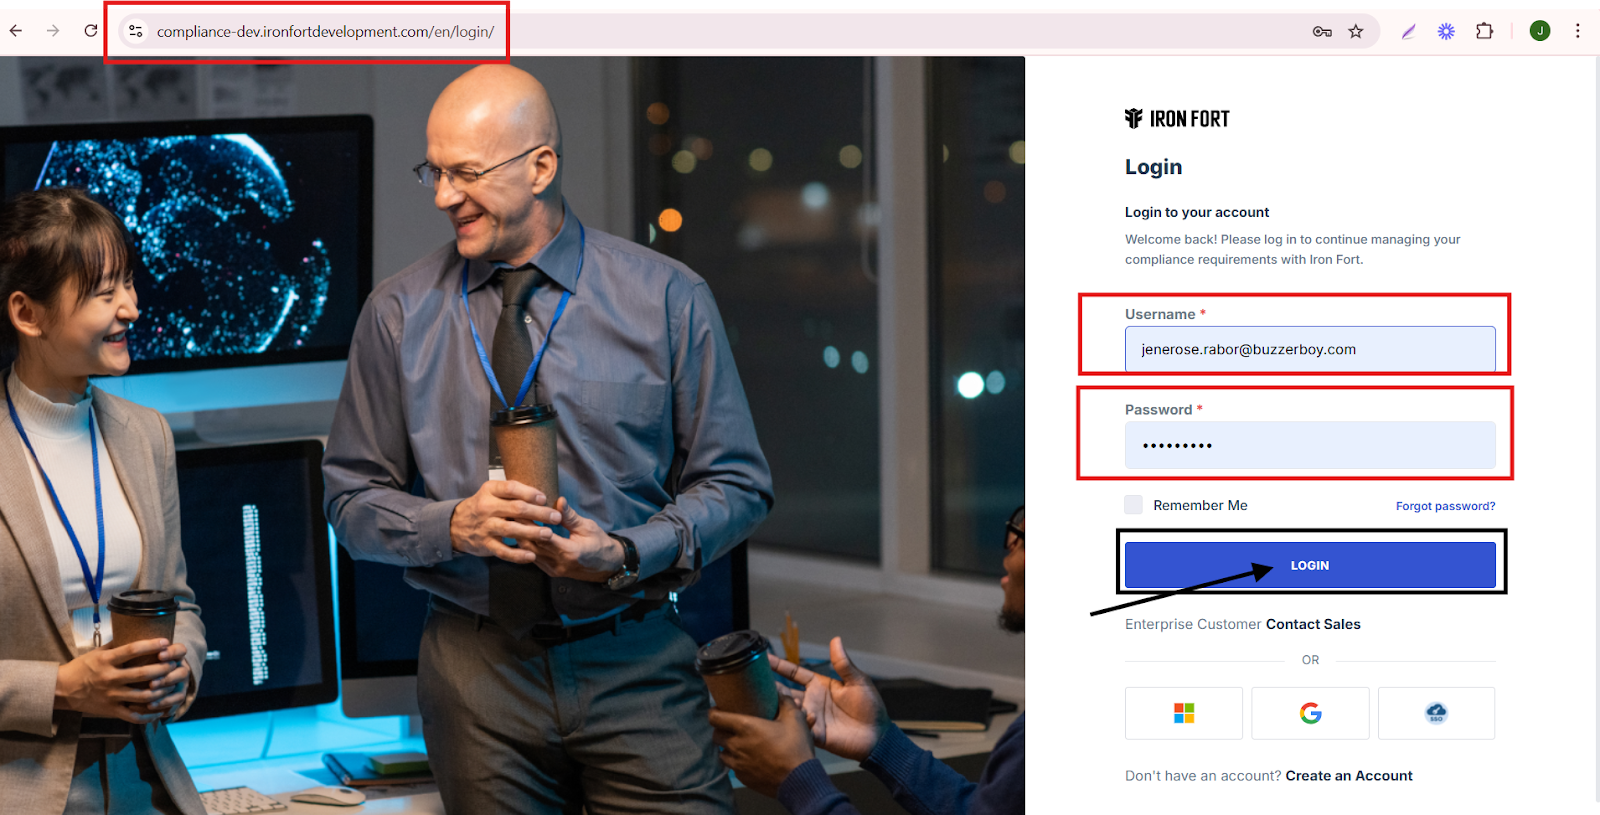
- Navigate to your organization’s Iron Fort Compliance login page
- Log in to Your Account
- Check your email for the One-Time Password (OTP) sent on your email and enter the OTP to proceed
- Enter the OTP to verify your identity and click “validate.”
- Once logged in, a welcome prompt will appear displaying
- Move your cursor to the left side of the dashboard to display the menu
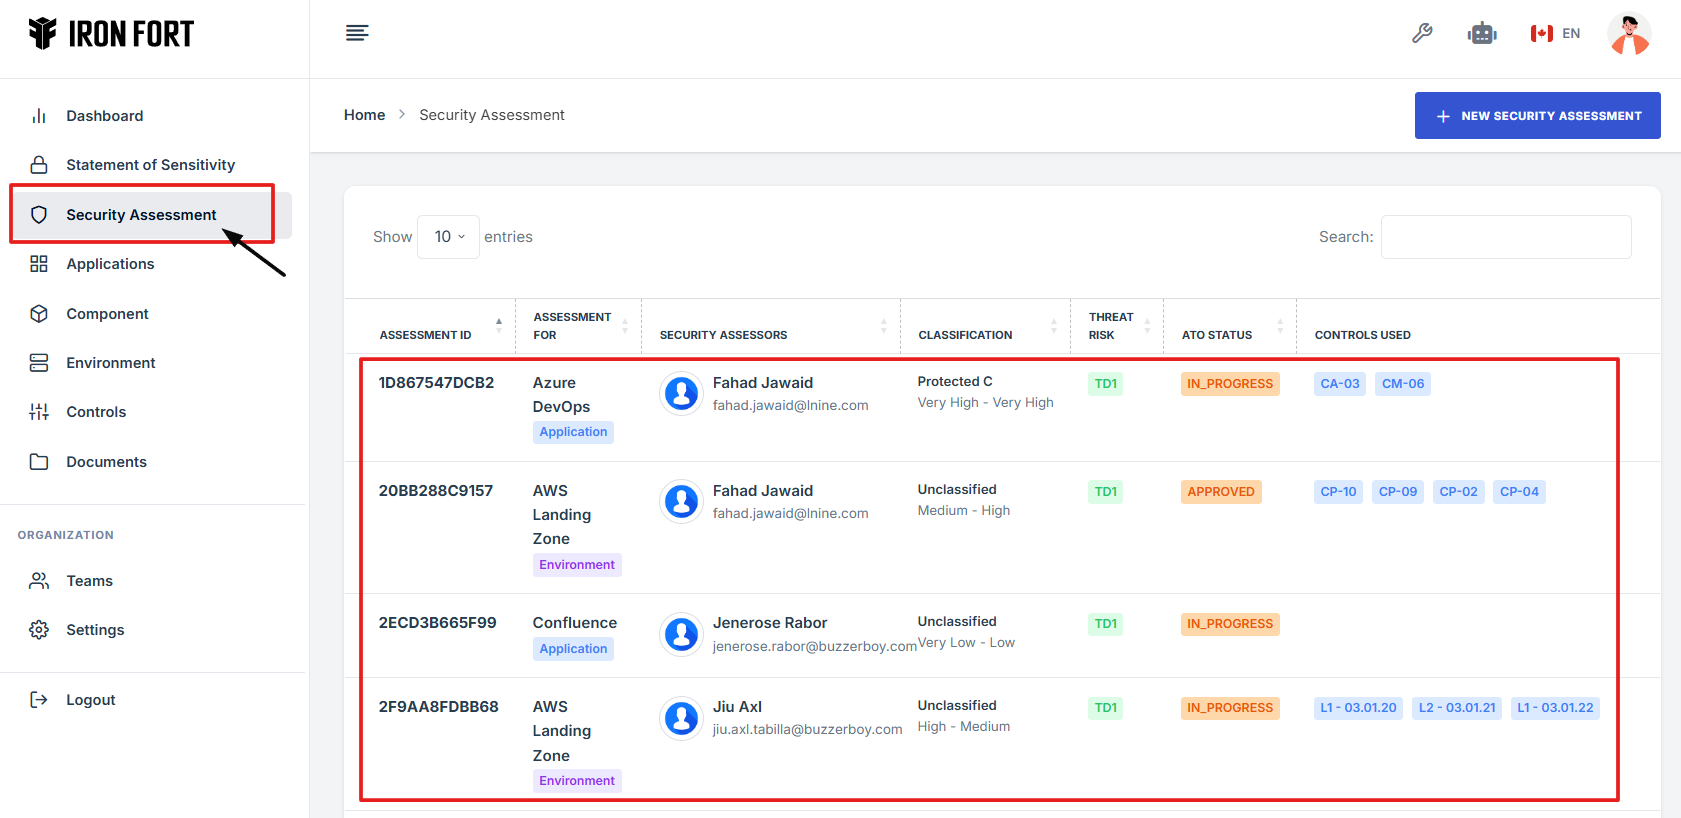
- Locate and click the Security Assessment tab on the dashboard.
- Find and click the existing assessment you want to start.
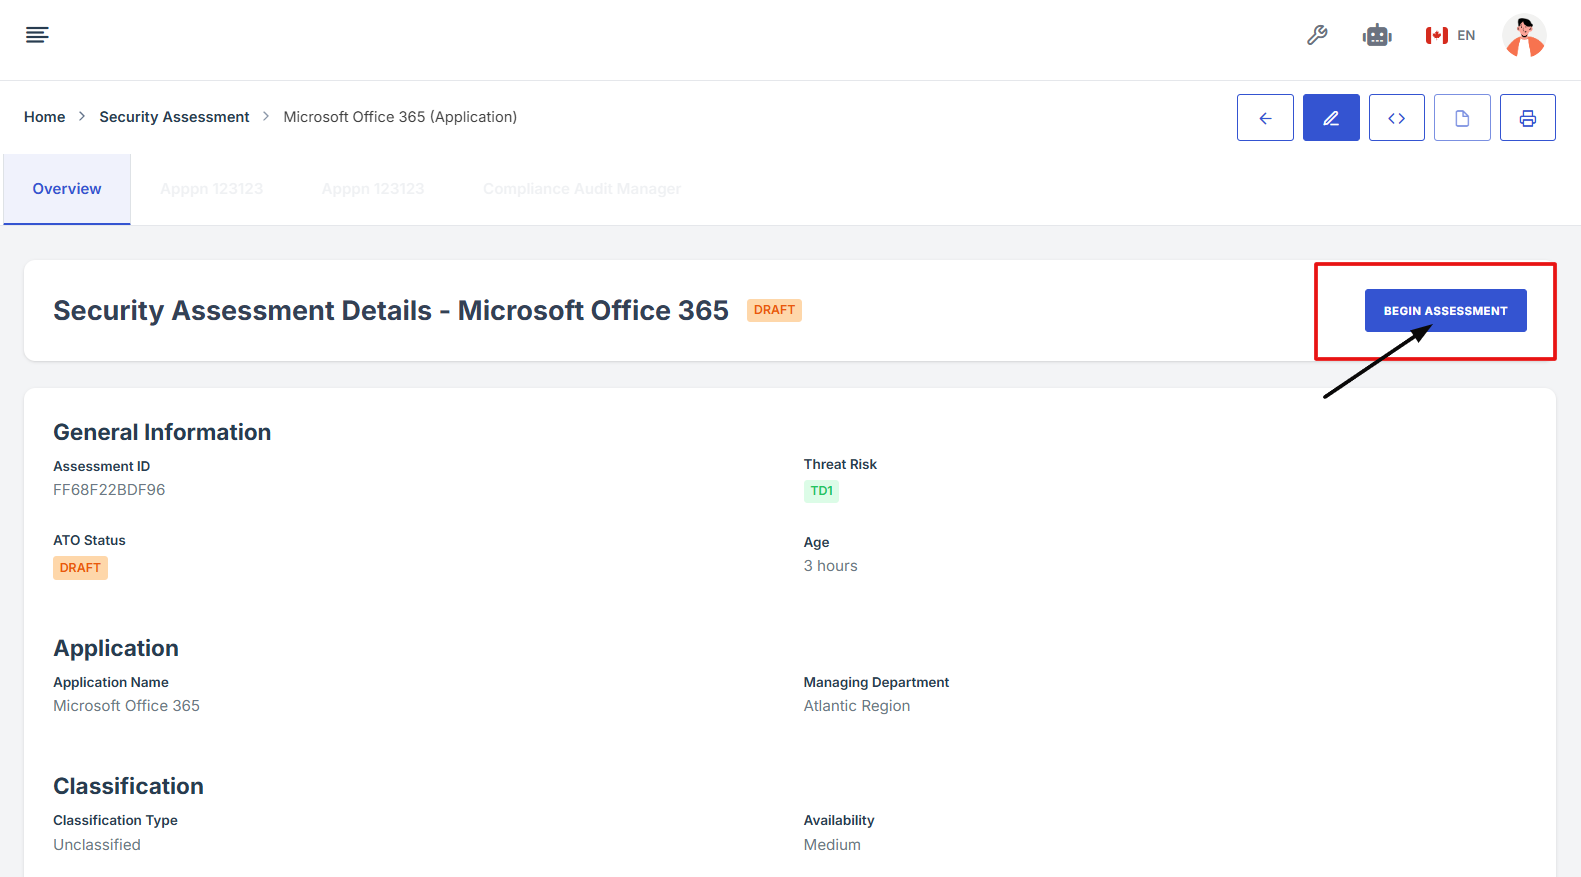
- Click on the Assessment ID to go to the overview page
- On the overview page, click Begin Assessment to get started
1. Navigate to your organization’s Iron Fort Compliance login page
For example: https://compliance-demo.ironfortdemos.com/en/login/?next=/en
2. Log in to Your Account
Enter your email and password to log in.
3. Check your email for the One-Time Password (OTP) sent on your email and enter the OTP to proceed.
4. Enter the OTP to verify your identity and click “validate.”

5. Once logged in, a welcome prompt will appear displaying
-
Tenant Key Information: Verifying your system access
-
User Email: Your registered email for auditing purposes
-
Last Login Details: To track your previous access
-
Iron Fort Support Email: For any login issues or concerns
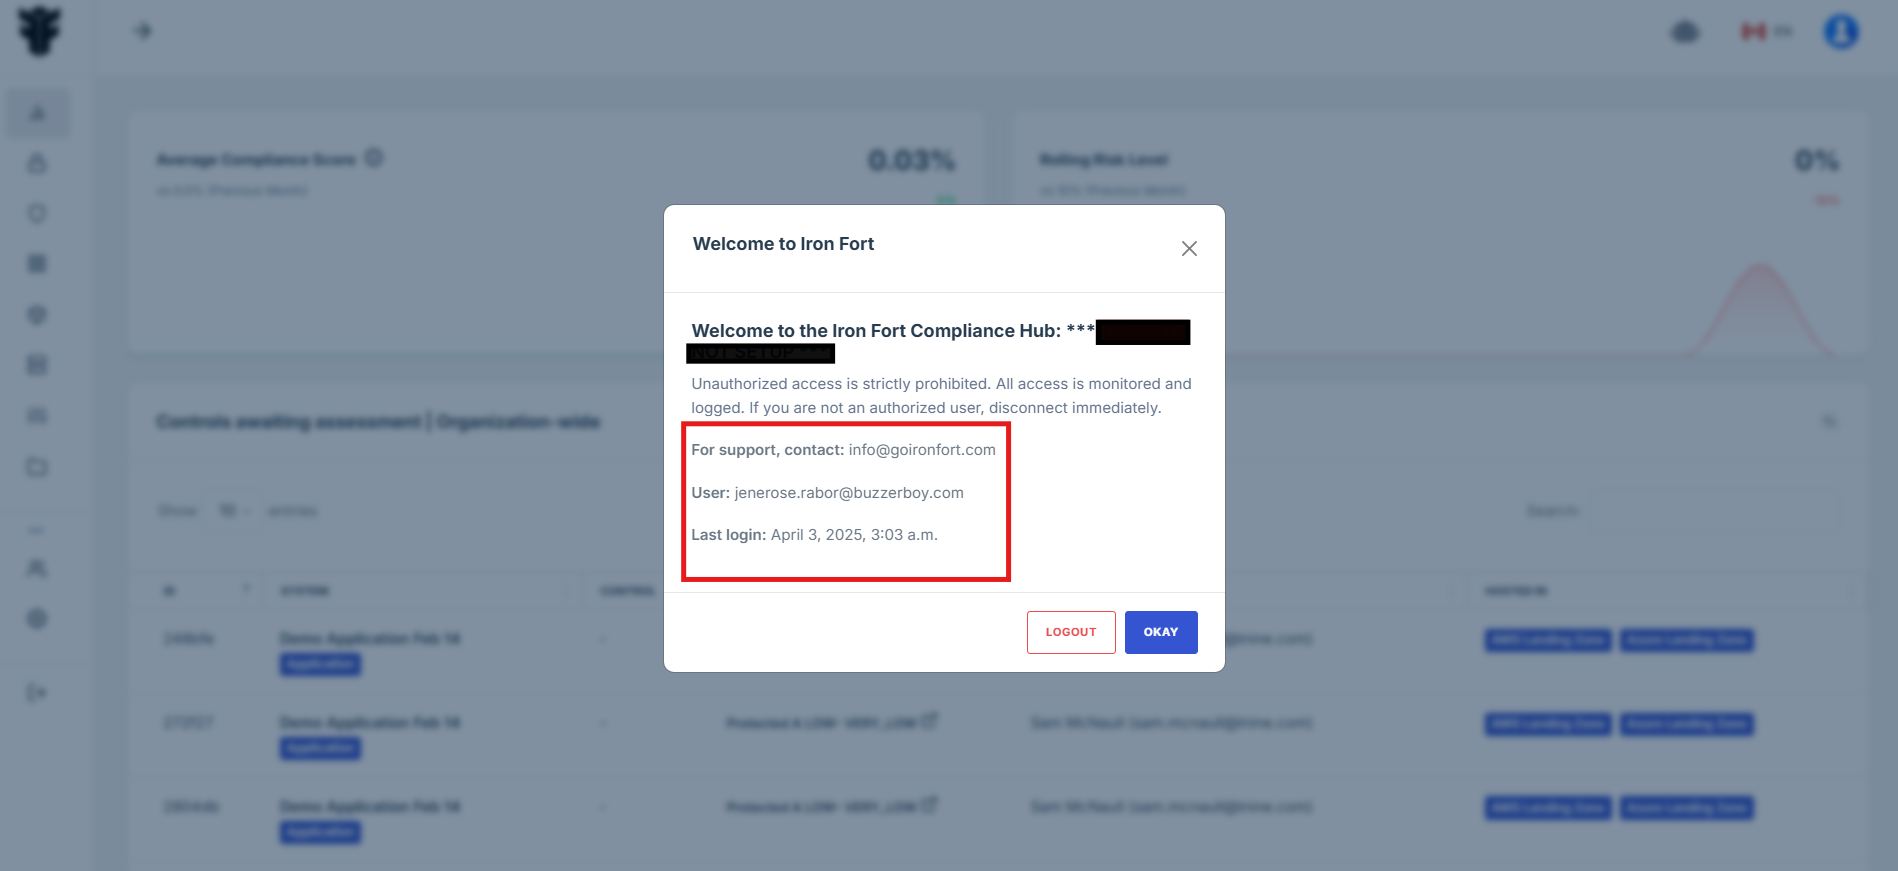
NOTE: If you recognize the details and are authorized, click "OK" to continue. However, if you are not an authorized user, click "Logout" immediately to exit.
6. Move your cursor to the left side of the dashboard to display the menu.
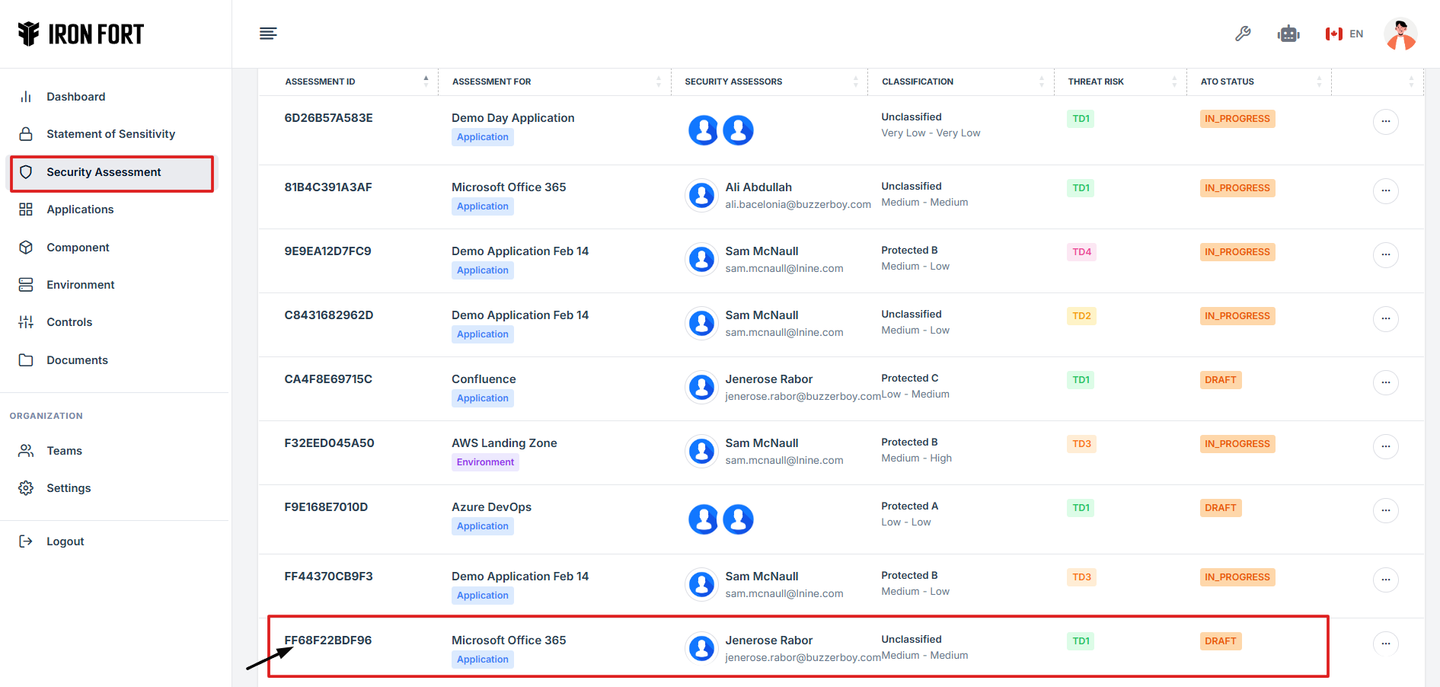
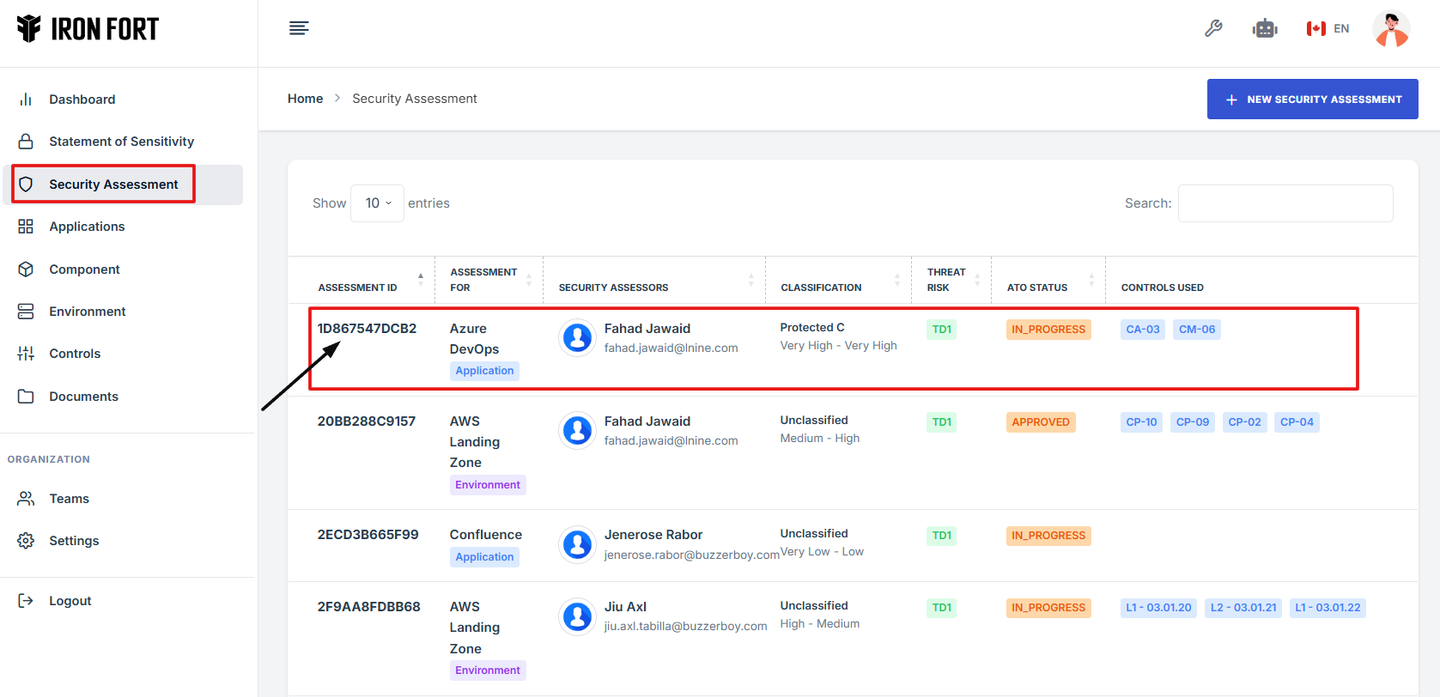
7. Locate and click the Security Assessment tab on the dashboard.
8. Find and click the existing assessment you want to start.

9. Click on the Assessment ID to go to the overview page.
10. On the overview page, click Begin Assessment to get started.
-
How To: Plan a security assessment
- Navigate to your organization’s Iron Fort Compliance login page
- Log in to Your Account
- Check your email for the One-Time Password (OTP) sent on your email and enter the OTP to proceed
- Once logged in, a welcome prompt will appear displaying
- Move your cursor to the left side of the dashboard to display the menu.
- Locate and click the Security Assessment tab on the dashboard.
- Click Add Security Assessment to begin setting up a new assessment.
- Choose the Assessment Type
- Provide essential information for the assessment
- Click “Submit Request” – Save and request the security assessment for review and approval.
1. Navigate to your organization’s Iron Fort Compliance login page
For example: https://compliance-demo.ironfortdemos.com/en/login/?next=/en
2. Log in to Your Account
Enter your email and password to log in.
3. Check your email for the One-Time Password (OTP) sent on your email and enter the OTP to proceed.
4. Once logged in, a welcome prompt will appear displaying:
-
Tenant Key Information - Verifying your system access
-
User Email - Your registered email for auditing purposes
-
Last Login Details - To track your previous access
-
Iron Fort Support Email - For any login issues or concerns
NOTE: If you recognize the details and are authorized, click "OK" to continue. However, if you are not an authorized user, click "Logout" immediately to exit.
5. Move your cursor to the left side of the dashboard to display the menu.
6. Locate and click the Security Assessment tab on the dashboard.
7. Click Add Security Assessment to begin setting up a new assessment.
8. Choose the Assessment Type
Select whether the assessment is for an Application or an Environment.
- Application - specific software or system
- Environment - network, infrastructure, or cloud setup

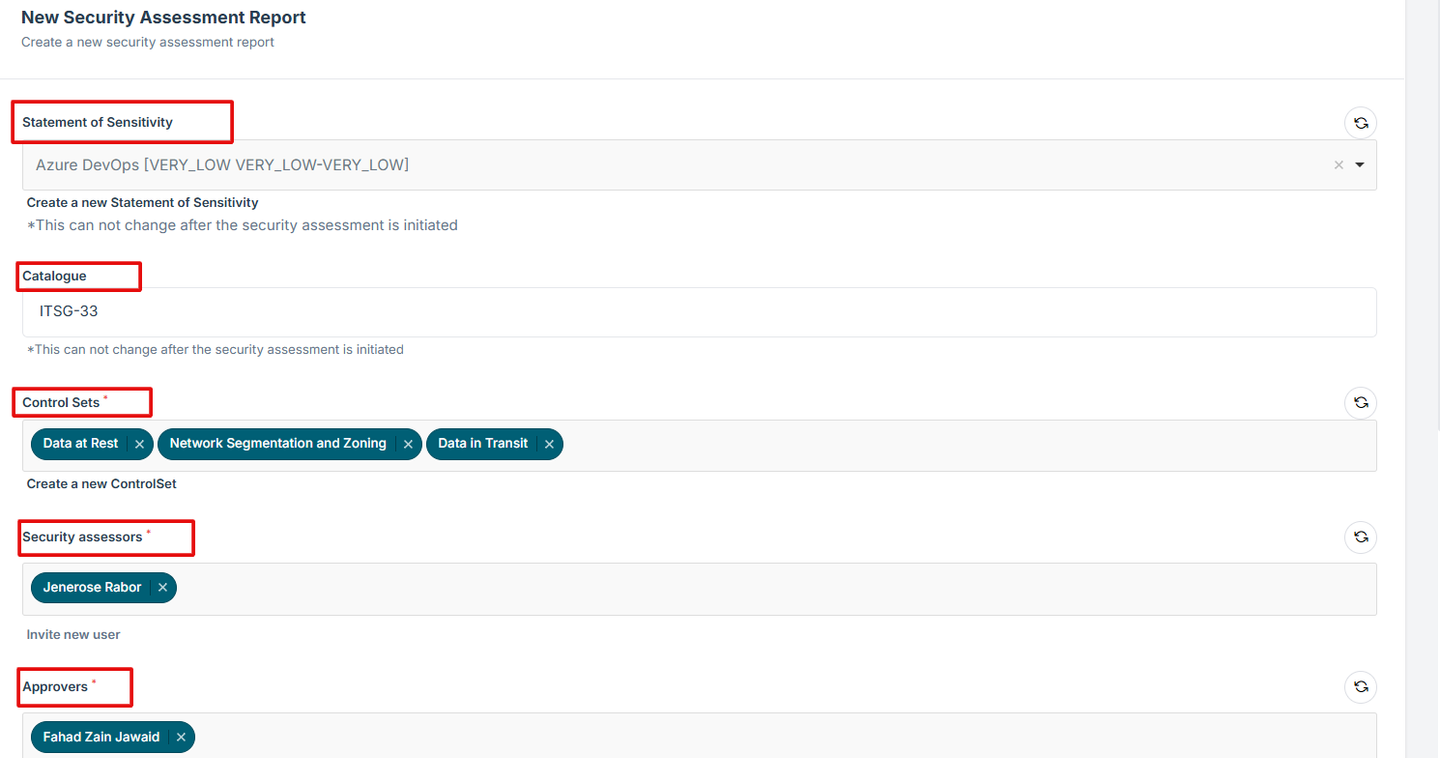
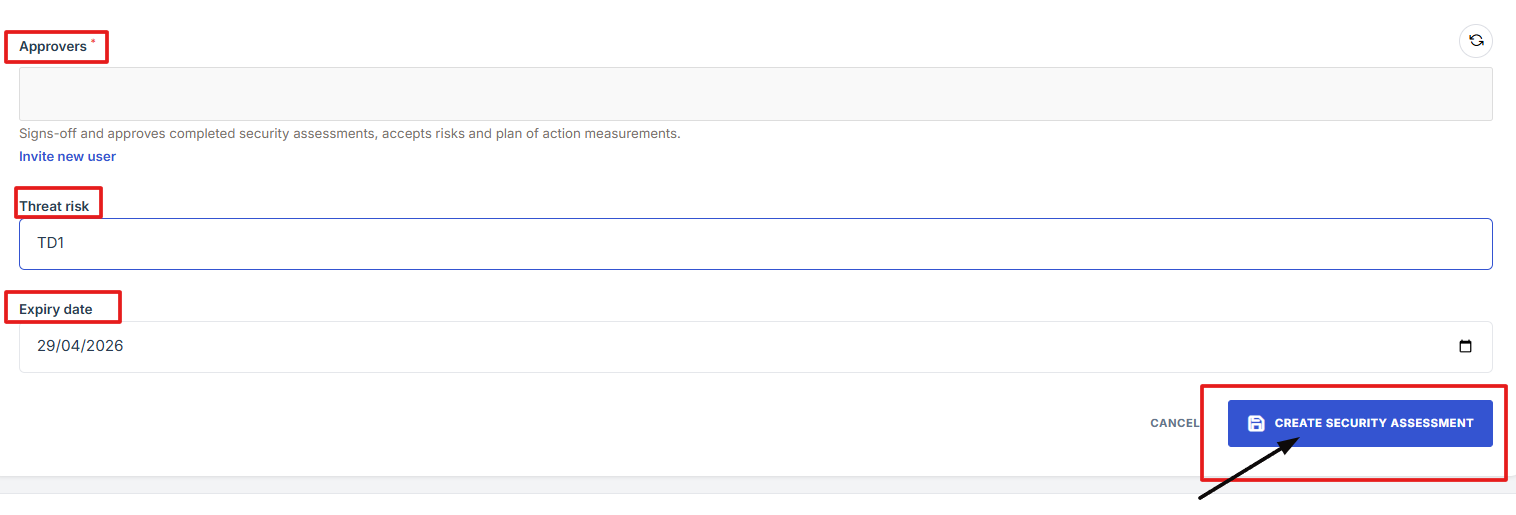
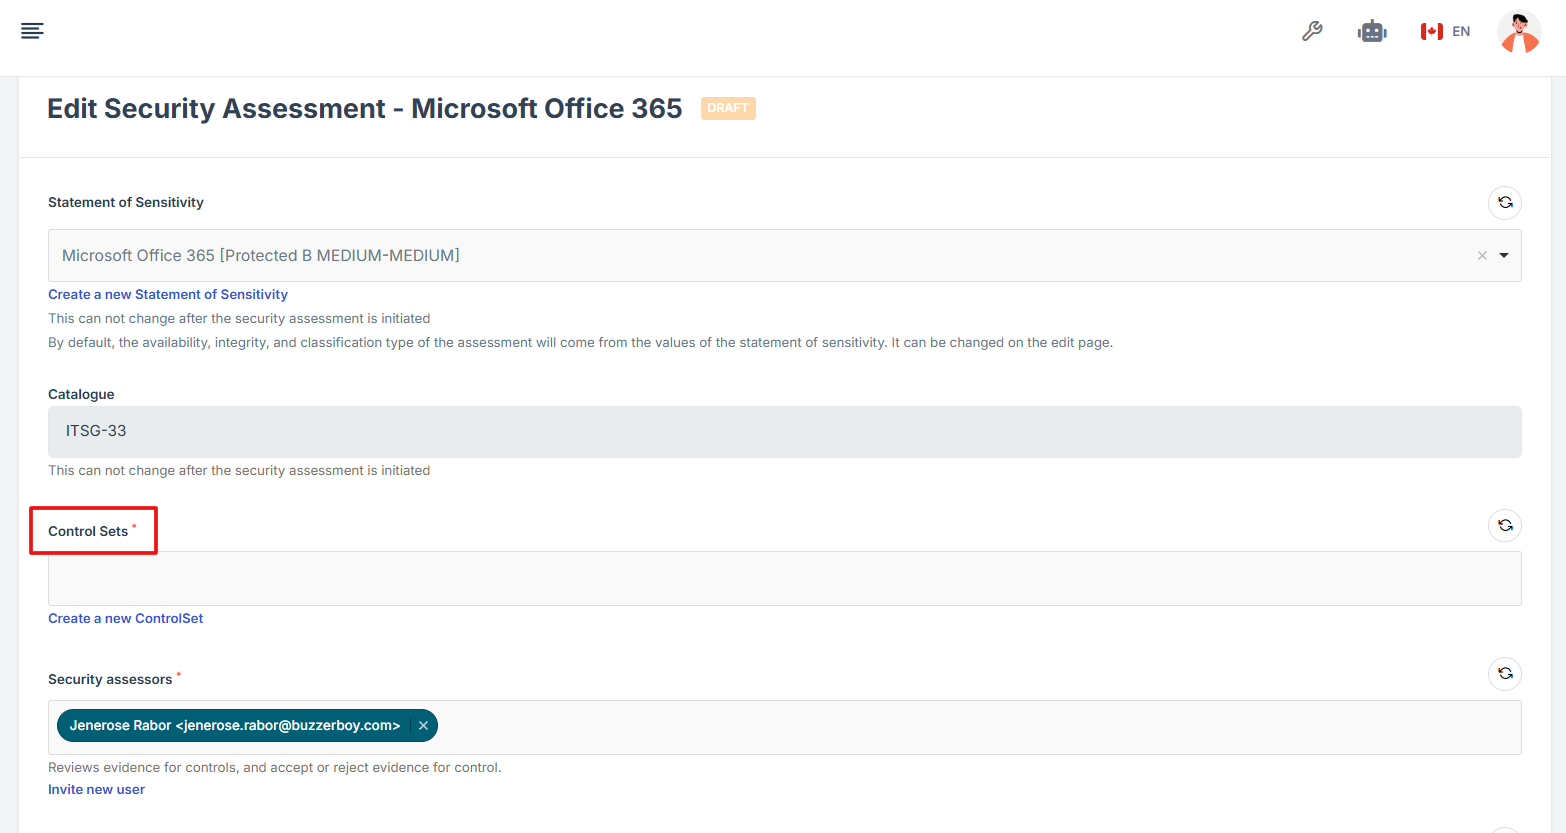
9. Provide essential information for the assessment:
Statement of Sensitivity - Define the data sensitivity level.
Catalogue - Select applicable security frameworks.
Control Sets - Choose security controls for compliance.
Security Assessor - Assign a responsible security professional.
Approvers - List individuals who will approve the assessment.
Threat Risk - Identify potential risks and vulnerabilities.
Classification Type - Specify classification level: protect A, Protect B, Top Secret, etc.
Integrity and Availability - Assess data protection and availability needs.
10. Click “Submit Request” – Save and request the security assessment for review and approval.
-
How To: Attach an evidence for a control in a security assessment
- Navigate to your organization’s Iron Fort Compliance login page
- Log in to Your Account
- Check your email for the One-Time Password (OTP) sent on your email and enter the OTP to proceed
- Enter the OTP to verify your identity and click “validate.”
- Once logged in, a welcome prompt will appear displaying
- Move your cursor to the left side of the dashboard to display the menu
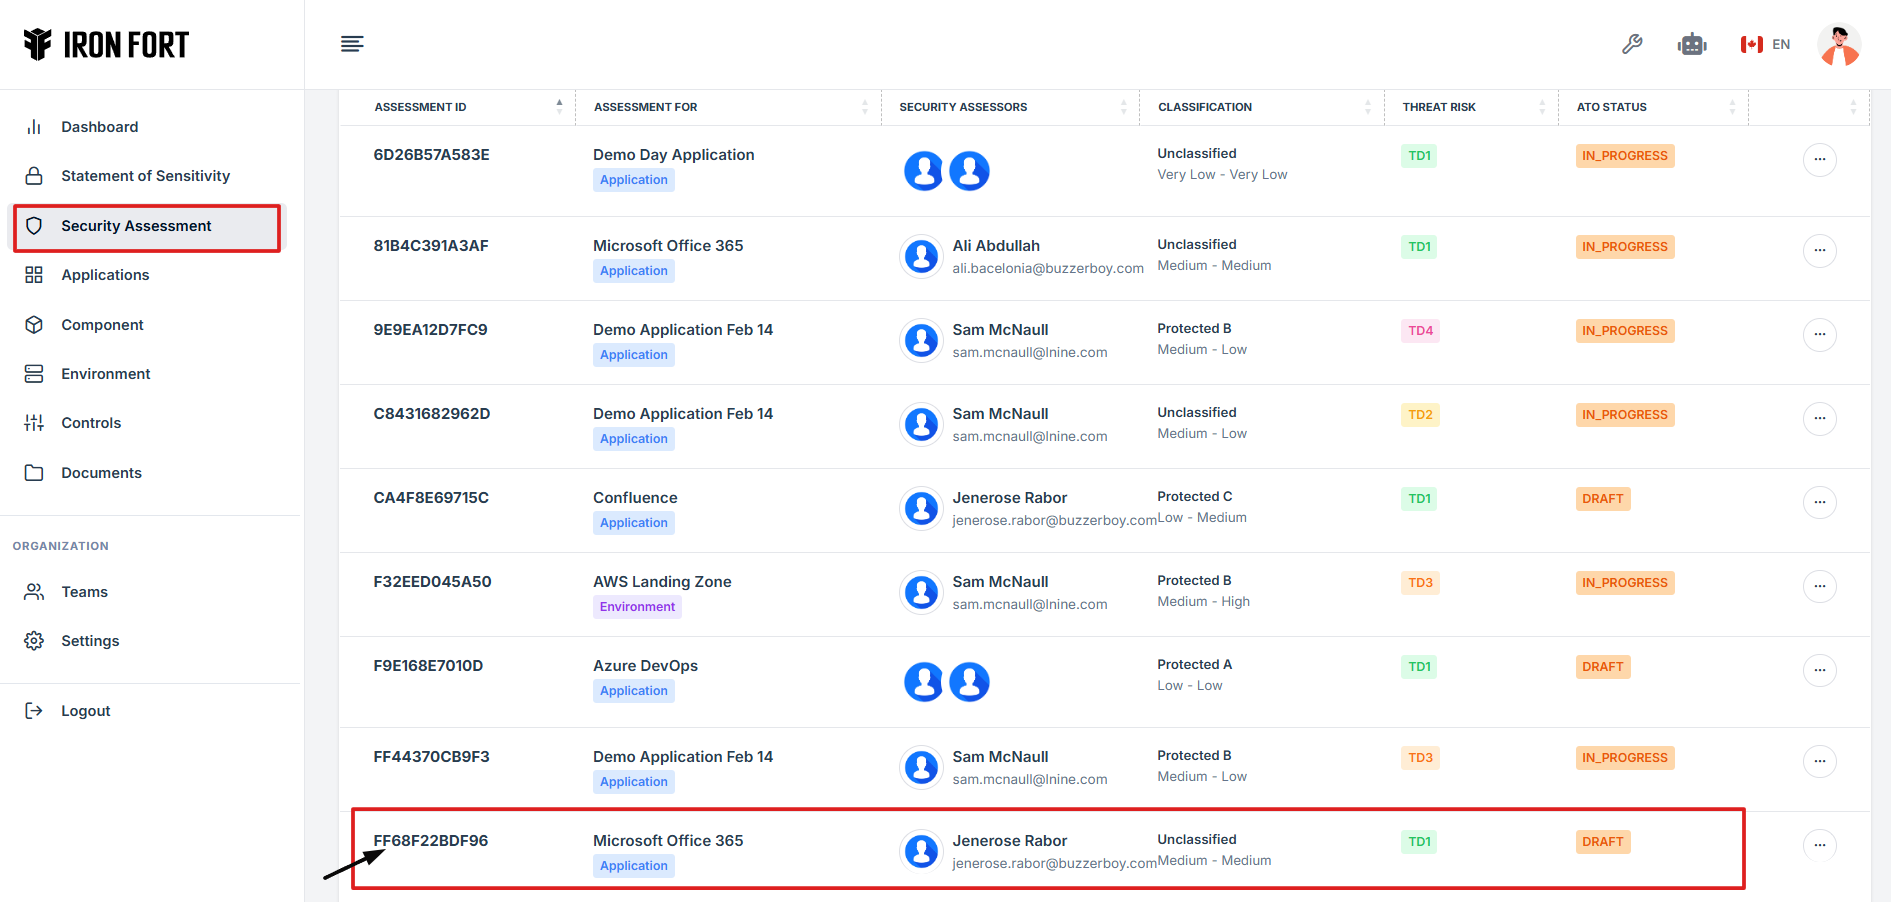
- Locate and click the Security Assessment tab on the dashboard.
- Find and click the existing assessment you want to attach an evidence.
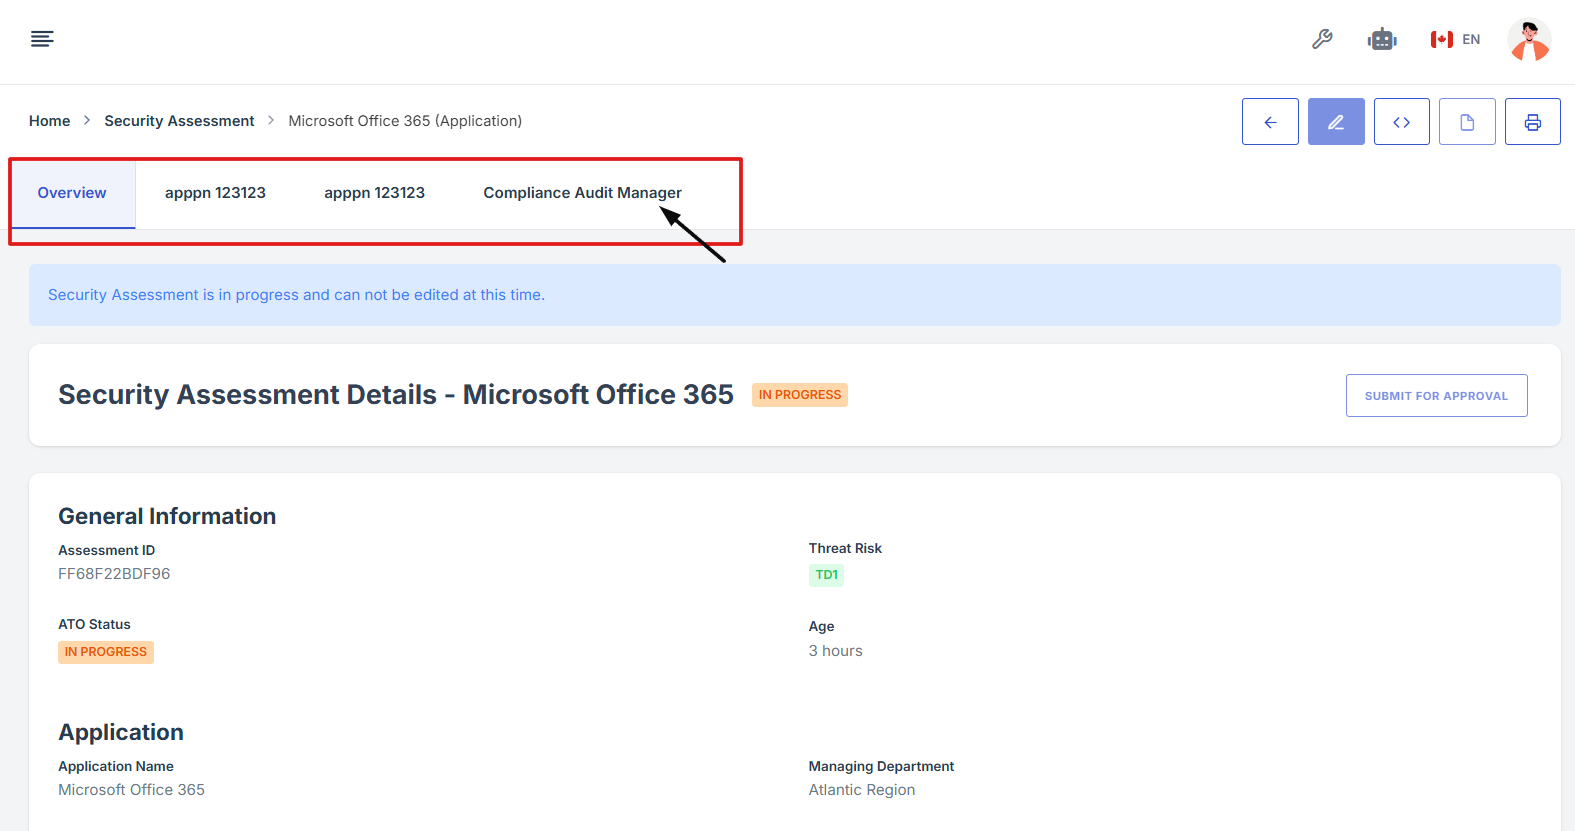
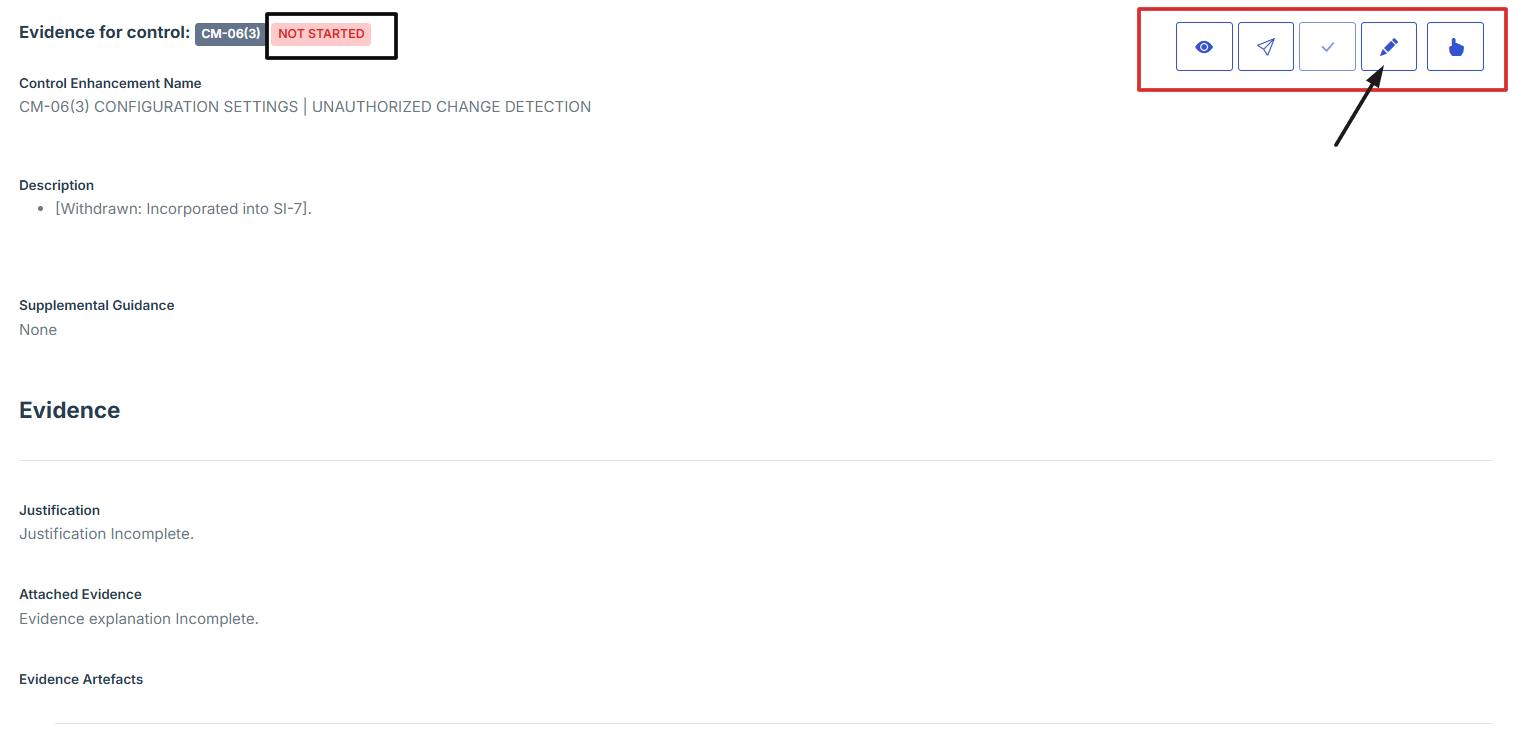
- On the overview page, click the control you want to attach evidence to.
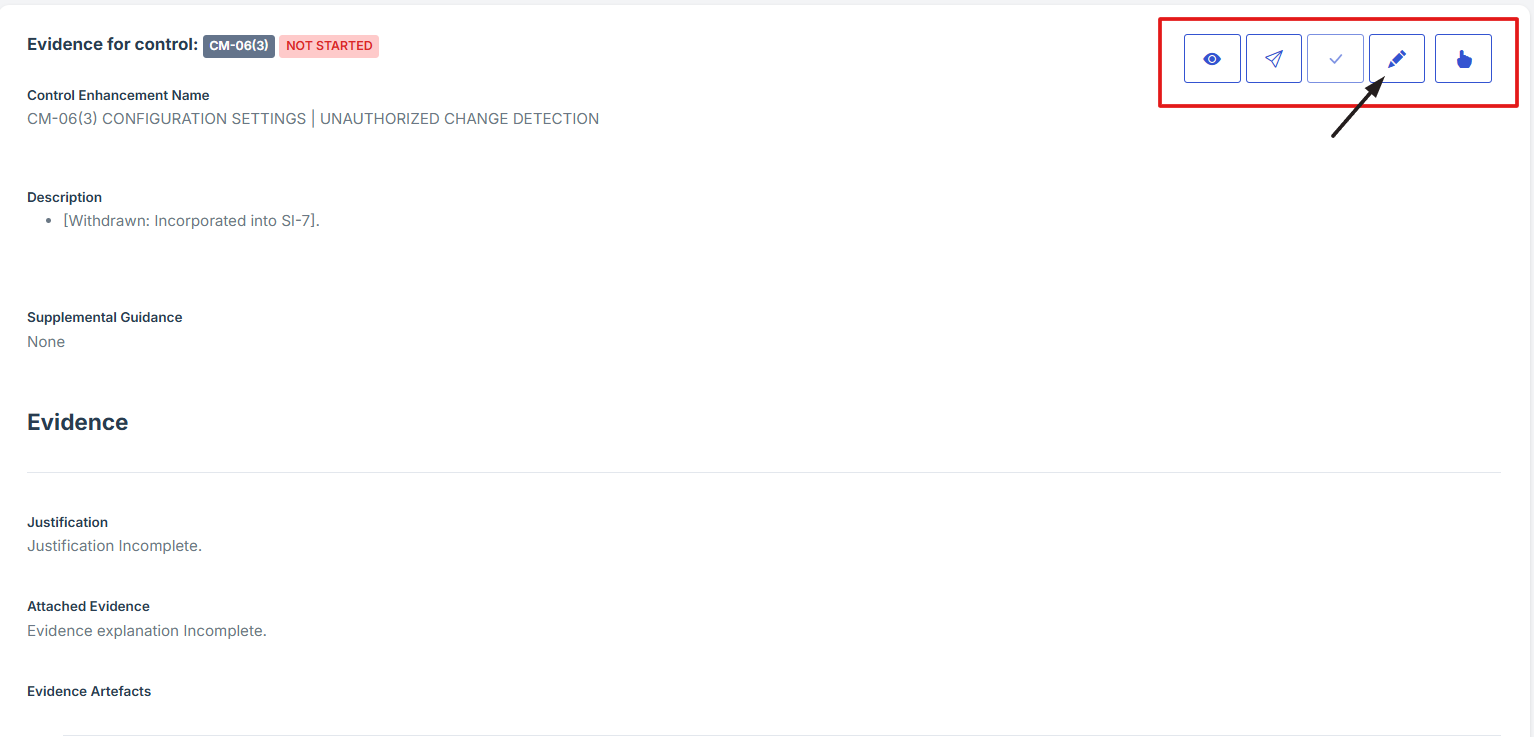
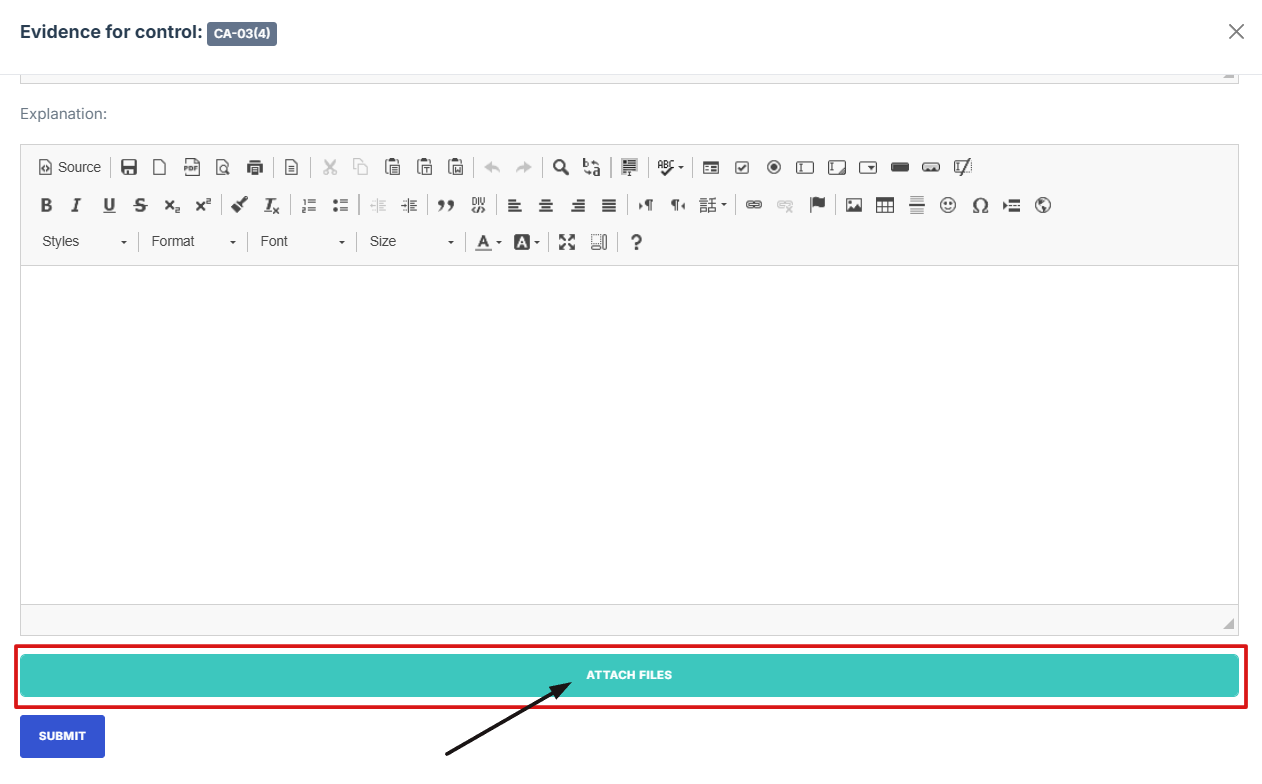
- Scroll down the page until you locate the "Evidence for Control" section.
- Click on the Manage Evidence button (pencil/edit icon) from the three available options to enter the evidence editing page.
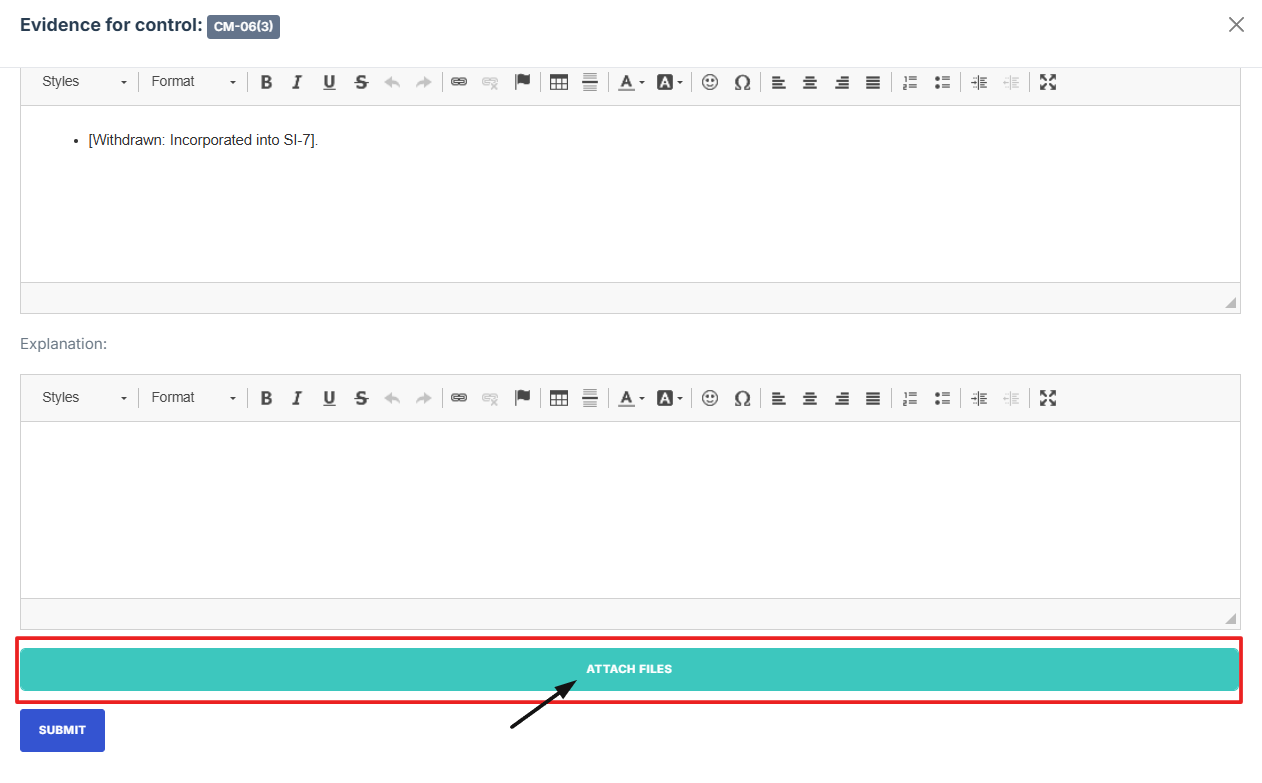
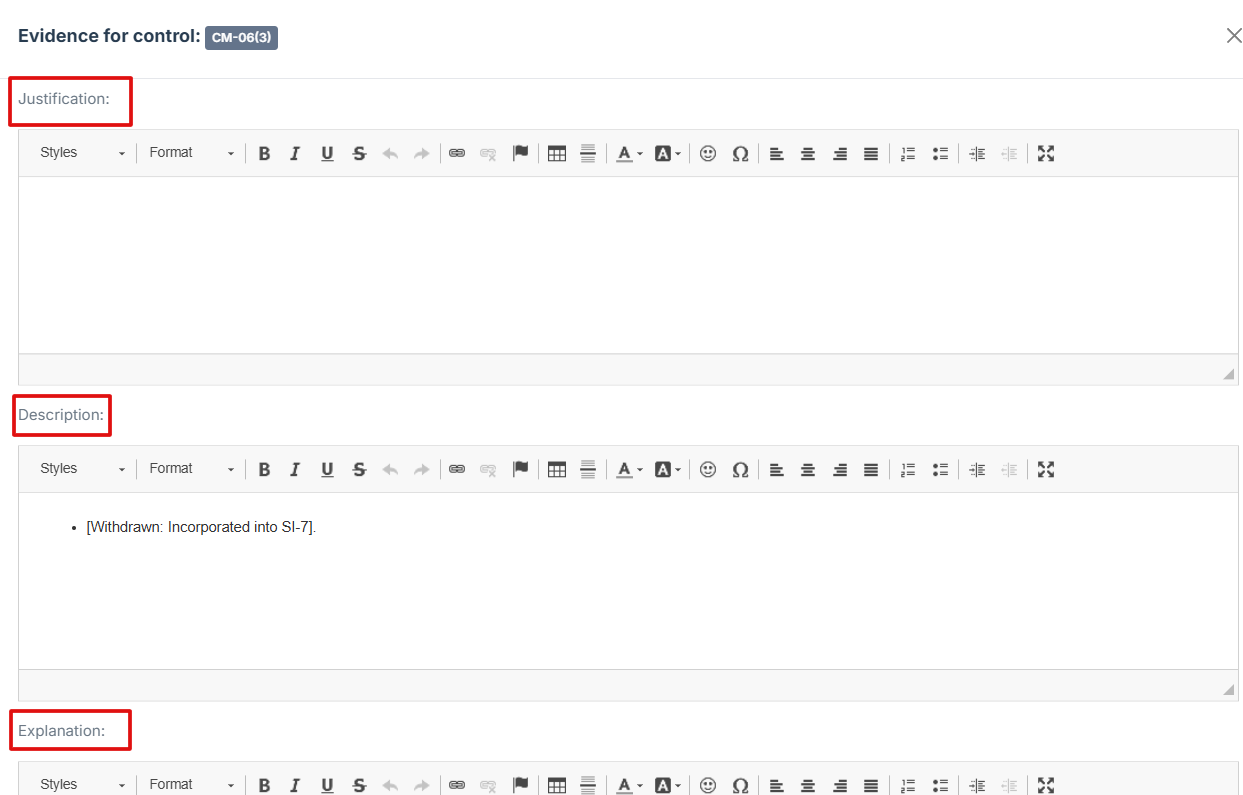
- Provide Detailed Information
- Click Attached file button to upload a document, image, or other relevant evidence.
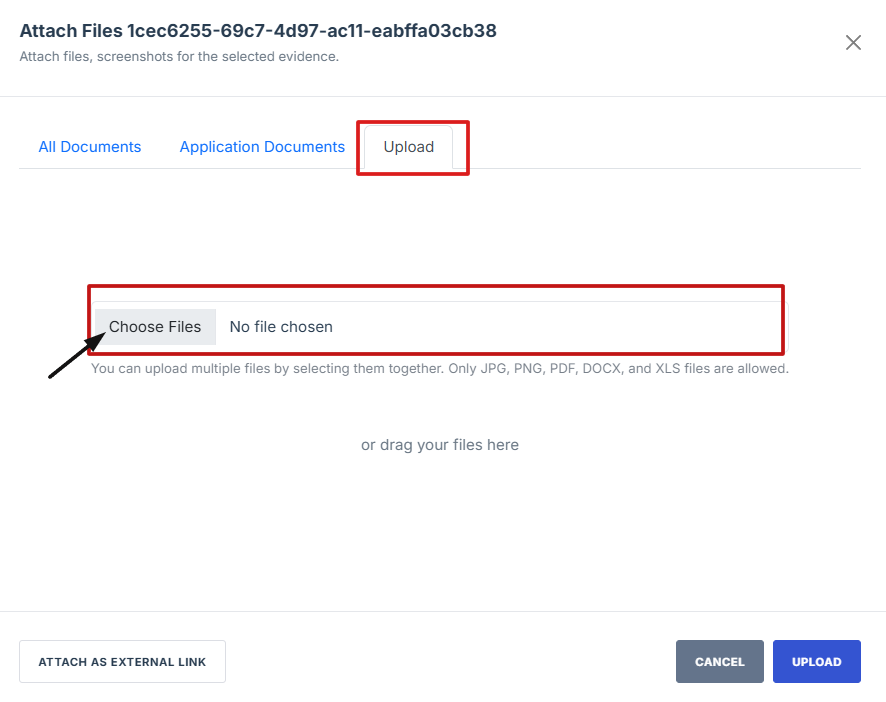
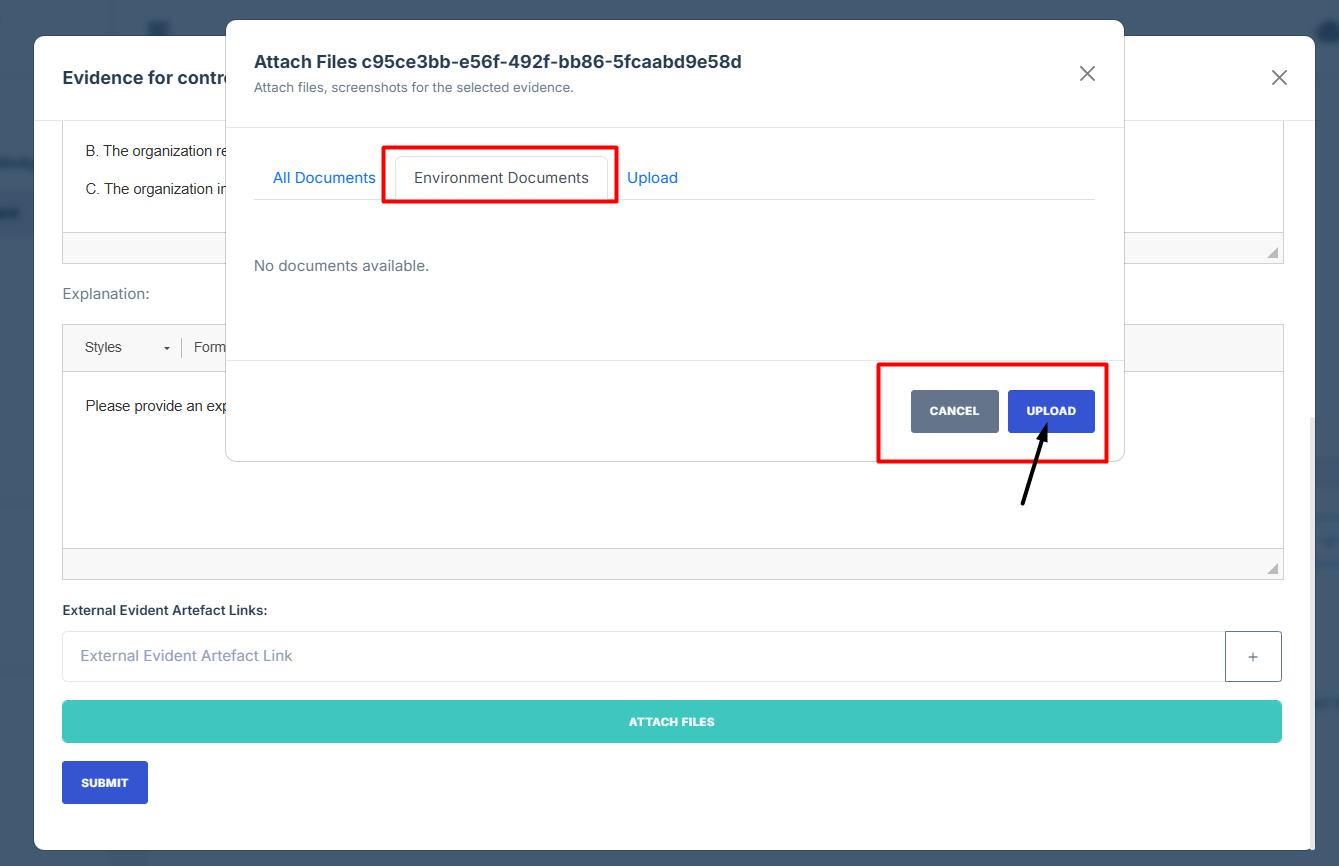
- To attach evidence files, choose from the following options based on the source or relevance of the document.
- All Documents: Access and select from all previously uploaded files available in the system, regardless of category. Ideal for reusing existing documents.
- Environment/Application Documents: Filter and attach documents that are specifically tied to a particular environment or application, ensuring they’re relevant to the control you're working on.
- Upload: If the required file isn’t already in the system, you can upload a new document directly from your device.
- After attaching the control evidence, click upload to save changes.
- Once everything is filled out, click Submit to attach the evidence to the control.
1. Navigate to your organization’s Iron Fort Compliance login page
For example: https://compliance-demo.ironfortdemos.com/en/login/?next=/en
2. Log in to Your Account
Enter your email and password to log in.
3. Check your email for the One-Time Password (OTP) sent on your email and enter the OTP to proceed.
4. Enter the OTP to verify your identity and click “validate.”
5. Enter the OTP to verify your identity and click “validate.”
-
Tenant Key Information: Verifying your system access
-
User Email: Your registered email for auditing purposes
-
Last Login Details: To track your previous access
-
Iron Fort Support Email: For any login issues or concerns
NOTE: If you recognize the details and are authorized, click "OK" to continue. However, if you are not an authorized user, click "Logout" immediately to exit.
6. Move your cursor to the left side of the dashboard to display the menu.
7. Locate and click the Security Assessment tab on the dashboard.
8. Find and click the existing assessment you want to attach an evidence.

9. On the overview page, click the control you want to attach evidence to.

10. Scroll down the page until you locate the "Evidence for Control" section.
Note: the status should be not started in order to edit the evidence page.
11. Click on the Manage Evidence button (pencil/edit icon) from the three available options to enter the evidence editing page.

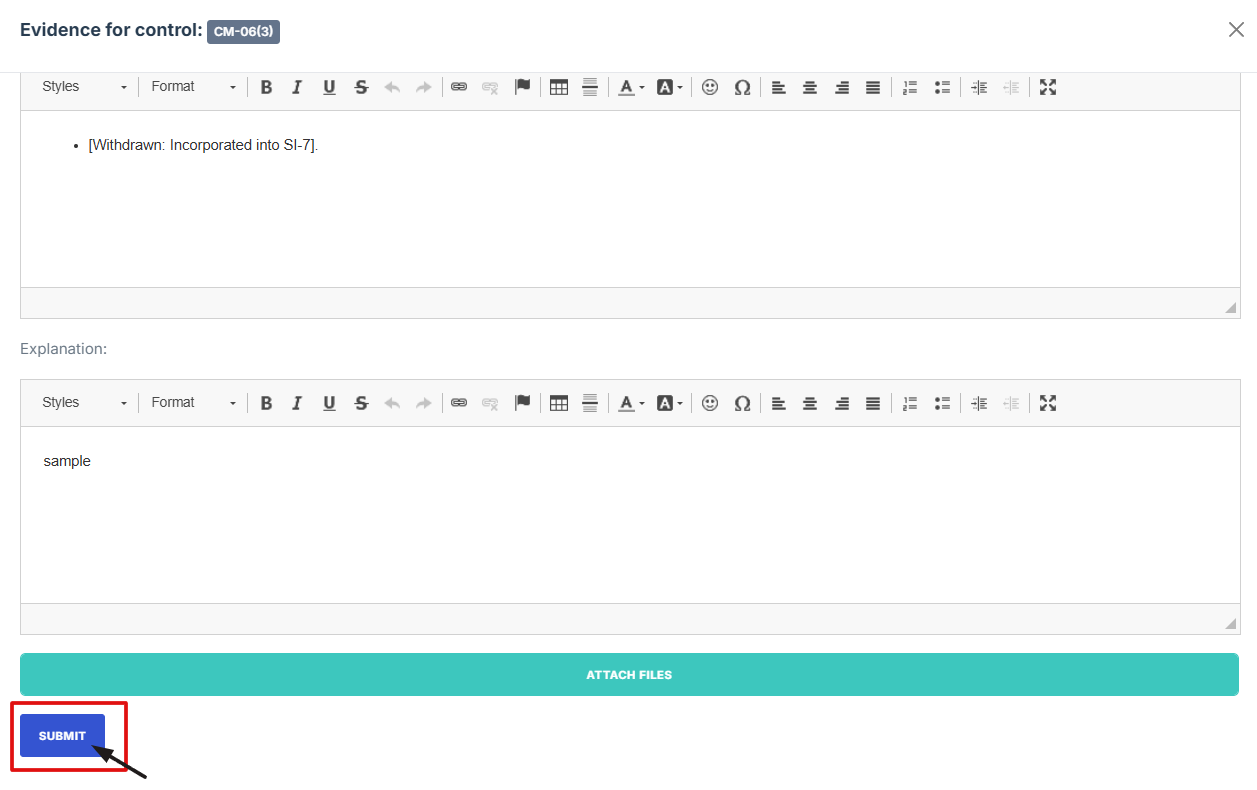
12. Provide Detailed Information:
-
Fill out the Justification, Description, and Explanation fields to give a thorough rationale for the evidence submission

13. Click Attached file button to upload a document, image, or other relevant evidence.

14. To attach evidence files, choose from the following options based on the source or relevance of the document.
15. All Documents: Access and select from all previously uploaded files available in the system, regardless of category. Ideal for reusing existing documents.

16. Environment/Application Documents: Filter and attach documents that are specifically tied to a particular environment or application, ensuring they’re relevant to the control you're working on.
17. Upload: If the required file isn’t already in the system, you can upload a new document directly from your device.
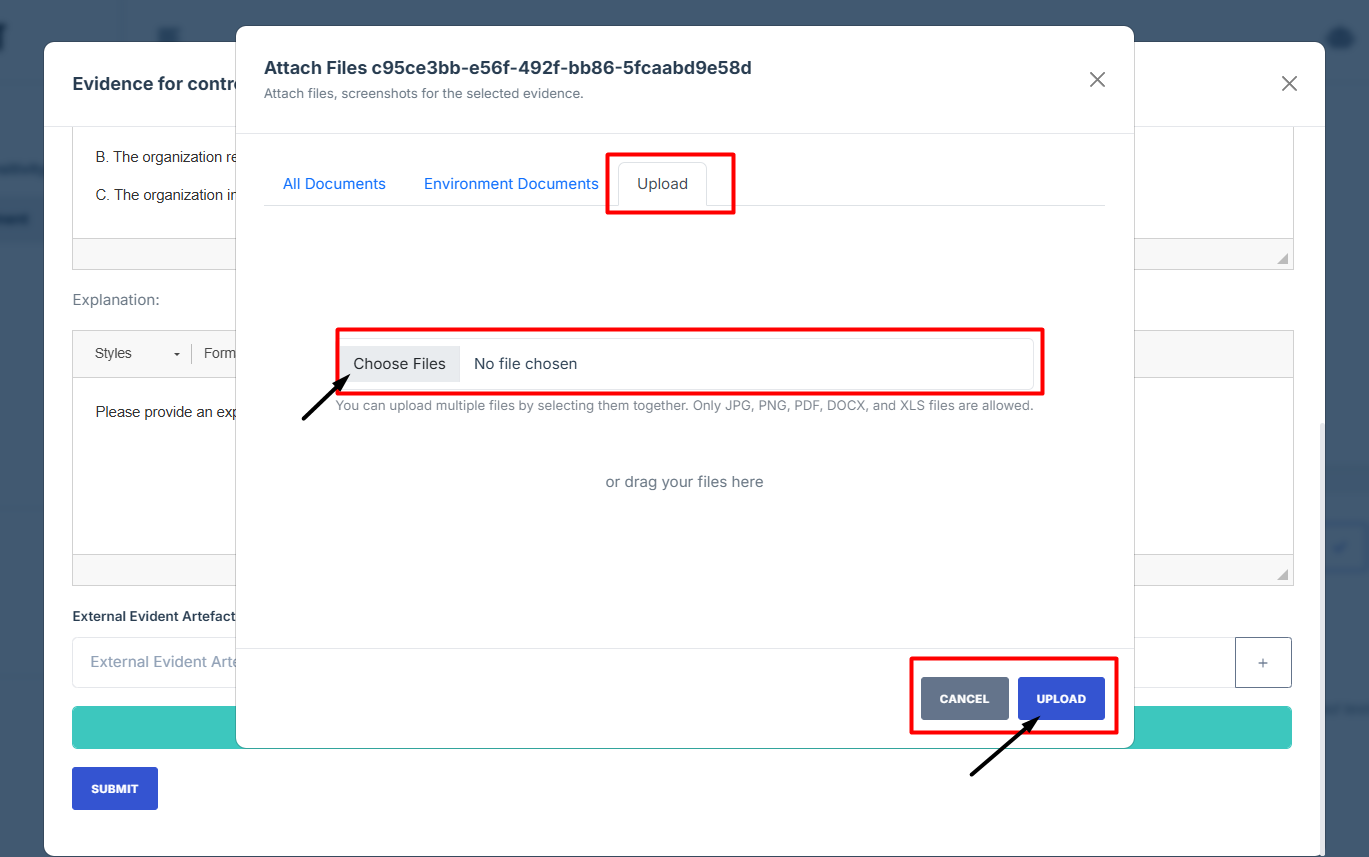
18. After attaching the control evidence, click upload to save changes.
19. Once everything is filled out, click Submit to attach the evidence to the control.

-
How To: Attach a link to an internal document to a security assessment for evidence
- Navigate to your organization’s Iron Fort Compliance login page
- Log in to Your Account
- Check your email for the One-Time Password (OTP) sent on your email and enter the OTP to proceed
- Enter the OTP to verify your identity and click “validate.”
- Once logged in, a welcome prompt will appear displaying
- Move your cursor to the left side of the dashboard to display the menu
- Locate and click the Security Assessment tab on the dashboard
- On the security assessment page
- On the overview page, click the specific control set at the top that relates to your evidence
- Scroll down the page until you locate the "Evidence for Control" section.
- Click on the Manage Evidence button (pencil/edit icon) from the three available options to enter the evidence editing page
- Provide Detailed Information
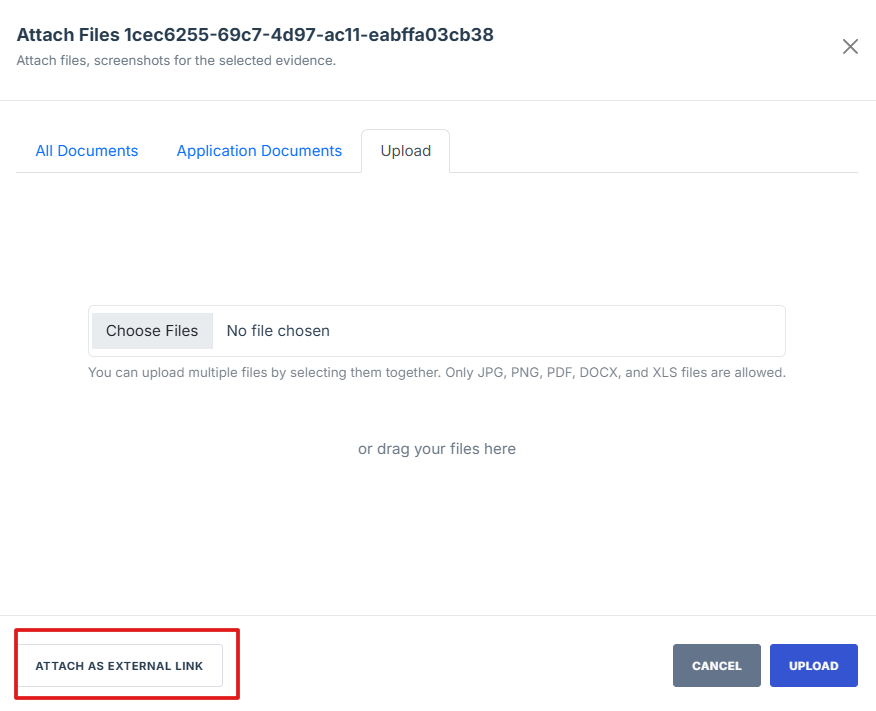
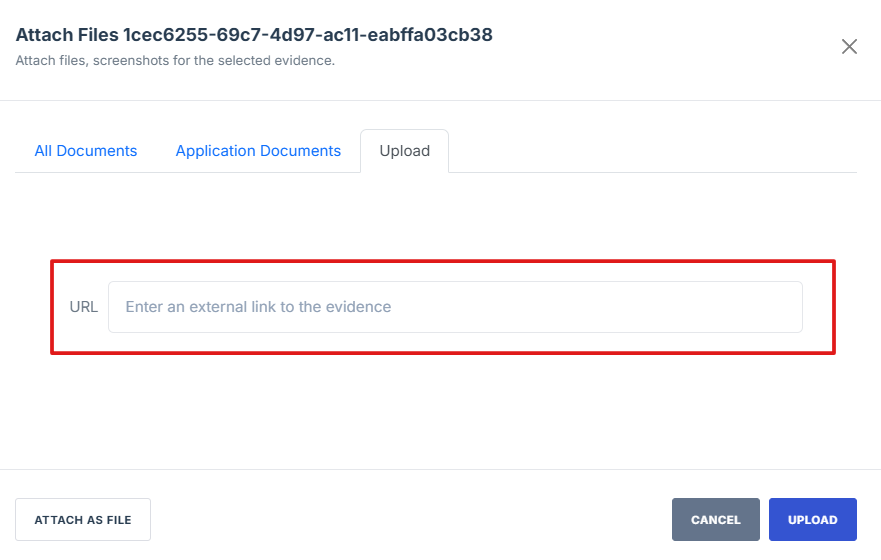
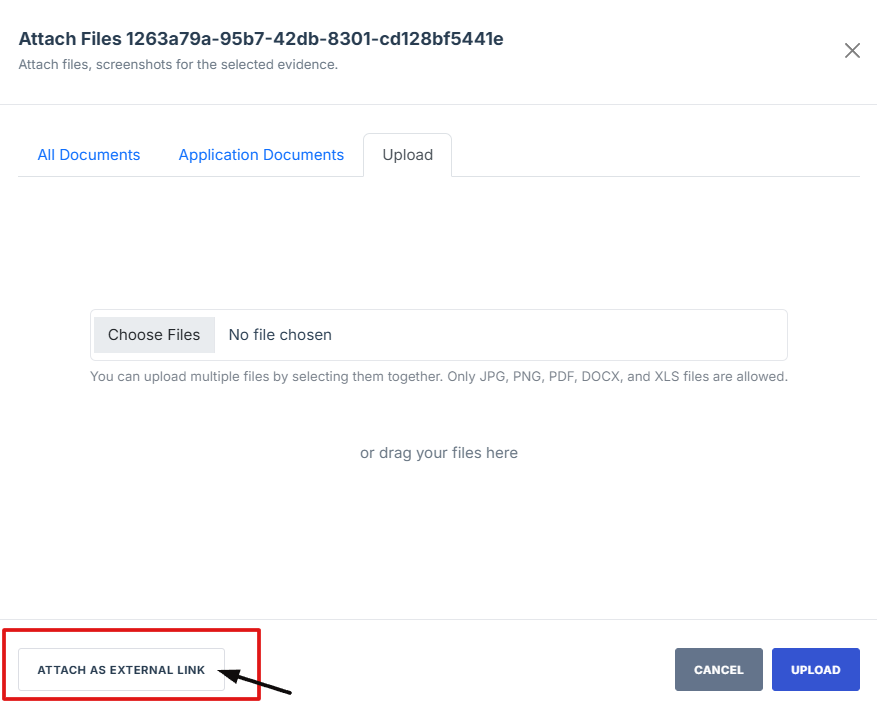
- Click Attached file button to attached an external document or other relevant evidence
- On the upload page, click the "Attach as External Link" button to open the external evidence page
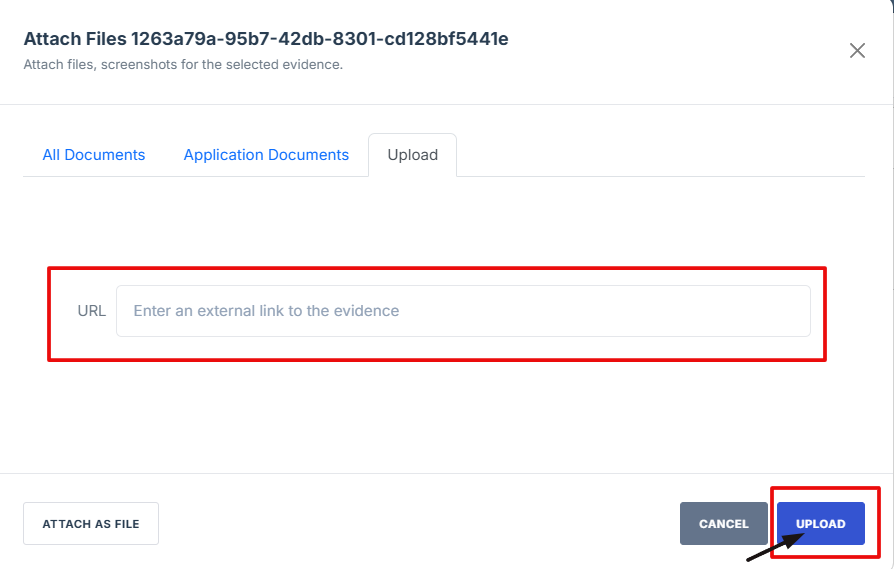
- Paste the evidence link in the field provided, then click Upload to save the attached evidence
- After attaching the control evidence, check if everything is filled out, click Submit to attach the evidence
1. Navigate to your organization’s Iron Fort Compliance login page
For example: https://compliance-demo.ironfortdemos.com/en/login/?next=/en
2. Log in to Your Account
Enter your email and password to log in.
3. Check your email for the One-Time Password (OTP) sent on your email and enter the OTP to proceed.
4. Enter the OTP to verify your identity and click “validate.”
5. Once logged in, a welcome prompt will appear displaying
-
Tenant Key Information: Verifying your system access
-
User Email: Your registered email for auditing purposes
-
Last Login Details: To track your previous access
-
Iron Fort Support Email: For any login issues or concerns
NOTE: If you recognize the details and are authorized, click "OK" to continue. However, if you are not an authorized user, click "Logout" immediately to exit.
6. Move your cursor to the left side of the dashboard to display the menu.
7. Locate and click the Security Assessment tab on the dashboard.
8. On the security assessment page
Locate and click the Assessment ID of the security assessment where you need to attach evidence.
9. On the overview page, click the specific control set at the top that relates to your evidence.
10. Scroll down the page until you locate the "Evidence for Control" section.
Note: the status should be not started in order to edit the evidence page.
11. Click on the Manage Evidence button (pencil/edit icon) from the three available options to enter the evidence editing page.

12. Provide Detailed Information:
-
Fill out the Justification, Description, and Explanation fields to give a thorough rationale for the evidence submission

13. Click Attached file button to attached an external document or other relevant evidence.
14. On the upload page, click the "Attach as External Link" button to open the external evidence page.
15. Paste the evidence link in the field provided, then click Upload to save the attached evidence.
16. After attaching the control evidence, check if everything is filled out, click Submit to attach the evidence.

- How To: Submit a control to an assessor
- Submitting a control for assessment
- Login to the Iron Fort System
-
Select the security assessment to submit control evidence
- Move your cursor to the left side of the dashboard to display the menu
- Locate and click the Security Assessment tab on the dashboard.
- Find and click the existing assessment you want to submit
- On the overview page, click Begin Assessment to submit the control to the assessor
- Scroll down the page until you locate the "Evidence for Control" section.
- Click on the Manage Evidence button (pencil/edit icon) from the three available options to enter the evidence editing page.
- Provide Detailed Information
- Click Attached file button to upload a document, image, or other relevant evidence
- Upload a new document directly from your device
- Once everything is filled out, click Submit to attach the evidence to the control
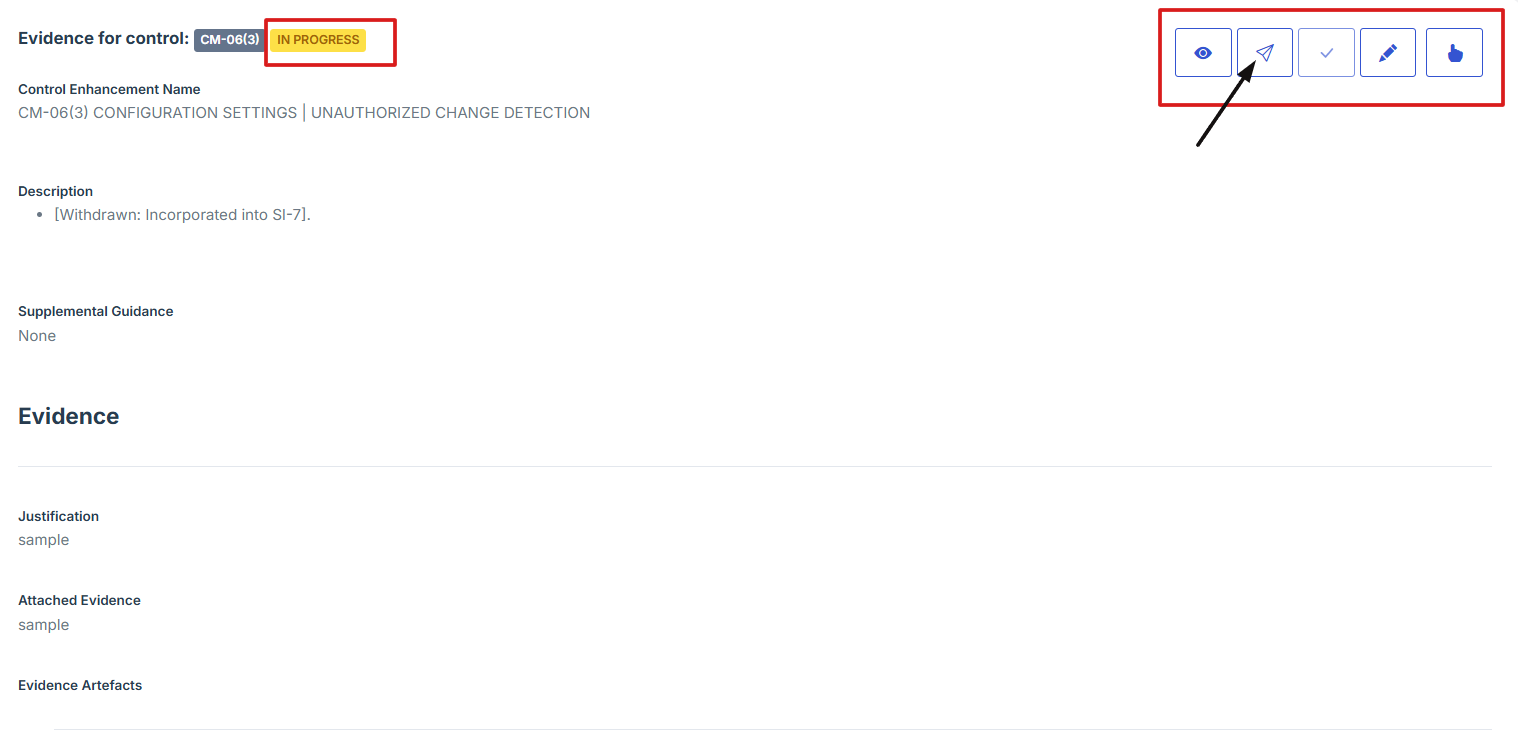
- After submitting, click the second icon (Submit for Approval) from the five options at the top right
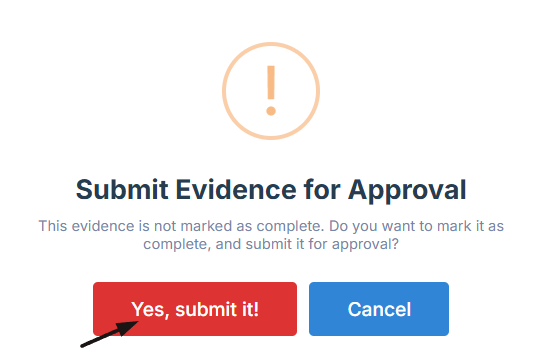
- A confirmation prompt will appear. Click Yes, Submit to confirm your submission
- Once submitted, the status will change from “In progress” to “Pending”, indicating that the evidence submission process is finalized.
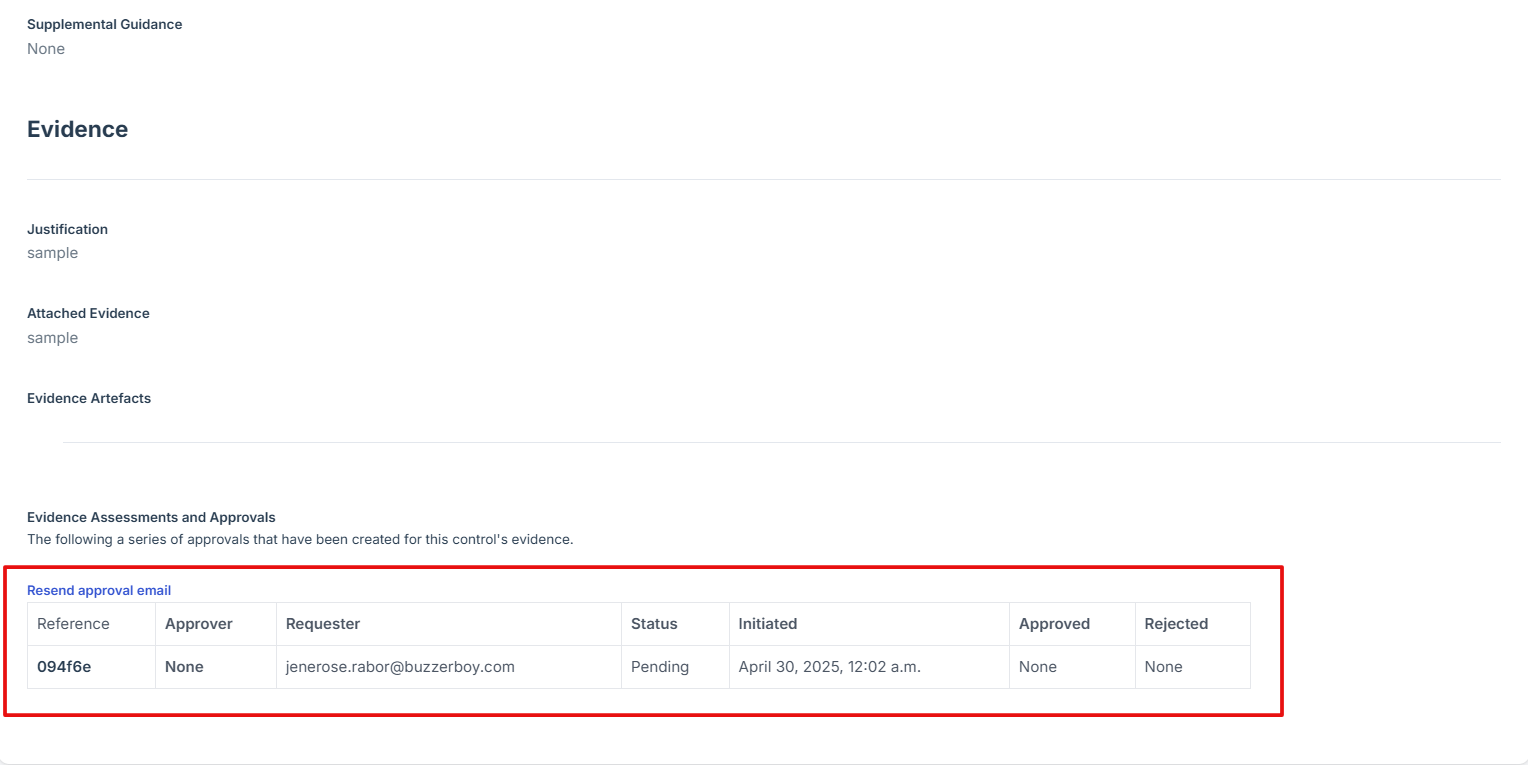
- On the evidence page, scroll down and look under the approval section to confirm whether your control evidence has been approved or is still pending.
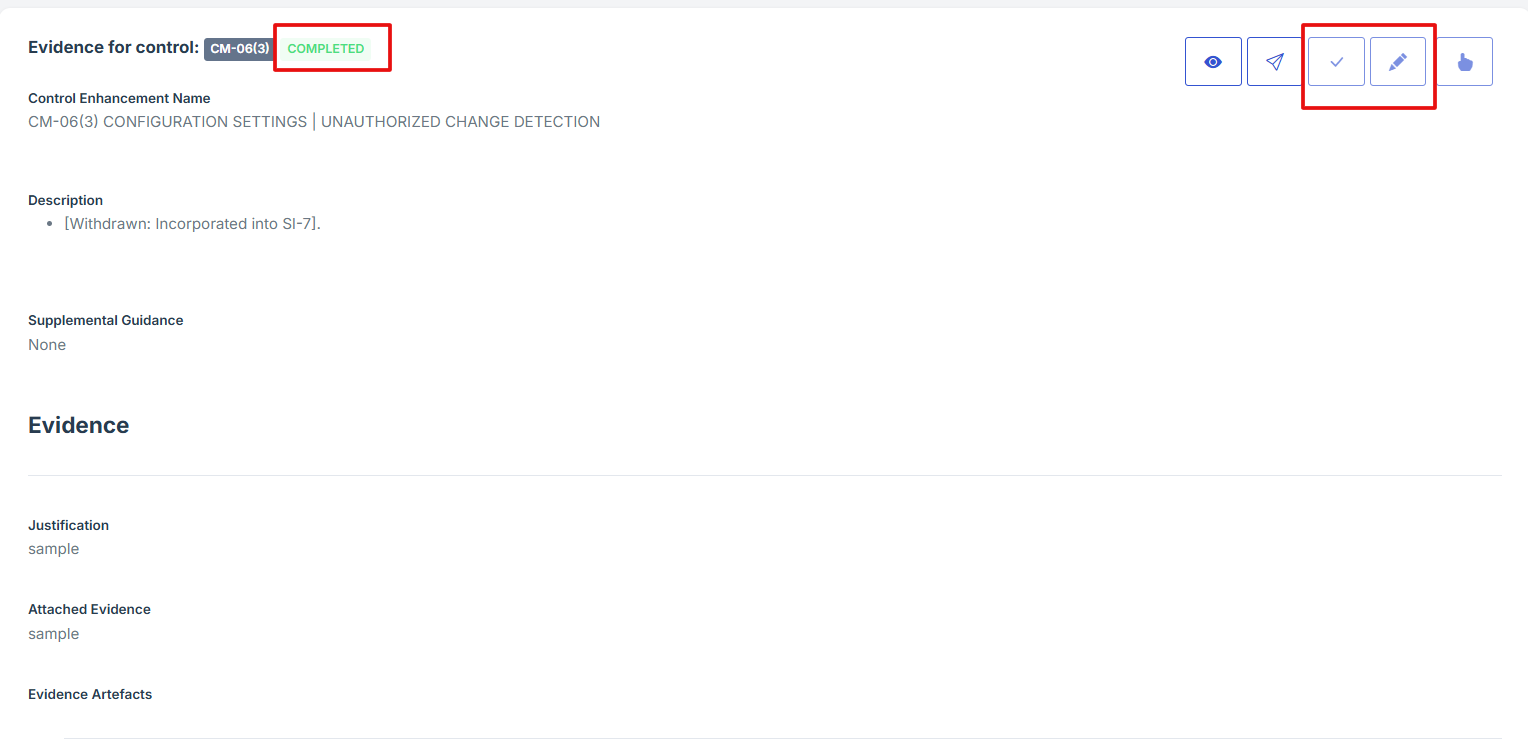
- Once the control evidence is approved, the status will change from “Pending” to “Completed,” and the edit and attach evidence icons will be disabled.
As part of a security assessment process, Security Practitioners, and Application Owners can submit evidence for controls to a Security Assessor to assessment.
It is important to note, when a control’s evidence is submitted, it is sent to all the security assessors identified in the Security Assessment as Assessors. Therefore, any security assessor can pick up the submitted evidence and perform an assessment.
1. Navigate to your organization’s Iron Fort Compliance login page
For example: https://compliance-demo.ironfortdemos.com/en/login/?next=/en
2. Log in to Your Account
Enter your email and password to log in.
3. Check your email for the One-Time Password (OTP) sent on your email and enter the OTP to proceed.
4. Enter the OTP to verify your identity and click “validate.”
5. Once logged in, a welcome prompt will appear displaying
-
Tenant Key Information: Verifying your system access
-
User Email: Your registered email for auditing purposes
-
Last Login Details: To track your previous access
-
Iron Fort Support Email: For any login issues or concerns
NOTE: If you recognize the details and are authorized, click "OK" to continue. However, if you are not an authorized user, click "Logout" immediately to exit.
1. Move your cursor to the left side of the dashboard to display the menu.
2. Locate and click the Security Assessment tab on the dashboard.
3. Find and click the existing assessment you want to submit.

4. On the overview page, click Begin Assessment to submit the control to the assessor.
5. Scroll down the page until you locate the "Evidence for Control" section.
Note: the status should be not started in order to edit the evidence page.
6. Click on the Manage Evidence button (pencil/edit icon) from the five available options to enter the evidence editing page.
7. Provide Detailed Information:
-
Fill out the Justification, Description, and Explanation fields to give a thorough rationale for the evidence submission
8. Click Attached file button to upload a document, image, or other relevant evidence.

9. Upload a new document directly from your device.

10. Once everything is filled out, click Submit to attach the evidence to the control.

11. After submitting, click the second icon (Submit for Approval) from the five options at the top right

12. A confirmation prompt will appear. Click Yes, Submit to confirm your submission
13. Once submitted, the status will change from “In progress” to “Pending”, indicating that the evidence submission process is finalized.
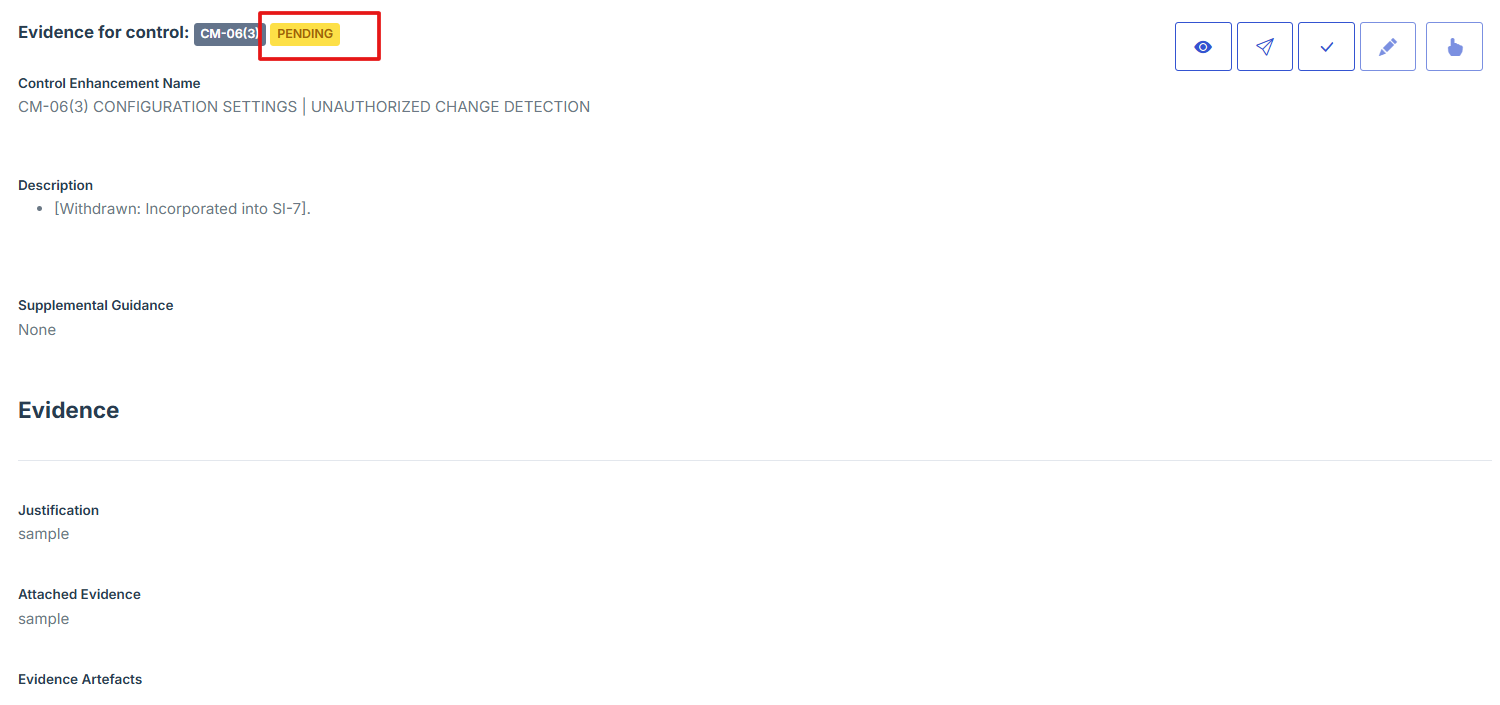
14. On the evidence page, scroll down and look under the approval section to confirm whether your control evidence has been approved or is still pending.
15. Once the control evidence is approved, the status will change from “Pending” to “Completed,” and the edit and attach evidence icons will be disabled.
- How To: Finalize an assessment and submit it for approval
- Finalizing and submitting an assessment for approval
-
Login to the Iron Fort System
- Navigate to your organization’s Iron Fort Compliance login page
- Log in to Your Account
- Check your email for the One-Time Password (OTP) sent on your email and enter the OTP to proceed
- Enter the OTP to verify your identity and click “validate.”
- Once logged in, a welcome prompt will appear displaying
- Move your cursor to the left side of the dashboard to display the menu
- Locate and click the Security Assessment tab on the dashboard.
-
Select the security assessment to submit control evidence
- On the security assessment page
- On the overview page, click the control you want to attach evidence to
- Scroll down the page until you locate the "Evidence for Control" section.
- Click on the Manage Evidence button (pencil/edit icon) from the five available options to enter the evidence editing page.
- Once everything is filled out and attached, click Submit to attach the evidence to the control.
- After submitting, click the second icon (Submit for Approval) from the five options at the top right
- Once the control evidence is approved, the status will change from “Pending” to “Completed,” and the edit and attach evidence icons will be disabled.
-
Add POAM and Residual Risk to Finalize the Assessment
- On the overview page of the security assessment, scroll down and click “add new” under Plan of Action and Milestones (POAM).
- Fill in the required fields
- Click Submit to save the POAM entry
- Scroll down and locate the Residual Risks section.
- Click "Add New" to log a new residual risk.
- Enter the following details
- Click Submit to save the residual risk entry.
- After completing all required updates, return to the Overview tab.
- Click Submit for Approval to finalize the assessment.
- An email notification will be sent to all users listed as approvers for their review and approval.
- Approvers will review and approve the assessment as part of the workflow.
- Once the assessment is approved, the status will update from 'Pending' to 'Approved'. The user will also see the option to download the approved assessment as a PDF.
Finalizing and submitting an assessment for approval
Once all required information and evidence have been added to the security assessment, the next step is to finalize and submit it for approval. This step is important as it signals that the assessment is ready for review by the appropriate approvers.
Keep in mind, once submitted, the assessment will no longer be editable unless sent back for revision. Make sure all details are accurate and complete before proceeding. The approvers listed in the Security Assessment will be notified and can begin their review process.
1. Navigate to your organization’s Iron Fort Compliance login page
For example: https://compliance-demo.ironfortdemos.com/en/login/?next=/en
2. Log in to Your Account
Enter your email and password to log in.
3. Check your email for the One-Time Password (OTP) sent on your email and enter the OTP to proceed.
4. Enter the OTP to verify your identity and click “validate.”
5. Once logged in, a welcome prompt will appear displaying
-
Tenant Key Information: Verifying your system access
-
User Email: Your registered email for auditing purposes
-
Last Login Details: To track your previous access
-
Iron Fort Support Email: For any login issues or concerns
NOTE: If you recognize the details and are authorized, click "OK" to continue. However, if you are not an authorized user, click "Logout" immediately to exit.
6. Move your cursor to the left side of the dashboard to display the menu.
7. Locate and click the Security Assessment tab on the dashboard.
1. On the security assessment page
Locate and click the Assessment ID of the security assessment where you need to attach evidence.

2. On the overview page, click the control you want to attach evidence to.

3. Scroll down the page until you locate the "Evidence for Control" section.
Note: the status should be not started in order to edit the evidence page.
4. Click on the Manage Evidence button (pencil/edit icon) from the five available options to enter the evidence editing page.

5. Once everything is filled out and attached, click Submit to attach the evidence to the control.
6. After submitting, click the second icon (Submit for Approval) from the five options at the top right.
7. Once the control evidence is approved, the status will change from “Pending” to “Completed,” and the edit and attach evidence icons will be disabled.

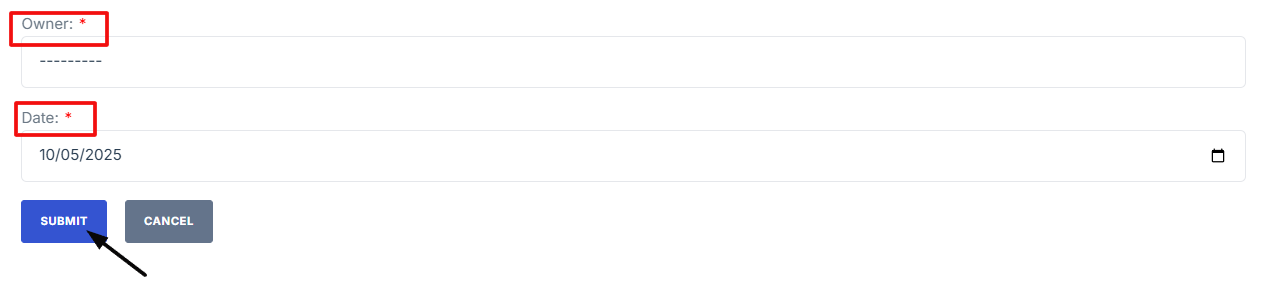
1. On the overview page of the security assessment, scroll down and click “add new” under Plan of Action and Milestones (POAM).
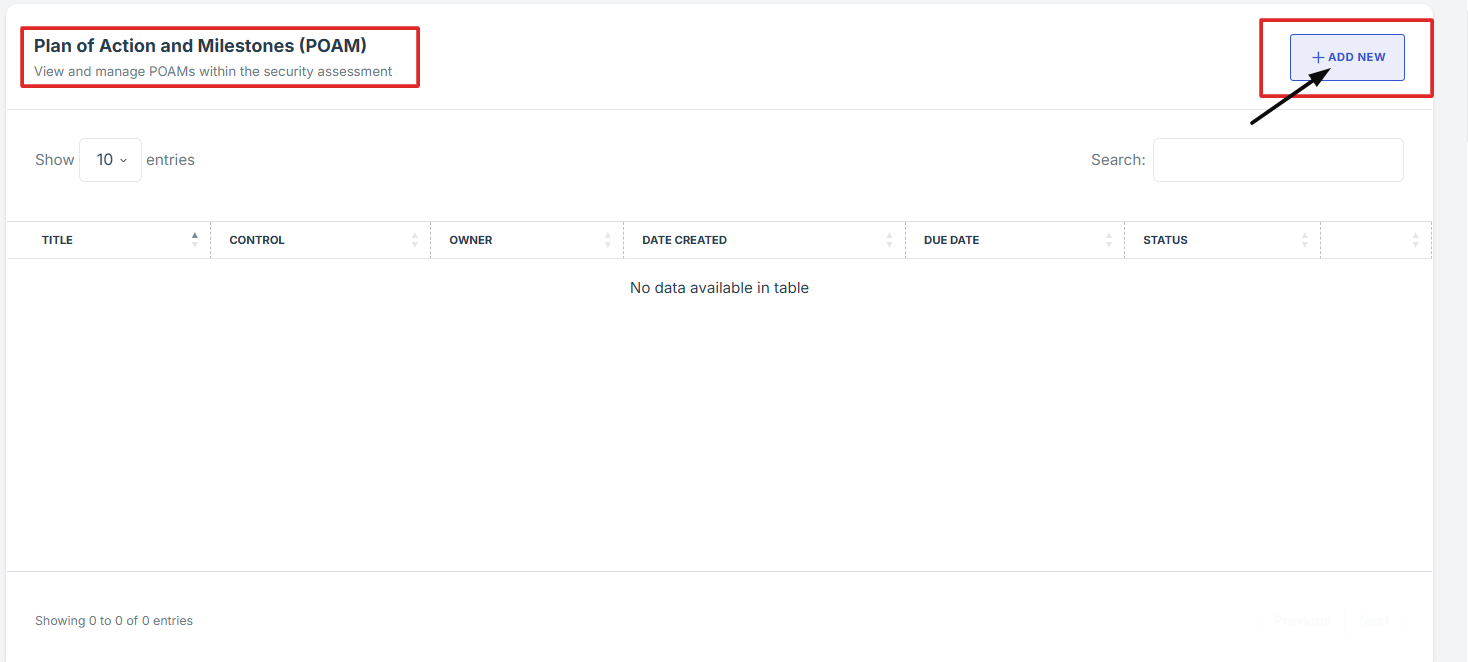
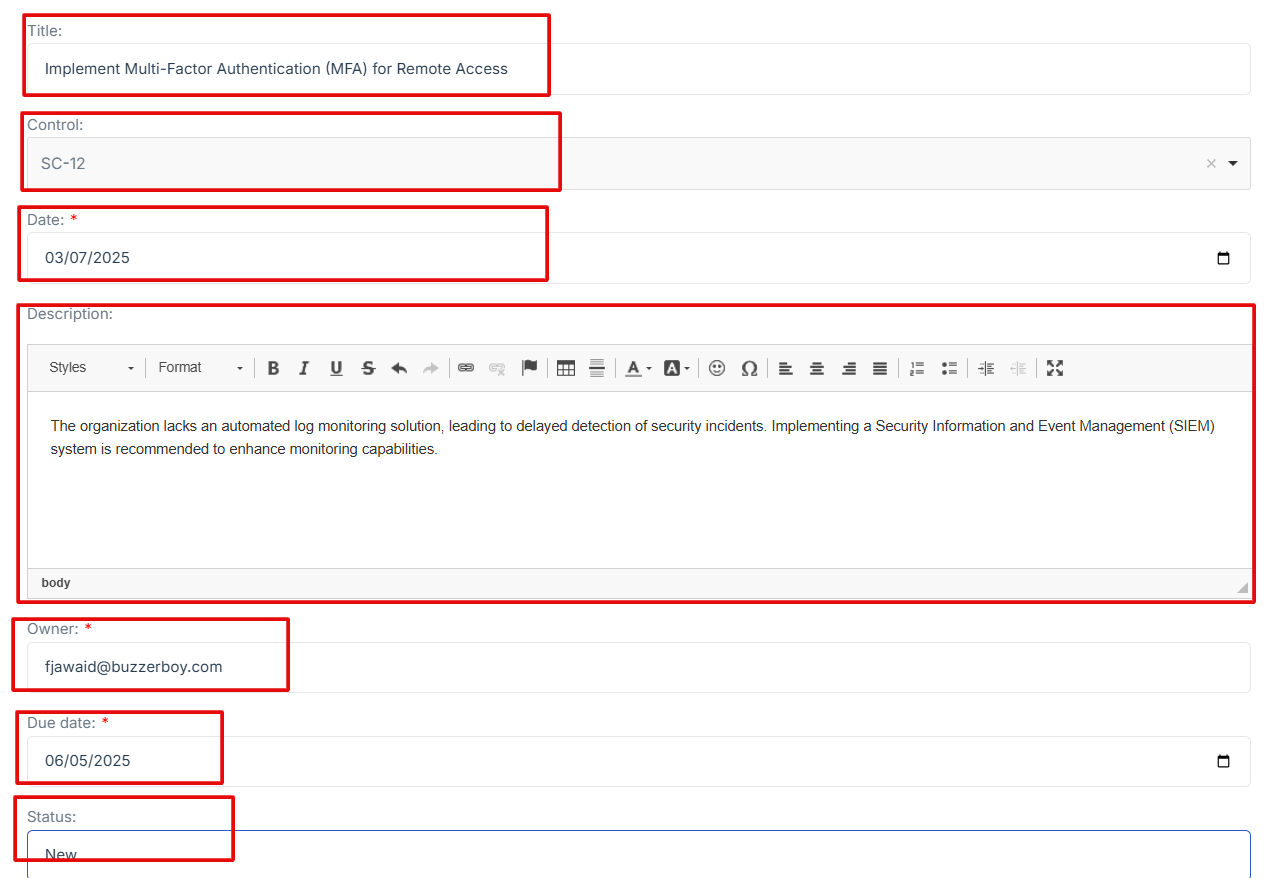
2. Fill in the required fields:
-
Title: Provide a brief name for the POAM item.
-
Control: Select the relevant security control.
-
Date: Enter the date of the POAM entry.
-
Description: Describe the issue and necessary actions.
-
Owner: Assign a responsible person for resolution.
-
Due Date: Set a deadline for addressing the issue.
-
Status: Indicate progress (e.g., Open, In Progress, Closed).
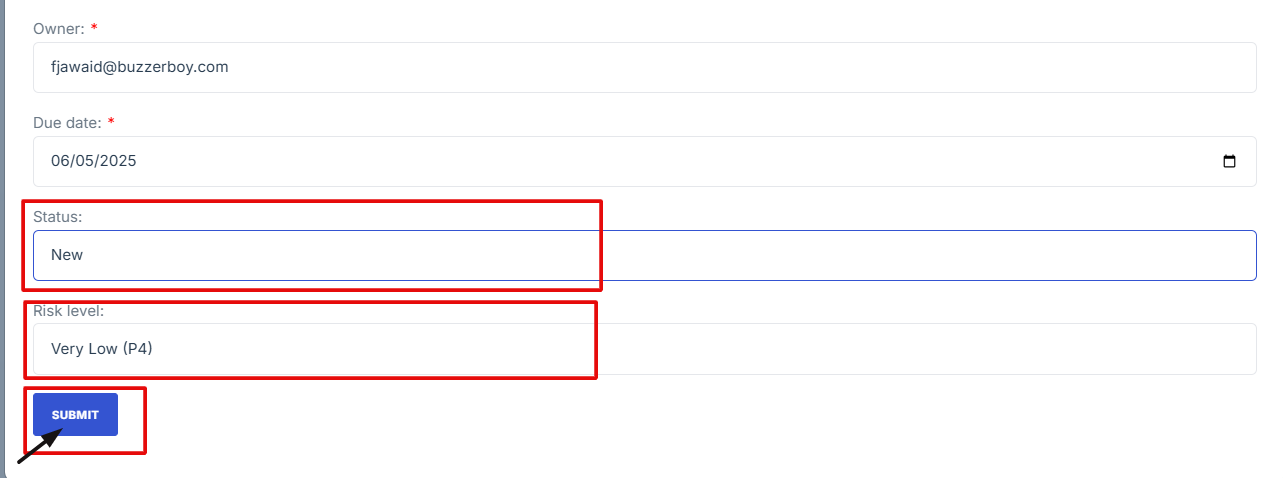
3. Click Submit to save the POAM entry
4. Scroll down and locate the Residual Risks section.
5. Click "Add New" to log a new residual risk.
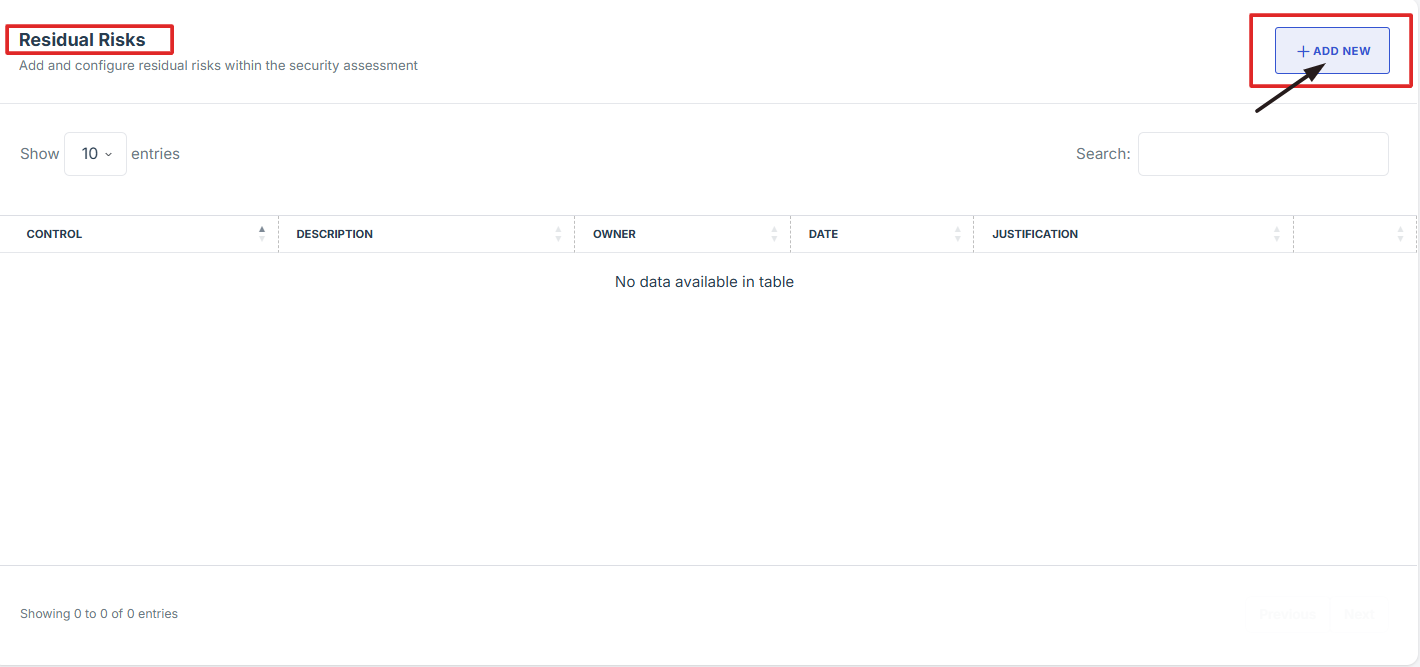
6. Enter the following details:
-
Control: Select the relevant security control.
-
Description: Provide a summary of the risk.
-
Justification: Explain why the risk exists and any mitigating factors.
-
Owner: Assign responsibility for monitoring the risk.
-
Date: Enter the date of the risk entry.
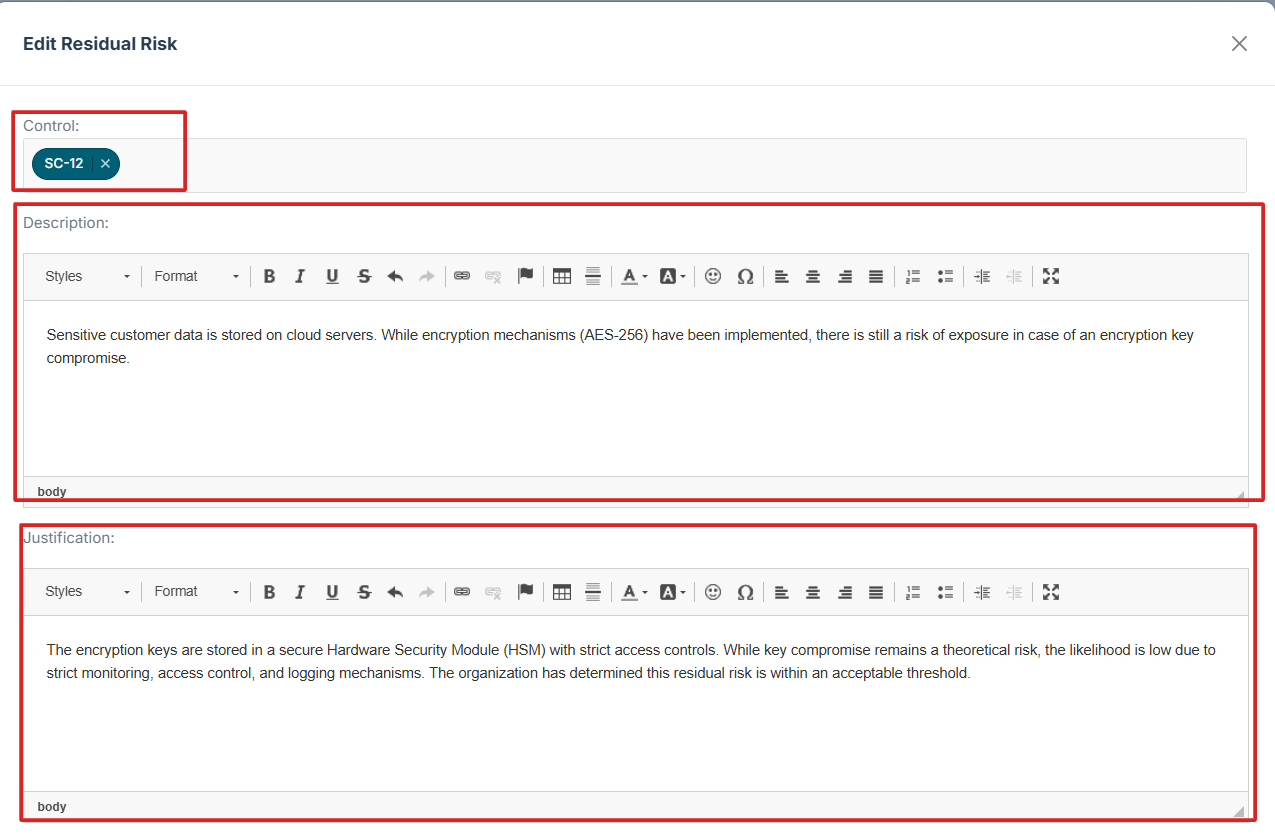
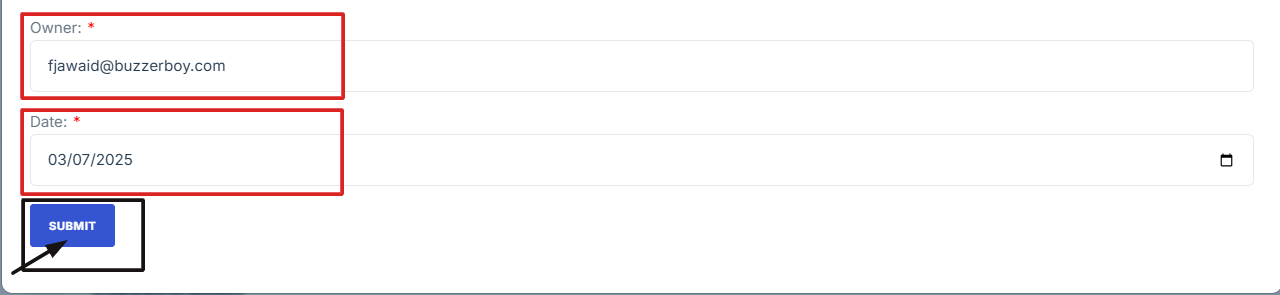
7. Click Submit to save the residual risk entry.
8. After completing all required updates, return to the Overview tab.
9. Click Submit for Approval to finalize the assessment.
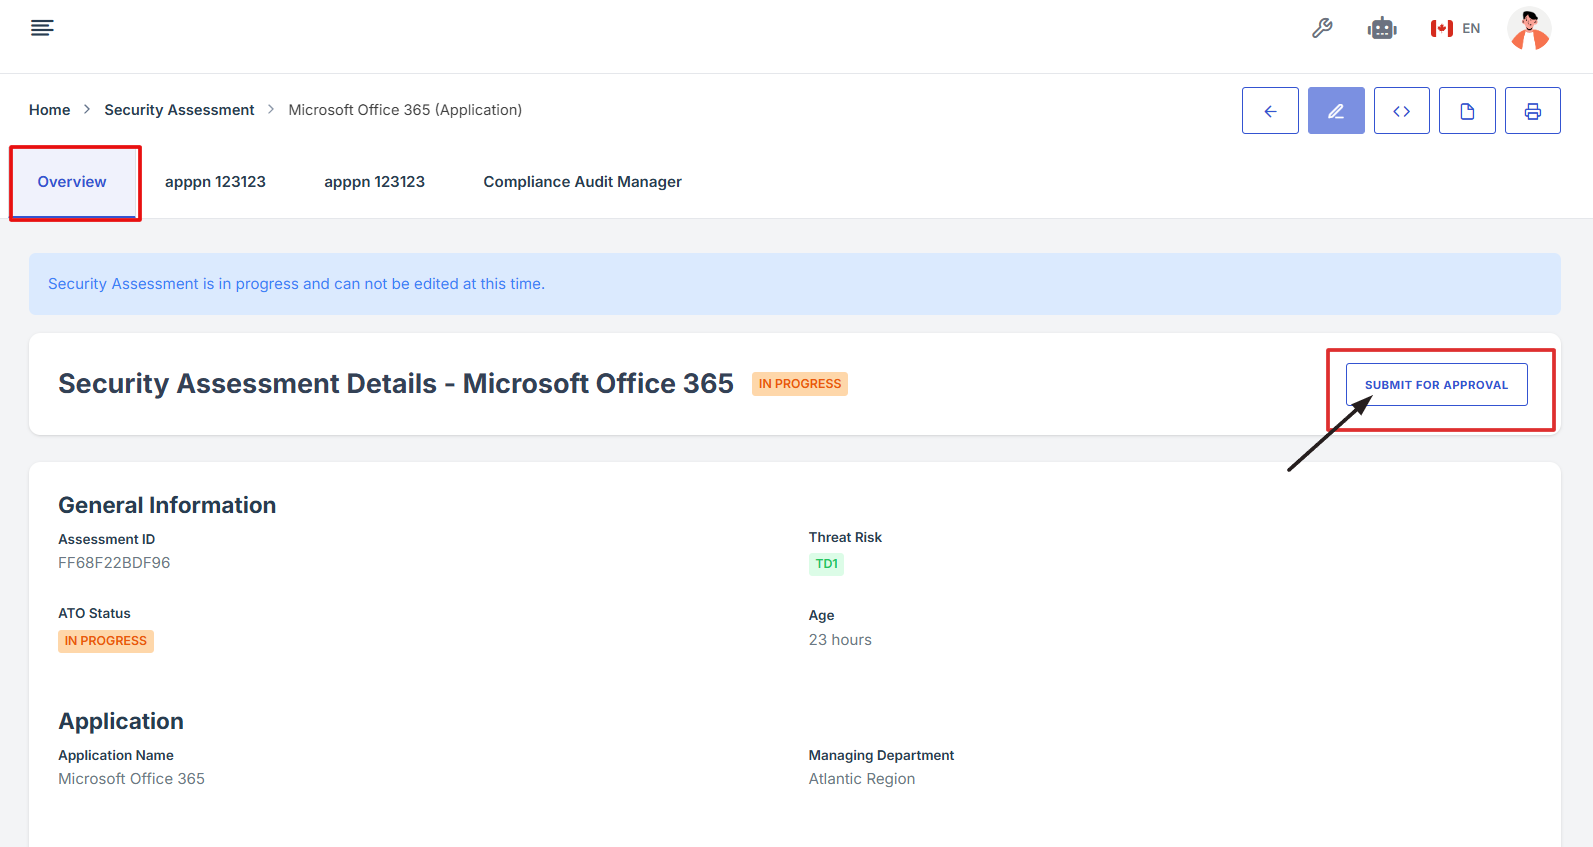
10. An email notification will be sent to all users listed as approvers for their review and approval.
11. Approvers will review and approve the assessment as part of the workflow.

12. Once the assessment is approved, the status will update from 'Pending' to 'Approved'. The user will also see the option to download the approved assessment as a PDF.
-
How To: View evidence in security assessment
- Navigate to your organization’s Iron Fort Compliance login page
- Log in to Your Account
- Check your email for the One-Time Password (OTP) sent on your email and enter the OTP to proceed
- Enter the OTP to verify your identity and click “validate.”
- Once logged in, a welcome prompt will appear displaying
- Move your cursor to the left side of the dashboard to display the menu
- Locate and click the Security Assessment tab on the dashboard.
- Find and click the assessment you want to open to view its evidence
- On the overview page, click the control you want to view its evidence
- Scroll down the page until you locate the "Evidence for Control" section
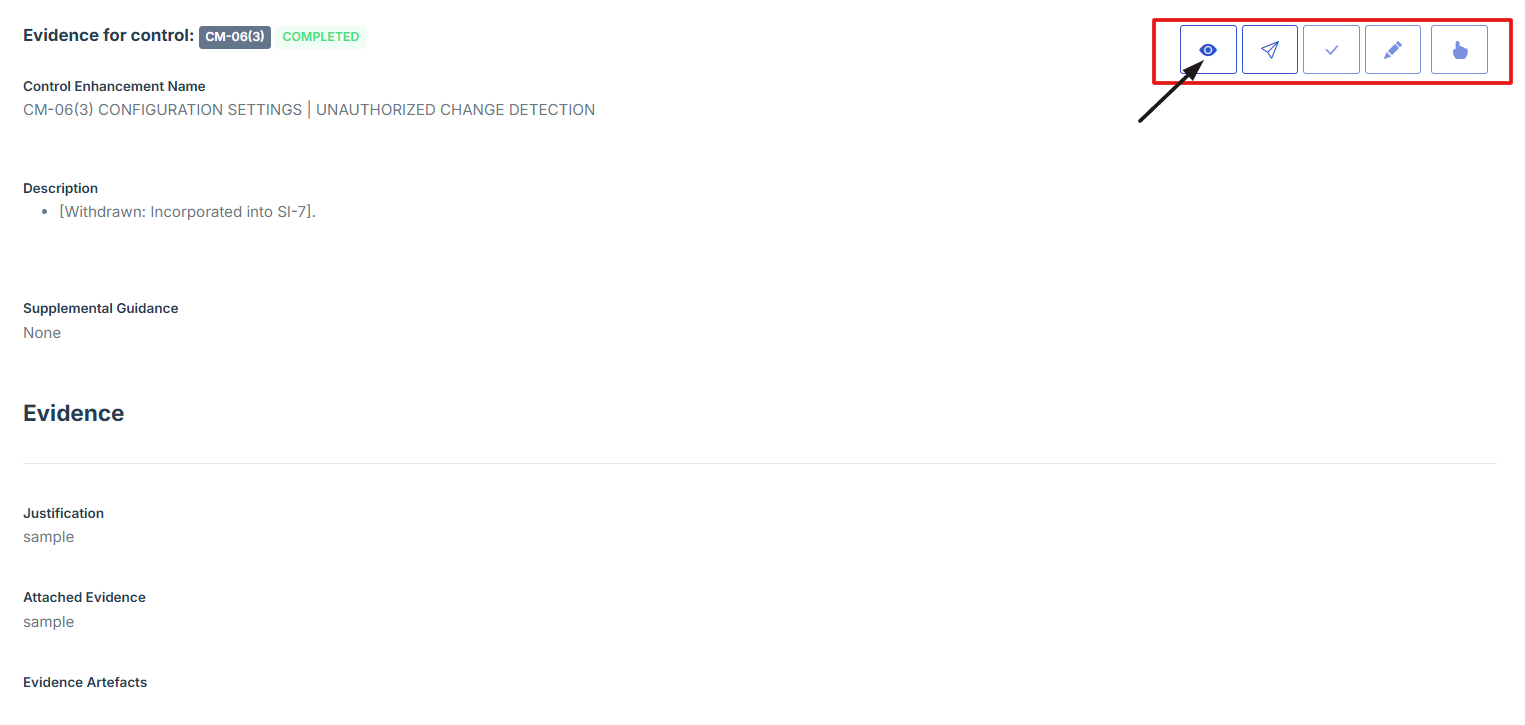
- Click on the View Evidence button (eye icon) from the five available options to view the evidence
1. Navigate to your organization’s Iron Fort Compliance login page
For example: https://compliance-demo.ironfortdemos.com/en/login/?next=/en
2. Log in to Your Account
Enter your email and password to log in.
3. Check your email for the One-Time Password (OTP) sent on your email and enter the OTP to proceed.
4. Enter the OTP to verify your identity and click “validate.”
5. Once logged in, a welcome prompt will appear displaying
-
Tenant Key Information: Verifying your system access
-
User Email: Your registered email for auditing purposes
-
Last Login Details: To track your previous access
-
Iron Fort Support Email: For any login issues or concerns
NOTE: If you recognize the details and are authorized, click "OK" to continue. However, if you are not an authorized user, click "Logout" immediately to exit.
6. Move your cursor to the left side of the dashboard to display the menu.
7. Locate and click the Security Assessment tab on the dashboard.
8. Find and click the assessment you want to open to view its evidence.

9. On the overview page, click the control you want to view its evidence.

10. Scroll down the page until you locate the "Evidence for Control" section.
11. Click on the View Evidence button (eye icon) from the five available options to view the evidence.
-
How To: Plan a new Security Assessment
- Navigate to your organization’s Iron Fort Compliance login page
- Log in to Your Account
- Check your email for the One-Time Password (OTP) sent on your email and enter the OTP to proceed
- Enter the OTP to verify your identity and click “validate.”
- Once logged in, a welcome prompt will appear displaying
- Move your cursor to the left side of the dashboard to display the menu
- Locate and click the Security Assessment tab on the dashboard.
- Click Add Security Assessment to begin setting up a new assessment
- Choose the Assessment Type
- Provide essential information for the assessment
- Click “Create Security Assessment” and you will prompted to Edit Security Assessment page
- Choose the appropriate control sets from the dropdown
- After reviewing all information, click Update Security Assessment to save and complete the setup process.
1. Navigate to your organization’s Iron Fort Compliance login page
For example: https://compliance-demo.ironfortdemos.com/en/login/?next=/en
2. Log in to Your Account
Enter your email and password to log in.
3. Check your email for the One-Time Password (OTP) sent on your email and enter the OTP to proceed.
4. Enter the OTP to verify your identity and click “validate.”
5. Once logged in, a welcome prompt will appear displaying
-
Tenant Key Information: Verifying your system access
-
User Email: Your registered email for auditing purposes
-
Last Login Details: To track your previous access
-
Iron Fort Support Email: For any login issues or concerns
NOTE: If you recognize the details and are authorized, click "OK" to continue. However, if you are not an authorized user, click "Logout" immediately to exit.
6. Move your cursor to the left side of the dashboard to display the menu.
7. Locate and click the Security Assessment tab on the dashboard.
8. Click Add Security Assessment to begin setting up a new assessment.
9. Choose the Assessment Type
(Select whether the assessment is for an Application or an Environment.)
-
Application: specific software or system
-
Environment: network, infrastructure, or cloud setup

10. Provide essential information for the assessment
-
Statement of Sensitivity: Define the data sensitivity level.
-
Catalogue: Select applicable security frameworks.
-
Security Assessor: Assign a responsible security professional.
-
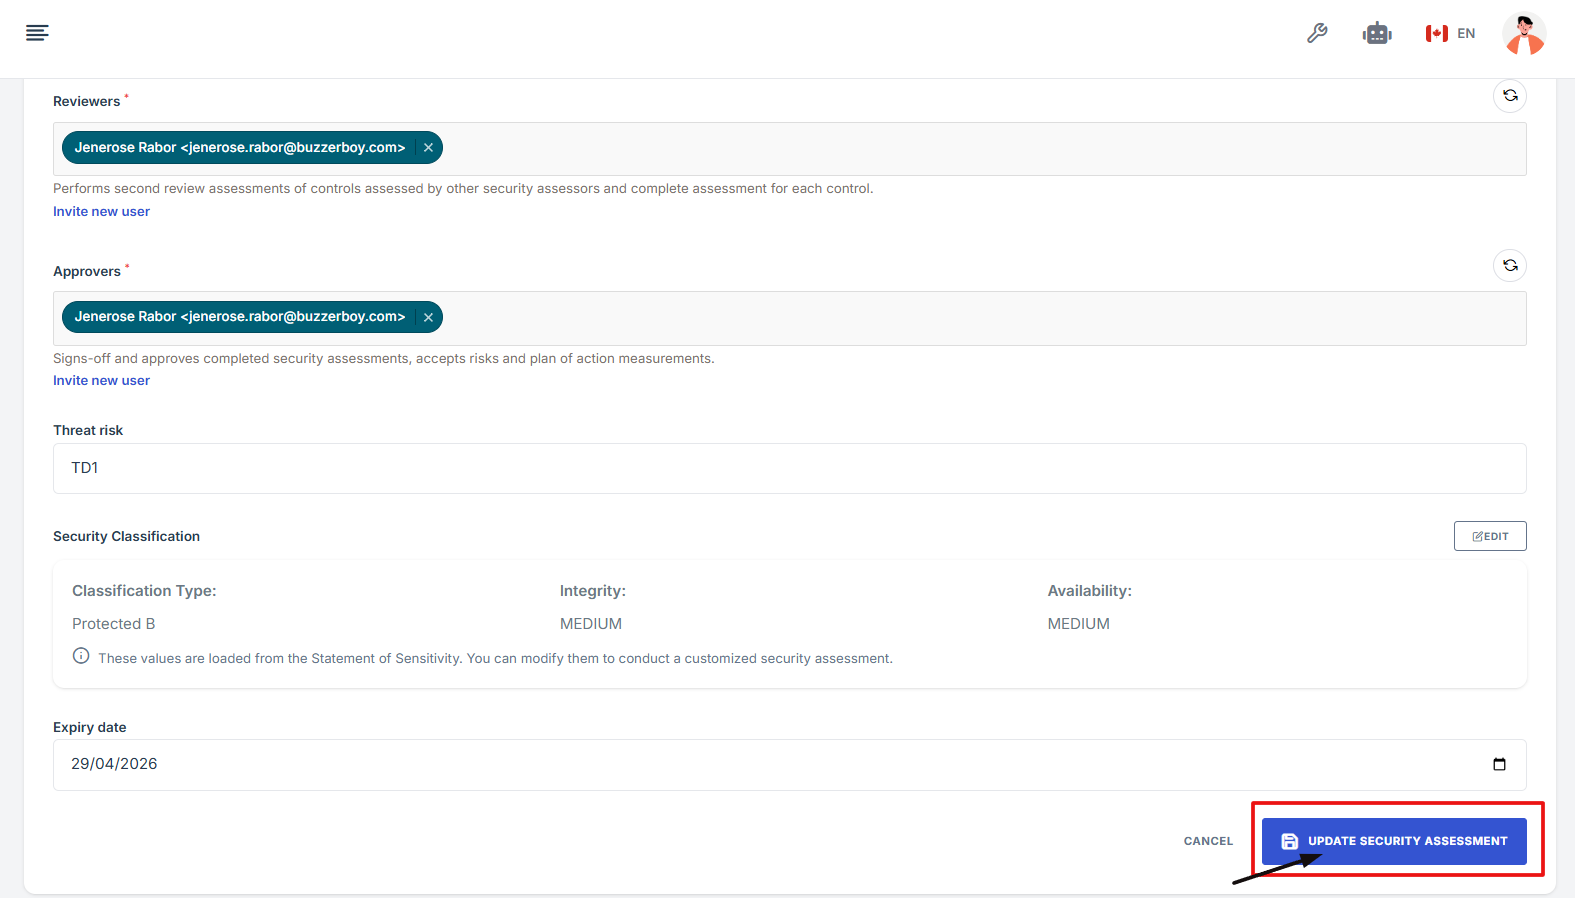
Reviewers: Perform second review assessments of controls assessed by other security assessors and complete assessment for each control.
-
Approvers: List individuals who will approve the assessment.
-
Threat Risk: Identify potential risks and vulnerabilities.
-
Expiry Date: Specify when the security assessment will expire and may require renewal.

11. Click “Create Security Assessment” and you will prompted to Edit Security Assessment page.
12. Choose the appropriate control sets from the dropdown.
13. After reviewing all information, click Update Security Assessment to save and complete the setup process.
-
How To: Inherit from Approved Security Assessment
- Navigate to your organization’s Iron Fort Compliance login page
- Log in to Your Account
- Check your email for the One-Time Password (OTP) sent on your email and enter the OTP to proceed
- Enter the OTP to verify your identity and click “validate.”
- Once logged in, a welcome prompt will appear displaying
- Move your cursor to the left side of the dashboard to display the menu
- Locate and click the Security Assessment tab on the dashboard.
- Find and click the assessment you want to inherit its evidence.
- On the overview page, click the control you want to inherit its evidence.
- Scroll down the page until you locate the "Evidence for Control" section.
- Click on the Inherit from approved security assessment button (thumbs up icon) from the five available options to enter the inherit the evidence page.
- This will take you to the inheritance page, where you can select the environment or application you want to copy the evidence from.
- After choosing it, click the Inherit button and confirm your choice.
- A confirmation prompt will appear—click Yes to confirm and save your changes.
1. Navigate to your organization’s Iron Fort Compliance login page
For example: https://compliance-demo.ironfortdemos.com/en/login/?next=/en
2. Log in to Your Account
Enter your email and password to log in.
3. Check your email for the One-Time Password (OTP) sent on your email and enter the OTP to proceed.
4. Enter the OTP to verify your identity and click “validate.”
5. Once logged in, a welcome prompt will appear displaying
-
Tenant Key Information: Verifying your system access
-
User Email: Your registered email for auditing purposes
-
Last Login Details: To track your previous access
-
Iron Fort Support Email: For any login issues or concerns
NOTE: If you recognize the details and are authorized, click "OK" to continue. However, if you are not an authorized user, click "Logout" immediately to exit.
6. Move your cursor to the left side of the dashboard to display the menu.
7. Locate and click the Security Assessment tab on the dashboard.
8. Find and click the assessment you want to inherit its evidence.

9. On the overview page, click the control you want to inherit its evidence.

10. Scroll down the page until you locate the "Evidence for Control" section.
Note: the status should be not started in order to inherit the evidence.
11. Click on the Inherit from approved security assessment button (thumbs up icon) from the five available options to enter the inherit the evidence page.

12. This will take you to the inheritance page, where you can select the environment or application you want to copy the evidence from.
13. After choosing it, click the Inherit button and confirm your choice.

14. A confirmation prompt will appear—click Yes to confirm and save your changes.

1. Log in to Iron fort: How To: Login
2. Locate and click the Security Assessment tab on the dashboard.
-
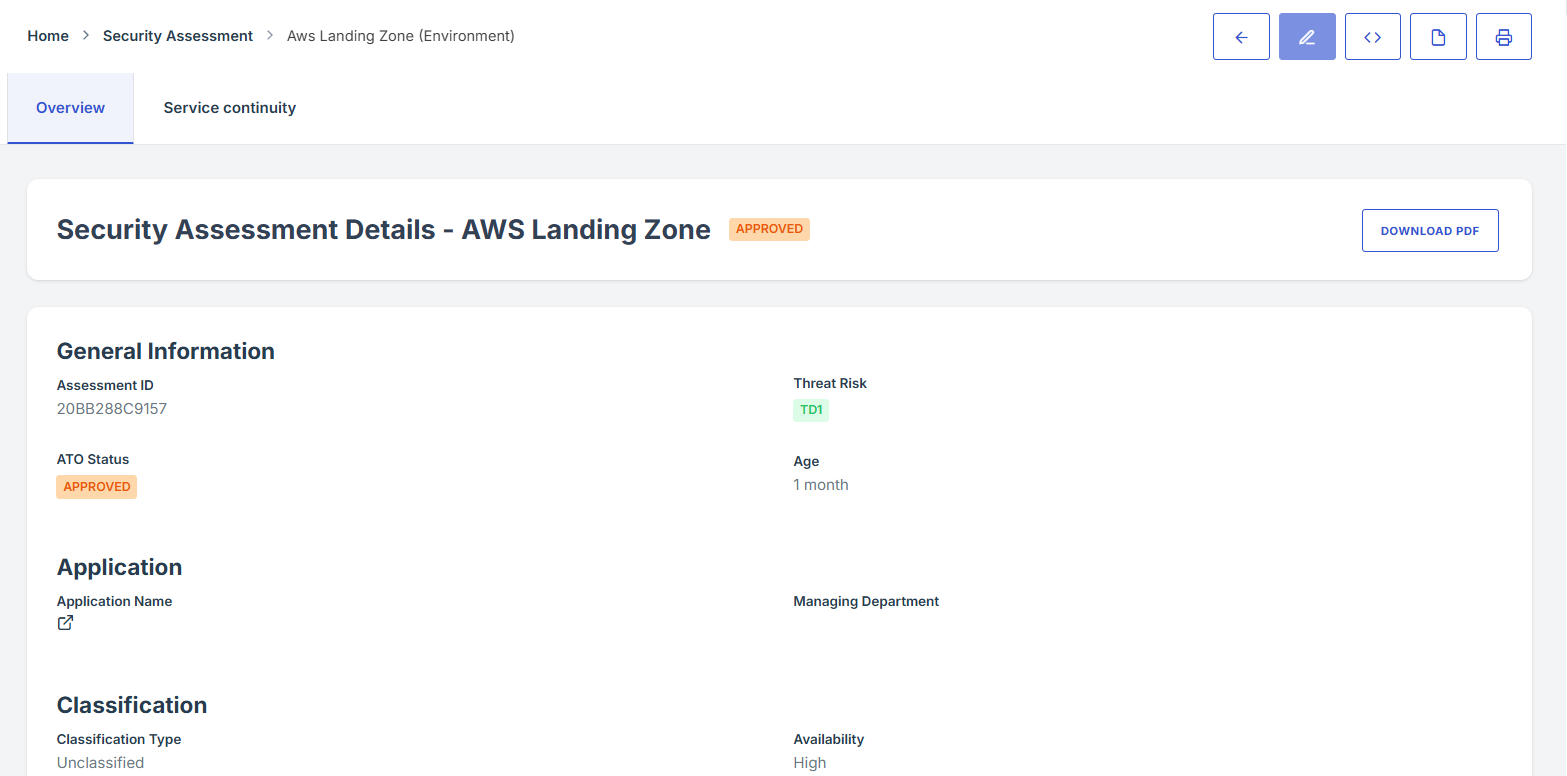
How To: View Security Assessment Overview details
- Log in to Iron fort: How To: Login
- Locate and click the Security Assessment tab on the dashboard.
- Under the Security Assessment page, click the Assessment ID” to get to the overview page.
- Once on the overview page, you'll see a summary section that provides key details about the Security Assessment.
- Note
1. Log in to Iron fort: How To: Login
2. Locate and click the Security Assessment tab on the dashboard.
3. Under the Security Assessment page, click the Assessment ID” to get to the overview page.

4. Once on the overview page, you'll see a summary section that provides key details about the Security Assessment.
5. Note
Note: Only users assigned as Security Assessor, Reviewers, or Approvers have the permission to open the Security Assessment overview details. If you are not, the option will not be available.
-
How To: Add POAM under Security Assessment
- Log in to Iron fort: How To: Login
- Locate and click the Security Assessment tab on the dashboard.
- Under the Security Assessment page, click the Assessment ID” to get to the overview page.
- Scroll down the overview page until you see the POAM section.
- Click the “Add new” to begin adding a new entry.
- Fill in the required fields:
- Once all fields are completed, click “Submit” to store the POAM.
- Note
1. Log in to Iron fort: How To: Login
2. Locate and click the Security Assessment tab on the dashboard.
3. Under the Security Assessment page, click the Assessment ID” to get to the overview page.

4. Scroll down the overview page until you see the POAM section.
5. Click the “Add new” to begin adding a new entry.

6. Fill in the required fields:
-
Title: Provide a clear and concise name for the POAM item.
-
Control Enhancement: Specify the relevant control enhancement associated with this POAM.
-
Date: Enter the current date or the date the issue was identified.
-
Description: Add a brief description outlining the issue and the plan to address it.
-
Owner: Assign the team member responsible for addressing this POAM.
-
Due Date: Set a target date for resolution.
-
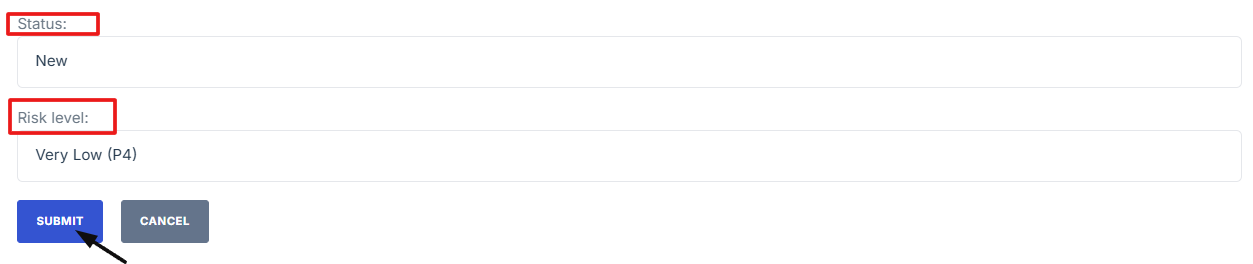
Status: Select the current status.
-
Risk Level: Choose the appropriate risk level.

7. Once all fields are completed, click “Submit” to store the POAM.
8. Note
Note: Only users assigned as Security Assessor, Reviewers, or Approvers have the permission to add POAM on the Security Assessment. If you are not, the option will not be available.
-
How To: Add Residual Risk under Security Assessment
- Log in to Iron fort: How To: Login
- Locate and click the Security Assessment tab on the dashboard.
- Under the Security Assessment page, click the Assessment ID” to get to the overview page.
- Scroll down the overview page until you see the Residual Risk section.
- Click the “Add new” to begin adding a new entry.
- Fill in the required fields:
- Once all fields are completed, click “Submit” to store the POAM.
- Note
1. Log in to Iron fort: How To: Login
2. Locate and click the Security Assessment tab on the dashboard.
3. Under the Security Assessment page, click the Assessment ID” to get to the overview page.

4. Scroll down the overview page until you see the Residual Risk section.
5. Click the “Add new” to begin adding a new entry.
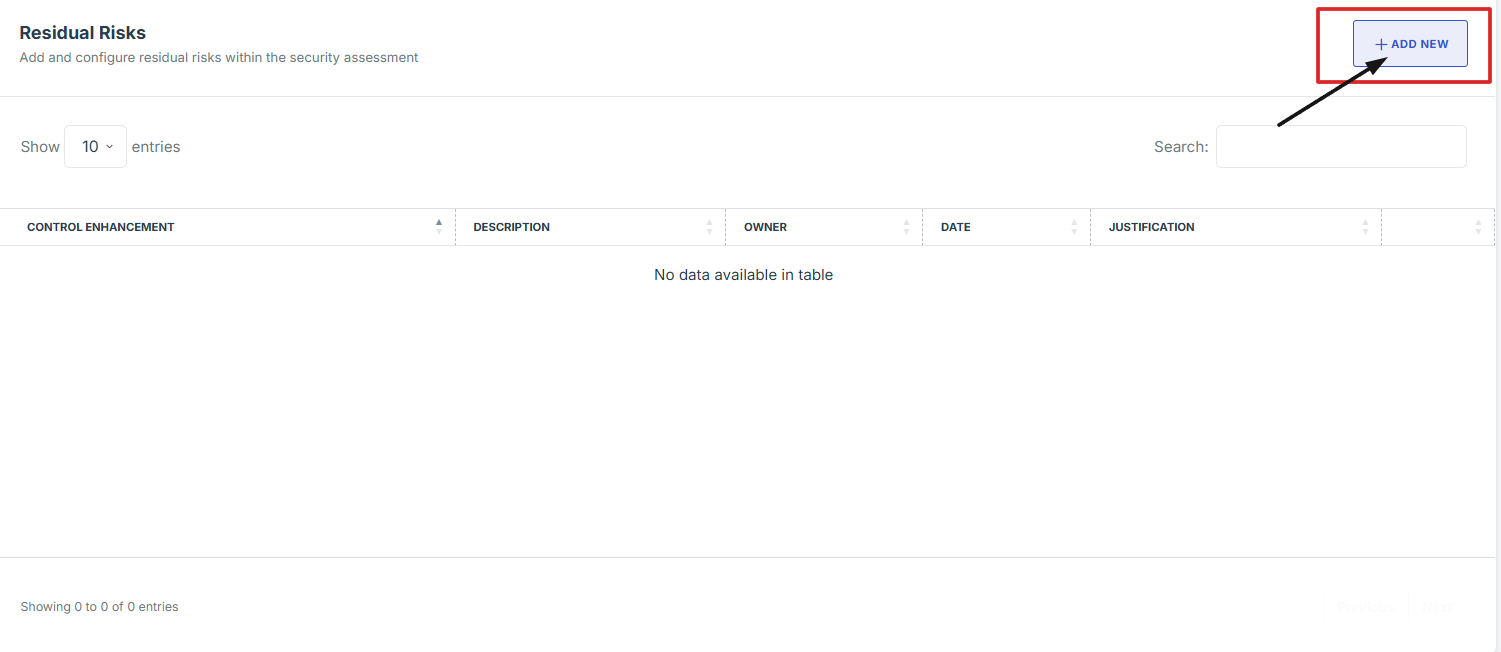
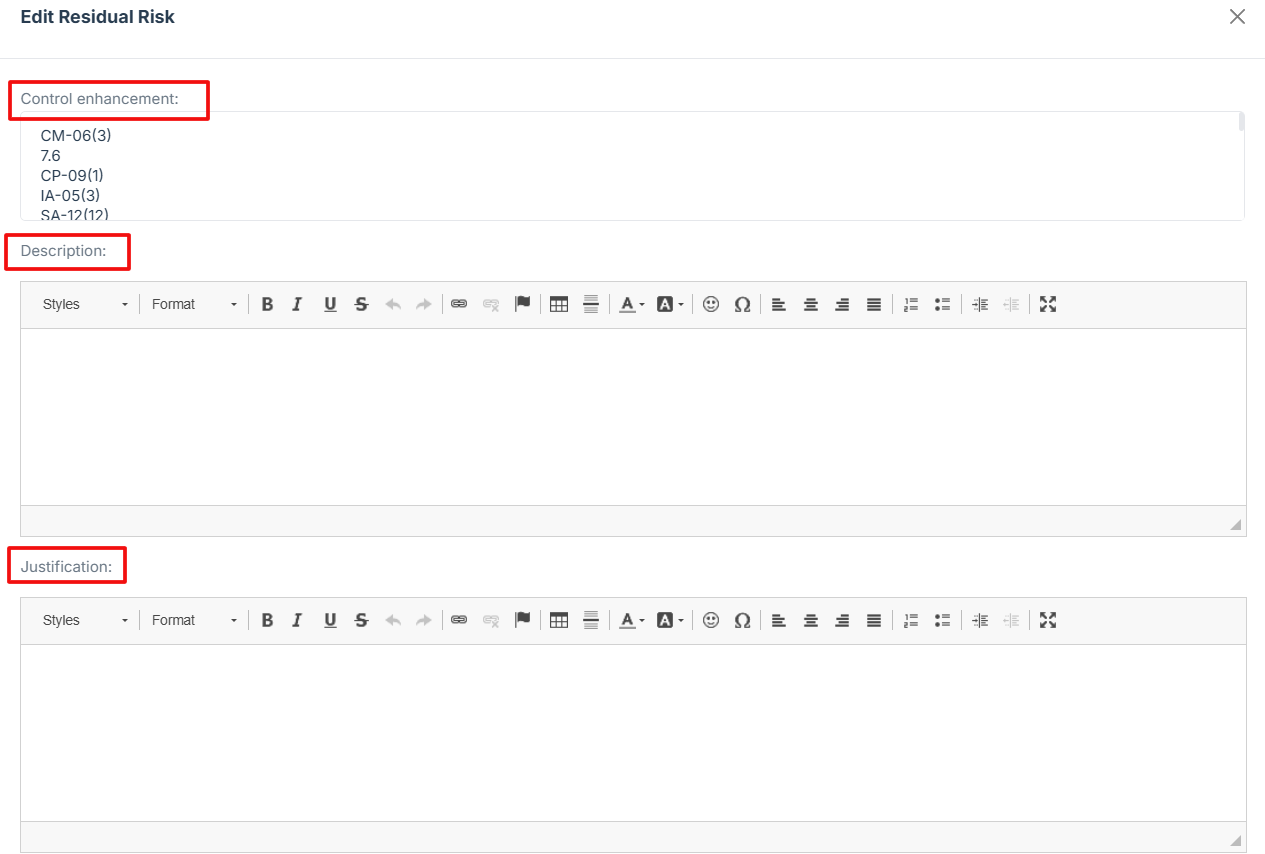
6. Fill in the required fields:
-
Control enhancement: Indicate the specific control was added to help reduce the risk.
-
Description: Explain the risk that still remains even after applying the controls.
-
Justification: State why the remaining risk is acceptable or cannot be reduced further.
-
Owner: Identify the person responsible for managing this risk.
-
Date: Provide the date when the residual risk was last reviewed or recorded.
7. Once all fields are completed, click “Submit” to store the POAM.
8. Note
Note: Only users assigned as Security Assessor, Reviewers, or Approvers have the permission to add Residual Risk on the Security Assessment. If you are not, the option will not be available.
-
How To: Edit Security Assessment Details
- Log in to Iron fort: How To: Login
- Locate and click the Security Assessment tab on the dashboard.
- Under the Security Assessment page, click the Assessment ID” to get to the overview page.
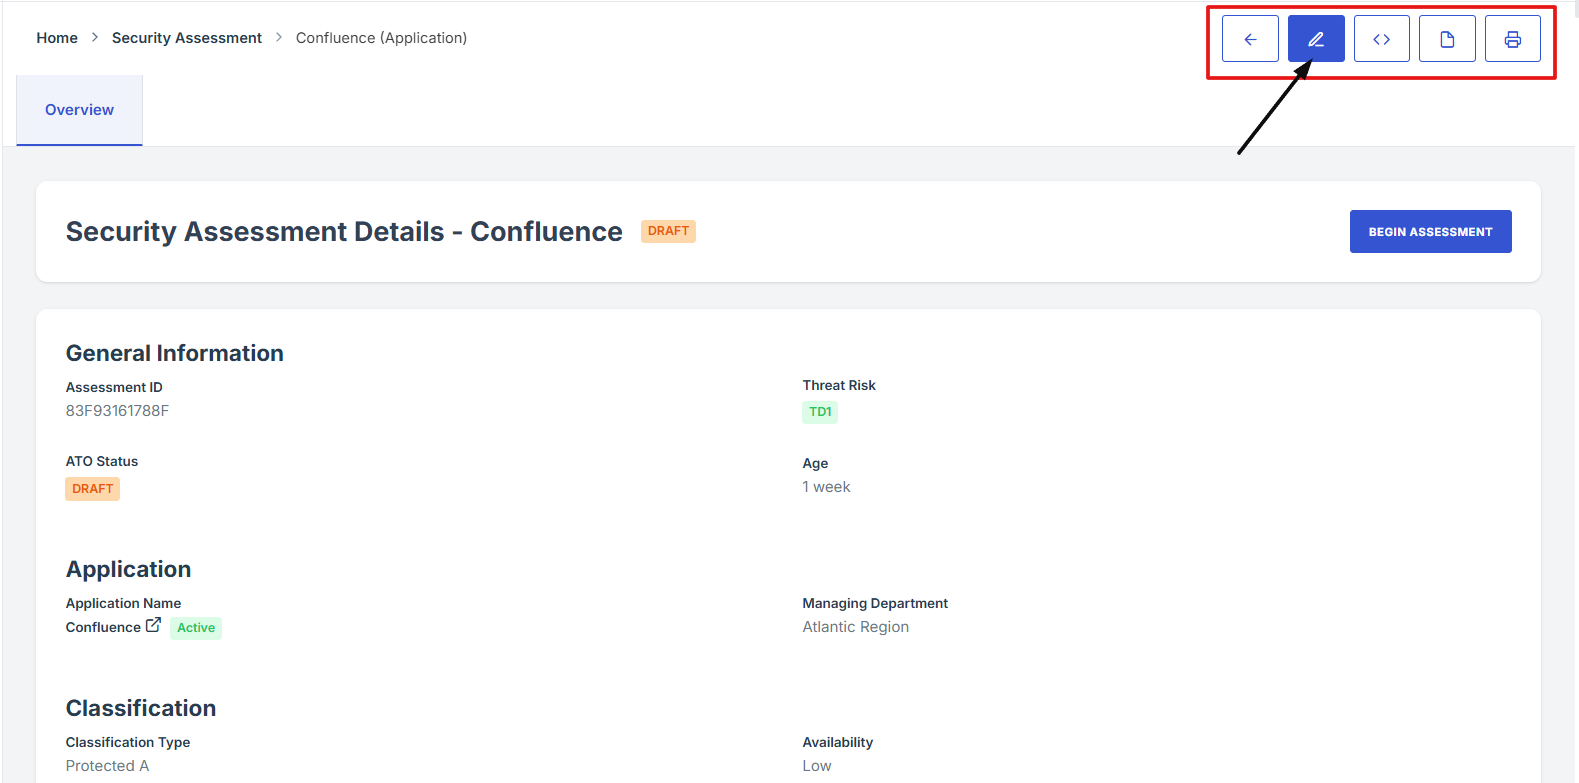
- On the Security Assessment overview page, navigate at the top right corner and click the pencil icon to edit the assessment page.
- Note
1. Log in to Iron fort: How To: Login
2. Locate and click the Security Assessment tab on the dashboard.
3. Under the Security Assessment page, click the Assessment ID” to get to the overview page.

4. On the Security Assessment overview page, navigate at the top right corner and click the pencil icon to edit the assessment page.
5. Note
Note: Only users assigned as Security Assessor, Reviewers, or Approvers have the permission to edit the Security Assessment overview details. If you are not, the option will not be available.
-
How To: Navigate Back from the Security Assessment Overview Page
- Log in to Iron fort: How To: Login
- Locate and click the Security Assessment tab on the dashboard.
- Under the Security Assessment page, click the Assessment ID” to get to the overview page.
- On the Security Assessment overview page, navigate at the top right corner and click the pencil icon to edit the assessment page.
- Note

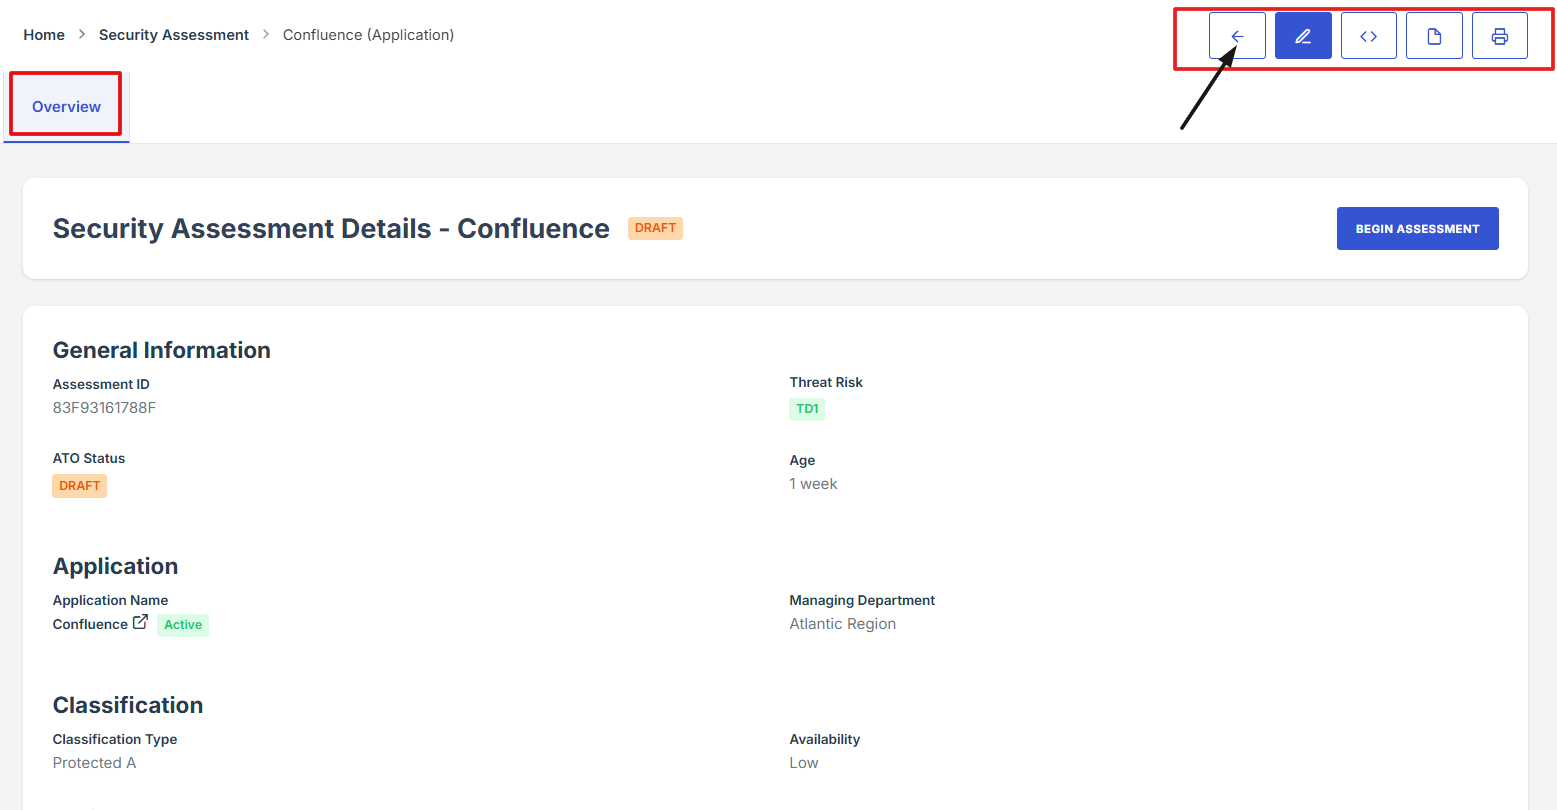
Note: Only users assigned as Security Assessor, Reviewers, or Approvers have the permission to navigate on the Security Assessment overview details. If you are not, the option will not be available.
-
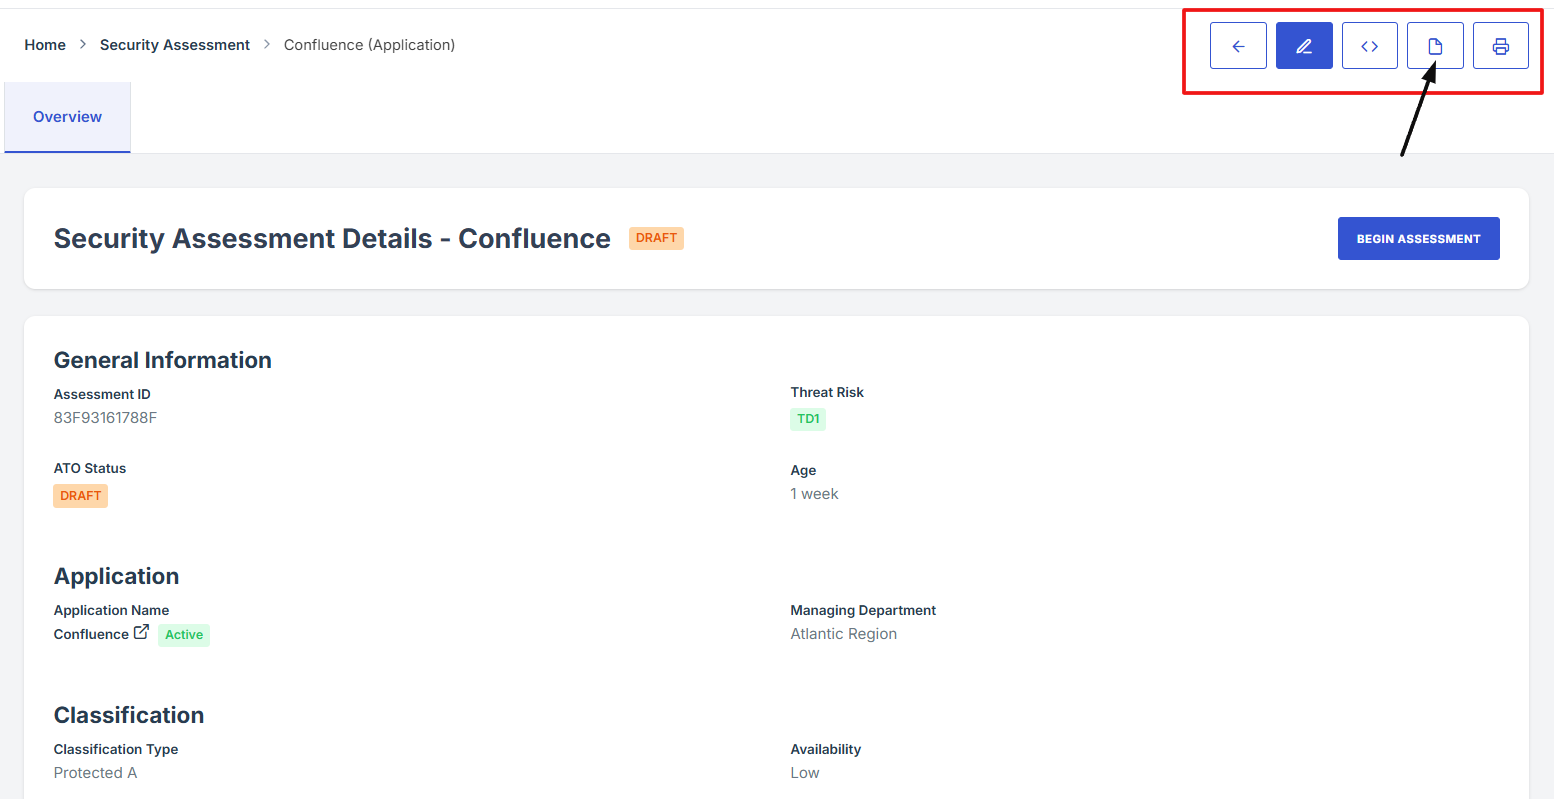
How To: Print Security Assessment Overview Details
- Log in to Iron fort: How To: Login
- Locate and click the Security Assessment tab on the dashboard.
- Under the Security Assessment page, click the Assessment ID” to get to the overview page.
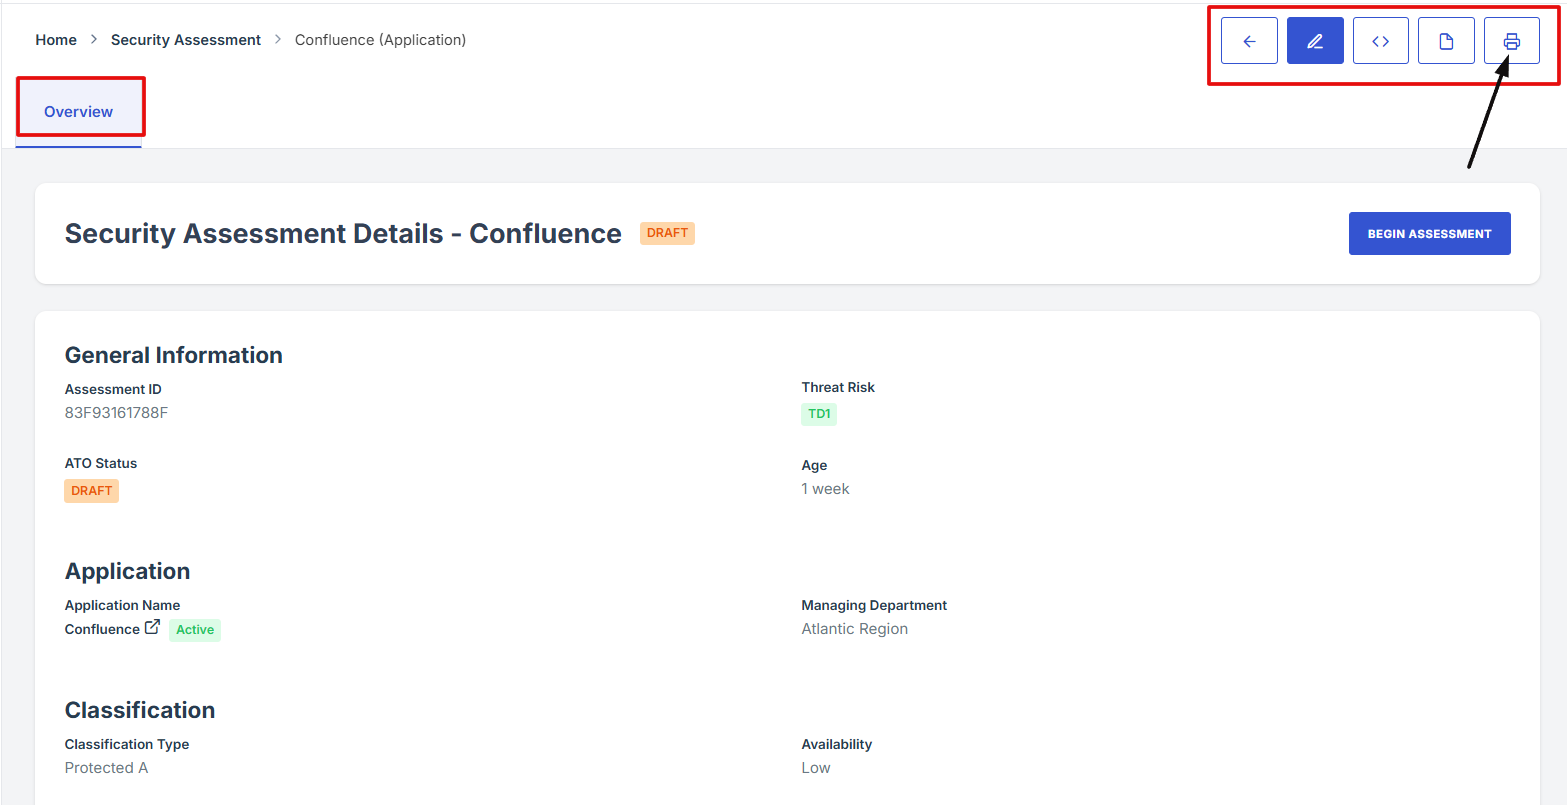
- On the top-right corner of the overview page, locate and click the Print icon. This will print a copy of the Security Assessment overview details.
- Note
1. Log in to Iron fort: How To: Login
2. Locate and click the Security Assessment tab on the dashboard.
3. Under the Security Assessment page, click the Assessment ID” to get to the overview page.

4. On the top-right corner of the overview page, locate and click the Print icon. This will print a copy of the Security Assessment overview details.
5. Note
Note: Only users assigned as Security Assessor, Reviewers, or Approvers have the permission to Print the Security Assessment. If not, the print option will not be available.
-
How To: Download Security Assessment Overview in PDF format
- Log in to Iron fort: How To: Login
- Locate and click the Security Assessment tab on the dashboard.
- Under the Security Assessment page, click the Assessment ID” to get to the overview page.
- On the top-right corner of the overview page, locate and click the Download icon. This will download a copy of the Security Assessment overview details.
- Note
1. Log in to Iron fort: How To: Login
2. Locate and click the Security Assessment tab on the dashboard.
3. Under the Security Assessment page, click the Assessment ID” to get to the overview page.

4. On the top-right corner of the overview page, locate and click the Download icon. This will download a copy of the Security Assessment overview details.
5. Note
Note: Only users assigned as Security Assessor, Reviewers, or Approvers have the permission to download the Security Assessment. If not, the download option will not be available.
-
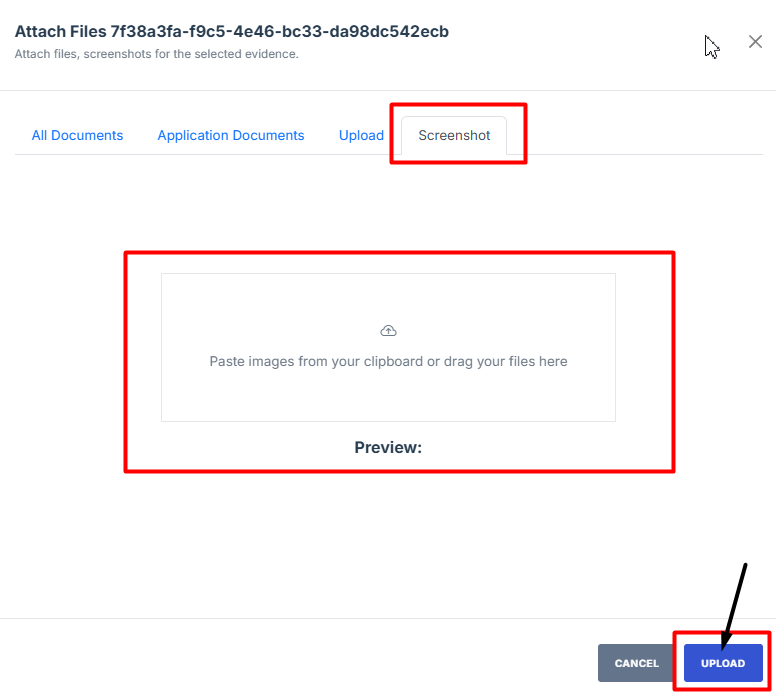
How To: Attach evidence control using screenshot
- Log in to Iron fort: How To: Login
- Locate and click the Security Assessment tab on the dashboard.
- On the overview page, click the control you want to attach evidence to.
- Scroll down the page until you locate the "Evidence for Control" section.
- Click on the Manage Evidence button (pencil/edit icon) from the five available options to enter the evidence editing page.
- Provide Detailed Information:
- Click Attached file button to upload a document, image, or other relevant evidence.
- Navigate to the Screenshot tab and paste the screenshot image you took.
- Click the Upload button to save it.
1. Log in to Iron fort: How To: Login
2. Locate and click the Security Assessment tab on the dashboard.
3. On the overview page, click the control you want to attach evidence to.

4. Scroll down the page until you locate the "Evidence for Control" section..
Note: the status should be not started in order to edit the evidence page.
5. Click on the Manage Evidence button (pencil/edit icon) from the five available options to enter the evidence editing page.

6. Provide Detailed Information:
Fill out the Justification, Description, and Explanation fields to give a thorough rationale for the evidence submission.

7. Click Attached file button to upload a document, image, or other relevant evidence.
8. Navigate to the Screenshot tab and paste the screenshot image you took.
9. Click the Upload button to save it.
-
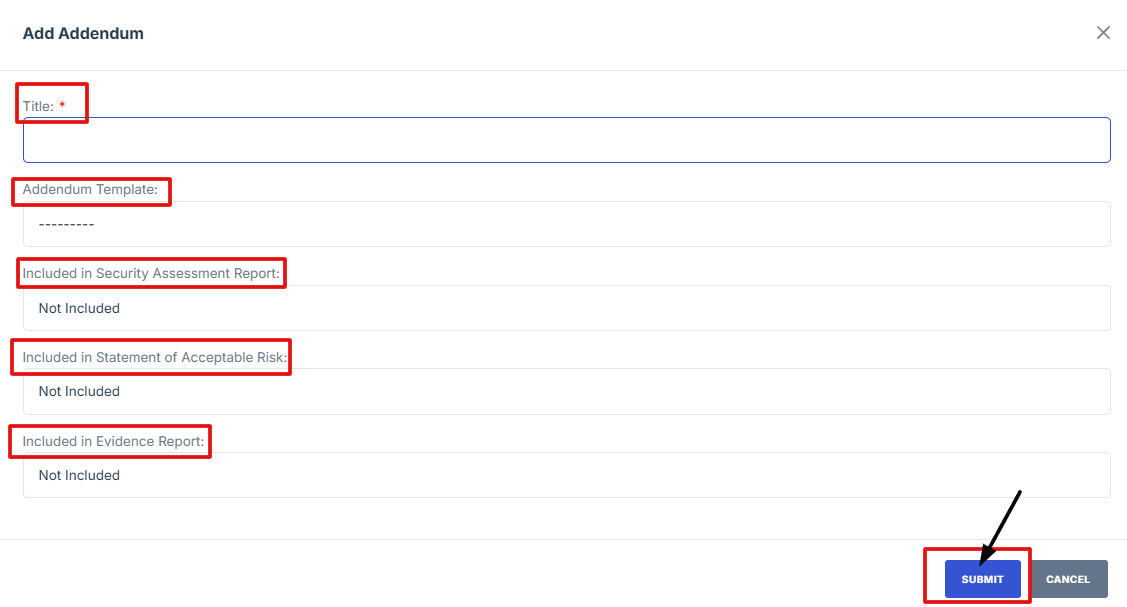
How To: Add Addendums under Security Assessment
- Log in to Iron fort: How To: Login
- Locate and click the Security Assessment tab on the dashboard.
- Under the Security Assessment page, click the “Assessment ID” to get to the overview page.
- Scroll down the overview page until you see the Addendum section.
- Click the "Add Addendum" button to start.
- Fill in the required details on the form.
- You’ll then be taken to the template page where you can review or edit the content.
- Once done, click Save Changes to keep your updates.
The Addendum feature lets you add custom pages before or after your Security Assessment PDF and Statement of Accepted Risk (SOAR). This is helpful if you want to include a cover page, extra notes, or a page for handwritten signatures—without editing the original document.
To make things easier, you can use a template if you often add the same page. Just select the template, and it will automatically add your custom content. This saves time and keeps your documents consistent and professional.
1. Log in to Iron fort: How To: Login
2. Locate and click the Security Assessment tab on the dashboard.
3. Under the Security Assessment page, click the “Assessment ID” to get to the overview page.
4. Scroll down the overview page until you see the Addendum section.
5. Click the "Add Addendum" button to start.
6. Fill in the required details on the form.
7. You’ll then be taken to the template page where you can review or edit the content.
8. Once done, click Save Changes to keep your updates.

-
How To: Add Tag under Security Assessment
- Log in to Iron fort: How To: Login
- Locate and click the Security Assessment tab on the dashboard.
- On the Statement of Sensitivity list page, click on the Assessment ID of the record you want to edit. This will take you to the overview page.
- Scroll down the overview page until you find the "Tag" section.
- In the Tag section, fill in the required fields:
- Once all required fields are completed, click "Submit" to save the new tag.
1. Log in to Iron fort: How To: Login
2. Locate and click the Security Assessment tab on the dashboard.
3. On the Statement of Sensitivity list page, click on the Assessment ID of the record you want to edit. This will take you to the overview page.

4. Scroll down the overview page until you find the "Tag" section.
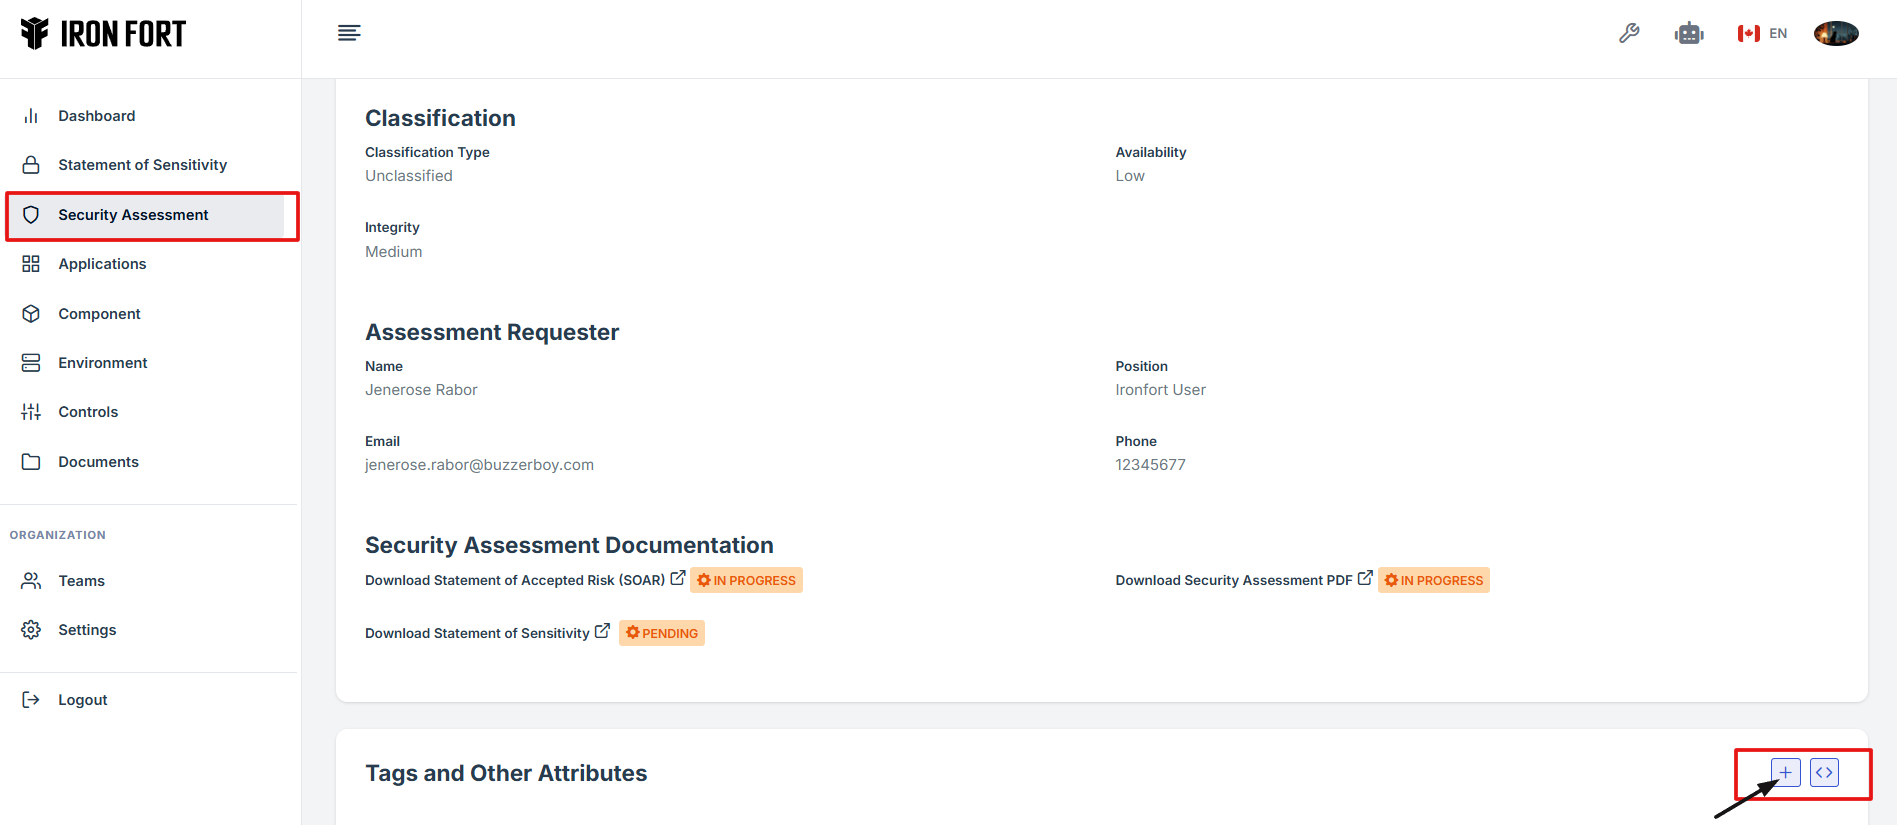
5. In the Tag section, fill in the required fields:
-
Key: Enter the tag's name or identifier.
-
Value: Provide the corresponding value for the key.
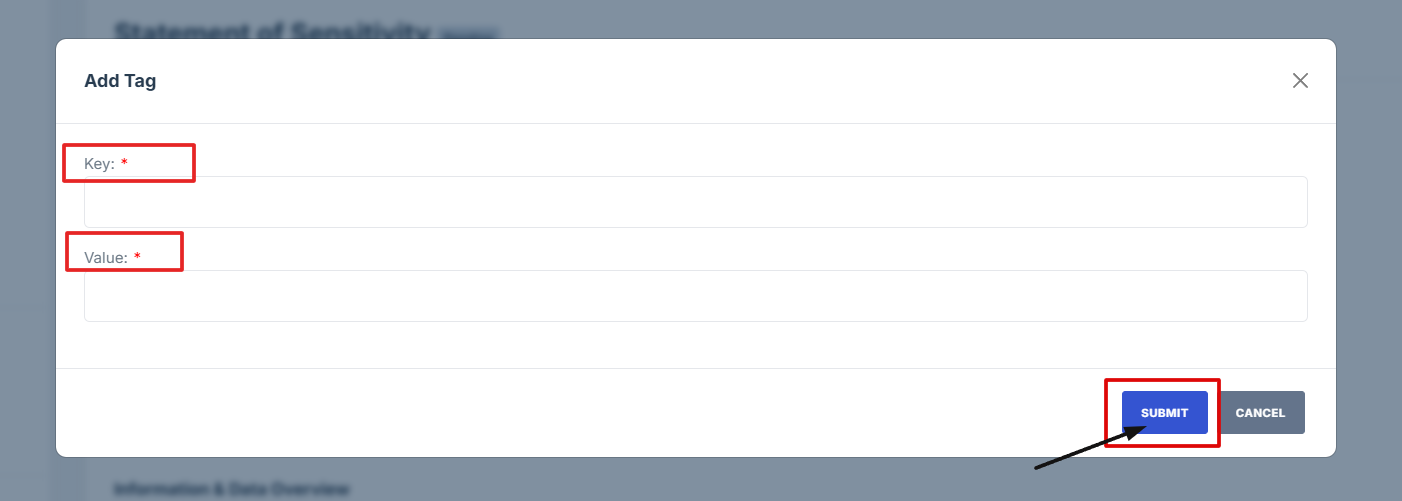
6. Once all required fields are completed, click "Submit" to save the new tag.
-
How To: Add Reviewers to the Security Assessment
- Log in to Iron fort: How To: Login
- Locate and click the Security Assessment tab on the dashboard.
- On the Statement of Sensitivity list page, click on the Assessment ID of the record you want to edit. This will take you to the overview page.
- Scroll down the overview page until you find the "Add Reviewers" section.
- Click the "Add Reviewers" button, then enter the name of the person you wish to assign as a reviewer. Select the correct name from the dropdown to add them.
- Click "Submit" to save changes.
This tutorial will guide you through the steps to add reviewers to a Security Assessment. It is designed to help users assign the appropriate team members responsible for reviewing and validating the control evidence details.
1. Log in to Iron fort: How To: Login
2. Locate and click the Security Assessment tab on the dashboard.
3. On the Statement of Sensitivity list page, click on the Assessment ID of the record you want to edit. This will take you to the overview page.

4. Scroll down the overview page until you find the "Add Reviewers" section.
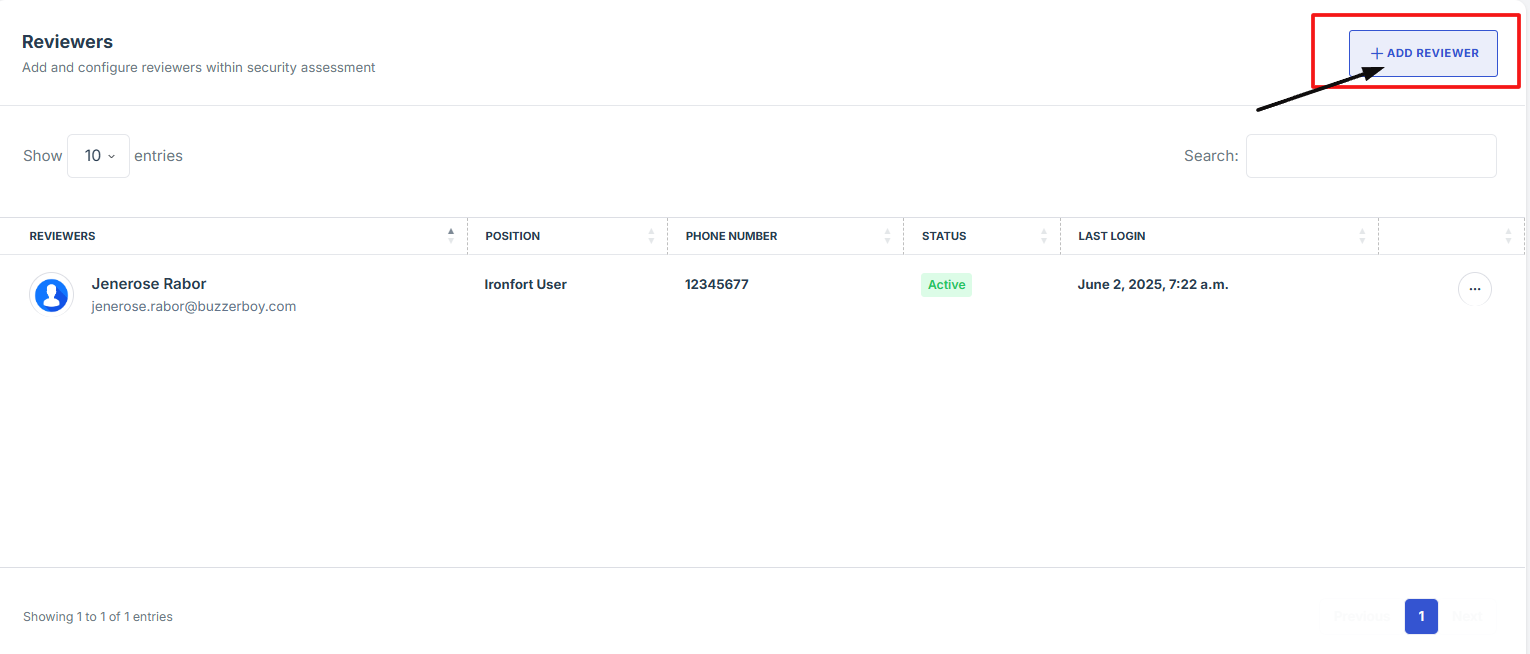
5. Click the "Add Reviewers" button, then enter the name of the person you wish to assign as a reviewer. Select the correct name from the dropdown to add them.
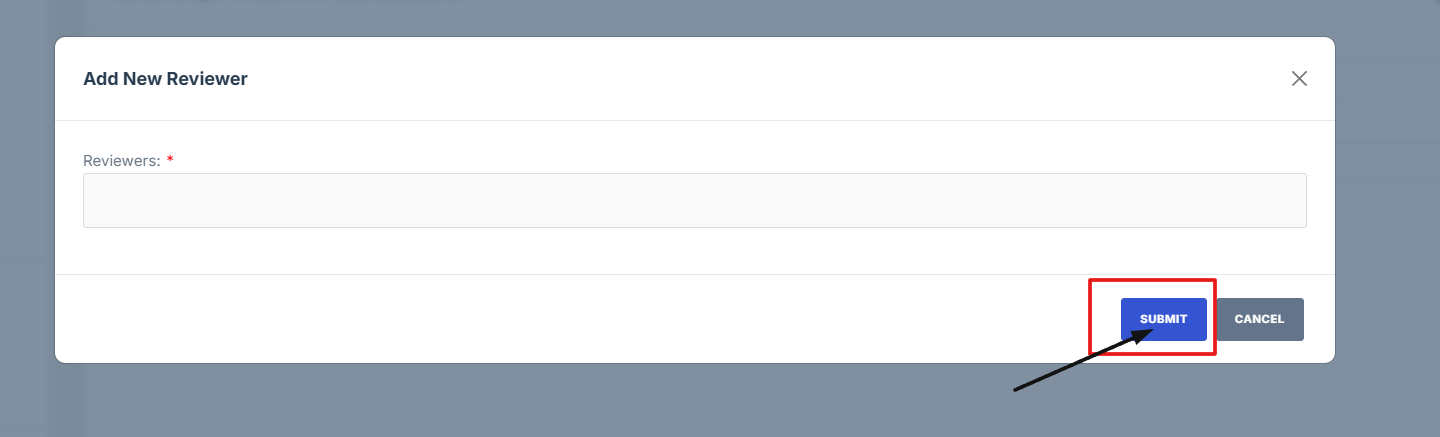
6. Click "Submit" to save changes.
-
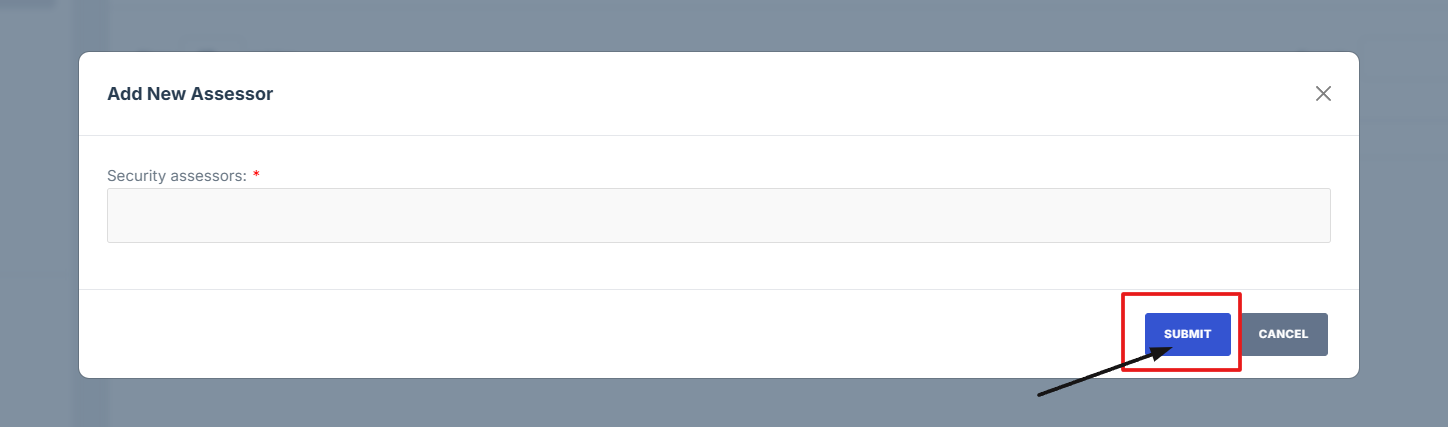
How To: Add Assessor to the Security Assessment
- Log in to Iron fort: How To: Login
- Locate and click the Security Assessment tab on the dashboard.
- On the Statement of Sensitivity list page, click on the Assessment ID of the record you want to edit. This will take you to the overview page.
- Scroll down the overview page until you find the "Add Assessors" section.
- Click the "Add Approvers" button, then enter the name of the person you wish to assign as a assessor for the assessment. Select the correct name from the dropdown to add them.
This tutorial will guide you through the steps to add assessor to a Security Assessment. It is designed to help users assign the appropriate team members responsible for approving and validating assessment details.
1. Log in to Iron fort: How To: Login
2. Locate and click the Security Assessment tab on the dashboard.
3. On the Statement of Sensitivity list page, click on the Assessment ID of the record you want to edit. This will take you to the overview page.

4. Scroll down the overview page until you find the "Add Assessors" section.
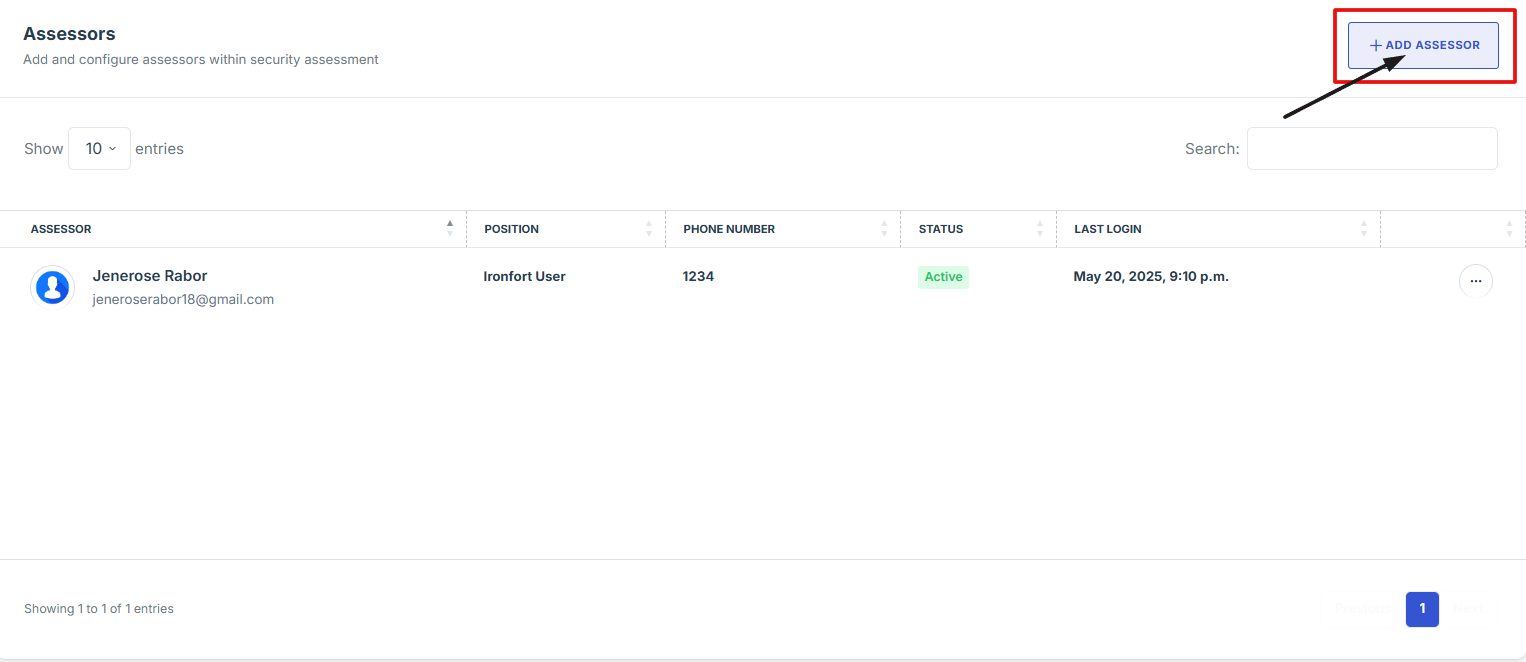
5. Click the "Add Approvers" button, then enter the name of the person you wish to assign as a assessor for the assessment. Select the correct name from the dropdown to add them.
-
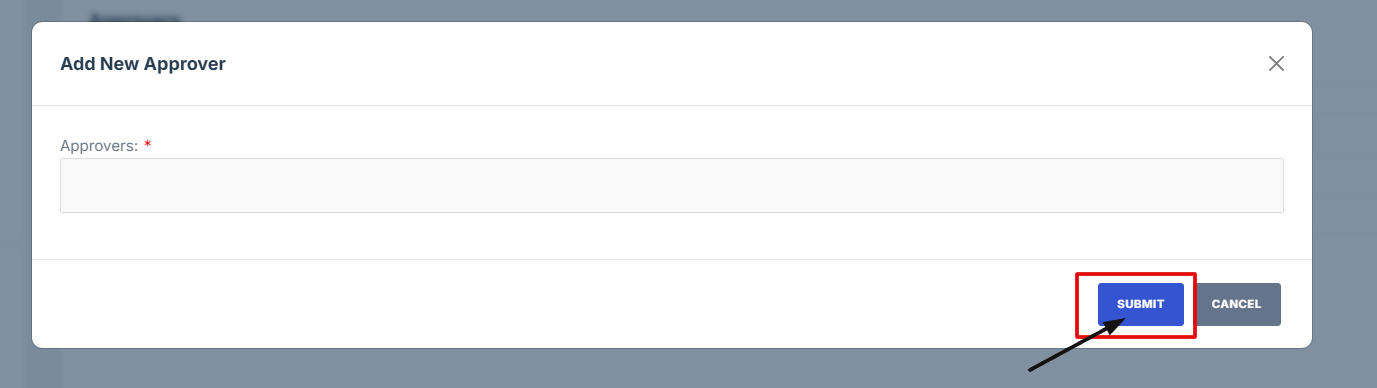
How To: Add Approvers to the Security Assessment
- Log in to Iron fort: How To: Login
- Locate and click the Security Assessment tab on the dashboard.
- On the Statement of Sensitivity list page, click on the Assessment ID of the record you want to edit. This will take you to the overview page.
- Scroll down the overview page until you find the "Add Approvers" section.
- Click the "Add Approvers" button, then enter the name of the person you wish to assign as a assessor for the assessment. Select the correct name from the dropdown to add them.
This tutorial will guide you through the steps to add approvers to a Security Assessment. It is designed to help users assign the appropriate team members responsible for approving and validating assessment details.
1. Log in to Iron fort: How To: Login
2. Locate and click the Security Assessment tab on the dashboard.
3. On the Statement of Sensitivity list page, click on the Assessment ID of the record you want to edit. This will take you to the overview page.

4. Scroll down the overview page until you find the "Add Approvers" section.
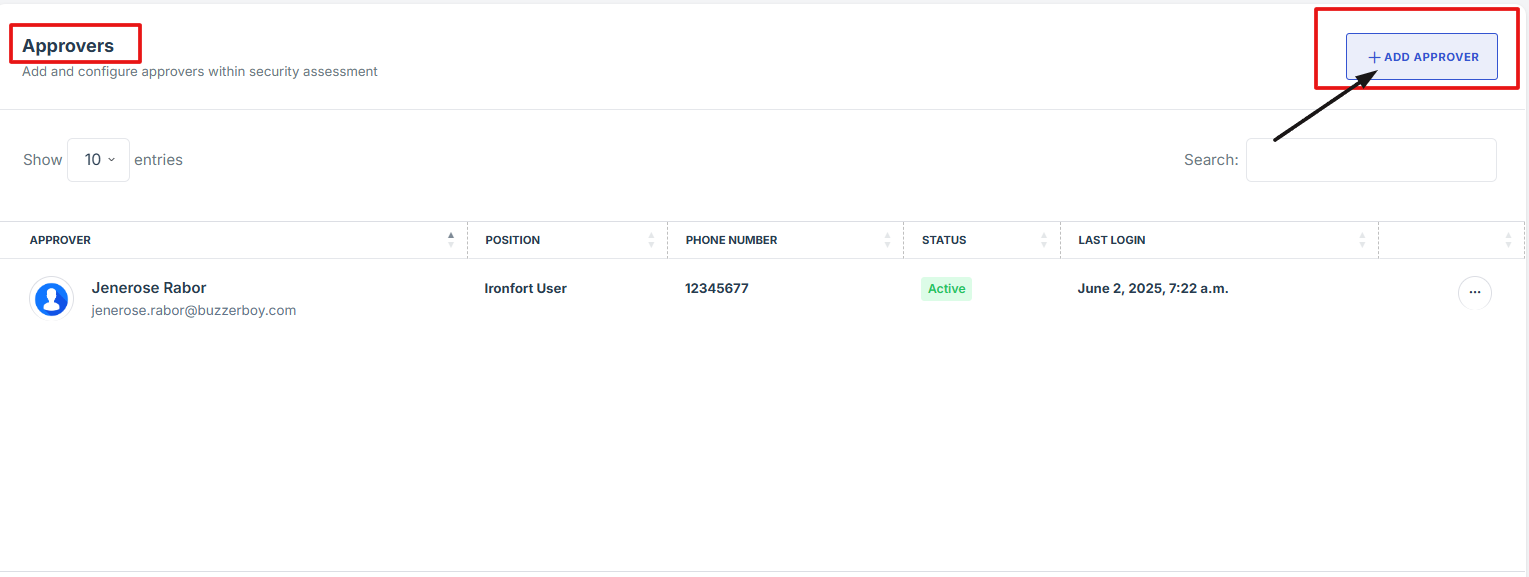
5. Click the "Add Approvers" button, then enter the name of the person you wish to assign as a assessor for the assessment. Select the correct name from the dropdown to add them.
-
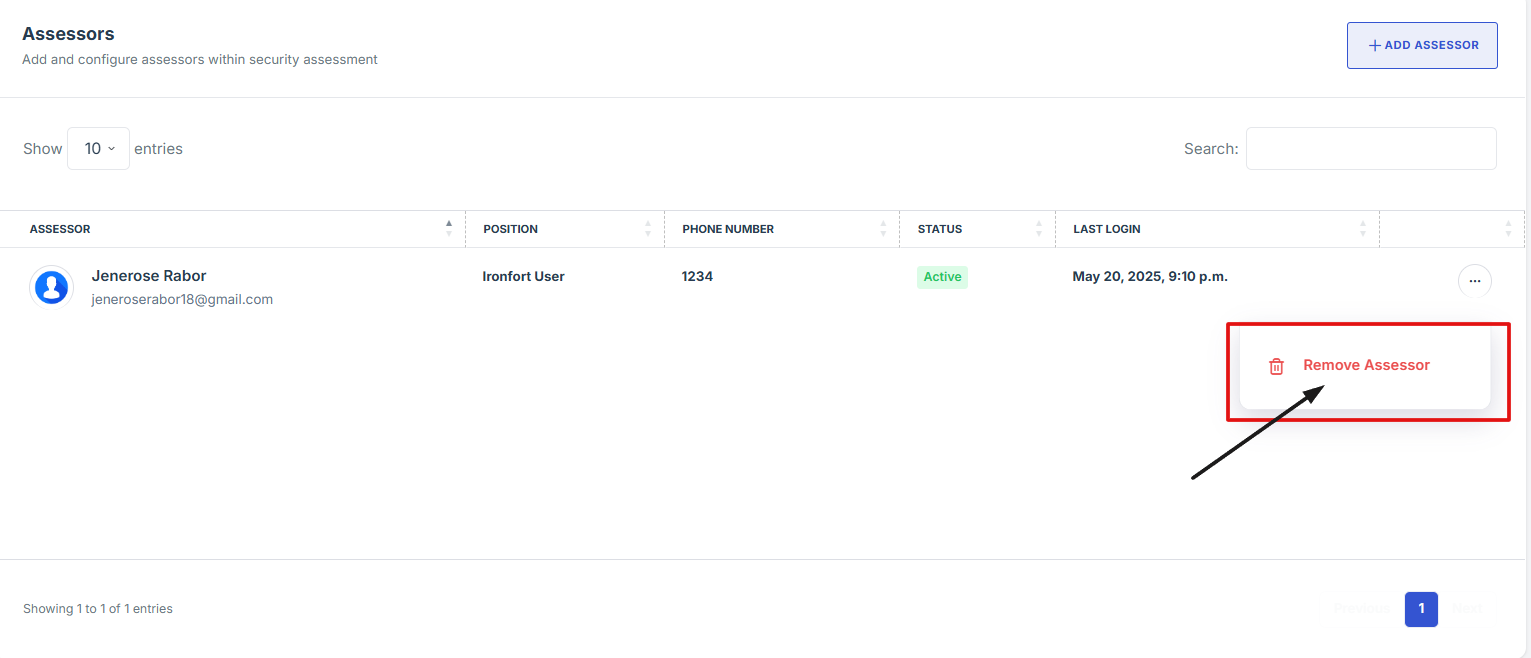
How To: Delete Assessor to the Security Assessment
- Log in to Iron fort: How To: Login
- Locate and click the Security Assessment tab on the dashboard.
- On the Statement of Sensitivity list page, click on the Assessment ID of the record you want to edit. This will take you to the overview page.
- Scroll down the overview page until you find the "Assessor" section.
- Locate the name of the assessor you want to remove. Click the three-dot menu (⋮) next to their name, then select "Remove Assessor" from the dropdown options to remove them.
1. Log in to Iron fort: How To: Login
2. Locate and click the Security Assessment tab on the dashboard.
3. On the Statement of Sensitivity list page, click on the Assessment ID of the record you want to edit. This will take you to the overview page.

4. Scroll down the overview page until you find the "Assessor" section.
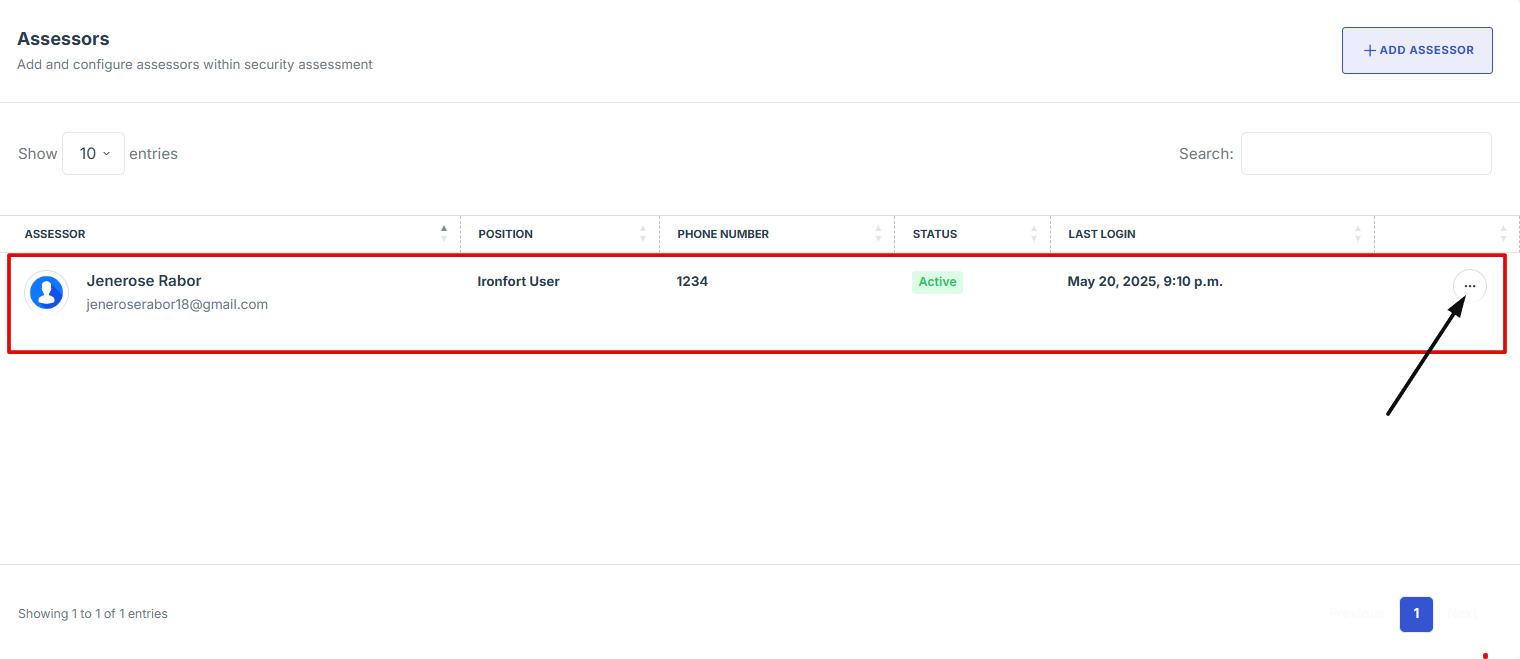
5. Locate the name of the assessor you want to remove. Click the three-dot menu (⋮) next to their name, then select "Remove Assessor" from the dropdown options to remove them.
-
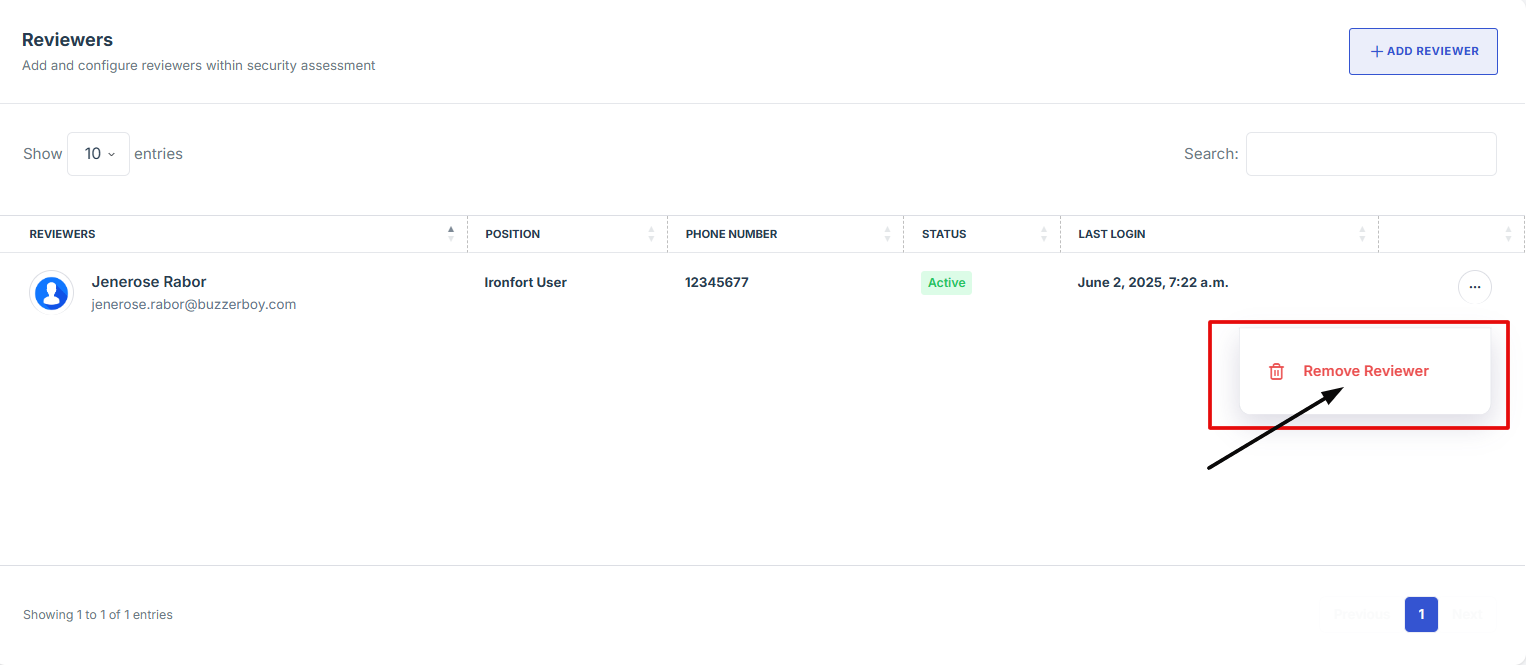
How To: Delete Reviewers to the Security Assessment
- Log in to Iron fort: How To: Login
- Locate and click the Security Assessment tab on the dashboard.
- On the Statement of Sensitivity list page, click on the Assessment ID of the record you want to edit. This will take you to the overview page.
- Scroll down the overview page until you find the "Reviewers" section.
- Locate the name of the reviewer you want to remove. Click the three-dot menu (⋮) next to their name, then select "Remove Reviewer" from the dropdown options to remove them.
1. Log in to Iron fort: How To: Login
2. Locate and click the Security Assessment tab on the dashboard.
3. On the Statement of Sensitivity list page, click on the Assessment ID of the record you want to edit. This will take you to the overview page.

4. Scroll down the overview page until you find the "Reviewers" section.
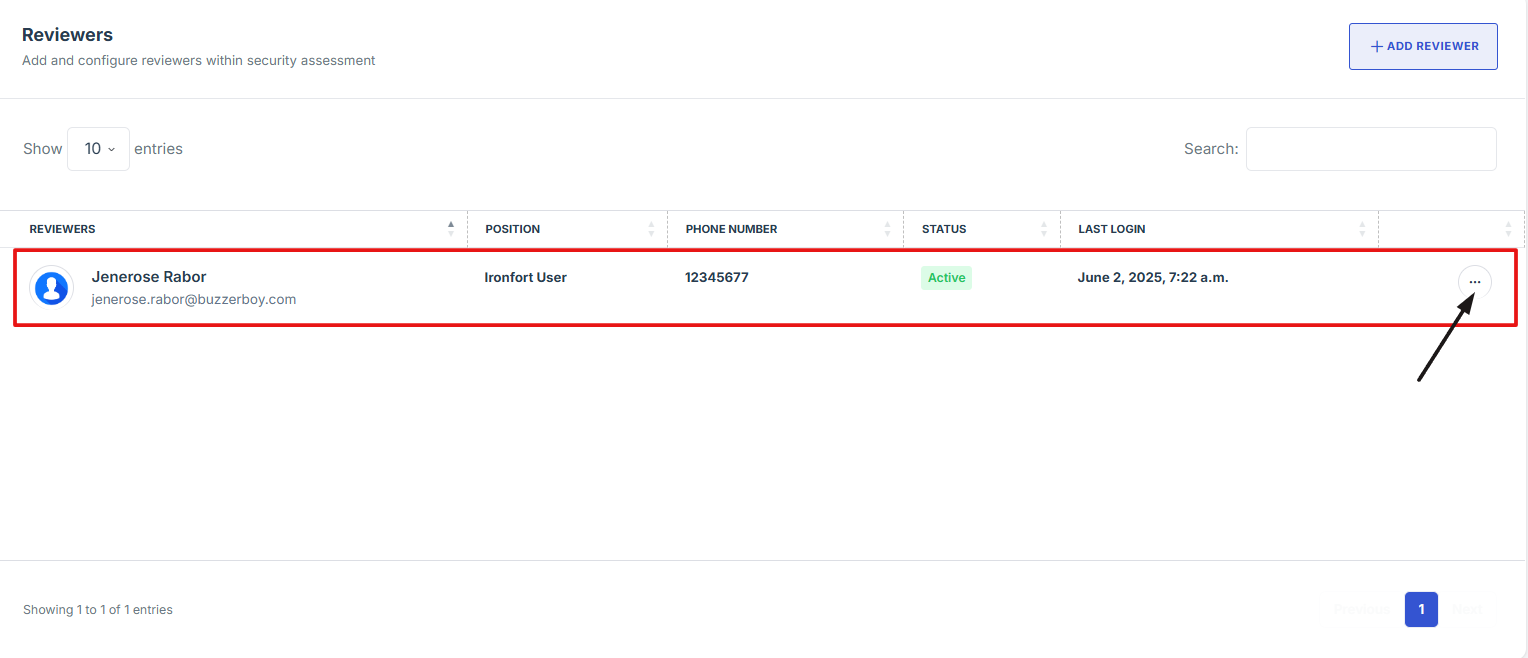
5. Locate the name of the assessor you want to remove. Click the three-dot menu (⋮) next to their name, then select "Remove Reviewer" from the dropdown options to remove them.
-
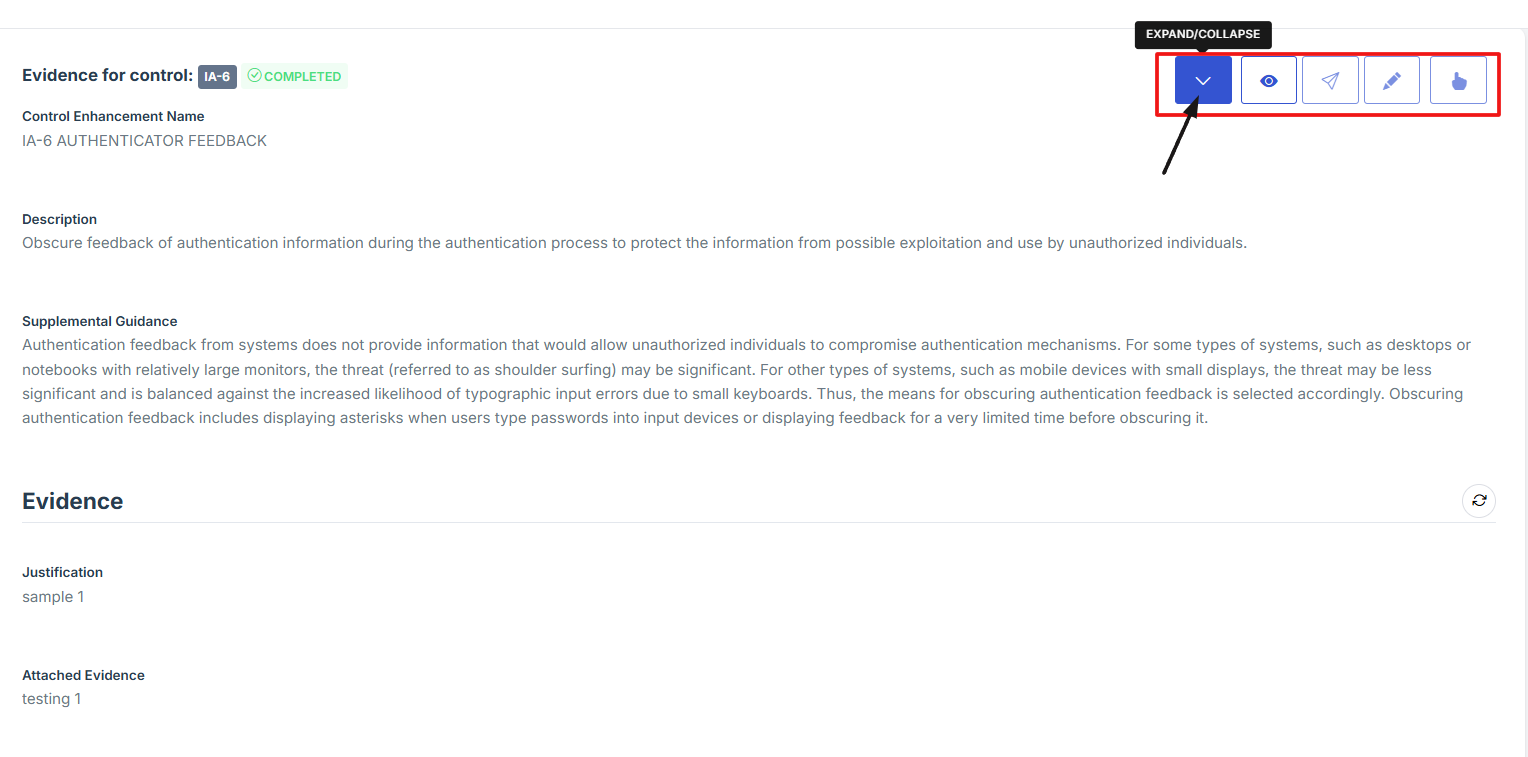
How To: Collapse the Control Evidence Modal in a Security Assessment
- Log in to Iron fort: How To: Login
- Locate and click the Security Assessment tab on the dashboard.
- On the Statement of Sensitivity list page, click on the Assessment ID of the record you want to edit. This will take you to the overview page.
- On the overview page, click the Control you want to attach evidence to.
- Scroll down the page to find the "Evidence for Control" section. Once there, navigate to the top-right corner of the section to access the available action icons.
- Click the caret (^) icon to expand or collapse the Evidence Control section for better visibility and navigation.
1. Log in to Iron fort: How To: Login
2. Locate and click the Security Assessment tab on the dashboard.
3. On the Statement of Sensitivity list page, click on the Assessment ID of the record you want to edit. This will take you to the overview page.

4. On the overview page, click the Control you want to attach evidence to.

5. Scroll down the page to find the "Evidence for Control" section. Once there, navigate to the top-right corner of the section to access the available action icons.

6. Click the caret (^) icon to expand or collapse the Evidence Control section for better visibility and navigation.
-
How To: Delete Approvers to the Security Assessment
- Log in to Iron fort: How To: Login
- Locate and click the Security Assessment tab on the dashboard.
- On the Statement of Sensitivity list page, click on the Assessment ID of the record you want to edit. This will take you to the overview page.
- Scroll down the overview page until you find the "Reviewer" section.
- Locate the name of the approver you want to remove. Click the three-dot menu (⋮) next to their name, then select "Remove Approver" from the dropdown options to remove them.
1. Log in to Iron fort: How To: Login
2. Locate and click the Security Assessment tab on the dashboard.
3. On the Statement of Sensitivity list page, click on the Assessment ID of the record you want to edit. This will take you to the overview page.

4. Scroll down the overview page until you find the "Reviewer" section.
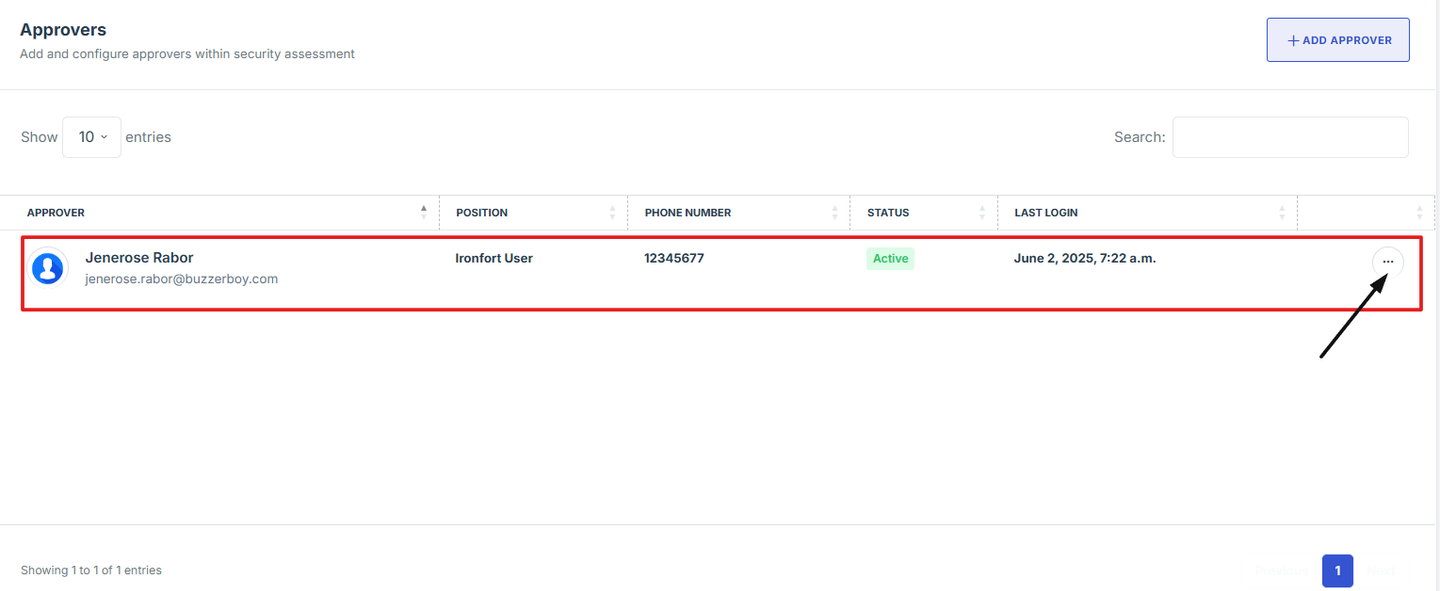
5. Locate the name of the approver you want to remove. Click the three-dot menu (⋮) next to their name, then select "Remove Approver" from the dropdown options to remove them.
