How To Guidelines in Application
This page provides step-by-step guidelines on how to register and manage applications within the Iron Fort Compliance system, including their purpose, lifecycle, and required details.
An application is a digital tool or software registered within the Iron fort Compliance system to support business or operational functions. It includes essential details such as its name, associated department, description, environment, and status (e.g., Active, In Development, Deprecated). Applications can be newly created, tested, or archived, depending on their lifecycle within the organization. Each application must have a designated logo that meets specific size and file requirements.

-
How To: Register a new application
- Navigate to your organization’s Iron Fort Compliance login page
- Log in to Your Account
- Check your email for the One-Time Password (OTP) sent on your email and enter the OTP to proceed
- Once logged in, a welcome prompt will appear displaying
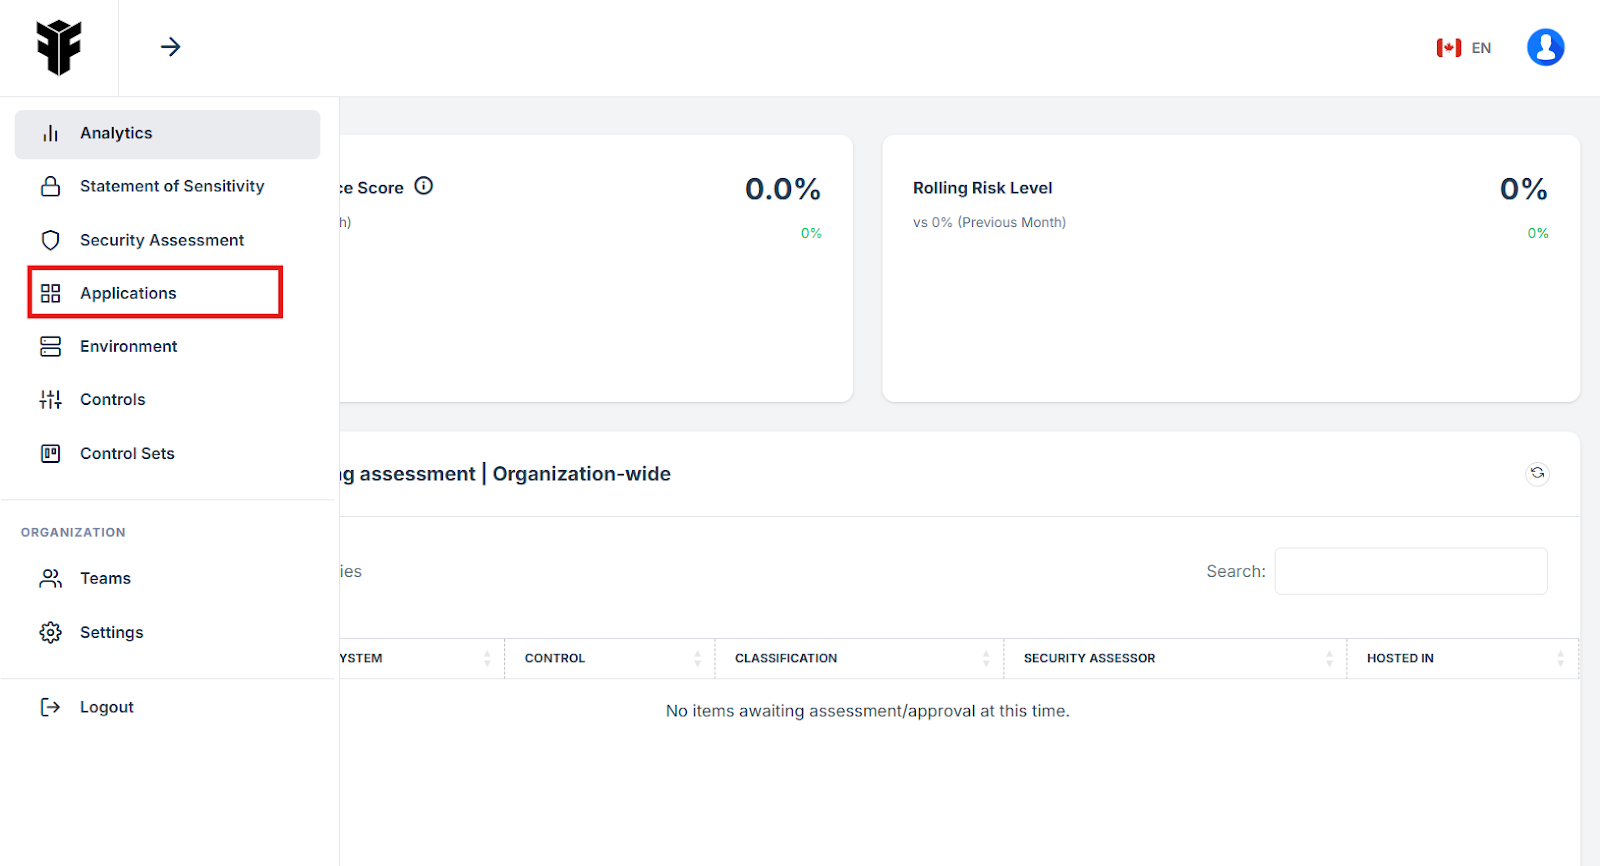
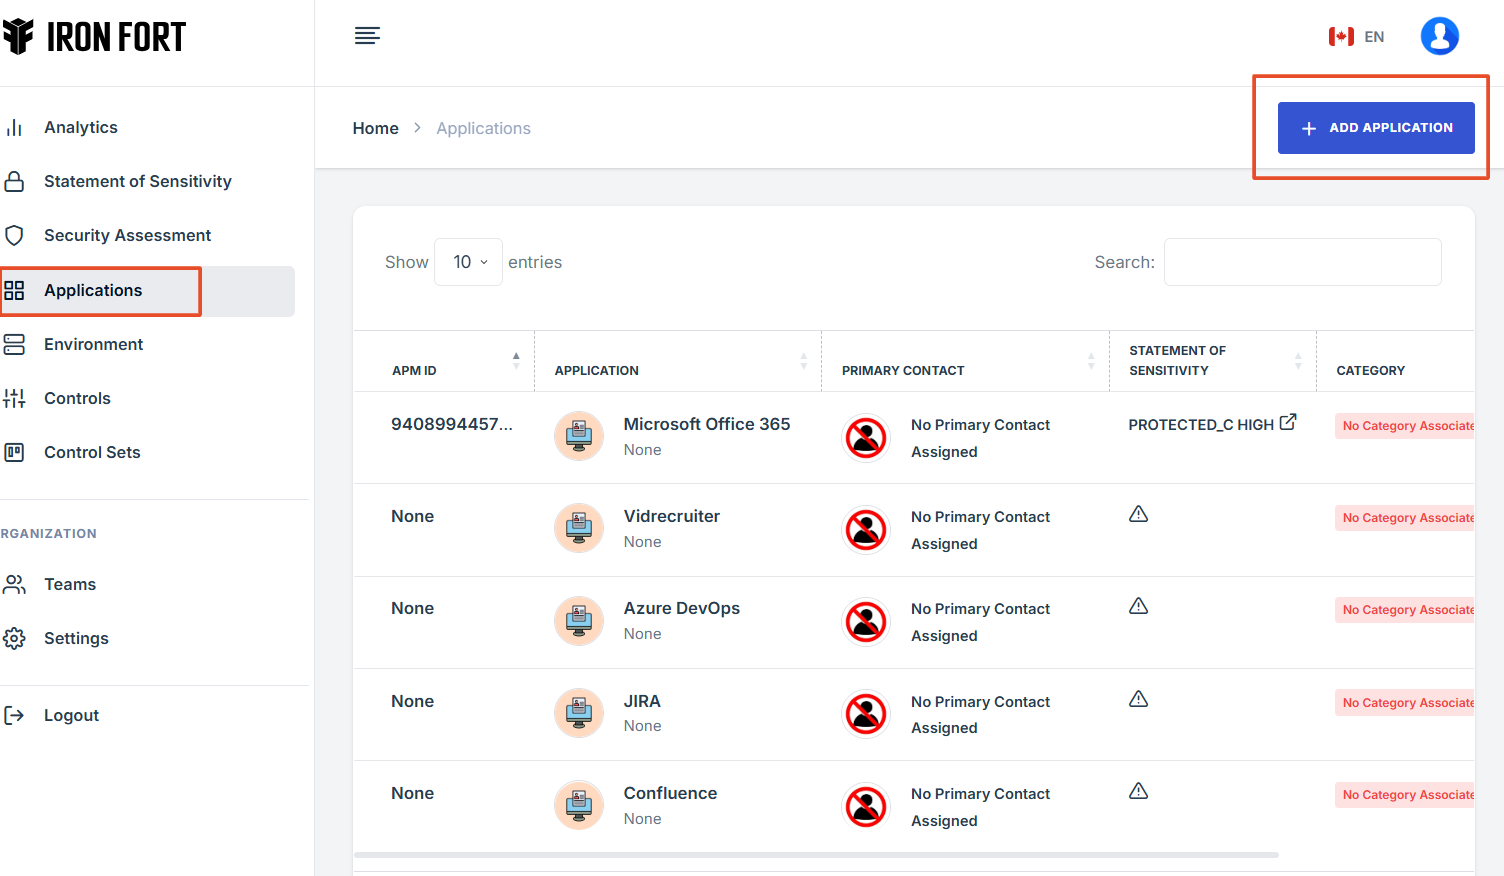
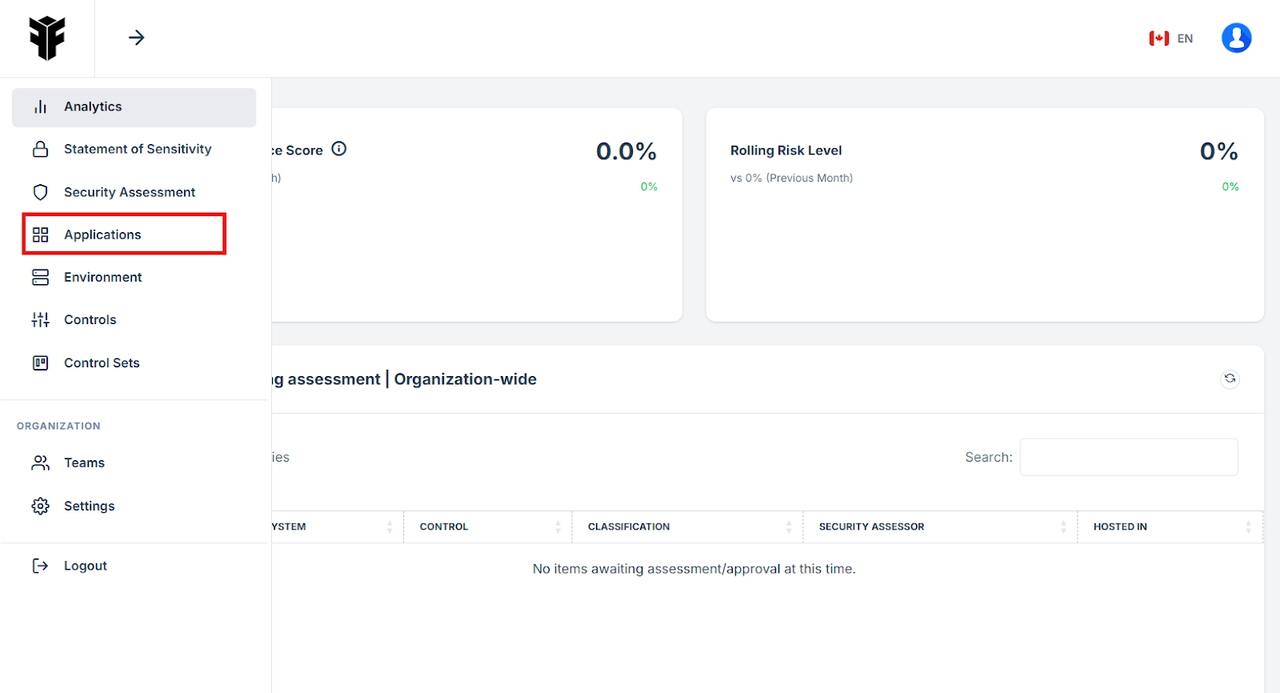
- Move your cursor to the left side of the dashboard to reveal the menu
- Click on Applications from the menu
- Click on Add Application to create a new entry
- Upload the Application Logo and Fill in the Required Information
- More details for STATUS section
- Save Your Changes
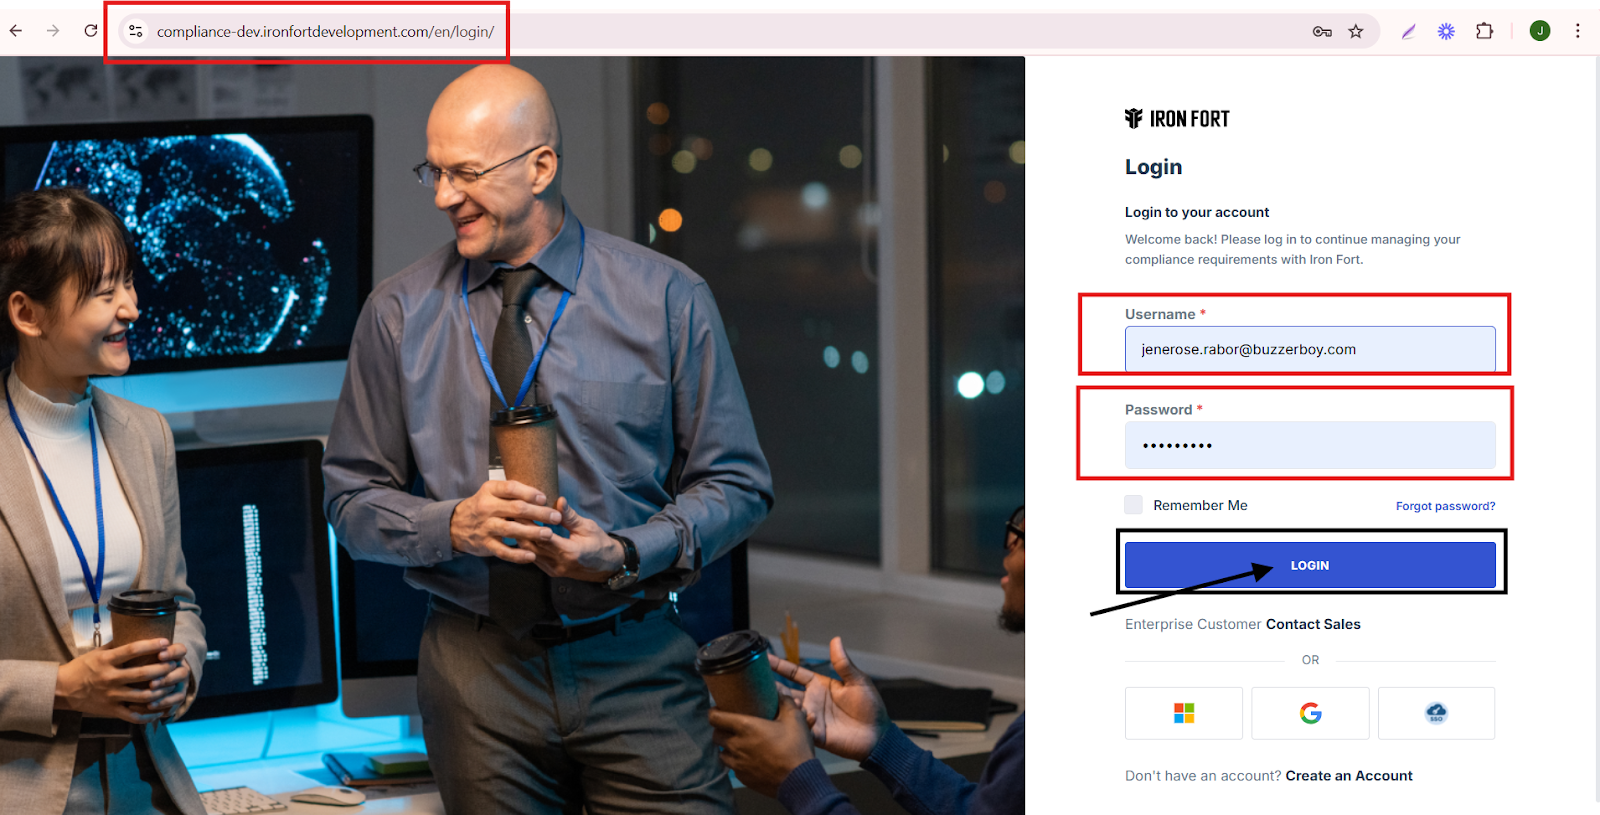
1. Navigate to your organization’s Iron Fort Compliance login page
For example: https://compliance-demo.ironfortdemos.com/en/login/?next=/en
2. Log in to Your Account
Enter your email and password to log in.
3. Check your email for the One-Time Password (OTP) sent on your email and enter the OTP to proceed.

4. Once logged in, a welcome prompt will appear displaying
-
Tenant Key Information: Verifying your system access
-
User Email: Your registered email for auditing purposes
-
Last Login Details: To track your previous access
-
Iron Fort Support Email: For any login issues or concerns
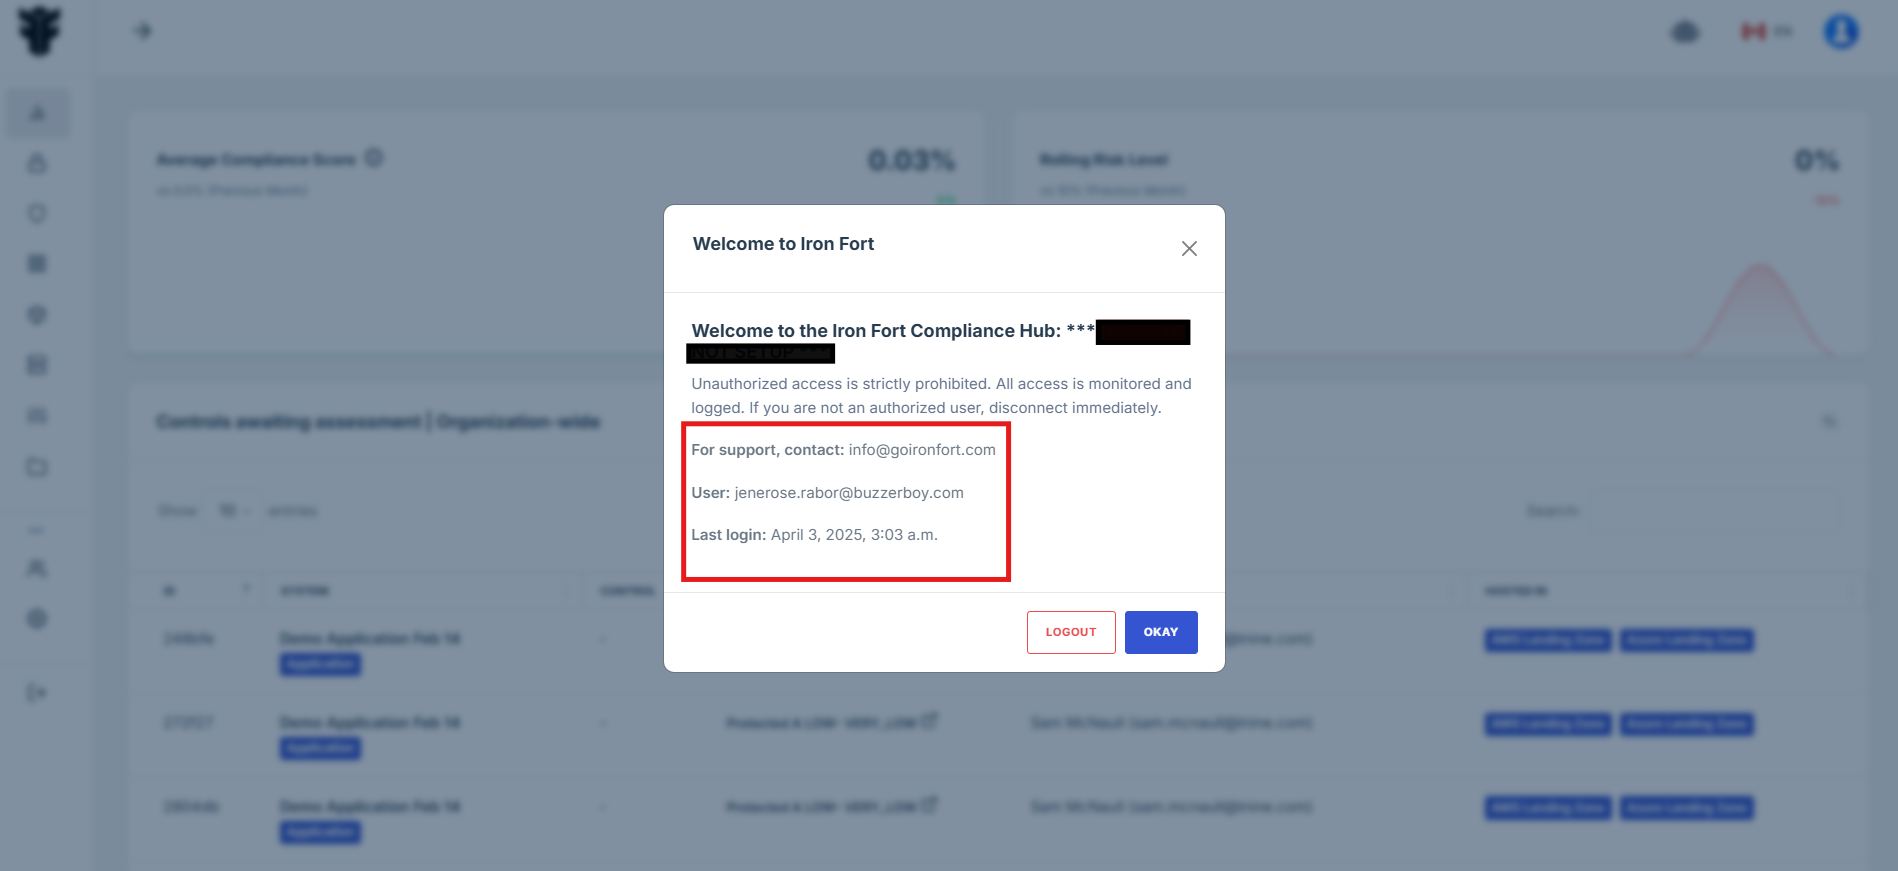
NOTE: If you recognize the details and are authorized, click "OK" to continue. However, if you are not an authorized user, click "Logout" immediately to exit.
5. Move your cursor to the left side of the dashboard to reveal the menu.
6. Click on Applications from the menu.
7. Click on Add Application to create a new entry
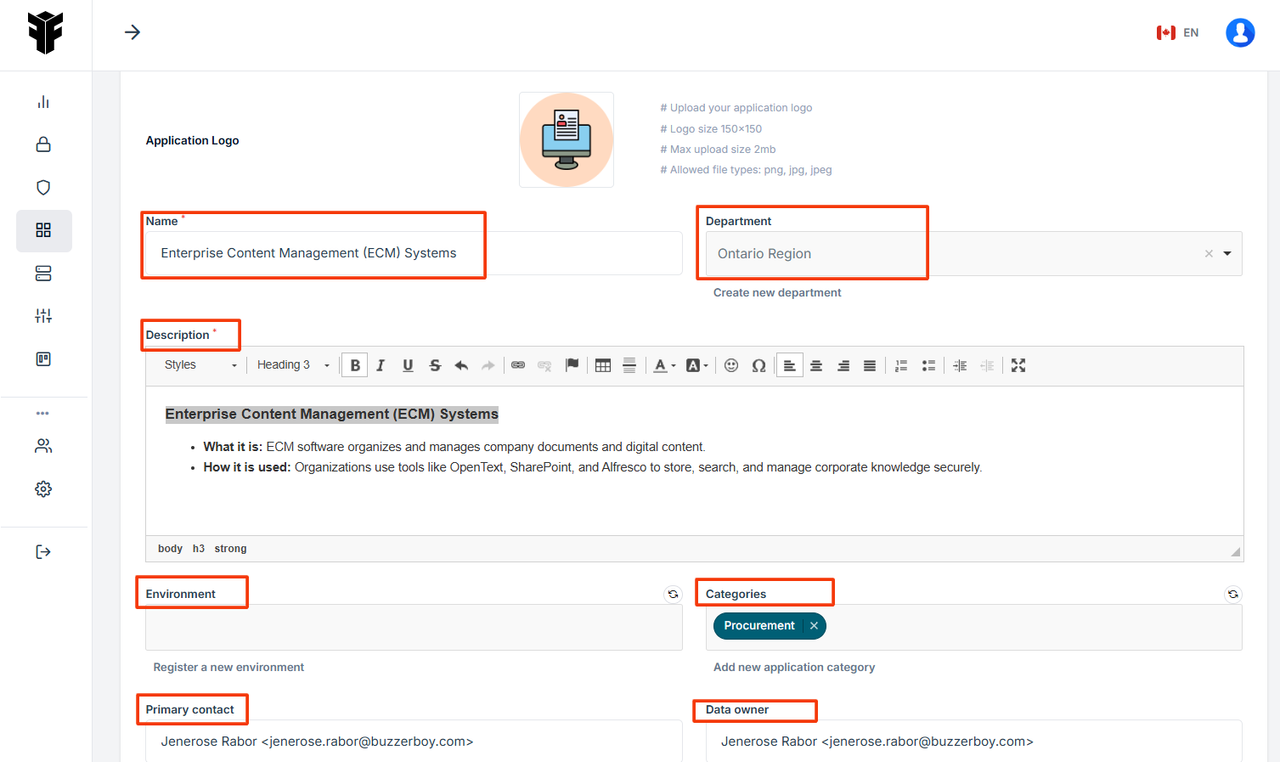
8. Upload the Application Logo and Fill in the Required Information.
Application Name
Department (Select an existing department or create a new one)
Description (Provide details about the application)
Environment (Choose or register a new environment)
Status (Indicate whether it is Active, In Development, or Deprecated)
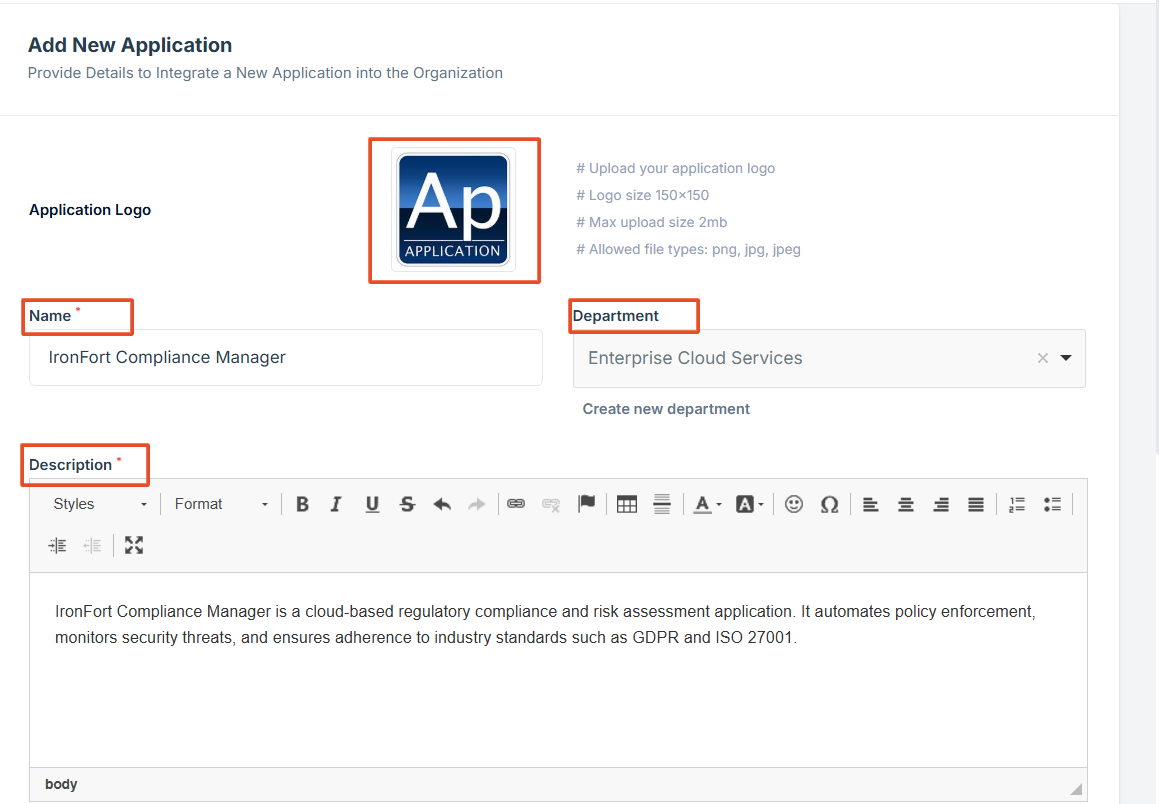
NOTE: Ensure the logo meets the specified size and MB limit.
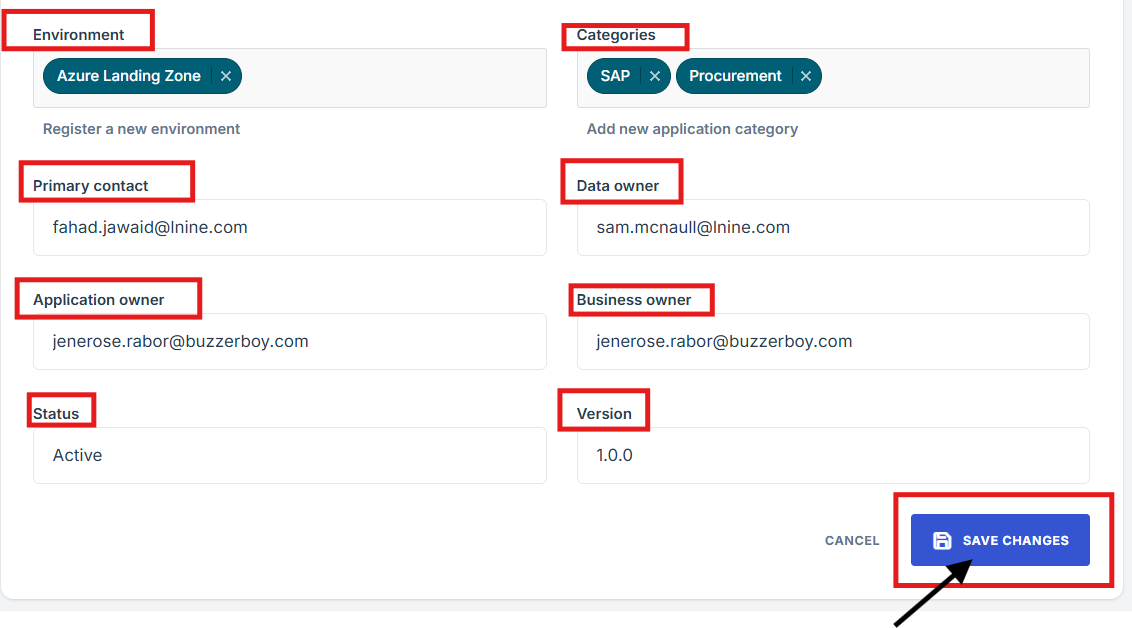
9. More details for STATUS section:
Active: The application is currently in use.
In Development: The application is still being developed.
Deprecated: The application is no longer supported.
10. Save Your Changes: Click Save to confirm and apply your updates.
-
How To: Add an Application
- Navigate to your organization’s Iron Fort Compliance login page
- Log in to Your Account
- Check your email for the One-Time Password (OTP) sent on your email and enter the OTP to proceed
- Move your cursor to the left side of the dashboard to reveal the menu.
- Click on Applications from the menu.
- Click on Add Application to create a new entry
- Fill in the Required Information
- Register a new environment and click Configure Environment
- After filling out the form under Environment, save the changes
- Save Your Changes
1. Navigate to your organization’s Iron Fort Compliance login page
For example: https://compliance-demo.ironfortdemos.com/en/login/?next=/en
2. Log in to Your Account
Enter your email and password to log in.
3. Check your email for the One-Time Password (OTP) sent on your email and enter the OTP to proceed.
4. Move your cursor to the left side of the dashboard to reveal the menu.
5. Click on Applications from the menu.
6. Click on Add Application to create a new entry
7. Fill in the Required Information.
Application Name
Department (Select an existing department or create a new one)
Description (Provide details about the application)
Environment (Choose or register a new environment)
Status (Indicate whether it is Active, In Development, or Deprecated)
8. Register a new environment and click Configure Environment to be redirected to the environment page.
9. After filling out the form under Environment, save the changes.
Then, navigate to the Application tab and update the environment type, replacing the previous selection with the environment you just created.
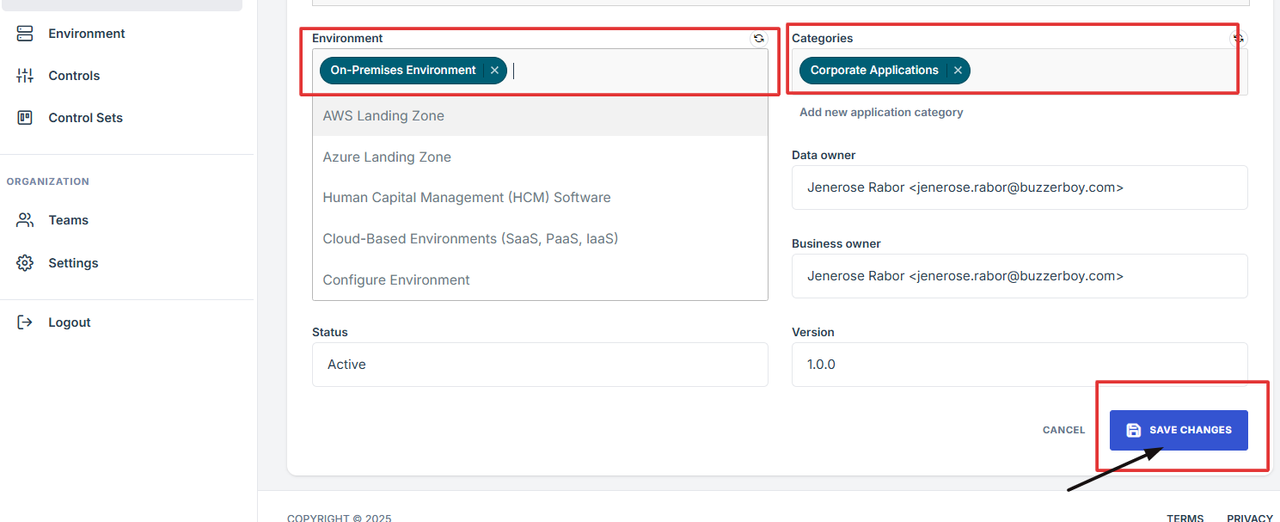
10. Save Your Changes: Click Save to confirm and apply your updates.
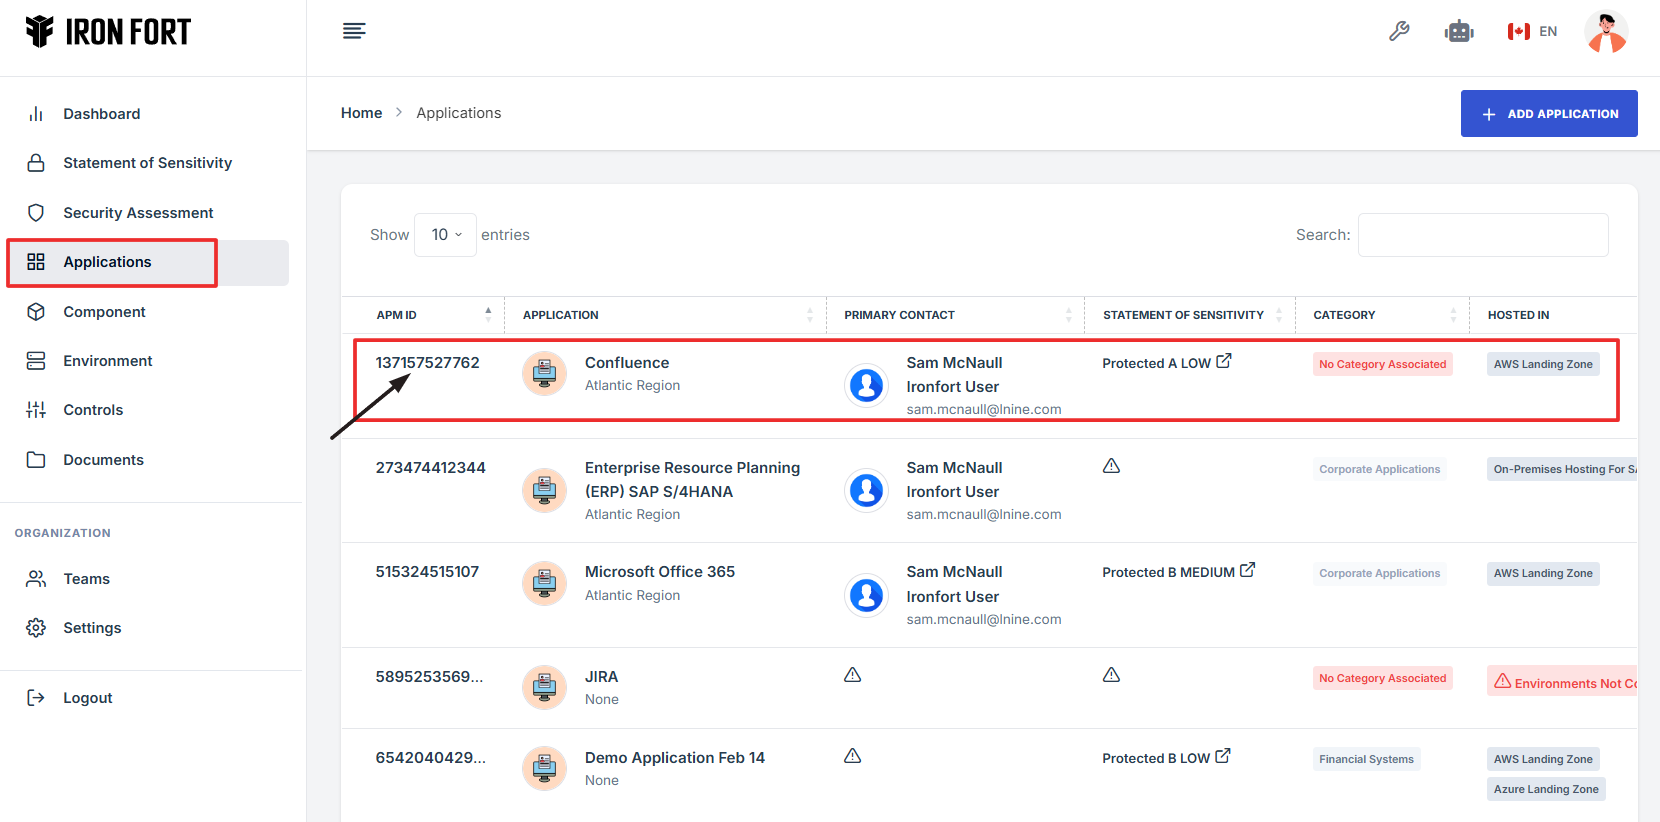
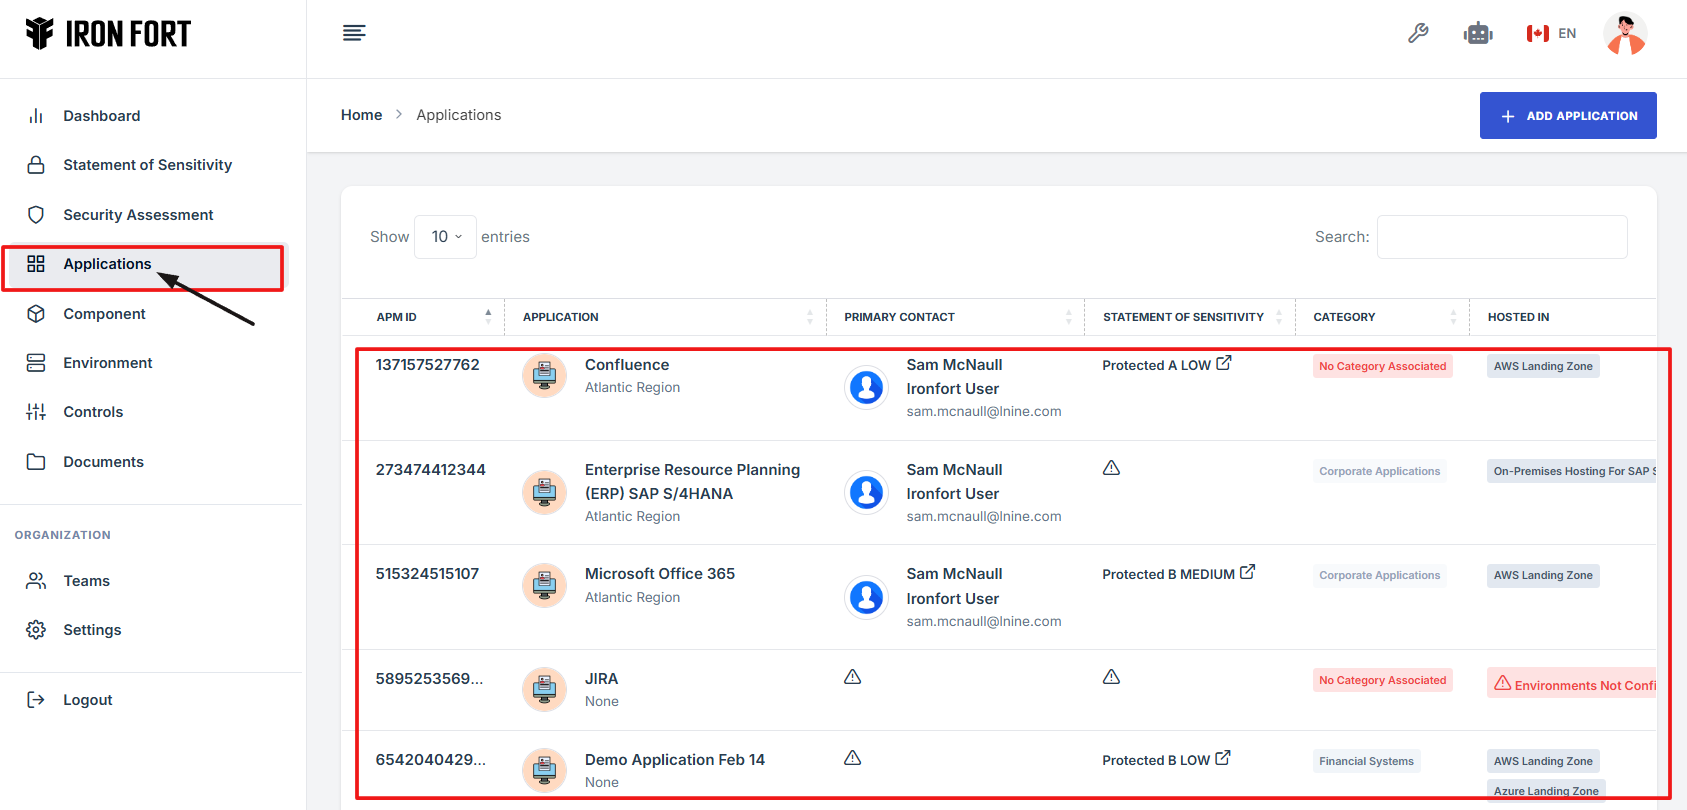
1. Log in to Iron fort: How To: Login
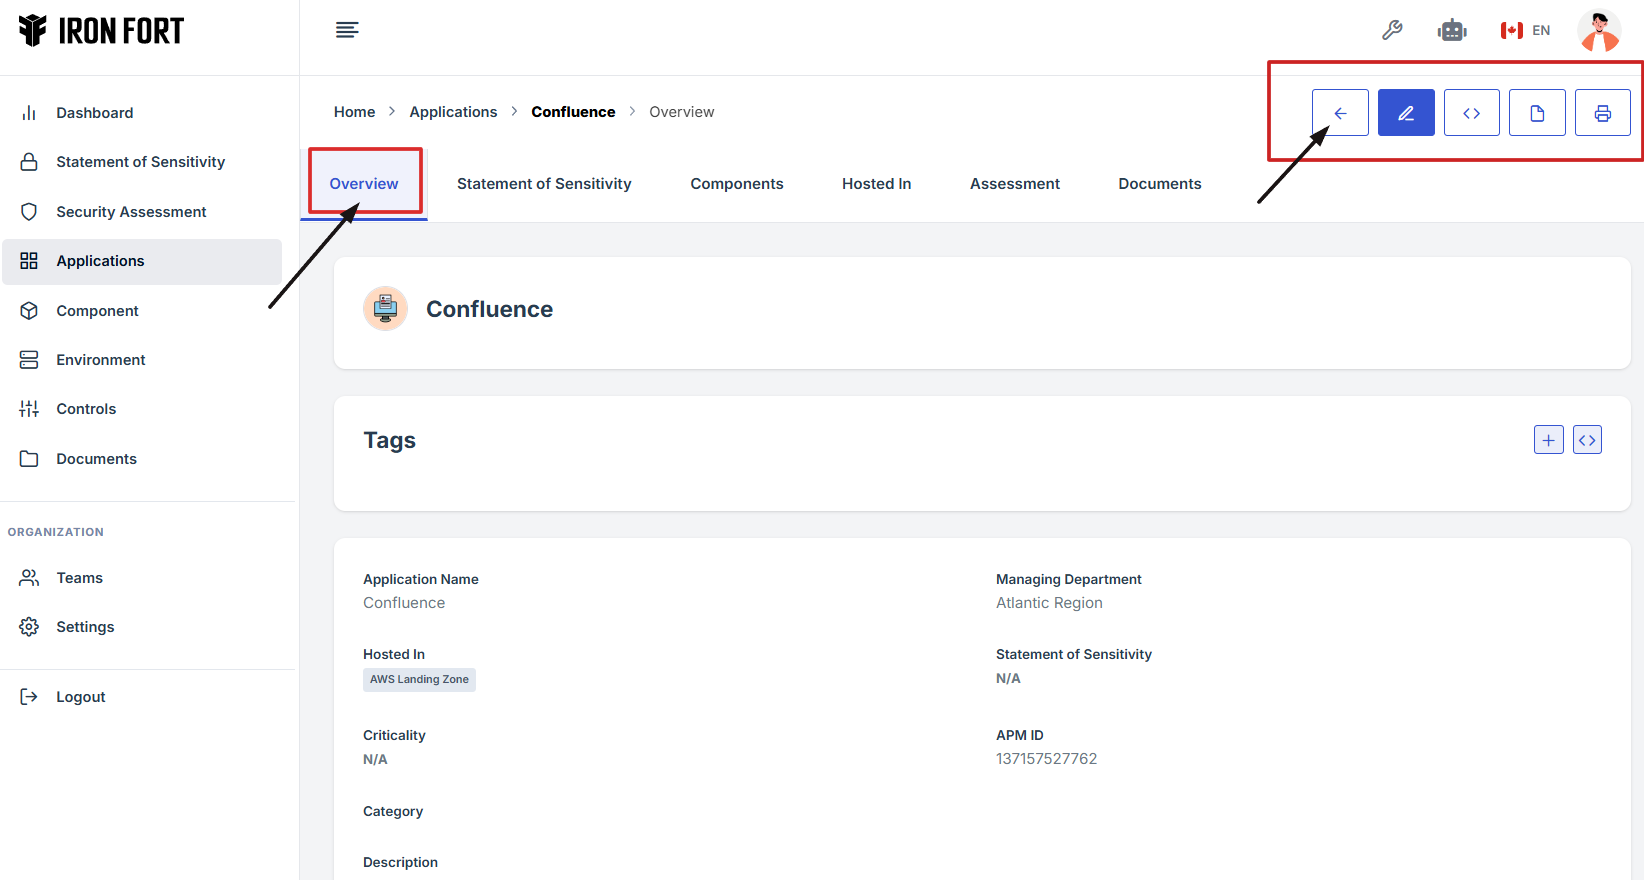
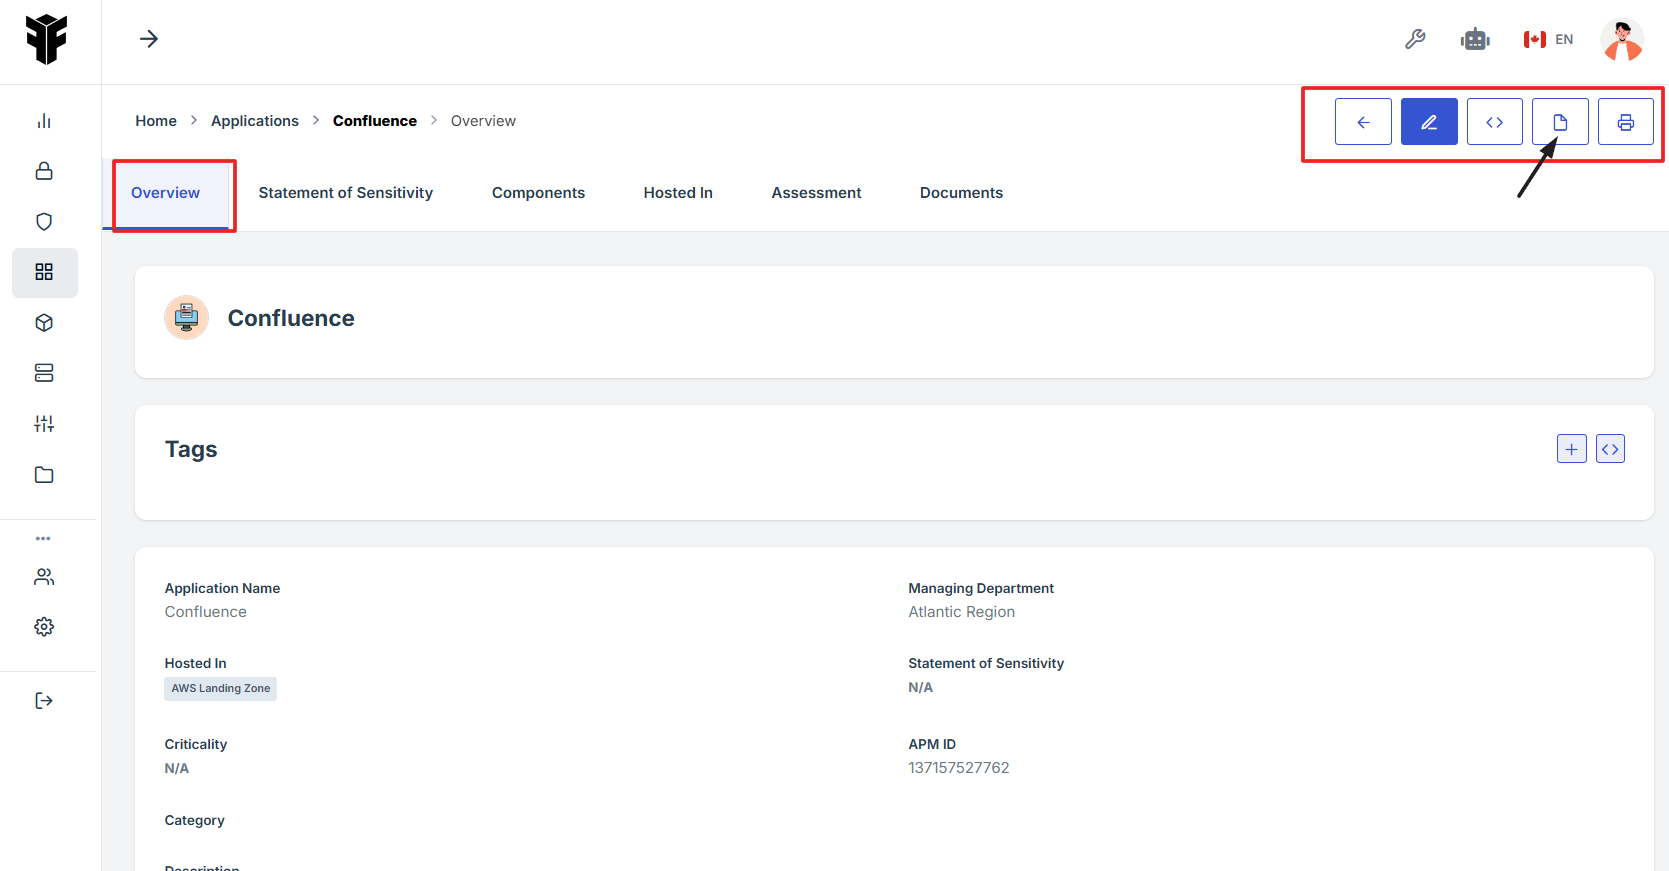
2. Locate and click the Application tab on the dashboard.

3. Under the Application page, click the “APM ID” to get to the overview page.

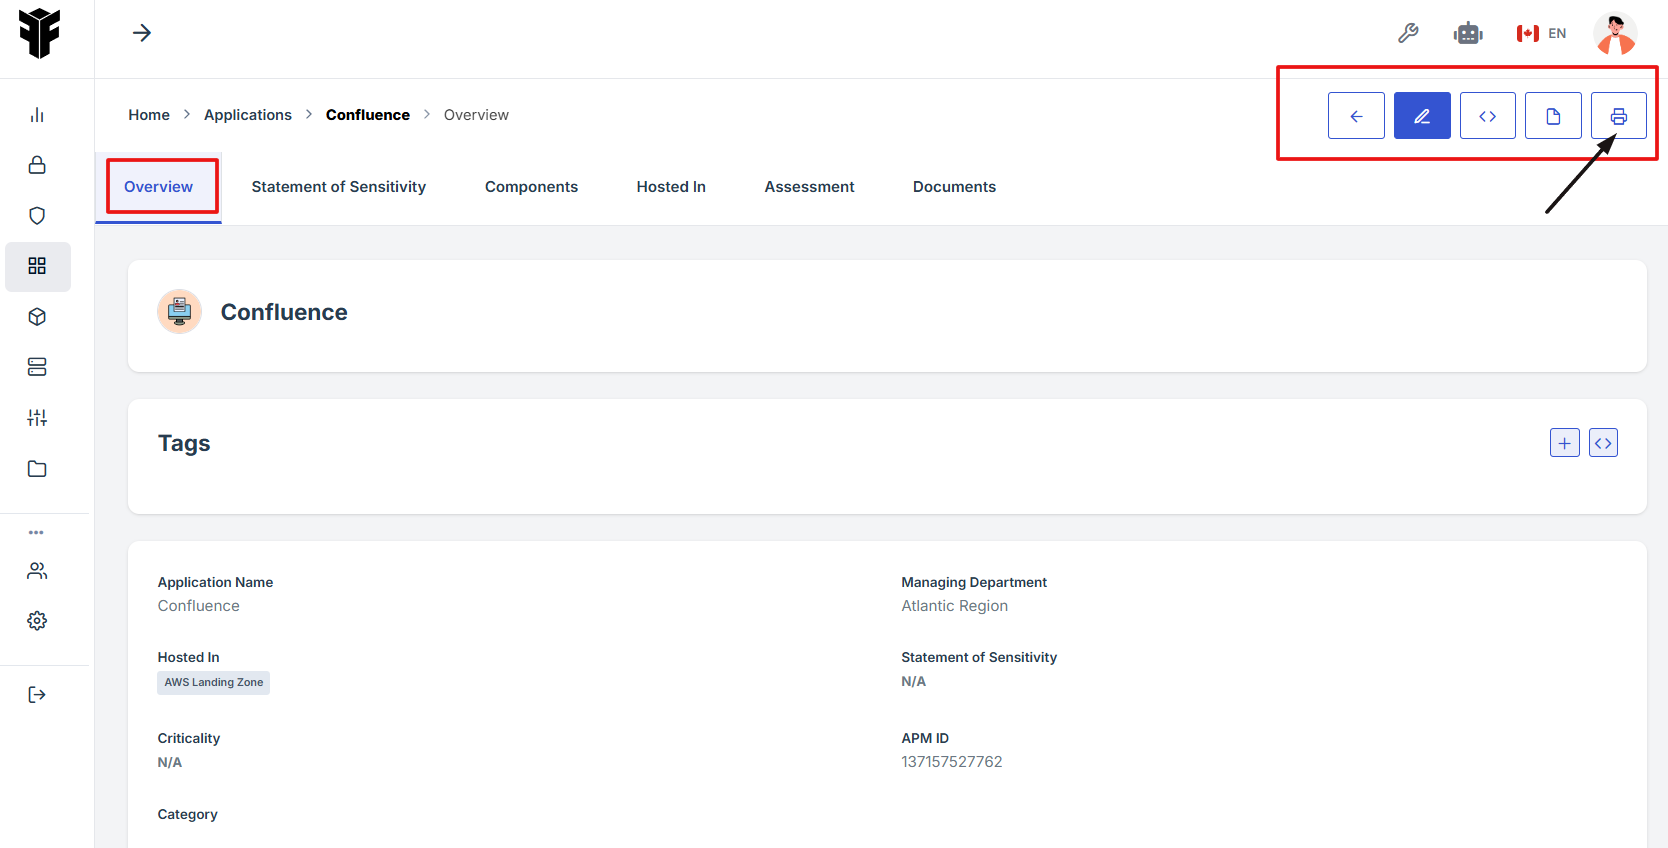
4. On the Application overview page, navigate at the top right corner and click the pencil icon to edit the Application.

1. Log in to Iron fort: How To: Login
2. Locate and click the Application tab on the dashboard.
3. Under the Application page, click the “APM ID” to get to the overview page.

4. On the Application overview page, navigate at the top right corner, click the PDF icon to download the Application overview details.
1. Log in to Iron fort: How To: Login
2. Locate and click the Application tab on the dashboard.
3. Under the Application page, click the “APM ID” to get to the overview page.
4. On the Application Overview page, navigate to the top right corner and click the print icon to print the Application Overview page.
-
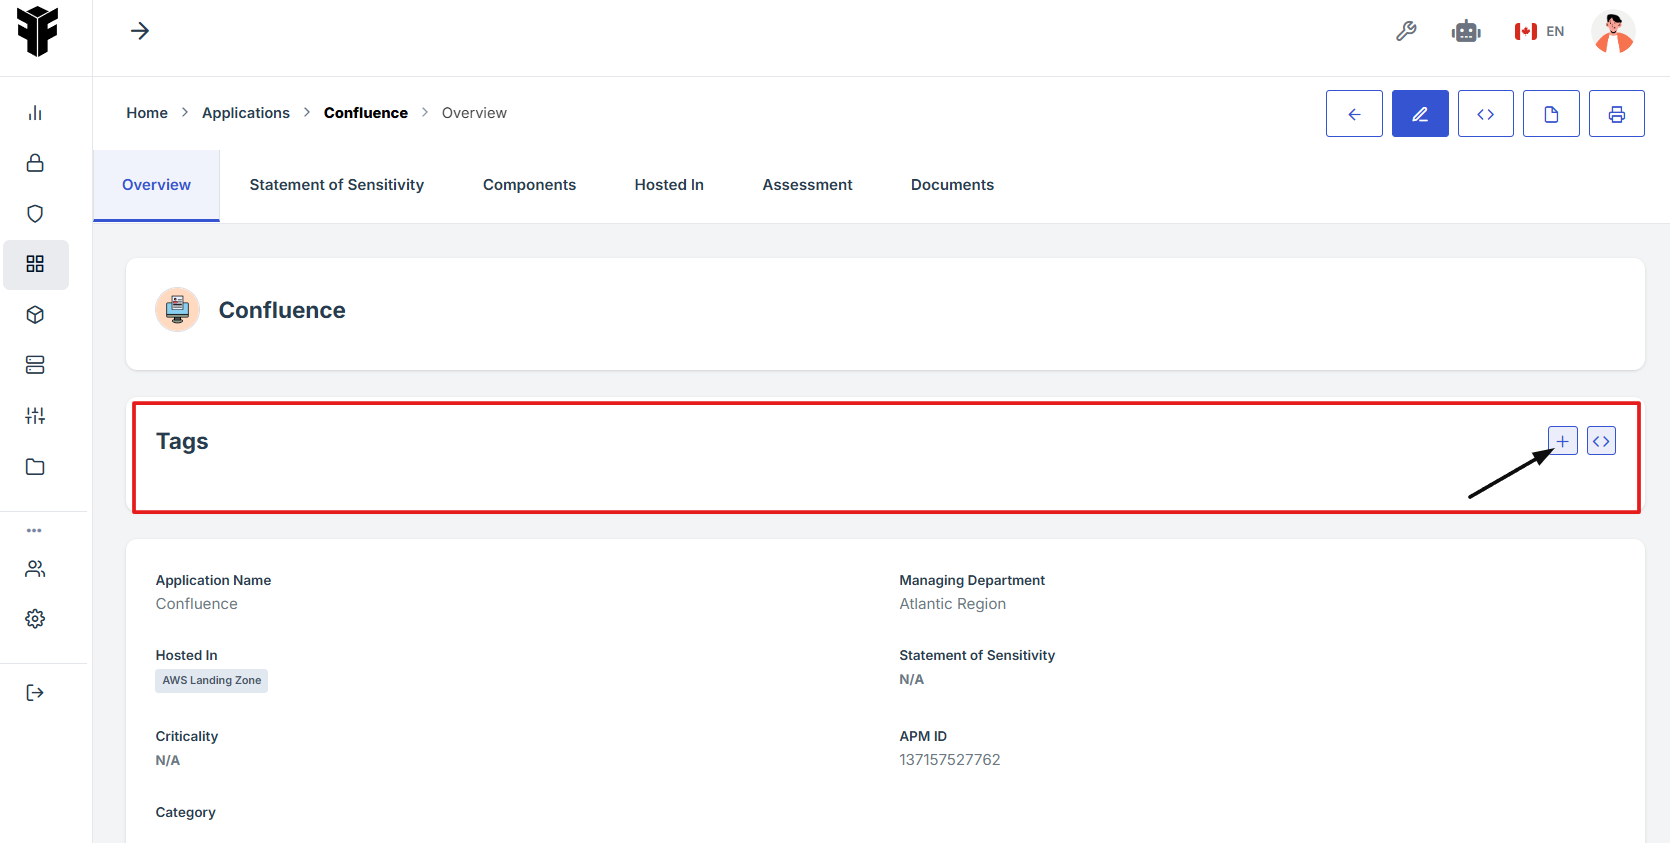
How To: Locate the Tag Section in the Application Overview
- Log in to Iron fort: How To: Login
- Locate and click the Application tab on the dashboard.
- Under the Application page, click the “APM ID” to get to the overview page.
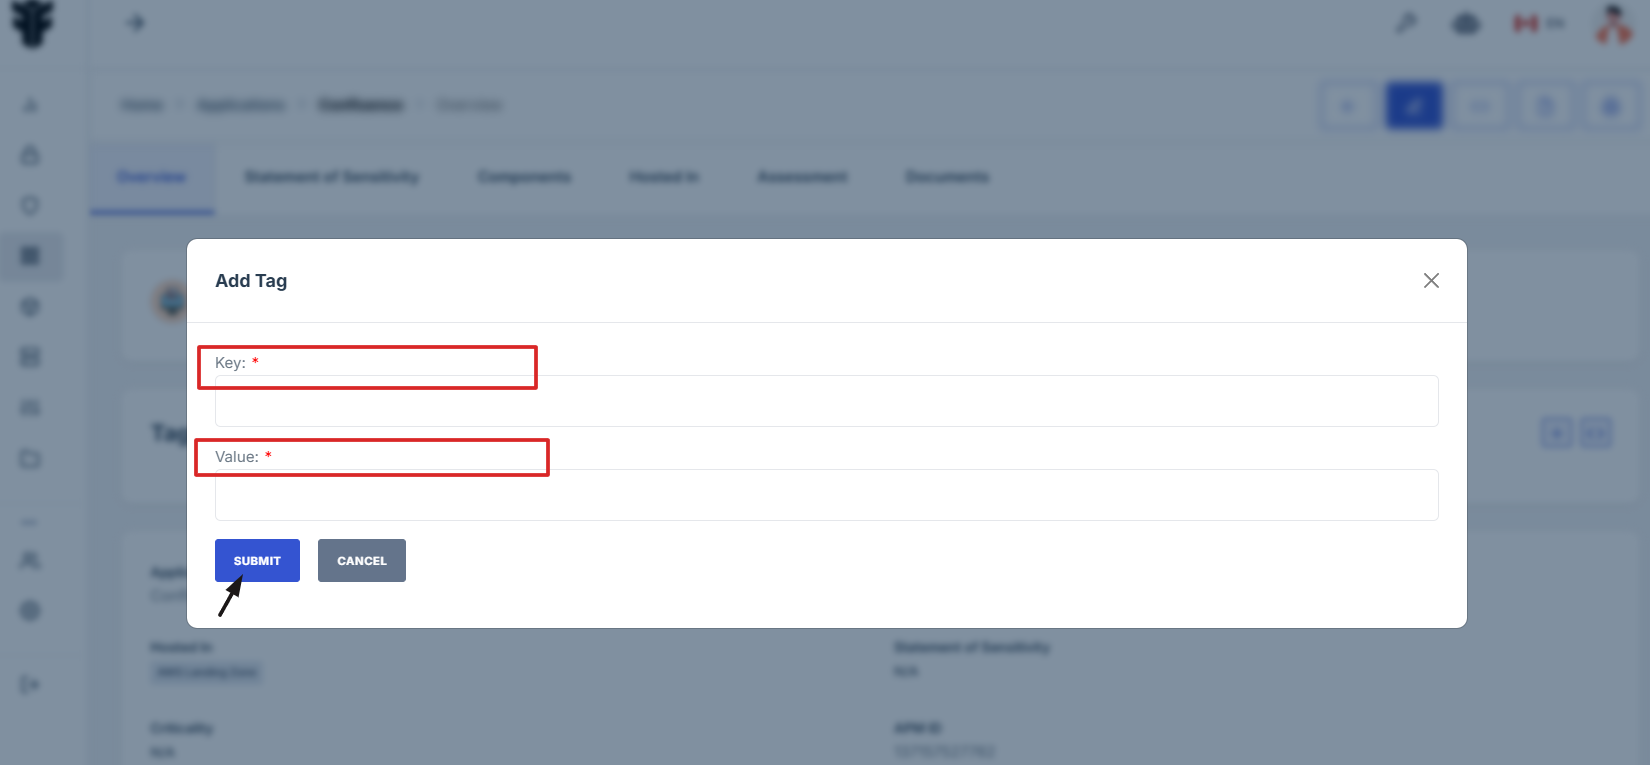
- On the Application Overview page, navigate to the Tag section and click the (+) icon to add tags.
- Add key details and value, click submit to save changes.
1. Log in to Iron fort: How To: Login
2. Locate and click the Application tab on the dashboard.
3. Under the Application page, click the “APM ID” to get to the overview page.

4. On the Application Overview page, navigate to the Tag section and click the (+) icon to add tags.
5. Add key details and value, click submit to save changes.
-
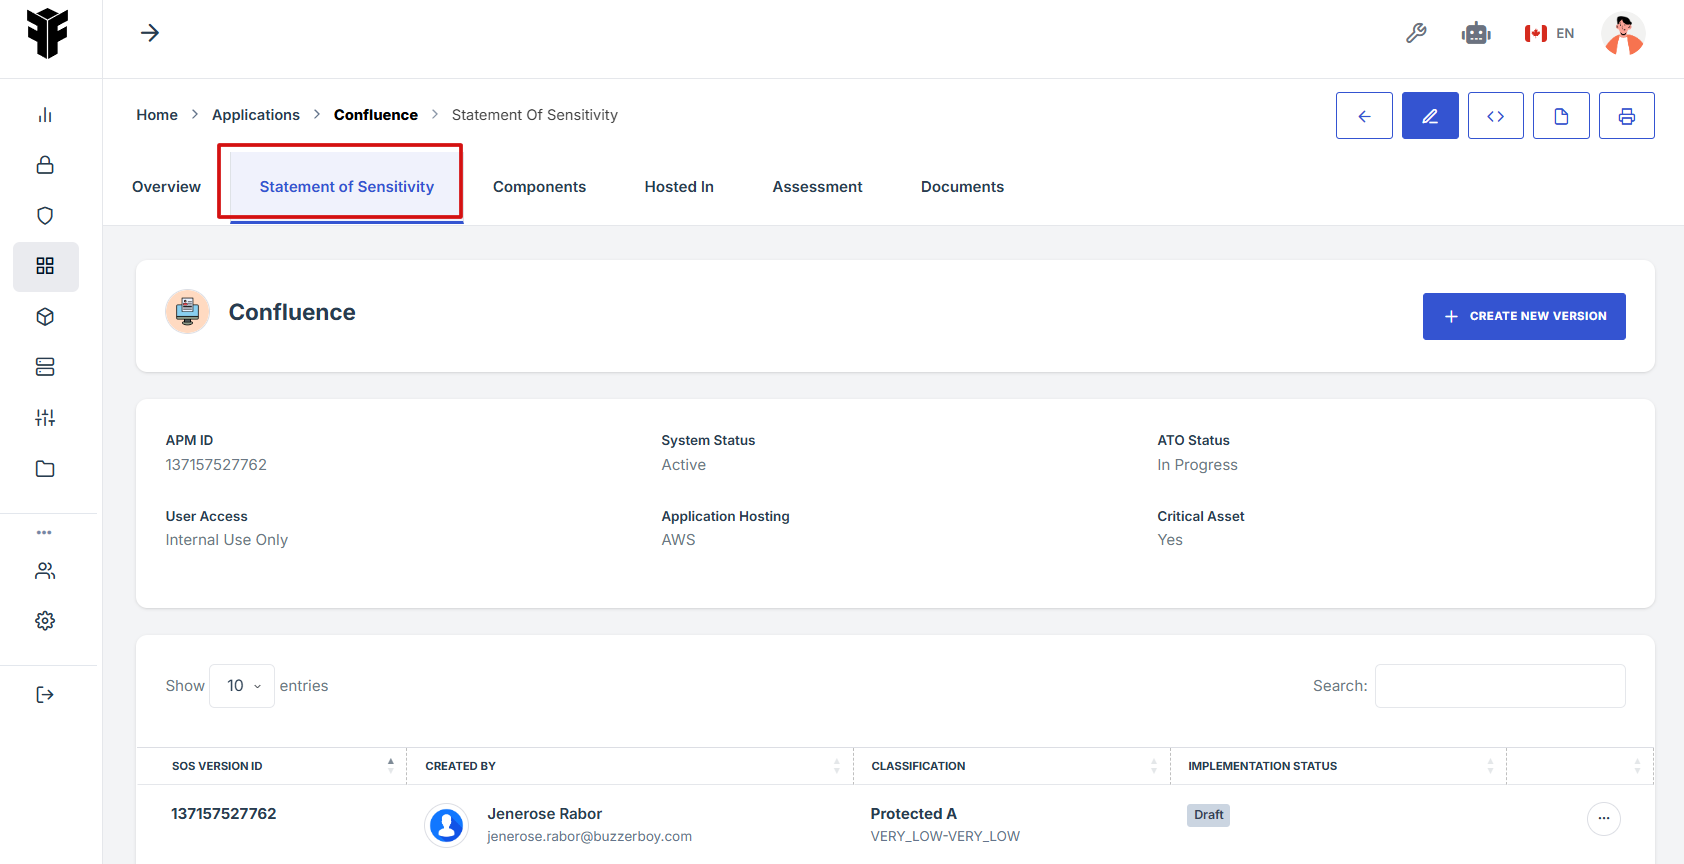
How To: Access the Statement of Sensitivity Tab in an Application
- Log in to Iron fort: How To: Login
- Locate and click the Application tab on the dashboard.
- Under the Application page, click the “APM ID” to get to the overview page.
- On the Application page, go to the top navigation ribbon and click the Statement of Sensitivity tab to view or manage the application's sensitivity details.
1. Log in to Iron fort: How To: Login
2. Locate and click the Application tab on the dashboard.
3. Under the Application page, click the “APM ID” to get to the overview page.

4. On the Application page, go to the top navigation ribbon and click the Statement of Sensitivity tab to view or manage the application's sensitivity details.
-
How To: Generate a New Statement of Sensitivity for an Application
- Log in to Iron fort: How To: Login
- Locate and click the Application tab on the dashboard.
- Under the Application page, click the “APM ID” to get to the overview page.
- On the Application page, click the Statement of Sensitivity tab from the top navigation ribbon.
- On the right-hand side, click the Create New Version button. This will take you to the Add Statement of Sensitivity page under the Application.
- Complete the required fields with the relevant sensitivity information, then save your entry to initiate the new version.
- And, For a detailed guide, refer to: How To: Create a new Statement Of Sensitivity
1. Log in to Iron fort: How To: Login
2. Locate and click the Application tab on the dashboard.
3. Under the Application page, click the “APM ID” to get to the overview page.

4. On the Application page, click the Statement of Sensitivity tab from the top navigation ribbon.

5. On the right-hand side, click the Create New Version button. This will take you to the Add Statement of Sensitivity page under the Application.
6. Complete the required fields with the relevant sensitivity information, then save your entry to initiate the new version.
7. And, For a detailed guide, refer to: How To: Create a new Statement Of Sensitivity
-
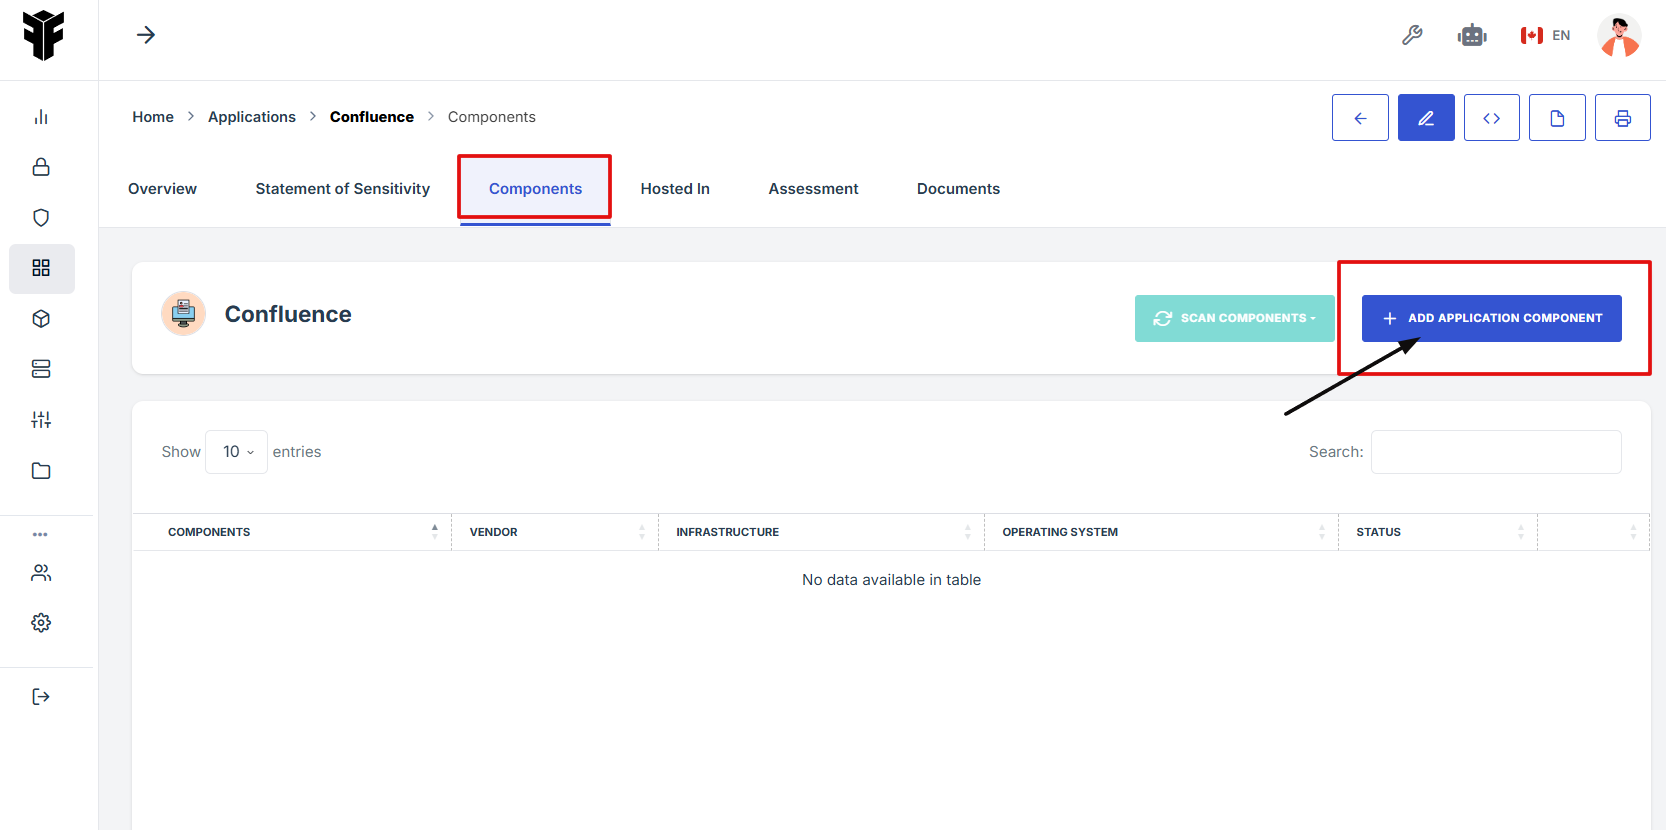
How To: Navigate to the Components Tab in Application
- Log in to Iron fort: How To: Login
- Locate and click the Application tab on the dashboard.
- Under the Application page, click the “APM ID” to get to the overview page.
- On the Application page, go to the top navigation ribbon and click Components tab to view or manage the application's components details.


-
How To: Add Application Components to an Existing Application
- Log in to Iron fort: How To: Login
- Locate and click the Application tab on the dashboard.
- Under the Application page, click the “APM ID” to get to the overview page.
- On the Application page, go to the top navigation ribbon and click Components tab to add Application Component.
- Fill out the necessary details on the Add Application Component form.
- After filling in all the required fields, click the Save Changes button to submit the component.
1. Log in to Iron fort: How To: Login
2. Locate and click the Application tab on the dashboard.
3. Under the Application page, click the “APM ID” to get to the overview page.

4. On the Application page, go to the top navigation ribbon and click Components tab to add Application Component.
5. Fill out the necessary details on the Add Application Component form.
-
Name: Enter a unique name for the component.
-
Vendor: Select the vendor providing the component.
-
Infrastructure: Choose the type of infrastructure.
-
Version: Specify the version of the component.
-
Operating system: Select the operating system the component is compatible with.
-
Status: Choose the current state of the component.
-
Description: Provide a brief description of what this component does or supports.
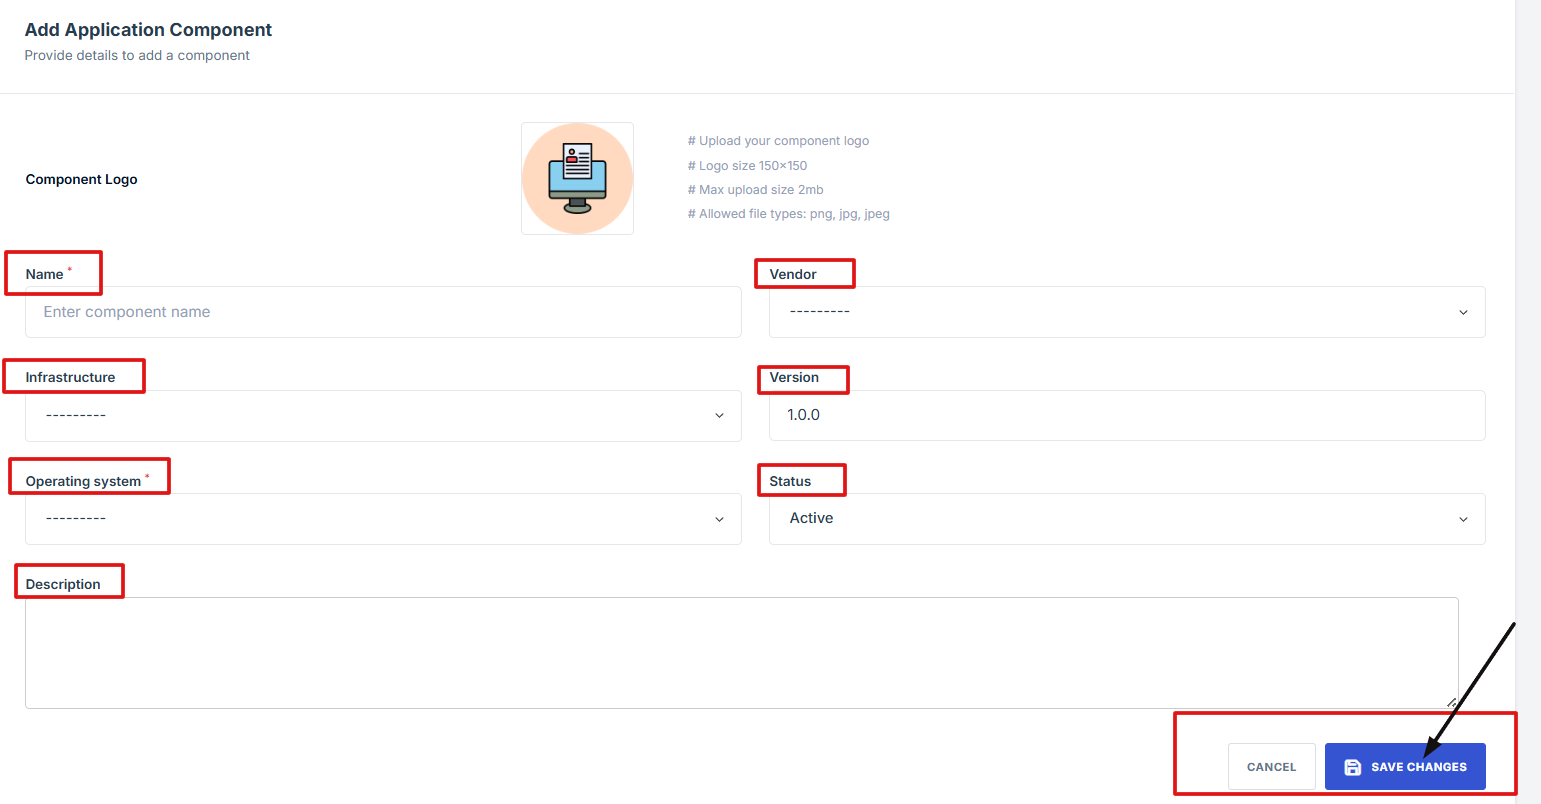
6. After filling in all the required fields, click the Save Changes button to submit the component.
-
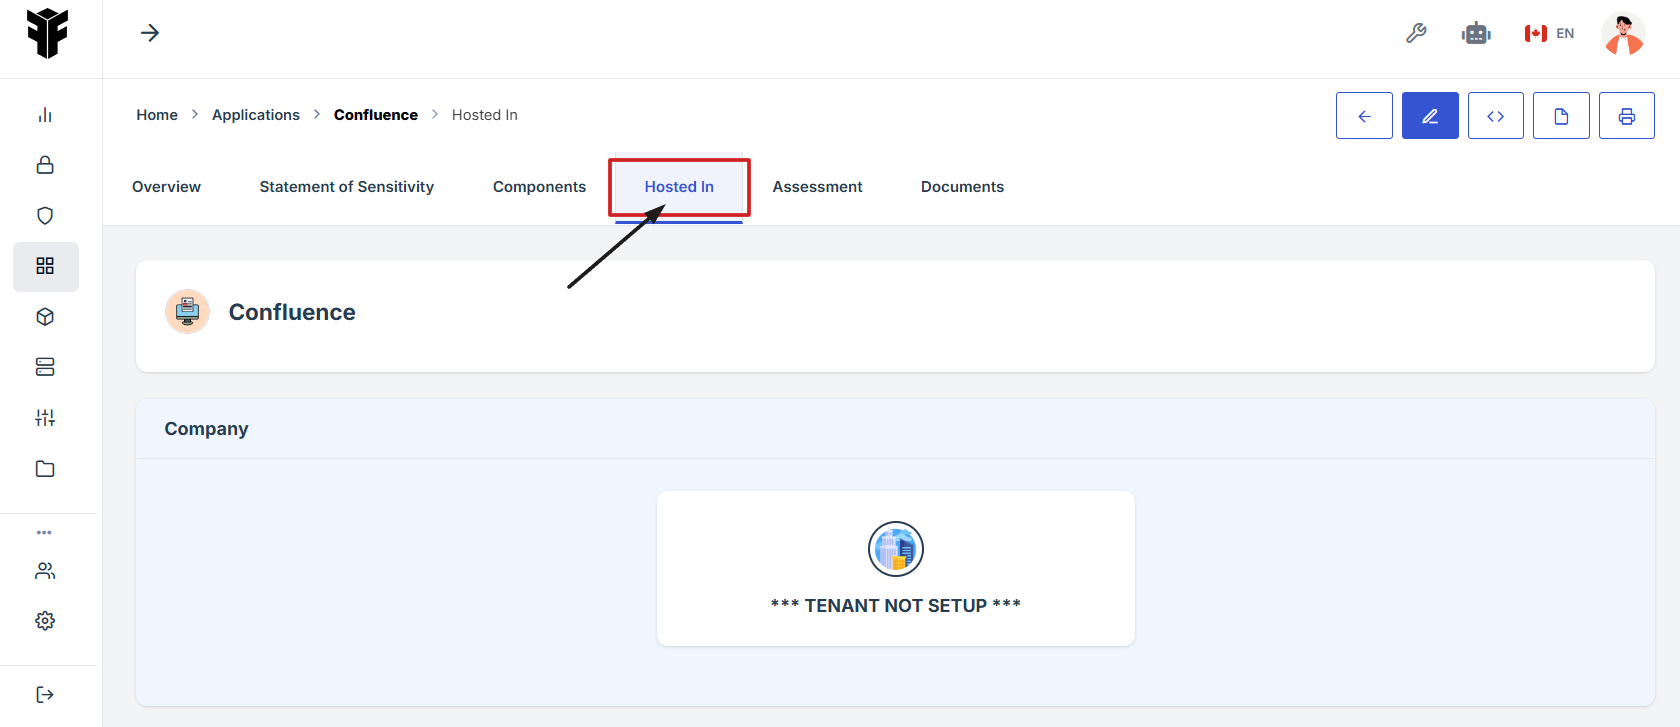
How To: Navigate to the Hosted In Tab from the Application Page
- Log in to Iron fort: How To: Login
- Locate and click the Application tab on the dashboard.
- Under the Application page, click the “APM ID” to get to the overview page.
- On the Application page, go to the top navigation ribbon and click Hosted In tab to view or manage the application's Hosted In details.

-
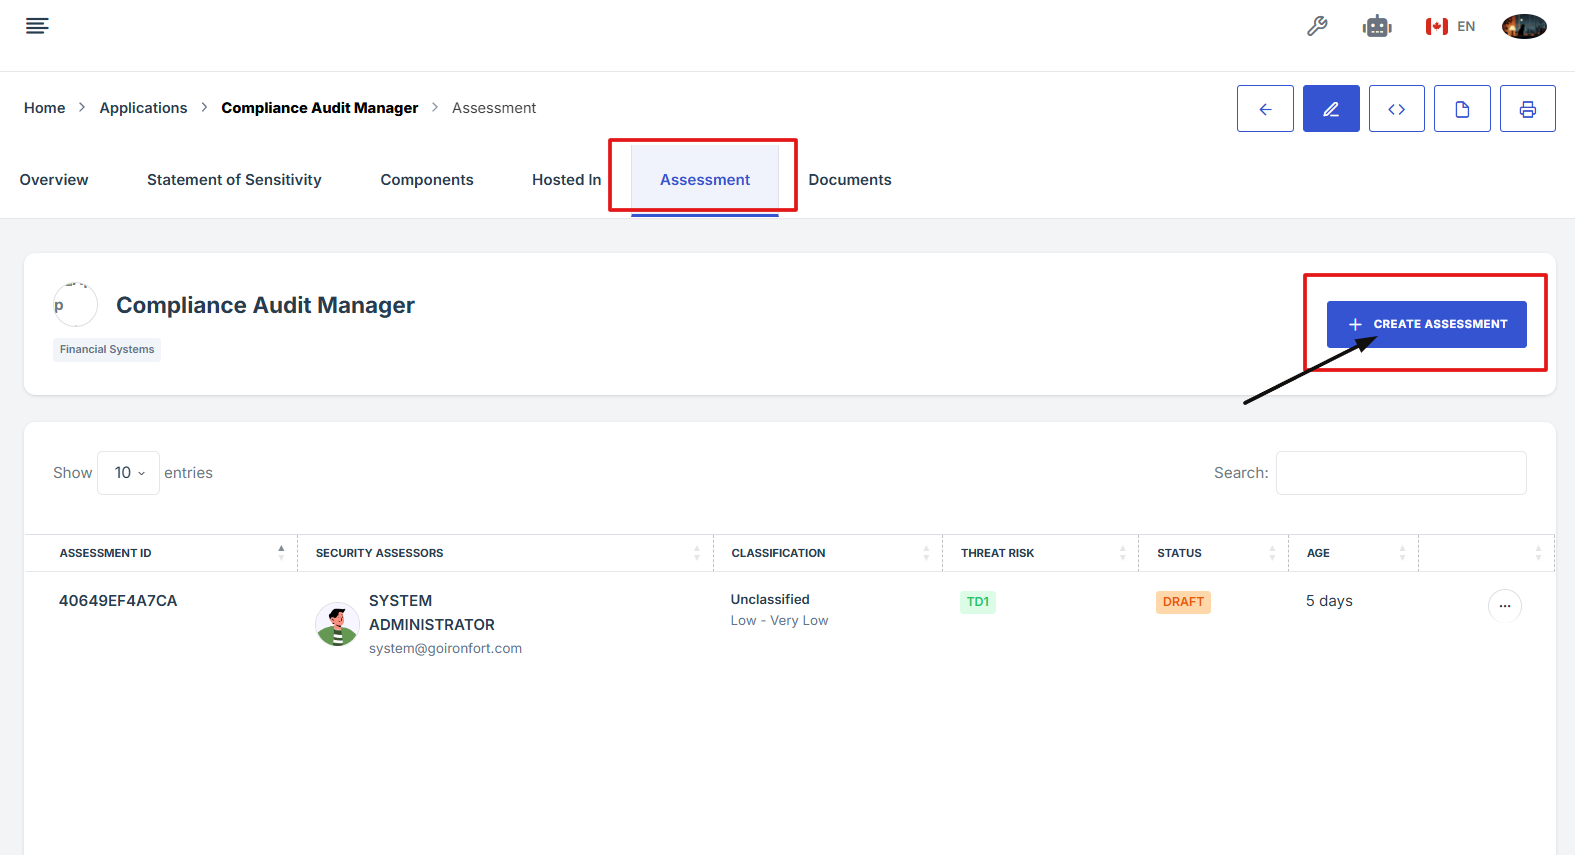
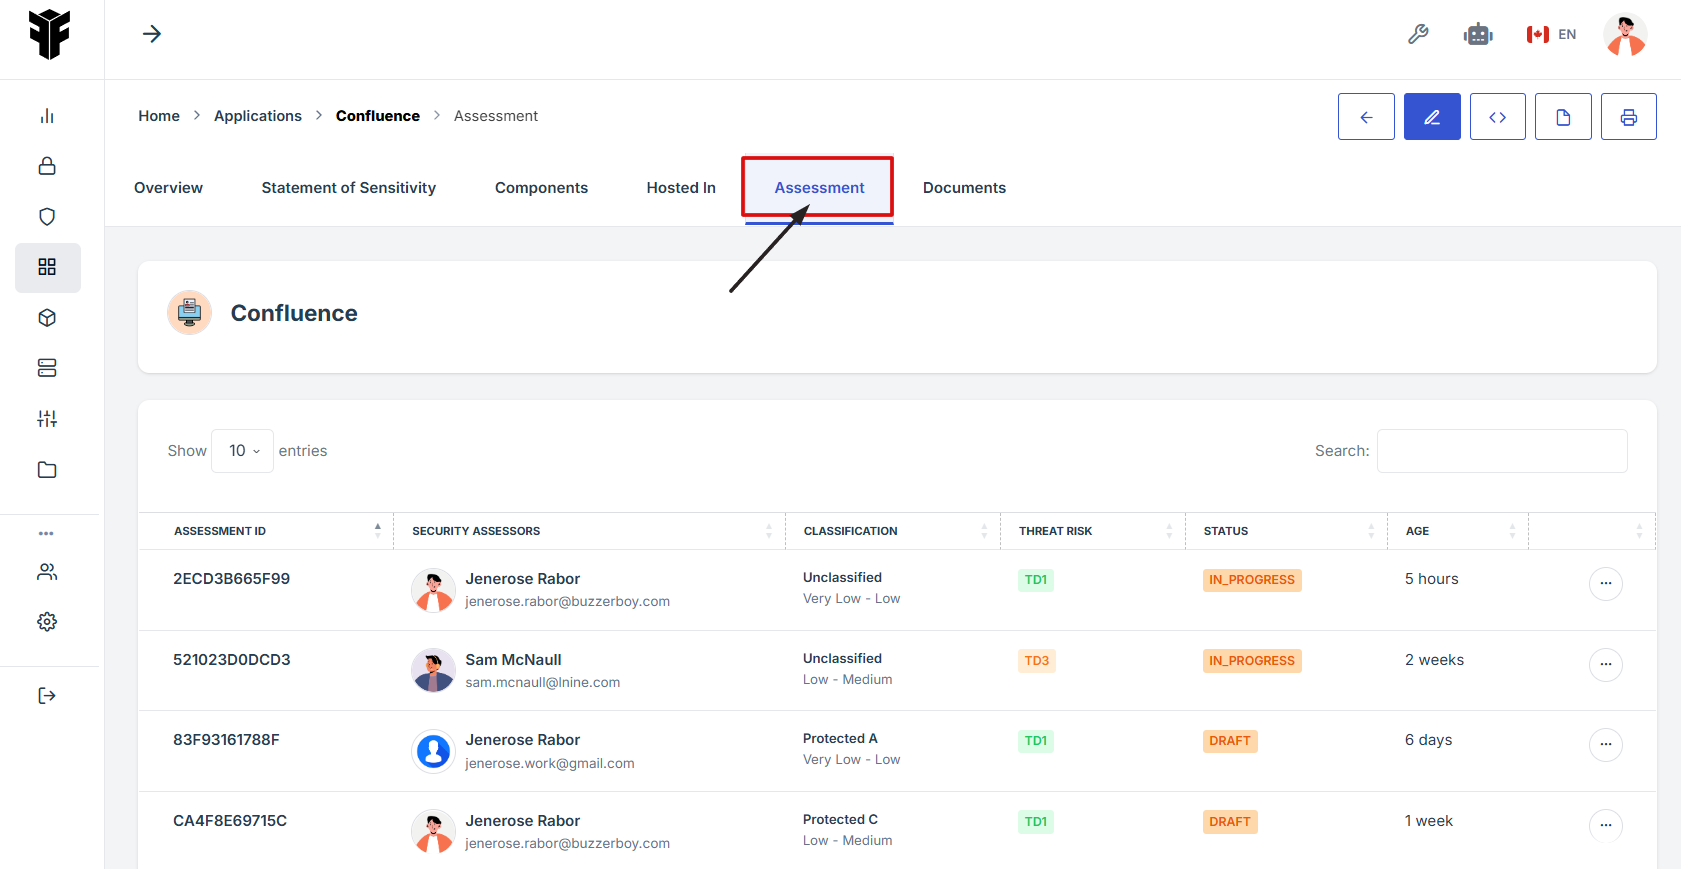
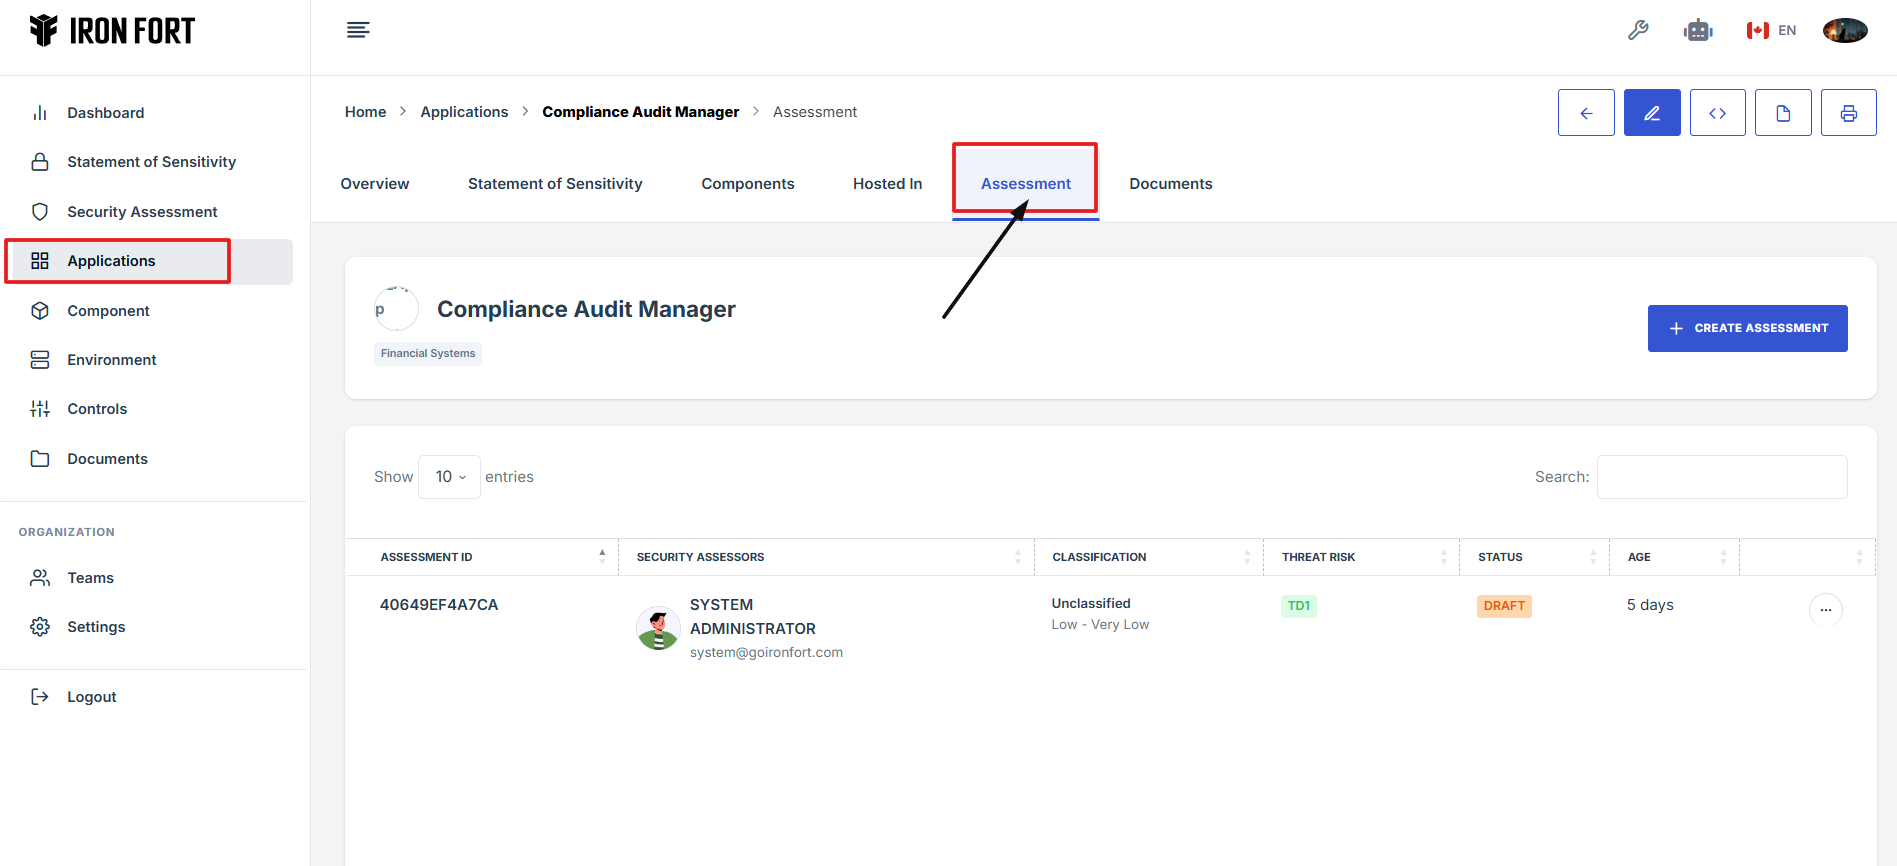
How To: Navigate to the Assessment Tab from the Application Page
- Log in to Iron fort: How To: Login
- Locate and click the Application tab on the dashboard.
- Under the Application page, click the “APM ID” to get to the overview page.
- On the Application page, go to the top navigation ribbon and click Assessment tab to view or manage the application's Assessment details.
An assessment on the application is a process used to review and evaluate the security and risk level of the application. It helps identify how sensitive the data is and what kind of protection it needs. Each assessment is done by a security assessor and includes details like classification, threat risk, and current status.

-
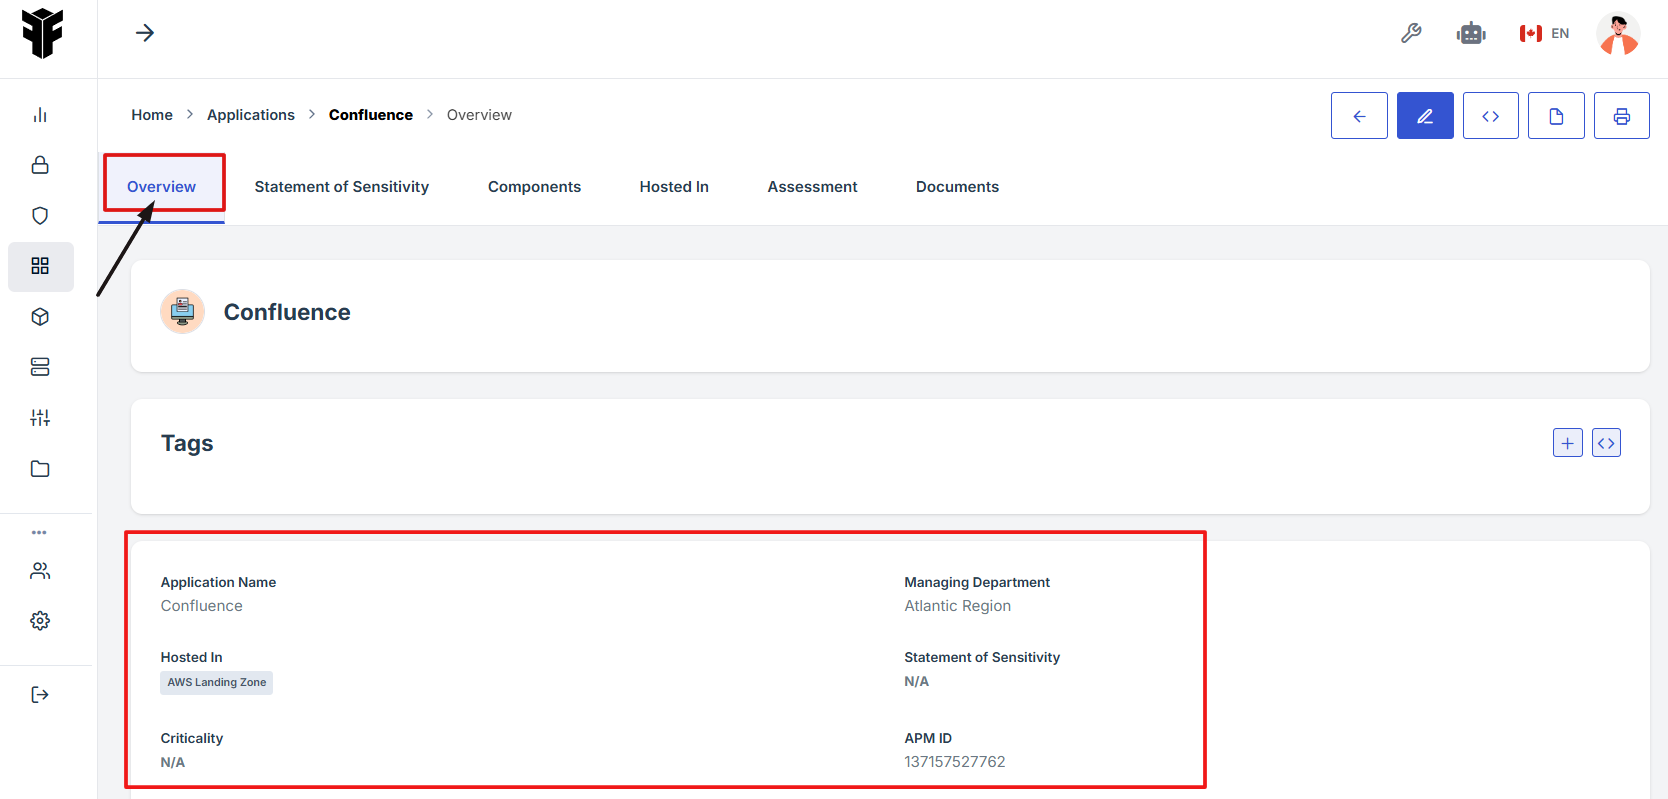
How To: View Application Overview details
- Log in to Iron fort: How To: Login
- Locate and click the Application tab on the dashboard.
- Under the Application page, click the “APM ID” to get to the overview page.
- This section provides a summary of the application’s core details to help users quickly understand its background and hosting environment.
1. Log in to Iron fort: How To: Login
2. Locate and click the Application tab on the dashboard.
3. Under the Application page, click the “APM ID” to get to the overview page.

4. This section provides a summary of the application’s core details to help users quickly understand its background and hosting environment.
1. Log in to Iron fort: How To: Login
2. Locate and click the Application tab on the dashboard.
3. Under the Application page, click the “APM ID” to get to the overview page.
-
How To: Add Assessment under Application
- Log in to Iron fort: How To: Login
- Locate and click the Application tab on the dashboard.
- Under the Application page, click the “APM ID” to get to the overview page.
- On the Application page, go to the top navigation ribbon and click Assessment tab to view.
- Under the Assessment page navigate to the “Create Assessment” button to create a security assessment under the application.
- Navigate to the following page to learn how to create a new security assessment: How to plan a new Security Assessment?
An assessment on the application is a process used to review and evaluate the security and risk level of the application. It helps identify how sensitive the data is and what kind of protection it needs. Each assessment is done by a security assessor and includes details like classification, threat risk, and current status.
1. Log in to Iron fort: How To: Login
2. Locate and click the Application tab on the dashboard.
3. Under the Application page, click the “APM ID” to get to the overview page.

4. On the Application page, go to the top navigation ribbon and click Assessment tab to view.
5. Under the Assessment page navigate to the “Create Assessment” button to create a security assessment under the application.